


R Cubed
-
Posts
1,678 -
Joined
-
Last visited
Content Type
Profiles
Forums
Gallery
Blogs
Events
Articles
Store
Downloads
Everything posted by R Cubed
-

restoration Front restoration of GMC 352
R Cubed replied to R Cubed's topic in Blogs of MV restorations
No problem...... From today, Mon 19th April have a full 15 days, on the 16th day it will be on the ferry to Guernsey In this time have to finish building the cab, rewire the cab and lighting, spray the whole truck stencil it with stars ect, dig out the gun and spray that as well.....:nut::nut::nut::nut::nut: Oh for 60 hours a day !! -
restoration Front restoration of GMC 352
R Cubed replied to R Cubed's topic in Blogs of MV restorations
Important note when building up the cab on the truck. Do not fit cowl until last, ie fit the back panel then 2 x cab support rails then position floor panel, position sides, fit dashboard panel to front corners of both sides, then fit cowl once done bolt all bits up tight. How do I know this because I bolted the back, 2 x rails, floor, 2 x sides and cowl together then discovered that the dash slides down over the side front corners, you cant do this because of the glove box and instruments :angry:angry:angry:angry:angry:angry:angry Had to undo all bolts remove cowl and the fit dash then fit cowl, canvas beading, and gun ring mounts and spacing plates then bolt up..... -
restoration Front restoration of GMC 352
R Cubed replied to R Cubed's topic in Blogs of MV restorations
Rosie hereNot much pressure then!!!!!!!!!!!!!!!!!!!!!!!!!!!!!!!!!!!!!!!!!!!!!!!!!!!!!!!!!!!!!!!!!!!!!!!!!!!!! -
restoration Front restoration of GMC 352
R Cubed replied to R Cubed's topic in Blogs of MV restorations
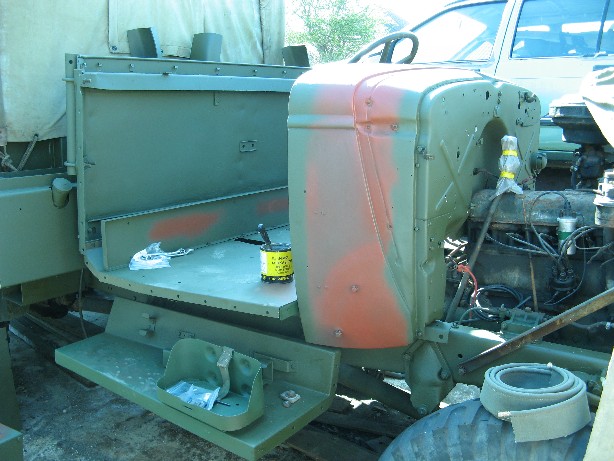
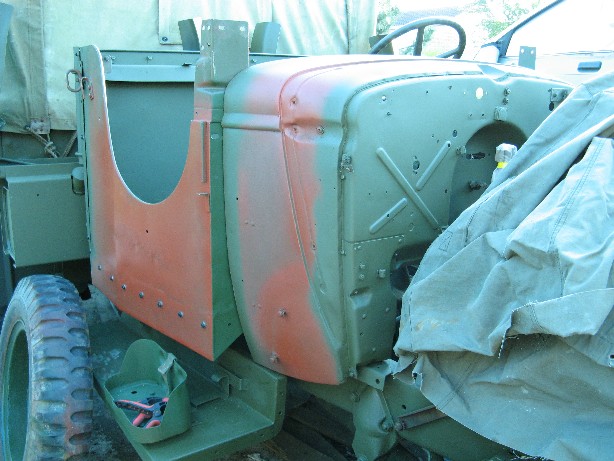
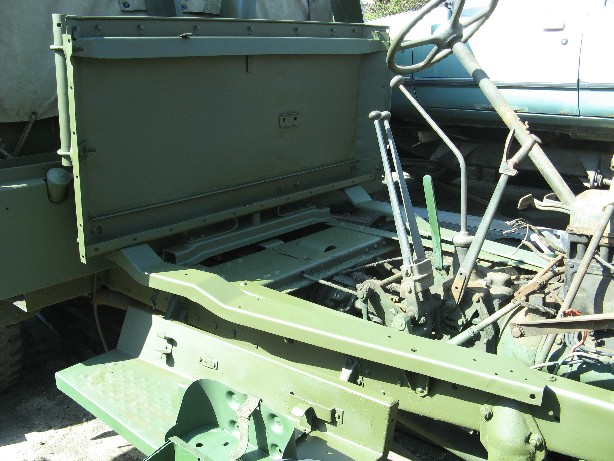
Right back to the job in hand. Below is a pic of the rear tailgate before paint. Bit tatty so here we go. Good bit of rubbing down and several coats of red oxide and then some green.. Here is the repaired main floor panel, the bit leaning up against the truck, the long thin panel just infront of that is the seat rear support panel, this is new as the old one had rotted out along the bottom of it, then there are the two seat boxes for the driver and passenger. Here you can see the cab back and cab support rails just above the main chassis rails, these support the cab floor and mount the whole cab in only 3 positions, one at the front of each rail and the 3 is in the centre of the rear panel above a chassis cross member. Here we lifted the cab cowl up and over the the steering column and pedals then lowered down into position on the cab support rails, then we positioned the floor ready to be bolted in to the correct place. NOTE: Sequence for reassembly back panel, cab support rails, cab cowl, floor, cab sides, then seat base back panel ( if you bolt this to the floor first before the sides you have to then remove the bolts and remove the seat back panel so you can angle the side panels in on the main rear panel. Here the fun starts, building the cab on the truck is fun, but does ensure that it fits what is on the truck, no misalignment :nut: The new cab beading getting it to fit nice and tight is an art but worth doing it looks all the better for it. Jim's contribution Thanks Allied Forces The other side panel being fitted.


-
restoration Front restoration of GMC 352
R Cubed replied to R Cubed's topic in Blogs of MV restorations
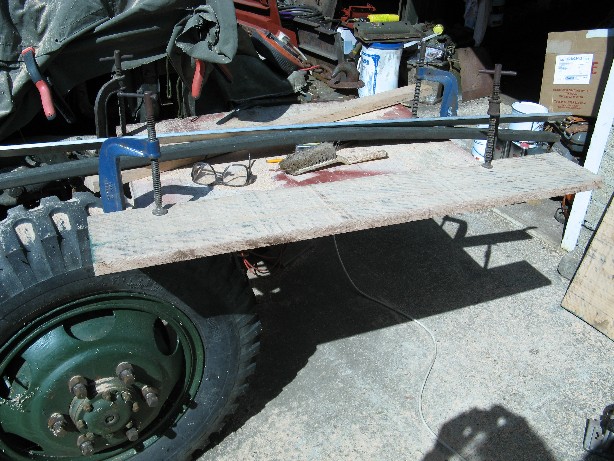
As a little rest bite from the cab I have been messing around with my crane, in doing so I needed to remove 3 of the rear hood bows, well as you are all aware these can be a bit troublesome to get out, yep you guessed it No2 and No3 from the back caused some resistance to my attempts of just pulling them out like you should :angry so large piece of wood and lots of wacking and bashing..... out they came, the bottoms of the bow uprights were well rotted so off to the timber merchants where I bought 2 planks of American red oak which was enough to produce 10 uprights for the 5 bows. Here is my temporary work bench with a nice bit of oak on it. Out with my trusty circular saw, do you recognise what it is ! Here are the cut pieces just a bit of planing and painting they will be fit for service.

-
restoration Markheliops' Ward La France diesel conversion
R Cubed replied to TooTallMike's topic in Blogs of MV restorations
I would say if it is a vehicle that can be used on the road and the owner likes taking it to shows which are a fare distance then if it is a case of keeping the whole thing original and not being able to afford to fuel it so it stays in a shed out of sight, or to fit a modern diesel and be able to show it so people can appreciate the vehicle and see what it can do, then put a diesel in it. If the vehicle has to be trailered anywhere then it should stay as original as possible as there is not really any reason for doing anything else. The final thing is, it is the owners decision to do what he likes, some would say using a second vehicle as spares is bad as that too could have been restored, but where do you draw the line, end of the day its up to the owner to do what he likes and that's all you have to worry about... -
Now it seems I am getting a bit anorak ish about my GMC and would like to know what sizes the white stars should be and where they should go on a open cab GMC, any help please. I think there should be one in the middle of the rear tailgate, one on each side of the open cab sides just behind the step through bit, one on the bonnet, and the last one on the middle of the winch bumper above the roller for the winch cable. With reference to the star on the bonnet can anybody clear up what the meanings are of the star on its own, a broken white band round it and a solid band round it ??
-
Well with the rise of repro chassis and bodys for Jeeps would there be more in existence now than was built during the war effort :cool2:
-
restoration Front restoration of GMC 352
R Cubed replied to R Cubed's topic in Blogs of MV restorations
dah-dit dit di-dah-dah di-di-dit di-di-dah di-dah-dah-dit dah-di-dit di-dah dah dit :nut: :nut: :nut: :nut: Well had G506 come round and help today and got lots more done. I have been hard at sanding and spraying since the last postings, so at the start of today we were at a point to start assembly as paint was tight, I was only spraying the internals and butting surfaces so this is why some pics show red panels. Jim Clark came good with the cab beading, that arrived on Fri so full steam ahead. Thanks for the speedy delivery of that Jim. :bow: -
restoration Front restoration of GMC 352
R Cubed replied to R Cubed's topic in Blogs of MV restorations
Ho ho ho well that would be telling, when I get a chance I will get some pics of how I bend my sheet metal :nut: -
Off for a week now, and hard at the truck, no time to spare....on the ferry beginning of May. How do I spray my truck when its outside and its ****** raining all the time, ran out of mig gas last night Thurs 1st all places now shut Aggggggggggggghhhhhhhhhhhhhhhhhhhhh The whole world is against me Aggggggggggghhhhhhhhhhhhhhh Had enough going to have a beer.... :nut:
-
You never have had a good eye for a vehicle, don't suppose its green ? :nut: :nut:
-
Could you post some pics of each of the items so we can see what you are talking about the short leads ect.
-
I have been looking at getting one so this has come along just at the right time. Did you just get the cam or did you get a kit, if so which bits did you get ? Is the lead to the camera detachable from the cam ?
-
restoration Markheliops' Ward La France diesel conversion
R Cubed replied to TooTallMike's topic in Blogs of MV restorations
Sorry to put a spanner in the works guys, as I was reading this thread it sprang to mind, not trying to teach anyone here to suck eggs don't know the Wards transfer box innards, but pictured the possible problem which has been confirmed by NOS. Just a different brain working a different way...... -
restoration Front restoration of GMC 352
R Cubed replied to R Cubed's topic in Blogs of MV restorations
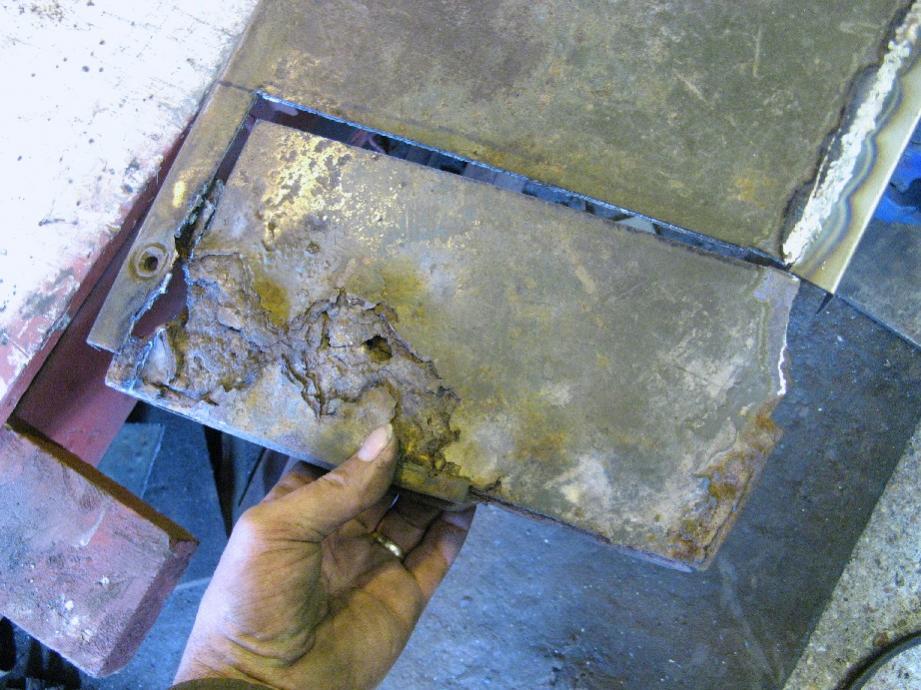
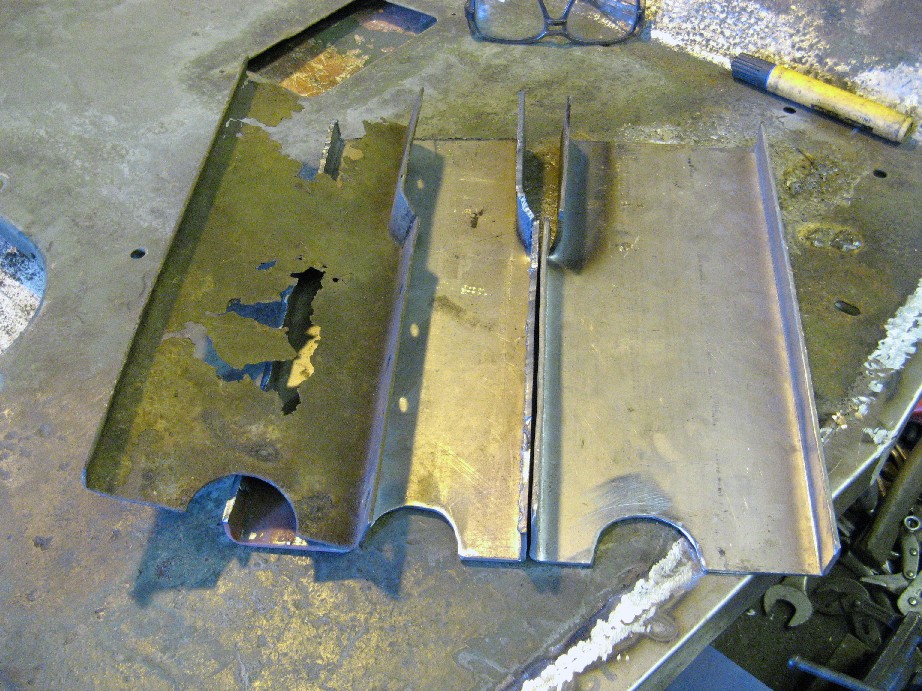
Ok so continuing on, here is the left hand side of the cab floor. This is the floor before any work, the silvery patches are where some lead filling has been done !! This bit of the floor bolts up to the main floor part of the cowl panel, just below this part of the floor is a bracing panel and is prone to getting corrosion between the two panels, this is the result. Here is a view of the underside of the main floor panel, in the process of replacing the lip on the edge of the floor, this is the part of the floor which bolts up the the cab side panel. Next section of the lip to be welded in place. This is the front edge of the panel with the reinforcing panel spot welded to the underside, here you can see I have just cut it out. Once the last bit has been cut out, I put in a new piece to fit. Under side view of the reinforcing panel, these are handed one for the left side and one for the right side. Below are a selection of the old and new reinforcing panels


-
Thanks everyone for the Birthday wishes.. See most of you at A and E in Dorset ? Had a good day and Rosie is still doing things for me.
-
restoration Front restoration of GMC 352
R Cubed replied to R Cubed's topic in Blogs of MV restorations
You should be sorting out that coil :-D -
restoration Front restoration of GMC 352
R Cubed replied to R Cubed's topic in Blogs of MV restorations
No..... not yet my ace welder is swanning round the world :nut: -
:thanx: Her who normally must be obeyed ( except on special occasions ) is doing everything for me !!! breakfast in bed, tea on demand and making sandwiches for me at lunch time. I am even now instructing her what to do out in the garage from the house with a beer in my hand so she can get dirty this afternoon :whistle: Its a good birthday. :beer::beer::beer::beer::beer:
-
There is also the issue of when you take it out somewhere, you ( the FAC holder ) must be with it ( the live gun ) at all times and not be left unattended this goes for transportation as well, if it was on a transporter you would need to be with it as well, this is what put me off getting a live 105mm Howitzer.
-
restoration Markheliops' Ward La France diesel conversion
R Cubed replied to TooTallMike's topic in Blogs of MV restorations
If there is no gearing in the front axle and so the front prop would be free to turn or stand still would there be an issue with once moving and prop is stationary so the shaft in the transfer box would also be stationary would this have any bad effects on the other parts of that shaft or bearings which will be driven. -
I feel as I need to say something with reference to this forum. It has taken our family to new events and met new people all of which has been a very pleasurable experience, the questions and answers back and forth, have been very well received and for once in our hobby people are starting to talk to each other and help with advice and pictures of how to do something on your vehicle, this is what our hobby should be about, we all have problems and require help or assistance at some stage and I have to say this is the first place I would come to and ask for some advice. Years ago if you met other people at an event and said you had a problem they did not seem to be very forthcoming with help, with the HMVF this is changing. The HMVF is a very worthy and useful tool for our hobby and the fact that it is having an impact with regards to this MOT thing has to be a good thing. So Jack keep strong and stick with it this IS FAR TOO GOOD to close down and people need to realise what they would loose out on. If you need help funding this forum then so be it.
-
Hi Baz, I would think it is the coil shorting out as that is the only link to a positive supply to give enough current flow through the points to earth to get the points red hot :shocked: Must say I have never heard of that either. Condenser is only there to cause a back emf to surge the coil to give a big voltage spike to the plugs, and absorb the initial arc at the points. Let us know the outcome. If it is the coil you might want to check the ignition switch ect in case of damage due to high current flow. Just thought, could it be a wiring short with other wires in the same bit of loom as the wire from the low tension connection on coil to points ?
-
show report OVERLORD 2010, Hampshire
R Cubed replied to RMS's topic in The meetings log and photobook
Not you Oily, Rambo means Rosie. Unless there is something you want to tell us :cool2:


