


rampant rivet
-
Posts
1,243 -
Joined
-
Last visited
-
Days Won
2
Content Type
Profiles
Forums
Gallery
Blogs
Events
Articles
Store
Downloads
Everything posted by rampant rivet
-

introduction Hello from the Lincolnshire wolds.
rampant rivet replied to peter75's topic in Introductions & Welcomes
Welcome to the HMVF good to hear your restoring some Bedfords would be nice to see some photos of your progress. -
question British MK 1940 Vokes Aircleaner TL13290
rampant rivet replied to Mark Pearson's topic in British Vehicles
What condition is the end plate with the handle on please? -
restoration Bedford MWD restoration
rampant rivet replied to rampant rivet's topic in Blogs of MV restorations
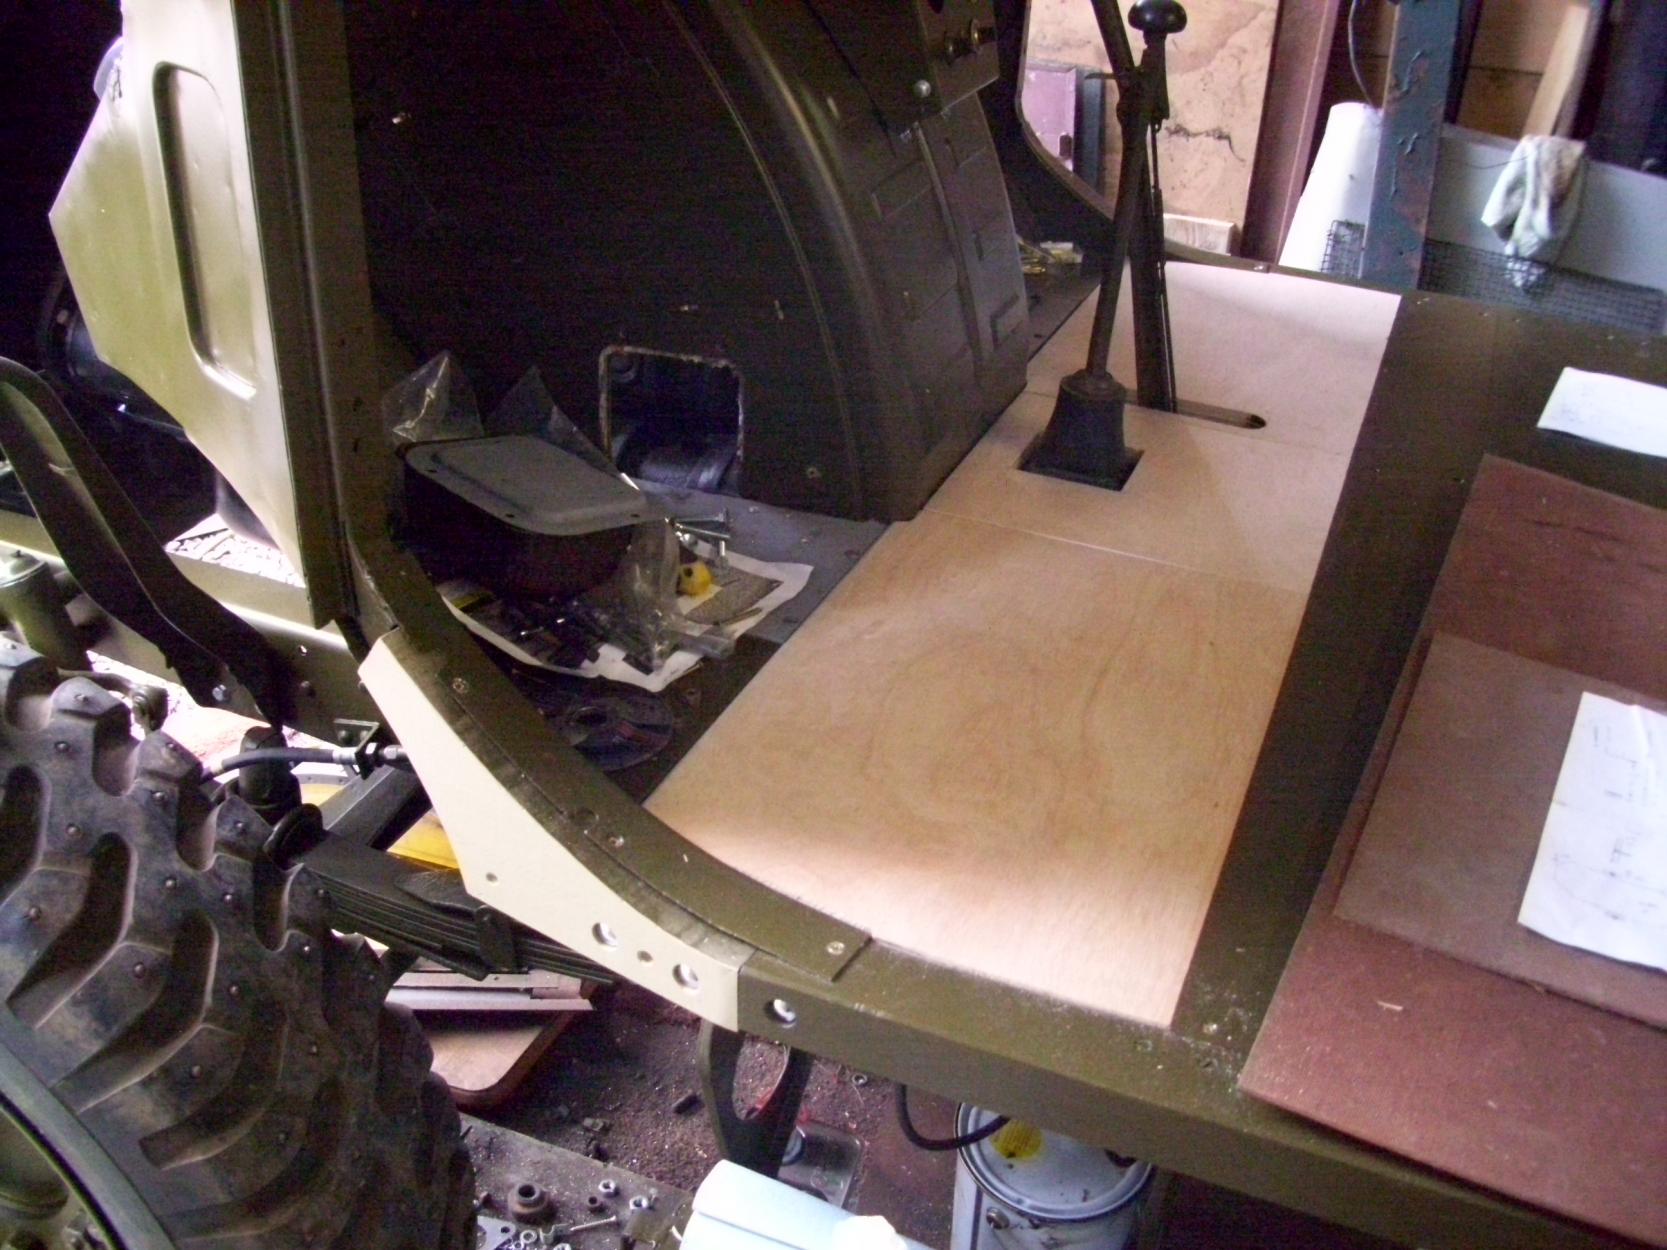
After taking last wkend off to visit the Dunsfold wings and wheels event which was bloody marvellous, Lancasters, Vulcan, Mitchell etc etc thought I'd better start on the cover strips for the egde of the cab floor. Cutting a piece of 50mm x 50mm down its length gives the correct edge radius that's needed thanks for the tip . Slotting the edge at 1/2" centres allows the curve to be formed. There is also an angle to form on the top face of the trim, just need to weld it all up now :nut:. Other jobs have included making a new oil line for the gauge and more repairs to the nearside fuel tank and finishing the cab floor access panels.


-
restoration Austin Champ 05 BE 56
rampant rivet replied to rampant rivet's topic in Blogs of MV restorations
Just a quick update on the champ thing, so far this year we have had it rewired thanks to Dave lock and had an electric fuel pump fitted plus I've given the brake master cylinder another beating to stop a leak and tonight I've just fitted a NOS carb to see if I can improve its running, Oh and am waiting for a correct muffler to arrive from OZ as the one I fitted made it sound like a panzer wagon not a champ ! :nut: -
restoration Bedford MWD restoration
rampant rivet replied to rampant rivet's topic in Blogs of MV restorations
Another day of playing with the MW have begun to sort fuel lines and have fitted the voltage regulator and fuse box to the front of the bulkhead. Then had a go at making the remaining cab floor panels. Have still to form the access holes to the master cylinder and air compressor. [ATTACH=CONFIG]95654[/ATTACH] Started to make the new petrol tank strap and battery box ends this avo :-D
-
restoration Bedford MW restoration project 2012/2013
rampant rivet replied to Danny P's topic in Blogs of MV restorations
HI Danny sorry it took so long but I hope this is the info you need - the hex nuts do have spring washers behind them and the diameter of the washers is approx. 23mm or 29/32" Not sure of the width of the bottom plank can you help ? Here are some pics of my side panels if you need any more I'll be working on my MW tomo these panels had been in storage and this has been my first chance to access them for a while. Regards RR.


-
restoration Bedford MW restoration project 2012/2013
rampant rivet replied to Danny P's topic in Blogs of MV restorations
Thank you for posting these photos they will be very useful when I come to restore my rear body -
Good question as all I found were the self tapping screws left so have no idea what was there and would like to know also :-D
-
restoration Bedford MWD restoration
rampant rivet replied to rampant rivet's topic in Blogs of MV restorations
I hope that that the required standard has already been reached so far in your build ? -
restoration Bedford MWD restoration
rampant rivet replied to rampant rivet's topic in Blogs of MV restorations
Just another day of odd jobs on the truck, have fitted the steering wheel bckt the correct way and the first pairs of Aero screen bckts are on which helps hold the inst panel in place plus she now has four feet on the ground for the first time in over 12 months :banana:. Then started to repair the passenger side fuel tank which on close inspection needs a lot of work. Don't panic !!! tank is completely empty of fuel or vapours :wow: Cutting out the rot has allowed me to remove a lot of the dents at the same time :-D


-
restoration Bedford MWD restoration
rampant rivet replied to rampant rivet's topic in Blogs of MV restorations
Thanks Miff The trick is to spread the vehicles and projects about a bit and that way it doesn't look like too much of a collection mind you it did help a bit "giving" the champ thing to the boss, though I still get to look after it :shocked: no chance of anything armoured I'm afraid as its not what I'm into really. Time management is the thing I did the Chepstow show today on the race course with Champy and Met the boss there after she had been to Cwmbran doing a bit of a shop, tonight I'm treating her to a meal out for extra brownie points and then I'm off to the MW to put the front wheels on tomo and hopefully will get home in time to ease some doors over the new carpets. Never a dull moment !!! -
restoration Bedford MWD restoration
rampant rivet replied to rampant rivet's topic in Blogs of MV restorations
Hi Pete I found some old thick grey undercoat primer on a shelf in the garage at home and used that to start with, as Red grandis has no knots to speak of there was no need to use any knotting goo, then I sprayed the frame and boards with the same undercoat I am using on the rest of the truck. Rubbed it all down with some fine sandpaper between coats. I used Firwood cellulose anti corrosion chassis undercoat from jeeeeparts and the top coat I am having mixed by Middleton paints based in Gloucester. Did you spot I have the steering wheel bckt round the wrong way ? I'll sort that the next visit :-D Cheers RR. -
restoration Bedford MWD restoration
rampant rivet replied to rampant rivet's topic in Blogs of MV restorations
After a day of rain and work on the house on Sat I managed a good session today on the MW, first job was to fit some old tyres to help get the old girl mobile again. I know these are not the correct pattern tread but they'll do for now, I hope to pick up another pair for the front on Tues. Truck sits more on the level now. Then it was a day of doing all those small jobs that need to be done as in fitting the rear exhaust pipe properly, adjusting brake and clutch pedals, reattaching handbrake cable, fixing cab floor frame, fitting grab rail to bulkhead, sorting the choke cable, fitting bulkhead heat shield and thinking about what's next on the to do list :nut:. Think the next big push will be fuel system and first engine start :drive:must get on and sort fuel tanks and lines etc. etc. Does anyone have a pair of tank straps spare or even just the ends ? Ps. Just ordered the POR 15 from Frost to seal the tanks :-D


-
Yet another new Oxfordshire Jeep (with starting issues)
rampant rivet replied to Great War truck's topic in American Vehicles
Just a thought but have you checked the starter switch for loose connections or burnt contacts as I remember a mates jeep with starting probs and this turned out to be the culprit. RR. -
restoration Bedford MWD restoration
rampant rivet replied to rampant rivet's topic in Blogs of MV restorations
Hi Wayne having worked as a carpenter for over 30 years I hope I can make a decent job of the woodwork although its not my favourite part of restoration because its too close to my day job :cool2: Undercoat on cab floor frame almost ready for top coat and final fitting.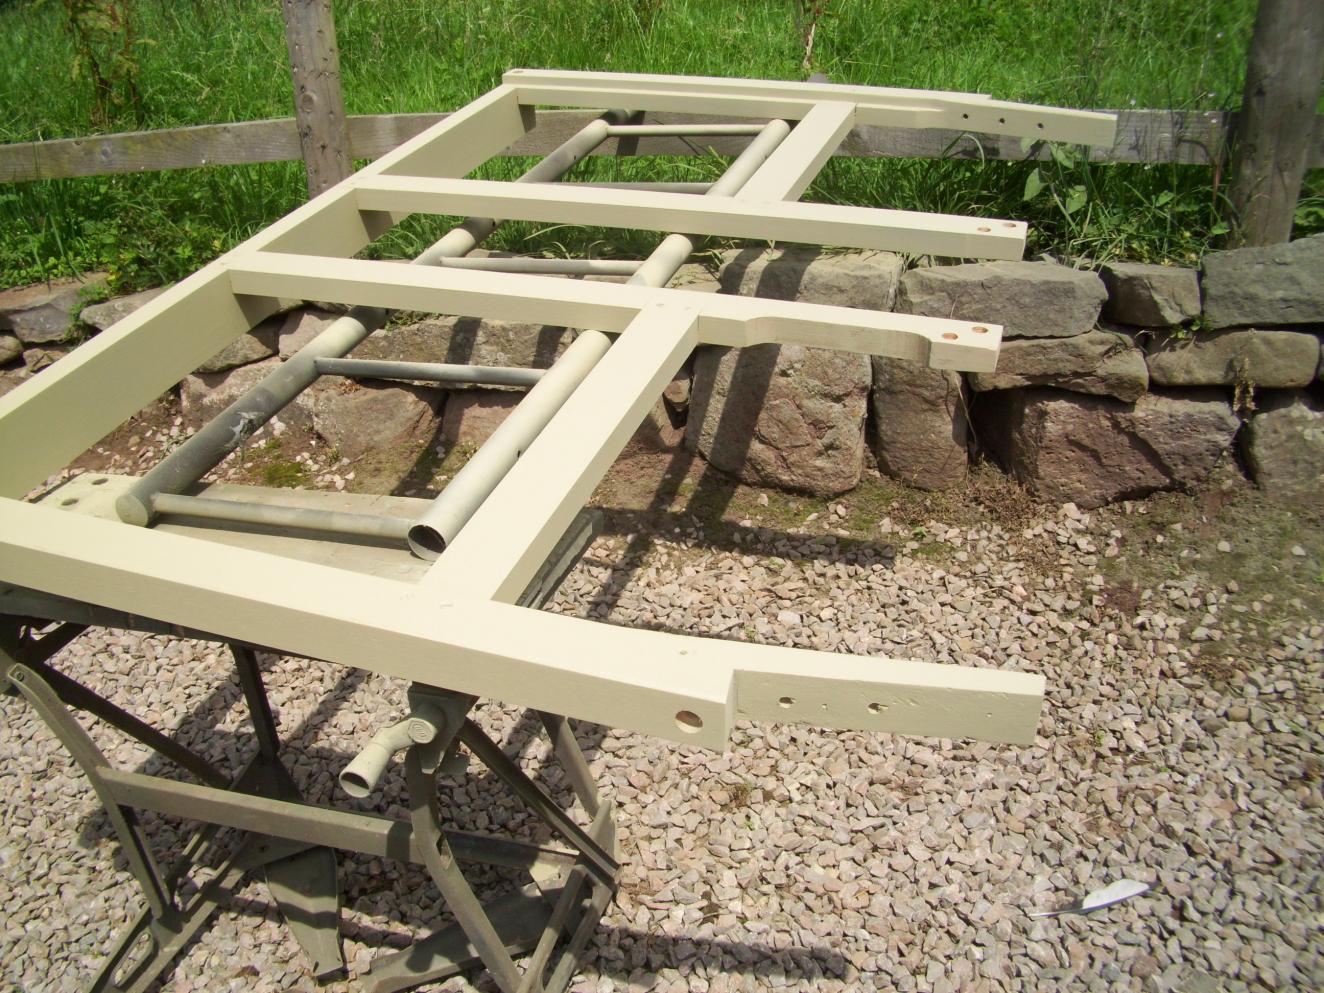
-
Yet another new Oxfordshire Jeep (with starting issues)
rampant rivet replied to Great War truck's topic in American Vehicles
Hi are there any fittings in the tub to take the half doors as I cannot see any ? is the cross member at the front round or square in section ? is there a spot weld in / on the small notch in the dash panel above the instruments the spot weld usually is half way on the notch / dash panel ? looks very much like a Hotchkiss tub to me at least deffo French wheels though the rear stowage bin tops look like ford ones is there a script F on the underside of them ? have you looked for chassis / engine Numbers ? willys and ford number behind oil filter later engines stamped above water pump, some French chassis have a rebuild plate welded to the chassis towards the rear. looks like the windscreen frame has been bent backwards quite a bit hence the poor fitting hood and the odd look. If you have a look at the engine / axles / gearbox/ transfer box look out for WOF = Willys overland Francias. As previously mentioned looks like battery problems as everything else seems in good order. Just noticed carb is not original type Carter, anything cast on the top of the head like "Jeep" then its a post war head or is there a script F under the oil filter bckt ? I hope these pointers have been of some help I'm sure there are more hmvf members with greater knowledge than me who can offer further advice :-D Cheers J. -
restoration Bedford MWD restoration
rampant rivet replied to rampant rivet's topic in Blogs of MV restorations
Have managed a couple of more sessions on the old truck this week :-D Measure twice cut once as they say Slowly reverse engineering the floor timbers using the rotten remains as patterns. At last it is fitted :clap: couldn't wait any more had to see how the filter fitted to the bulkhead. It is satisfying when all that hard work starts to come together Floor boards are cut in but still lots more fettling to do.


-
restoration Bedford MWD restoration
rampant rivet replied to rampant rivet's topic in Blogs of MV restorations
Wotcha Wayne I pressure washed the worst of the crud off using an engine degreaser then it was lots of elbow grease with wire brush and 4" grinder with various wire wheels to get the old paint and rust off , then 2 brush coats of satin black engine enamel. Had an evening session looking at fitting the new cab floor timbers. and repairing the bulkhead heat shield.

-
restoration Bedford MWD restoration
rampant rivet replied to rampant rivet's topic in Blogs of MV restorations
Thanks chaps well dropped lucky this morning as I called by my joiners to pick up a set of spindles for a stairs I had to finish today and spied this waiting for me hopefully this pile of Red Grandis will soon be the new cab floor for the MW. Couldn't wait to get home and start sorting out the jigsaw :nut: all new timber to original dims just over length to allow for fitting. Many thanks to all at DJ Gardners for doing the preliminary machining for me now for the fun bit


-
restoration Bedford MWD restoration
rampant rivet replied to rampant rivet's topic in Blogs of MV restorations
Just a couple of pics to remind myself how the old girl was :shocked:


-
restoration Rover 8 FFR Restoration
rampant rivet replied to Rover8FFR's topic in Blogs of MV restorations
Well done Matey, Welland next then ? -
restoration Bedford MWD restoration
rampant rivet replied to rampant rivet's topic in Blogs of MV restorations
Good progress down t'shed today with a helping hand from my mate Neil we lifted the bulkhead back into position This will allow me to start dry fitting the throttle linkages etc Exhaust system is fitted and I'll need to sorting a temp ignition circuit etc prior to an engine start up :nut: Had a look at sorting the engine access panels too :-) Last thing was to dry fit the front panel and bumper.


-
restoration Bedford MWD restoration
rampant rivet replied to rampant rivet's topic in Blogs of MV restorations
They are int shed nr Tintern, I will be there on Sat hopefully and can bring them home or you can call by and have a look at MW at the same time :-D -
restoration Bedford MWD restoration
rampant rivet replied to rampant rivet's topic in Blogs of MV restorations
Have two spare genny panels in t'shed if you need one :-D and yes thanks I am firing on all cylinders again -
restoration Bedford MWD restoration
rampant rivet replied to rampant rivet's topic in Blogs of MV restorations
Noo not really I would have used nylon or tuffnol if I had some but as I usually have odd bits of hardwood lying around I thought I'd try that first, by the way have you sorted your charging prob on the piggy ? I have two generators under the bench in the shed should you be in need, not sure if they are any good though


