


.JPG.ce5d5173b9120e587cf914646a67c75d.JPG)
Pete Ashby
-
Posts
1,697 -
Joined
-
Last visited
-
Days Won
8
Content Type
Profiles
Forums
Gallery
Blogs
Events
Articles
Store
Downloads
Everything posted by Pete Ashby
-
There was Dorchester in the land warfare hall at Duxford a number of years ago not sure if it's still there some one else on here will know. A quick google search using Dorchester armoured command vehicle brought up a whole shed load of photos. Pete
-
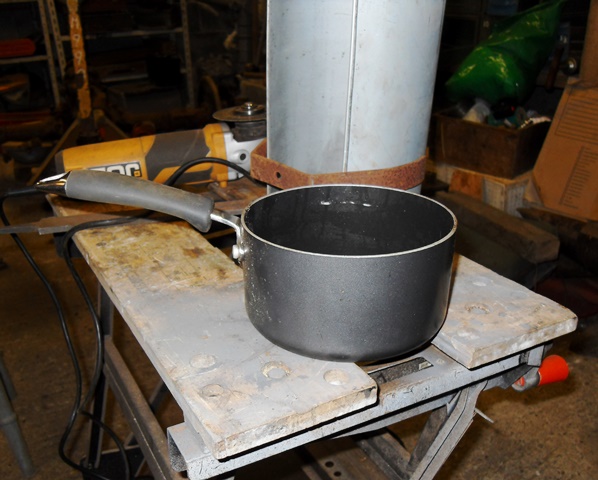
I pondered long and hard on how I could replicate the cast aluminium end plate that the bellows are attached to it is a complicated affair with a rounded base and ribs cast into it not a easy thing to reproduce. Then I spied the saucepan on the draining board one day :idea: the tricky bit was smuggling it out of the house :angel: the diameter was just right and the rounded base was correct it didn't have the ribs but it would do, cut down drilled and an exit hole cut in the base and the deed was done......saucepan?? what saucepan?? no sorry not seen it :flowers: A really good scrub in a strong hot detergent to remove any trace of flux from the soldering activies and then one coat of etch primer and a base coat of G3 to keep the rust at bay The last thing to do was bend up a the support bracket for the air cleaner from 2.5mm steel sheet this bolts to the frame of the truck and the air cleaner sits on top of the bracket. I'm not up for the epic sowing session undertaken by the Rampant Rivet to reproduce the felt and wire bellows this really was a work of art on his part, so I'm opting for a modern truck filter of the correct air flow for the engine capacity and it will fit inside the housing, it wont be seen when fitted and will do the job well. Another small task completed and a step nearer to getting the beast running Pete


-
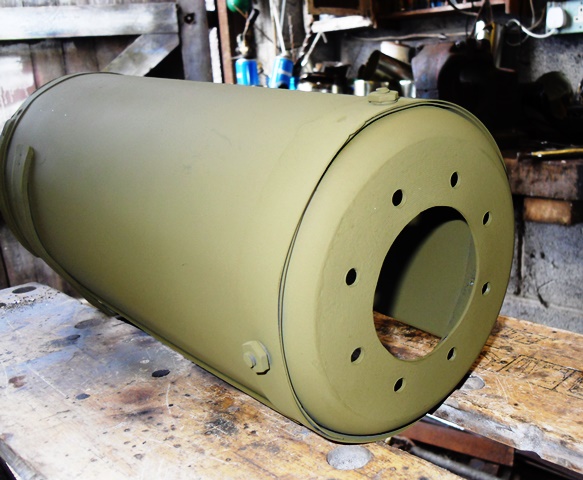
OK back again, here is the curve of the case starting to take shape after a bit more rolling with the scaff tube Finished curve The front end plate was made up out of five separate pieces and soldered together, as an aside I use a hot air gun for soft solder work now on sheet I find I get much better localised heating. The bottom case fixing bracket was bent up from flat bar and shaped on the horn of the anvil to match the curve of the case and the end bands were cut from the same gauge steel as the case and welded together. Small holes were drilled in the bands and bracket and then plug welded onto the case, the front plate was then soft soldered on and it looked like this: more to follow Pete


-
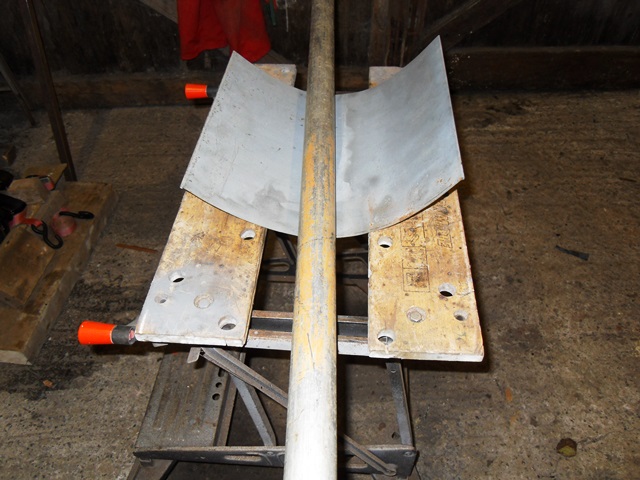
As a bit light relief from the fight with intermediate axle I decided to make the Vokes air filter case that fits under the floor boards on the mates side of the cab. This is similar in design but not identical in size to the type fitted to early Bedford MW's and I suspect other pre and early war British trucks (see The Rampant Rivets heroic account of making a set of bellows for his MW restoration). I had the decayed remains of about half the case for size and design and luckily a good end plate with handle attached so that was a start. The felt bellows had been home to a family of mice for decades and were in a very poor state The cast aluminium end plate that the bellows are fixed to was also broken some of it missing and only six pieces remaining and unusable. This is going to sound like a Christmas cracker joke......What can you make with an aluminium saucepan, a sheet of steel from an old washing machine and a scaffold tube?...... answer a Vokes air filter case. First job was to cut the steel to size and then produce the rolled stiffening edge on each side that's what's happening here using a pair of bending bars to produce the first 90' bend and then dressing down on the anvil Using the scaffold pole like a rolling pin and the workmate set to an increasing gap the sheet is slowly worked into a curve more to follow. Pete


-
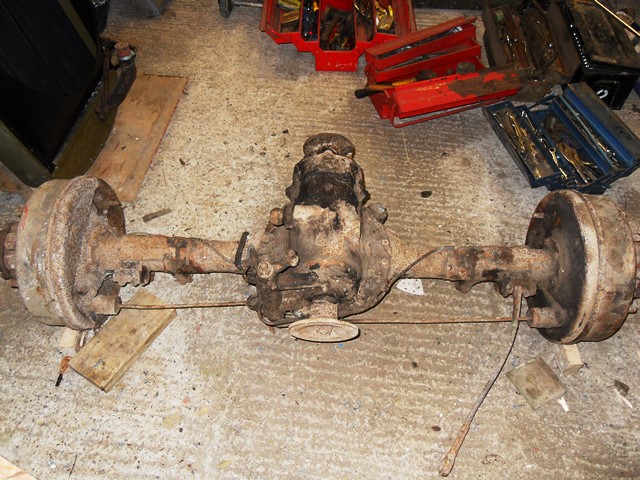
Time for anther update, progress has been slow over the winter due to a combination of a cold workshop and a good wood burner in the house . Having said that I have dug the intermediate axle out of the barn and moved it into the workshop ready for cleaning and strip down a few more pictures of work on this item will follow in due course. After an epic struggle due to the brake shoes rusting onto the drums the brake drums were removed I had to undo the pivots, anchors and wheel cylinders on each side to give some free movement if and when I could un-stick the shoes then with a combination of very controlled heating tapping and rotating the drum a fraction back and forth at last they came off and despite the effort needed to remove the drums the condition inside was not too bad. Pete

-
.thumb.JPG.fbe532a8a386c5010fe8daa1ff85aa23.JPG)
restoration Bedford MWD restoration
Pete Ashby replied to rampant rivet's topic in Blogs of MV restorations
The rockets were electrically fired out of launching tubes, early examples had one end the steel cable attached to the rocket and the rest was wound onto a drum fixed beside the launching tube, latter examples had a second larger parachute in a box beside the launching tube attached to the bottom end of the cable. The idea being that if a cable was snagged by a plane the larger chute would also deploy and produce extra drag. Pete -
restoration Bedford MWD restoration
Pete Ashby replied to rampant rivet's topic in Blogs of MV restorations
Looking splendid out in the sunshine Jeremy, you've obviously had better weather than we have further west !! the anti aircraft system you are thinking of is the The Parachute and Cable Defense System also known as as “Fizzing Onions” this was made up of boxes containing the rockets and cables raised above the ground by 2 feet and the boxes were set out in lines with 60ft between each box. When fired electrically 480ft of of steel cable rose to an altitude of 600ft, a parachute would open slowing the descent of the cable the idea being that enemy aircraft would fly into the forest of cables, when the increased drag on the aircraft would put the aircraft out of control. Funnily enough I have just been writing about the use of this system in a piece I'm currently working on Pete -
That's right Cubed, it was a GM design feature found on GMC and US and Canadian Chevrolet, it never fails to surprise me just how light the steering is even with a winch hanging off the front. There is no comparison in performance and handling of a recirculating ball box vs worm and peg or even worse worm and nut, the experience of having to drive a Morris CS8 for a number of miles still haunts me nearly 30 years later :drive: Pete
-
Pleased you've got it sorted the GM box is one of the better wartime steering systems and usually performs well providing all the bits hanging off it are in good shape Pete
-
Sounds very much like 'Wheel tramp' can be caused by a combination of components associated with suspension or steering or a combination of ware in both areas. The 'death wobble' which is the colloquial term for this problem has attracted the name for good reason. causes casn be any one or a combination of the following some of which you may already have covered, either way if it's as bad as you imply in your post it needs sorting quickly. Flat spots on the tyres mismatched tread pattern uneven or badly worn tires Out of balance wheels/tires (for what ever reason also see combination of above) Worn spring shackles in frame/spring eye/ bush Loose spring saddle / U bolts loose/broken Broken spring leaves worn/missing shock absorber bushes Failed/frozen or empty shock absorber on one or both sides Worn king pins/ failed carrier bearings Worn track rod joints Bent track rod Worn/bent drag link Bent/worn drop arm Steering box/linkage out of adjustment Worn components in the steering box Pete
-
Not sure if this is any use to you but it should give you a good idea of what you need flexi hoses ect will available from the usual dealers Pete

-
What book are you reading at the moment?
Pete Ashby replied to Great War truck's topic in Other Chatter
Just re-read a book from the collection 'The Diary of a Desert Rat' by R L Crimp published Leo Cooper 1971, ISBN 0 85052 039 8 I believe there is a second edition by Pan books. Excellent read for anyone interested in the North African campaign written from the first hand diary account of a British signaler in an infantry company. The narrative covers the 8th Army actions in the desert and the move into Tunisia followed by the eventual collapse of the Africa corp. Full of detail and a recommend read. I had a look on Amazon and copies are still available Pete -
Good job !! nothing beats that first run on the road pleased it went well for you, it makes all the time and money spent on a project worth while doesn't it :drive: Pete
-
PM sent Pete
-
Nice work, particularity like the jig for folding the brackets...... neat :goodidea: Pete
-
Sea change both in presentation and depth of content. The articles now warrant the time spent on reading them. Excellent first issue under the new stewardship looking forward to the next edition :thumbsup: Thanks Pete
-
restoration Bedford MWD restoration
Pete Ashby replied to rampant rivet's topic in Blogs of MV restorations
Ah that explains it then, the thing that drew my attention to the pressings was the sharp edge finish I thought you either had a really heavy duty press and die or a rolling wheel, still full marks for ingenuity Jez like it. In the same spirit of Iv'e just nicked an aluminium saucepan from the kitchen and turned it into the base of a Vokes air cleaner body (more of that another time in the Retriever thread) unless it's loss is detected :angry in which case I'm brown bread Keep the photos coming Pete -
restoration Bedford MWD restoration
Pete Ashby replied to rampant rivet's topic in Blogs of MV restorations
Good work Jez :thumbsup:, Two questions, how did you produce the two pressings in the end door ? and how did you close the rivets off in such a restricted place inside the box ? Pete -
Now you come to mention it I think that's where they may have came from or perhaps it was a google image search it was a few years ago now...either way thanks to Dave Pope they were very useful. Thanks for the clarification re your drawings, I'll re-label them in my useful file as British spec only. Pete
-
Thanks for taking the time to produce the drawings and posting them, very useful information and just the sort of thing we all should do from time to time perhaps?, no matter seemingly how obscure the subject may be someone somewhere out there is looking for information and help So here's my contribution a few detail photos taken from the web (sorry I have lost the source references now but thanks to the posters) a number of years ago when I was making an 8cwt hood frame your drawings goanna would have made the whole job a lot easier !! Pete


-
Every reason for both of you to be proud, takes me back 25 years to when I started my son on his first Airfix model. All credit to your daughter Steve in a world of instant gratification it's refreshing to see a young person putting time and effort into producing something like this. Pete
-
Thanks Richard for the suggestion, I tracked it down via a number of classic tractor web sites it's about 2" too long for the job however in searching for it Iv'e found something else that will do the job Thanks Pete
-
Has anyone found a suitable modern cartridge air filter to replace the Vokes felt bellows type as fitted to early Bedford MW Leyland Retriever etc ? Thanks Pete
-
question Morris C8 with Bigend gone. whats it worth ?
Pete Ashby replied to Ian L's topic in British Vehicles
As you know Ian British, and for that matter Canadian trucks, can be difficult to gauge a realistic asking price for them, they are not everyone's cup of tea. Having said that if your C8 was A1 mechanically and with good paint work, good tires, canvass etc somewhere around the £8.5k to £10k mark I would suggest as the ball park price. With a dodgy crank and white metal cast bearings there is obviously a cost to take into account. It's a number of years since I had any white metal casting and line boring done (the last was a Chev engine about 10 years ago) The real issue is what damage has been done to the crank, is it just a regrind one size down or will it need metal spraying and rebuilding. I think that's where the unknown cost lies in your case. If it was me buying I'd want to see at least £1K off market price to cover potential work and possibly a tad more by the time transport to and from a specialist machine shop is taken into account. But as we all know (and most of us have been there at one time or another) Beauty is in the eye of the beholder..... so my advise for what it's worth.......... would be set a fair price and be prepared to deal :cool2: Pete -
Good luck completing the deal and look forward to following your thread in the restoration forum Pete
.thumb.JPG.fbe532a8a386c5010fe8daa1ff85aa23.JPG)


