


.JPG.ce5d5173b9120e587cf914646a67c75d.JPG)
Pete Ashby
-
Posts
1,686 -
Joined
-
Last visited
-
Days Won
8
Content Type
Profiles
Forums
Gallery
Blogs
Events
Articles
Store
Downloads
Everything posted by Pete Ashby
-
Useful link :thanx: Pete
-
try Jim Carter http://www.oldchevytrucks.com/cart/index.asp?cat2=9931&path=1934+-+1946+Truck+Parts/Speedometer+&+Gauge+Items/Speedometer+Cables+&+Grommets&station= this is a link to the speedo cable page suggest you measure your old one to make sure they are the correct length Pete
-
Try these guys https://www.lwdparts.com/ Pete
-
.thumb.JPG.fbe532a8a386c5010fe8daa1ff85aa23.JPG)
restoration Bedford MWD restoration
Pete Ashby replied to rampant rivet's topic in Blogs of MV restorations
First class job Jeremy really enjoyed following the restoration many thanks for sharing it with us on the forum it has undoubtedly provided inspiration and encouragement to all those who have followed your progress. The truck is a true credit to your skill and attention to detail :thumbsup: Regards Pete -
The diagram attached may be useful to you. Check both the ports highlighted are clear and that the lip of pressure cup clears the vent port when the brake pedal is in the off position. You can do this with a 0.6mm piece of welding wire bent at two 90' angles so that it will go into the reservoir and into the ports. If the vent port is blocked or obstructed several applications of the pedal will build residual pressure in the lines. Pete

-
Interesting, not tried citric acid before what concentration do you use ? do you need to neutralize the piece after removal or do you just give it a good wash off ? Pete
-
Really looking forward to following this restoration lots of updates and photos please Pete
-
restoration another Diamond T 980 restoration
Pete Ashby replied to greyhound32122's topic in Blogs of MV restorations
I guessed as much Sam, watching your video it was pretty obvious you guys had done this sort of thing before. Full marks for taking on the task with the 980 I'll look forward to following your updates. Pete -
restoration another Diamond T 980 restoration
Pete Ashby replied to greyhound32122's topic in Blogs of MV restorations
Interesting thread keep the up dates and photos coming. I'm impressed with the frame repair work and the hot riveting, did you hire the gun in or is it a piece of kit you already have ? Pete -
Pleased you've got it sorted and well done for coming back with the result :thanx:, It's always useful to hear what the solution to a problem was. Pete
-
I've not used fuel stabilizes before but I do use an additive (Castrol valve master ) to supposedly help combat valve and seat erosion caused by unleaded fuel. The question I have is: Are the two treatments compatible?, or is there the chance of some nasty gloppy reaction happening in the tank and lines any one know the answer or experience of using both at the same time? Pete
-
I have just finished reading this thread on the G503 forum web pages http://g503.com/forums/viewtopic.php?f=4&t=278431 Some of you may already be aware of this but I have not seen it discussed here. I post without wishing to be alarmist in any shape or form and without further comment it is for information only. With the advent of the internet we all now buy parts from many varied sources so if you have replaced a sector shaft in you steering box since 2011 it may benefit you to read the above link in full and then read the official recall notice here http://www.omix-ada.com/media/Steering%20Sector%20Shaft%20Recall.pdf Pete
-
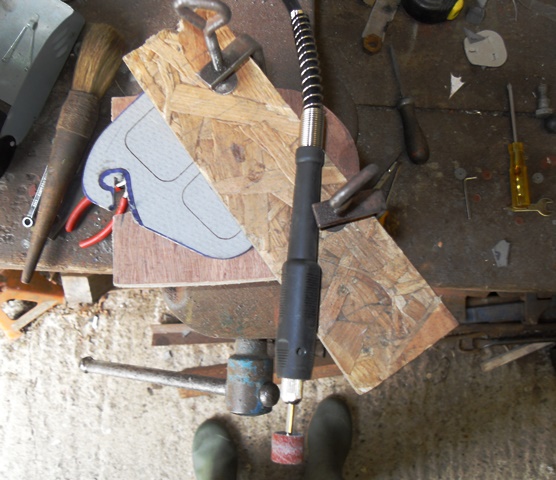
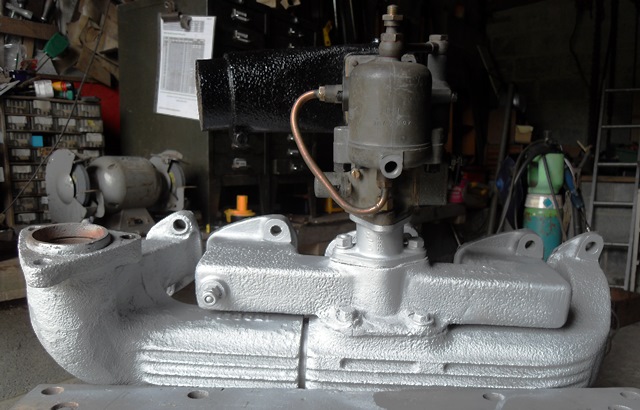
This is a busy time of year for us but I have found some time to make a set of inlet and exhaust manifold gaskets. Having had no luck finding a set to match or finding a company that would do a small volume run at anything less than eye watering prices I set to and have made my own from 2mm Klinger stainless reinforced sheet bought off e-Bay for a little under a tenner post paid. A few photos Theses are the new gaskets some are finished and some are still as blanks alongside the originals. I used the old gaskets as patterns and traced the shapes onto the Klinger sheet. The blanks were cut out using a small angle grinder and 0.75mm metal cutting discs It is vital that the sheet is held down during cutting so I improvised a simple jig and clamp. Port apatures and stud fixing holes are cut out using a Dremel with mini metal cutting discs and finished of with a Dremel rotary sanding tool and fine spherical grinder Not my most favorite of jobs in fact it rates marginally better than wire brushing rust, slow, time consuming work but it had to be done so the refurbished carburetor and manifold assembly could go back on (It's upside down on the bench by the way it's an up draft system) Pete


-
Dodge WC51 VSL 424. Does anybody know previous owners....
Pete Ashby replied to WOMBLE's topic in American Vehicles
Can't help with the history I'm afraid but nice looking truck :thumbsup: good job. Iv'e had a couple of Weapons of Carriers over the years and found them a good compromise between the nippy convince of the jeep and the usefulness and of a larger truck. The skinned knuckles and frost bite will soon fade when you're out cruising with the cab canvas off.....well maybe, this is Britain after all...... so beware of the 2 gallons of collected rain water from the bed tilt coming under the cab sheet and down the back of the neck when you brake, ....Oh how we laughed :argh:... note to self always drain the bed tilt after standing in rain before pulling away Pete -
Providing the insulation is in good condition, not cracked/soaked in oil and the terminals are good they should be OK. The reason I asked what leads you were using is that I have known the modern Carbon fiber leads give exactly the problem you were describing. Pete
-
What type of HT leads are you using are they the traditional copper core or modern Carbon fibre ? Pete
-
Thanks for the heads up Bob, would it be possible at some point to post a photo taken in natural light of a small flat area you have painted, I know colour matching from computer screens is not ideal but I would be interested in the tonal quality more then anything else. Pete
-
introduction Hello from South Gloustershire
Pete Ashby replied to A Howes's topic in Introductions & Welcomes
Rare truck welcome to HMVF Pete -
Thanks for the answer Peter as I said previously very nice work. For me this sort of topic provides the real value of web forums, it lets everyone share knowledge and skills that would take a life time to learn before the advent of the web. Keep posting the progress Peter Pete
-
Thanks for the explanation and photos nice piece of tooling there, one more question how do you ensure an even pressure across the top dia?. The reason I ask is that some years ago I had to make a throttle pedal with pressed ribs and made a similar set up but found that the point load from the press needed to be equally spread over the top die face to get good clean pressing, the work piece was relatively small so I used a chunk of 1" steel on top of the die plate. The plates you are producing are much bigger and look to have a very even pressure distribution nice piece of work :thumbsup: Pete
-
restoration Bedford MWC restoration
Pete Ashby replied to 64EK26's topic in Blogs of MV restorations
Some excellent engineering stuff going on here, well done very much enjoying this thread keep the photos and commentary coming Pete -
Agreed very sharp indeed, I'd be interested to know what tooling and method you used as well Pete
-
Has any one got a recommendation for a company in the UK that can make one off gaskets for inlet and exhaust ports from provided patterns ? Thanks Pete
-
Never come across this tool before very interesting thanks for posting Pete
-
Harsh Tony harsh :evil: pete
.thumb.JPG.fbe532a8a386c5010fe8daa1ff85aa23.JPG)


