


ruxy
-
Posts
2,824 -
Joined
-
Last visited
-
Days Won
16
Content Type
Profiles
Forums
Gallery
Blogs
Events
Articles
Store
Downloads
Posts posted by ruxy
-
-
12 hours ago, REME 245 said:
Huge numbers still in storage after the war were fitted with zips but generaly very rare for OR's to do it during the war. If you are part of a group they will also have rules on what pattern of Denison to wear and acceptable manufacturers. There is a lot of rubbish out there.
Your comment about rubbish , I suppose that is fabric and spurious designs ? and poor stitchers ? I have always fancied a Denison (full zip) , remembering the 1/4 zip anorak when I joined the scouts , but it had a zipped kangaroo pocket across the front - fine until I outgrew it - then a struggle to get into it. The leather woggle found a home is a vase because the first task was to make a proper one out of deer antler ,,
I remember reading a article about Denison smocks a few years ago - apparently the finest made by a firm at Redcar & they were £ expensive so it was locked in memory. Seems I need to do lots more research prior to purchase.
-
I used to view them at a independent Land Rover dealer near Thirsk - this must be over 20 years ago ,new (to order) and second hand . Fantastic quality - could not fault , bodywork far better than anything out of Solihull. Still built at Foers Rotherham - Farmers periodical ??
AFAIK - they moved to a farm near Hexham donkeys years ago.
-
2 hours ago, LarryH57 said:
When we acquire a vehicle whether or not it is an MV, classic car or everyday vehicle, I guess that most of us register it with the DVLA using the address of the owner and not the address of where the vehicle is kept? Which is it that the DVLA require?
In current times of Covid-19 and potential for local lockdowns, it occurred to me that if and when the Police had / have the powers to turn vehicles around that appear not to be from the area, whether vehicles should be registered where they are kept, if the owner happened to be in the lockdown area and wish to use the vehicle within the limits of the lockdown? Chances are that the Police would not be bothered but on the other hand any incident might raise a query and an accusation as to why you are in Somerset or wherever when you are a Londoner.
In recent years there are also local schemes relating to parking and council recycling centres that are only open to locals and locally registered vehicles. It makes sense to register where the vehicle is kept but perhaps more difficult if it is a remote barn without a proper address.
Possibly you should address your query to Dominic Cummins who seems to make up the vehicle 'lockdown' rules as he motors around the English countryside ?
-
 2
2
-
 1
1
-
-
I can't see any problem constructing a 1:1 scale replica chassis out of mild steel plate and at relative low cost . Basic boilermakes profile burner , rivet heating hearth & associated gear , or if welded - a good CO2 cake-icer . It is not as if you are on coded pressure vessel work.
You may be able to get your hands on your firm's blueprints ? Otherwise you need somebody in Sweden with a imperial tape-measure, pencil & paper. I speak as somebody who served 6 years in a British Railways workshop , 1 year as junior draftsman - then went to sea LoL
Then you just need all the bolt-ons as ££££££££££ allows..
-
This afternoon I was chopping up some ancient 3" x 4" RSJ's into posts to drive in the ground , doing diagonal cuts across the flanges to obtain a point to aid hammering in. It took 6 qty. Dronco (I normally use Dronco or SAIT) 115 x 20 a 1mm slitting discs - to produce 10 posts. The section was abt. 1/4" / 3/8" in flange & 1/4" in web.
This evening - I followed a Youtube back/back test of Dronco 115x1mm against Lenox (diamond) new disc 115x1.5mm , main advantage claimed will last duration of 30 abrasive discs & maintains full dia. - great , however on the various steel 'test-pieces' IIRC the time to cut through was approx. 50% to 100% longer - not so good because I would have been on morning & afternoon , possibly his extra 0.5mm on disc thickness slowed ?
I was using a good wattage on 240V by AEG. I do have a 25+ years old Toshiba 5" (beast - no soft-start) - I only use the thing for slicing through exhaust pipes but a slitter a bit more than 1mm, also I have a 5" Makita (back -handle) - bit reluctant to use that also on 1mm abrasive slitting discs - I don't think I would have the control. Mind you - the bloke on Youtube was using a battery powered back-handle grinder , on the diamond disc he had a bit of snatch but he seemed to think with mains power it would not have been present.
I ask because in near future I will probably be cutting some heavier Universal Beams - they are more like 12mm in the flanges.
Possibly I should try some other makes of discs ? Looking on Ebay , a pack of 10 by Silverline costs more that the 80p to £1 each I pay for Dronco or SAIT , plenty of choice on Ebay but when you look at the photographs / write up many are made in PRC - best stick to EC or Ex-EC !
-
1
-
-
On 8/27/2020 at 9:11 PM, Jessie The Jeep said:
So after breakfast on Friday morning, I took "Jessie" out for a drive around the roads that encircle the airfield. I began by heading away from the airfield, towards the water tower we'd driven by the day before while going to the camp site. The tower dominates the road side and is still an impressive structure, 75 years later.
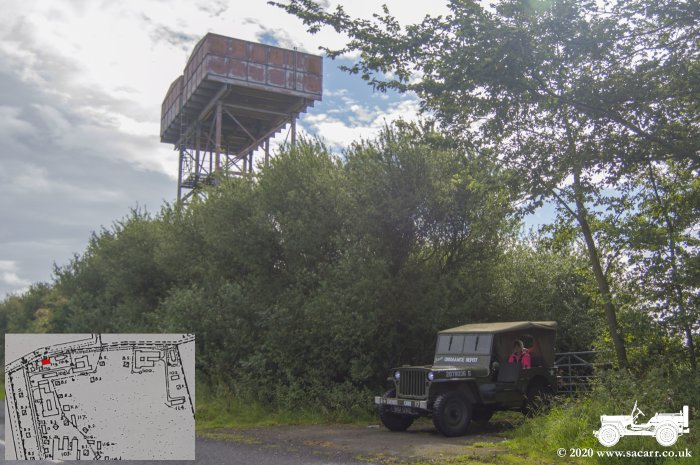
From there, I turned around and headed back to the airfield. Driving down the public road to the East of the airfield, the only surviving hangar can be seen, a Miskins blister hangar. Back in 1988, the aviation company I worked for, dismantled the last of the T1 hangars for re-use at Newcastle Airport.
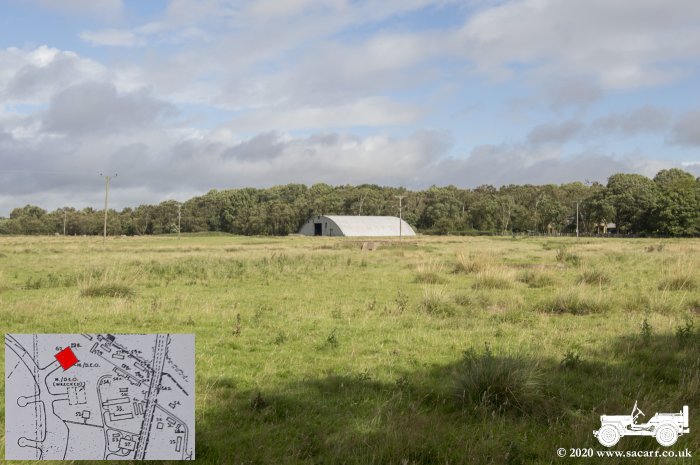
The RAF Tranwell 'blisters' have a interesting history from the WW2 re-positioning - Ref. the book by Chorlton for the area landing fields. Some were blown over in a gale and others re-positioned quite a distance without dismantling. The Ministry filmed the procedure and yet it is a mystery how it was done ?
-
1
-
-
I think the best course of action is chassis vigilance , as soon as you see rust starting - spray it with such as ACF50 , WD40 , son's stash of mountain bike GT40 , anywhere - bolting of alloy panels to steel - likewise I give a periodic spray using the 'red-straw' inc. around the front fuel tank fixings . I don't spray near the tank rear rubber bushes. I used to buy WD40 by the gall. & use their hand pump sprayer, sometimes still do around chassis rails prop-shafts etc. - preventative.
My cousin used to overwinter his Morgan inside a air-con. tent thing, I was never convinced. I think a draughty shed is far better - provided it is not wrinkly-tin warming the air & then it cools down - the dreaded condensation, I still have my first timber sectional garage with felted roof , quite well sealed - around first few hot days in spring I have to stay the door open for a few hours because condensation can form on inside timbers / vehicles. A sheltered car-port is supposed to be best for car in daily use.
I once used aerosol bitumastic rope dressing on leaf springs , not as good as I expected. Back to twice a year I jack the chassis to hang the axles & spread the leaves -spend on a can of aerosol 3 in 1 oil , lay cardboard under springs & spray trying to keep most oil on springs than spillage on cards.
-
1 hour ago, LarryH57 said:
My original fuel tank has black underseal applied on the sides, and the front and rear under the fitting brackets only. It is applied in what I would describe as a stipple looking finish, so perhaps done by the Army?
I don't who / where the undersealing was done , I have noticed a bit of range in the Q.C. Dept. Probably at the Central vehicle Storage Depots ? I assume this is where the first in-service spray coat of IRR paint was done ? , that is to some but not all. From what I recall with most franchise new car dealerships , undersealing was a £ extra , such a messy job most did not wish to do in-house so sent out to the "trade". From late 1970's there seemed more car factory undersealing done.
I always give extra hosing down of any silt/mud on the rear cross member and around the fuel tanks.
-
Your photograph - post - Posted Sunday at 05:46 PM (edited)
The tank seems painted Nato Green top & towards front but some black at front & all side black. This is fairly common , they remove the seat base cushions and do minimum of masking , spray outside , inside of tub , inside of doors , hardly ever the bonnet underside. The tanks get a spray where exposed under the sills as it saves masking up. Often you get overspray on the back cushions because they don't do a good mask up of them.
I have 50HG75 DIS 12/80 , I purchased it 11/9/84 & t is still 11,258 miles (18,119 km) , garaged on stands & a new bulkhead & door awaiting time to do ! then a full disassembly & re-spray, it has the potential of being the best of all. The aircraft re-finish (I will have it looking very Ex-Works) I purchased went on another L'wt , it was only ever at 124 Recovery , Newton Aycliffe - so I recon they did the brush job and ran out of paint before they got to the vehicle rear LoL
-
17 hours ago, LarryH57 said:
And the colour of the fuel tanks when fitted at the Factory? Nato Green I guess, with replacements being black as they came from a different source?
BLACK
-
That is a EARLY tank , it is not welded construction . material is terne steel the side panels are seam folded & swaged with pressure rollers , the top seam (that often cracks) is soldered. The cradle is secured to the tank using solder plugs , holes abt. 5/8" dia. filled with solder when the tank is sweated to the cradle. IMHO - a far better quality tank & construction than the later welded "genuine" tanks.
I don't think there ever was a copy part / OEM offering of the original design. When Rover changed to the welded tanks , the only way you could tell it from a copy tank was that the X stiffener pressings in the side panels were in the opposite way. - In a way the manufacturers were losing control of parts , but they had negotiations - there was a MTA (Motor Traders Association) agreement with OEM's that their 'replacement parts' had to have a slight difference to original parts. The trade designated parts below OEM classed as "spurious" , often the very worse then were made in Iraq & India.
The Canadian made Aux. tank - that was originally very cheap (Imported by Hadrian Panels) is now NLA (it had their own design of snap-on cap) - yet there is now yet another Canadian made Aux tank on the market with yet another design of snap-on cap !
If ever you buy a replacement tank with a 'genuine design' top fill ring , be certain to confirm that the sliding neck will insert and actually slide and that the cap does secure as it should.
AFAIK most of the LR gearbox parts sold at a fraction of the top $ ' genuine' parts ££ price are made in Italy by a firm called TAS , I don't know anything about them , I understand they were a supplier to Santana (Spain) , if true - then they will be the ones that are OK.
-
10 minutes ago, matchlesswdg3 said:
I use ACF50 although that is not a permanent fix and needs to be re-applied. AND it is expensive, but I find its good for holding trouble spots at bay. Great on motorcycles for that oily rag finish.
Yes , agreed ACF50 is a bit special among the rest. I spent 30 years as a field inspection supervisor (rotating equipment) for a number of oil majors + crane test engineer on up to the biggest in the years I was involved . So came across claims of all sorts of paints & anti-corrosion performance testing.
-
btw I have just pulled out the relevant Illustrated ?? Parts Catalogue for the S3 Lightweight May 1975 issued, Army Code No. 61278 (For use in the Army and RAF) - correct for yours (in a way).
Page (s) C1 532176 described as TANK, FUEL ENGINE No. off 2 - it actually consists of 6 parts BUT not the FILLER NECK Item 7
1. Bare tank
2. Drain Plug
3. Washer for above
4. CAP , FUEL TANK
5. This is the chain between the CAP & sliding NECK (seems part No. not provisioned).
6. 551473 GASKET petrol filler - this will be the discontinued original cork crumb/composite gasket.
-----------------------------------
I will pull out the Civvy Optional Parts Cat. later - I doubt if part numbers are presented exactly the same.
-
25 minutes ago, LarryH57 said:
Ruxy, why do you describe my tank as an auxiliary tank?
To me - it prevents confusion , with such as Civvy & CL's that only have a single tank and it is not aux. underseat fill.
I think you will find these tanks ONLY Civilian listed in the Series OPTIONAL Equipment Parts books - within the Section page(s) for Auxiliary Fuel Tank KITS , Civilian LR - of course the main tank is a 'side-fill' . It is just that a MOD spec. Rover uses two "under-seat fill" aux. tanks - one as main and the other as reserve .
The same Part No. for the aux. tank carried over to the Defender range as the aux. tank.
-
Land Rover chassis are not that thick , I always descale and use a good primer / chassis enamel , watch for trouble then spot treat. I have tried all sorts & don't rate WaxOil , I think it is expensive for what it is. Inside box sections - I mist out using a paraffin gun using pale spindle oil / light hydraulic oil then follow up later with a viscous grade of Shell Ensis fluid (the original several grades are now much reduced). Externally - for a 'holding operation' - I would use a rope dressing , have used Revol but plenty of other makes & it comes in clear or bitumastic black. Don't think I have used this one - Wire Rope BMG-S – based on Wire Rope BMG with a solvent for dewatering and penetration properties , having a searcher & dewatering - should hold out well on light rust. Trade suppliers should be selling cheaper than Hammerite stuff.
http://www.revol.co.uk/products-8.html
The problem you may find is that if you start removing rust to white metal , then you may find battery rust pitting & penetration.
Hammerite products are more aimed at DIY market with top $ profit margins.
Preping a LR chassis - you have to work within a "time-frame" and there are few short cuts. I have industrial m Von Arx needle scalers , but only use them at certain positions with supplementary fine bunches of needles. If the chassis paint/ primer is still sound - shot blasting takes time to remove it - so I just sweep blast it to give grip to the tie-coat. I avoid heavy rusted chassis because in the main I work fastest on the top & near weld runs with carbide insert tipped engineers scrapers / drag scrapers = mechanical descaling , I never use any powered abrasive tool - if care not taken you will remove metal as well as rust and it is not so thick as to be sacrificial.
-
28 minutes ago, johann morris said:
Clear wax oil every time, then you can see what's happening under it. I have seen instances where black wax oil or other coloured products have been used, they look good but if they get chipped moisture gets under the coating and the material that you were trying to protect corrodes without you realising.
Jon
The last 5 years of Lightweight production - HG KA KB KC KD were not undersealed , most owners prefer the textured black look applied to the open wheelarch area. If undersealed - I leave as/is intact and just re-black. Aesthetics , I quite like the visible NATO green - I have two HG like that, and to me originality is important so I leave those - I have several + LWT's. Most are KB / KC all direct MOD sales to me and they are black painted within wheel arches (some parts flaking in sheets) - possibly over factory wax never steam cleaned off correctly) - no idea whom applied the black paint - seems brushed on.
-
4 minutes ago, Diana and Jackie said:
Dinitrol
Yes, 1986 - I can't remember exactly ,, think it was Dinitrol rather than a Ziebart franchisee took a small factory unit at my home town (Barnard Castle) they supplied the new Nissan factory at Sunderland , ISTR - cavity wax injection to sills. Been inside the original Finnegans Hammerite Nissen hut sheds @ Prudhoe + the new factory that has had a few top name owners. Finnegans in those days was mail order or collection only. Still have a unused sample tin of Finnegans "Corroles" = been inside 3 firms that will knock you up "Corroless" glass flake technology . In my days before the mast - the lascars used to stir up genuine red lead powder with fish oil/linseed oil in a 45 gall oil drum with a spade. Well proven anti-corrosive - just it was only then done outside territorial limits !
-
That is a late welded aux. tank - the "Bracket" (cradle) is spot welded to the tank , the original Terne tanks had the cradle solder plugged. It probably will weld repair at torn hole OK (a small reinforcement plate) providing you don't have a leak at spot-welds.
btw , I remove tanks with a small trolley jack , an old one where you can pass a bolt through the load support plate with flat washers to hold a timber cradle. I got this jack late 1960's for removing VW Beetle engines along with wood cradle. Just drive rear wheels onto a brick each side , remove tinware , the right 17mm spanner - release just four engine mounting bolts , pull back off clutch then lift the rear of car a bit to trolley the engine out - a aux. tank is a far easier procedure.
-
Proper "underseal" contained asbestos , this more or less ceased to be available abt. very early 1980's Then the in name Ziebart appeared , franchise treatment centres ISTR for full warranty the car had to be under 3 years old. Dinitrol seems to have a good name , Black WAXOYL is just anothe similar (expensive) "Shultz" a name that crept in after - underseal. Actually - Ex-MOD Land Rovers where the underseal hit received good protection , the top of the chassis hardly received any and as soon as the chassis enamel failed water entered & rust crept down. Also such as the rear cross-member was difficult , too many mud-traps. I used to buy boxes of Shultz from a factor & quite a good gun was thrown in , by slightly wrong air pressure & wrong spray distance you can replicate a underseal messy finish on chassis & inner wings where it shows on a LWT. The bulk of the chassis - I prefer a good double-header of machinery enamel such as Tractol (oil & fuel resistant after 1 month when through dry). Black full gloss with a touch of base matting seems to work best for Ex-works. The next one I do - probably I will not use Shultz at all and just use black "Stone Chip" PAINT - this is a plastic thick paint , that you can ripple effect with a heavy coat to just the alloy inner wings where seen , you can re-black this with most paint , Shultz won't take paint as it is a semi-solid oil with waxes - the better stuff has de-watering properties. Shultz can be scraped off - not chiseled off like underseal - I actually use not so blunt wood chisels LoL.
Years ago - if the underseal had not dried out , I used to de-rust small areas as needed and use a cheap black 'chassis-paint' this was sold by the gall. it was just bitumen paint & used on commercial vehicles / trailers as a glam. job prep for prior to , testing, some second hand car sales also used to do this.
-
The 'genuine' complete tank assemblies I have purchased - the caps were black as the tank , they were secured in place with a type of HD silver cloth reinforced tape (similar to some parcel tape). I remember pulling the paint off with the tape. Spare caps purchased a few years ago - almost certain just plated finish , can't put my hand on one just now to check. As far as I can recall - all the Ex-MOD LWT I have purchased direct have all had red painted caps & probably brush finish.
Are you able to post photograph(s) of that strange cap ?
-
1 minute ago, ruxy said:
Yes , effectively scrap - I have had a couple thrown to one side years ago. It was when I found one at filter base of the sliding neck , taking a better look at it - I then worked out how the cap works , until then I had just assumed it was something to help stop the rattle from the neck. I could possibly assemble the full history of caps back to the earliest. One I don't have is listed in S2A military parts as a ' pressure cap' - but not aware of what it was all about. The cap used late S2A , S3 & for coiler aux. tanks - nowhere in such as any Repair Op. Manual or User Handbook - have I ever come across a official Solihul description of operation or maintenance checks/procedures to be adopted. I think it possible for the breather filter thinghy to get choked up ? I do have the odd mag. going back to early 1980's , telling how to fit the early wide seal composite fibre seal on this last cap. Due to the lack of official publication by LR - I sus. that it is their way of absolving themselves of all blame in event of accidents - and there have been some reported over the years.
-
2 hours ago, LarryH57 said:
Thanks Ruxy.
So just to check I should fit NRC6836 to all my filler caps if they have none. However I guess the one filler cap I own with the white nylon peg broken off is scrap? I have more caps than fuel tanks luckily.
Next to consider is the tanks themselves, as I assume they need a seal too?
Yes , effectively scrap - I have had a couple thrown to one side years ago. It was when I found one at filter base of the sliding neck , taking a better look at it - I then worked out how the cap works , until then I had just assumed it was something to help stop the rattle from the neck. I could possibly assemble the full history of caps back to the earliest. One I don't have is listed in S2A military parts as a ' pressure cap' - but not aware of what it was all about. The cap used late S2A , S3 & for coiler aux. tanks - nowhere in such as any Repair Op. Manual or User Handbook - have I ever come across a official Solihul of operation or maintenance checks/procedures. I do have the odd mag. going back to early 1980's , telling how to fit the early wide seal composite fibre seal on this last cap. Due to the lack of official publication by LR - I sus. that it is their way of absolving themselves of all blame in event of accidents - and there have been some reported over the years.
-
The cap seems to be correct, the remains of that seal is of wrong type - I blame a LR Comic that did a article many years ago - the writer unaware that that type of seal (that needs to be soaked overnight to prevent damage when fitting to the cap intended for it) that particular type of cap pre-dates your cap...
That white nylon peg IIRC has a spring loaded filter and is the breather , the brass clack valve has a spring loaded ball (stops vent from spillage in event of a roll-over). Venting is via the annular between the cap sandwich layers.
That cap does not rely on any seal fitted to it. Originally your tank would have a cork crumb composite seal fitted in the tank top filler ring gutter. They cream crackered and are a hazard. It was superseded to a fuel resistant buna - Part No. NRC6836
https://www.lrseries.com/NRC6836-FUEL-FILLER-CAP-SEAL-RING-NEW-REPLACEMENT?search=fuel cap seal
Plug temp. or blank the stem pipe hole , fit new seal , pour in 1 pint of petrol & tip the tank upside down to prove all is working as it should.
You can always put the plastic peg to your mouth and blow to test the cap is OK , cap positioned as normal & upsidedown..
New genuine tanks I have purchased from franchise dealership ISTR no cap / no seal. However ISTR purchasing some Ex-MOD (surplus) + the sliding filler neck.
NRC6836 - Land Rover were a bit late with that change, mid-1970's I used a O ring splicing kit to DIY using round strand Viton , then I improved with square section - that probably came from the standard lub. oil canister seal.
-
12 hours ago, LarryH57 said:


'Full Zip'/'Officer' Denisons - a bit of a myth?
in Clothing/uniforms
Posted
If you could please expand on a 'rubbish' Denison for the unwary ? It would save me a load of time in research and probably ££