


Ron
-
Posts
3,424 -
Joined
-
Last visited
-
Days Won
38
Content Type
Profiles
Forums
Gallery
Blogs
Events
Articles
Store
Downloads
Everything posted by Ron
-

question Q. re BSA M20 Girder Forks - Dimensioned Drawings?
Ron replied to Old Git's topic in Motorcycles
Yes! Here is a drawing with measurements also a full breakdown of the parts. Let me know if you need the list of part numbers that relate to those key numbers. Note also that the WM20 forks are splayed out from the centre line further on the left side to accommodate the speedo drive. Therefore when rebuilding a wheel, the centre of the rim should be in line with the centre of the frame.......Not the forks! Also note that sometime later in the war, the forks were made 1/2" longer and a distance piece is then required at the mudguard mount in the centre of the forks. I've just straightened some WM20 forks for a friend and can give tips on how I did it if you want. Ron PS. click the pictures to enlarge.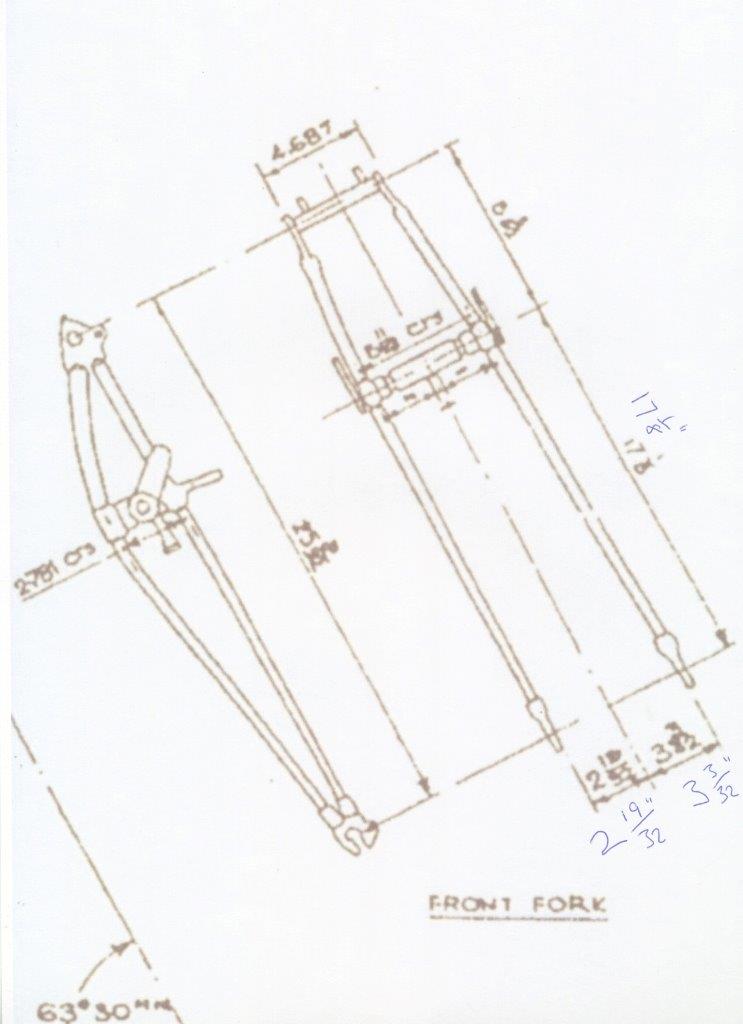

-
Blimey Jan! I'll definitely draw the line at cutting the headstock off to increase the angle by 5 degrees. I've been doing some more investigation checks again today by offering up the toolbox to the left side, and I'm sure the saddle tube must be extended by the same 1 1/2" as the front tube.......Unless they fitted a slightly shorter tool box.........Most unlikely! Ron
-
Of course. Just got my head round Jan's quote above. So all this cutting and shutting to frame and forks does not alter the ground clearance one bit. It must purely have been done to give some more engine clearance under the tank and, or for rider height. Ron
-
The front frame shouldn't be a problem Rik. I can jig the frame to stop it moving, and get my engineer (Dave) to make some hollow spigots of the correct sizes to let into the front and saddle tubes at anywhere convenient along their length. I figure that the tank tube needs to be cut between the rear tank mount and the saddle nose mount and the required size spigot let in. I expect that the frame will need to be removed and reassembled in the jig to get the three spigots in place before welding commences. We'll cross that bridge when we come to it and Dave will know that the frame must stay true and all engine plate holes must remain correct. The rear frame saddle spring tubes will also have to be cut and shut and their angles altered slightly at somewhere near the wheel spindle lugs.......Again we'll cross that bridge!!! The bottom run of the frame doesn't appear to be altered but will probably cut the feet off and let a piece in to extend the stand, as raising the forks has had an adverse affect on the stand which I have tried to overcome by welding on feet extensions, but it's not that good. Apart from being a trifle miffed at 3 months work which includes my nicely fitting mudguard and carrier and paintwork up the Swanee, I'm strangely excited about the challenge. Ron
-
Thanks guys and I'm really enjoying this too! In just a few days we have thrashed out my complete electrical equipment requirement. I think my headlamp is sorted. And as Jan worked out a while ago, the switch is handlebar mounted which can just be seen in one of the blow ups from Jan's original pictures. I just need that mag and tail lamp!! However another major set back has arisen! When I offered up my original tool box to see how I might fix it. I discovered that the box was too tall.......Or rather that the frame is too short! So with Jan performing some of his photography trickery we have worked out that the frame is extended up by 1 1/2" from the red line to the yellow line here. So a total strip down will be required to modify the frame WHEW! Despite that I will still feel a lot happier if I find the Miller parts to make the whole project worthwhile..... In for a Penny in for a Pound!! Ron

-
I can't remember that Lex told me anything.........Lex Who? Ron....I think?
-
I'm on the hunt for one of these Miller magdyno's. (Any condition or incomplete accepted) Any leads from anyone would be gratefully received. Ron
-
What about the Miller mag though Chris? I've never had to use one! Time to start looking. Ron
-
Yes Chris......I'm still learning. Ron
-
Ah! Now I have been reliably informed by Jan, that the alternator on the Enfield is in fact a 'Miller' unit. So another gold star for you Steve. And in Jan's words "Even rarer than the teeth on the chicken that has eaten some rocking horse poo" Here are close ups of the lucas and Miller alternators. Learning everyday! Ron


-
Hi Steve and welcome to my thread. Firstly, very well spotted that the experimental model is not fitted with a Lucas magdyno. It was in fact fitted with a Lucas mag/altenator. Again I think it was something of an experiment so as to run direct lighting and save the weight of a battery. The normal 6" headlamp was also replaced with a much smaller lamp. The idea was tried on other WD experimental bikes such as the BSA WB30 but it was soon abandoned in favour of the standard magdyno with battery set up. I think the chances of ever finding a mag/alternator are remote... to say the least! So I am using a magdyno but still hoping to run it as a direct lighting system, through a hidden solid state regulator. Here is my standard WD/D which the EXP bike is based on with its Lucas magdyno and problematic CB cap. Also the WB30. Ron


-
curiouser and curiouser ?? Ron
-
You could quite well be right there Rik. Where is Jan? When I first came across this dilemma, I could not believe that you would have to remove the whole primary side or mag to remove the cap. Which you certainly would if you installed a standard points cover before the primary! But it became so obvious after the old guy told me how it was done. I imagine RE must have either had them made or modified existing caps....like me! Sawing a cap in half is not good enough, without the shallow locating ring. My first one had the ring silver soldered into the cap, but the latest one is machined from solid. Ron
-
Yes will try to remind you Lex. It's impossible to fit the points cover any other way. I'll show you when you are here. A smear of Vaseline can work wonders !!!!! Ron
-
Today I completed a dummy fit of my primary case and foot pegs etc. One thing that came to light when I restored my Royal Enfield WD/D a few years ago, was that the cover for the contact breaker points would not fit as it's so close to the back of the inner primary case. The cover that came with the bike had a large cut out in it, which was performed by a previous owner. Even then you had to turn the engine over to align the points block with the cut out. But after talking to an old Enfield guy, he informed me that the cover needs to be in two parts. So for the second time, I have asked my friend John to fire up his Myford and modify an original cover into two parts. Each part is then slim enough to be put in place one at a time. I don't know of another bike where this is necessary? Ron
.jpg.b8b3bc76617a4f714c4cc50e49ef0b68.jpg)
.jpg.da2542984ff2090a88a3e96b8d32b7f3.jpg)
-
Thanks Steve. I've been doing some dummy run fitting of fuel tank, saddle and primary case. Ron

-
Thanks Jenk. Yes the primary case was made by Alan Swainson. The rear chain guard was Terry Roberts of 'Metal Magic'. Both are long time and well know fabricators of motorcycle parts. Alan is nearly 80 now and who will replace him when he's gone? Terry is also well into his 70's but his son Drew is working in the business. Contact details on request. Ron
-
I searched and searched for an outer primary case and in the end I borrowed one from another forum member and got one made. I also commissioned an exaggerated and oversized Flying Flea rear chain guard which I will have to sculpt to shape. Ron

.jpg.be83d151d4628d66ad4809d4565d8edd.jpg)
-
Here is the full tool kit. The ML carried on after the war in civy trim till 1948 I think and I'm sure would have had the same tool kit. Ron

-
Yes a 3HW only has one tap and a balance tube. The tap is the double type with a main pull on button and one for reserve. These should be available from one or all of the following 'Trisupply' Tri-Cor' 'Ace Classics' All bikes by 1944 would have been fitted with a standard MCT1 WD (fag end light). Ron


-
Yes I used 'HYCOTE VHT' I was very impressed with it after I sprayed the 'used' system on my WD/G. Some heavy riding on that bike including our trip to Normandy this year and it hasn't even discoloured at the bend.......Granted, it's a cooler running OHV. Since trying to find somewhere who can mat chrome plate them properly is difficult, the other options as you know are to grit blast bright chrome or stainless. Neither of which was a route I wanted to go down on this bike. Ron
-
These tyres are for solo use and I'm not aware of any specific for side car use these days. If your size is 350 or 375 x 19? They are more readily available than the 325's I needed. I would go for something like these. http://www.vintagetyres.com/item/570/350-19--350x19--ensign-trials-tyre--universal--s-r Ron
-
Quite a bit of cutting, shutting, re-bending and welding to make the 'Armours' WD/C front pipe fit and look reasonably correct for this frame and engine. Ron


-
question Replacement steering/headset bearings for a Triumph 3HW
Ron replied to Andy3HW's topic in Motorcycles
Funnily enough I did meet John at Kempton Park last week, and he confirmed he was still making these parts, and even gave me an insight into the machining and hardening process. Ron -
Thanks for clarifying this. As some of us will remember, it was a complicated process to apply for the licence in the first place, and I think I did inadvertently apply for the 'Military Goods' licence before eventually applying for the correct 'Vehicle' licence. I think I need to surrender the goods licence. Ron


.jpg.b8b3bc76617a4f714c4cc50e49ef0b68.jpg)
.jpg.da2542984ff2090a88a3e96b8d32b7f3.jpg)


.jpg.be83d151d4628d66ad4809d4565d8edd.jpg)


