


OzH
-
Posts
130 -
Joined
-
Last visited
-
Days Won
5
Content Type
Profiles
Forums
Gallery
Blogs
Events
Articles
Store
Downloads
Everything posted by OzH
-
I really can't remember I'm afraid! I think it was 4 or 5 mm, I bought a sheet of it off ebay but can't find it in my past purchases even! Sorry about that..!
-
Link to my trailer restoration if you are interested Ray.. It's been stalled for a while, hope to get more done over the winter this year Linky..
-
Hi Ray There should be spacers I think, a couple of pictures of my trailer you can see them I see you have the hole in the front end for the lights cable
-
Both the box and brackets have been added, neither would have been there when the trailer was issued
-
I was in BAOR in the 80s and all our tow hooks were painted green or black along with the rest of the vehicle camouflage with the exception to the inside of the hook which was "lightly greased", same for the tow eye of any of our trailers. I would think the red oxide is the factory colour, the other colours would be as it has gone through usage/paint jobs. Bear in mind, we would paint our trucks and land rovers regularly for various inspections etc so the black green colour demarcation would change over time. I also remember taking land rovers on a skiing expeditions or adventure training where we had to "civilianise" them. To do that we would pop down to the paint store and see what they had, I painted land rovers all yellow and all red, but we soon realised getting them back to green and black post exercise took a lot of effort so we then just went for an all over matt black look! No paint booths, spray guns or anything fancy like that, just brushes and petrol to thin the paint... normally having a fag at the same time..!
-

M16 Halftrack restoration/build. A long long road.
OzH replied to Chris Hall's topic in Tracked vehicles
Love it Chris, keep it coming..! -
Hi Josh. I'm in the process of restoring a 10CWT mortar trailer. From what I can find, these trailers were not generally fitted with lights in the factory, most were retrofitted or fitted post war I do intend to fit lights to my trailer, but these will be period so a single convoy light and single tail light so I am putting a light board together, using retro light fittings but modern bulbs, that I can remove and put in the trailer once at shows, at least that way, I should be road legal and safe on the way to and from shows
-
This is a bit of a trip down memory lane! I worked on IARRCIS and later ATTACS in the system support groups for both so was involved early on in the development of these things..! We had the main grey terminal boxes (can't remember their name), the smaller green "laptops" that were called Liaisons as they were allegedly portable! as well as Cisco routers, hubs, printers all in tempest protection so weighed a tonne to lug around! I think someone was asking about the big brass connector, if they meant this one, its the ruggedised fibre connection that had a big brass, rip your skin off connector! These were adapted to point vertically as they were shoved back against a wall or something and would snap the fibres which IIRC were a good few thousand each! There is a later version up for auction I see... https://bid.mod-sales.com/auctions/7759/witham10115/lot-details/5991bfab-c084-4cee-9cfa-acea00f58edd

-
What a great thread on a not so common vehicle..! Great work!
-
Dallas Auto do one https://www.dallasautoparts.com/product/radio-junction-box-kit-mb-gpw/
-
M16 Halftrack restoration/build. A long long road.
OzH replied to Chris Hall's topic in Tracked vehicles
Loving this thread Chris..! keep it coming.. -
I was thinking more along the lines of if you main cross member was usable, you may only need the rest..? Or you could get a local fabricator to knock out a bit of had channel for that piece? I had to do that for the cross member that goes under the rear of the tub
-
The main cross section in my photo is the JMP piece in the picture and at the time I restored my jeep they only did the ACM2 replacement channels you have pictured and as I have a ACM1 tub, that was the only piece I used... So, I have the rest spare if you want to PM me an offer?
-
I added some stock steel in place of the original oak, loads of primer and then dynax wax I use this stuff on the Jeep and my wifes VW Camper

-
I found the same, do the wiring when the tub is off. I also built a jig on wheels to make it easier to move move around to get access


-
Thanks for the tip Simon. My daughter makes resin jewelry, I was thinking that she may be able to put a thin clear layer over the top, but I may just try this first...
-
Carriage bolts arrived and are installed, small detail but would have bugged me..! Springs and axle re-assembled And back on wheels again.. I have a set of 1/2" bolts ready to go round to one of the local fabricator/machine shops but these will do for now.. On a side note, I managed to win a ropey old T plate on ebay - not cheap..! Some very careful use of paint stripper, sanding, masking and painting has come up OK. I just need to polish out the reflectors some how..


.thumb.jpg.76313faaf44b7fade4a9ac19d74ce7cb.jpg)

-
From what I remember there are a couple of options for spot weld drill bits, these were my preference as you only grind out one of the metal skin of a spot weld you are drilling from, so makes it easier when rejoining new metal, its basically a flat headed drill bit.. The other type that I think you describe above, either cuts out both skins so leaves a hole that will need filling or a bump that needs cleaning up before joining new metal. I also found them much more tricky to use due to needing to keep it square as Chris says above Just my experience...


-
I think this is one of the filters..? not cheap..! https://www.ebay.co.uk/itm/WW2-Bedford-Chevy-Water-Bowser-Trailer-Meta-Stellar-Water-Filter/324342143841?hash=item4b844c5b61:g:mMsAAOSwOTZfSDKC
-
Hi Richard, they should be 1/2” all the way through. All I’ve found online are 9/16” with a 1/2” thread so just to big Saying that, those have found look to be correct.. We have a couple of good vintage car/restoration places near by, I’ll try them before I buy the ones from the US.. Thanks for the pointer..
-
Could be Simon, wasn't sure what these are called so I go for a description!? but I agree, I think I'm going to have to bite the bullet and get some made up or modify some 1/2" x 3 1/2" bolts I found on ebay Thanks
-
Some evening work this week on the springs, I will replace the bolts with the correct carriage bolts, on order will swap them once they arrive. No idea what these are called, thin brass tubes that have perished And, re-assembled one set of brakes Compare with how these were, only things I had to replace were the oil seals and the grease!


-
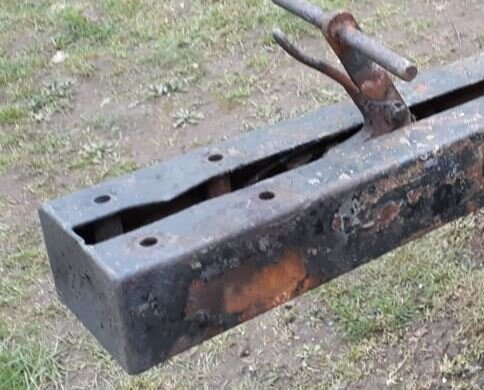
So, I think I've run into a problem that I had overlooked until now While disassembling the trailer, I managed to shear all but one of the the spring hanger bolts, even with heat, penetrating oil and lots of gentle persuasion, they all (bar one) sheared they are a 1/2" BSF grease bolt, does anyone have any idea where I could come by 5, preferably 6 of them? I have bought a load of 3.1/2" bolts so I can continue re-assembly, but in the long term I'd like the correct grease bolts.. Any help welcome..
-
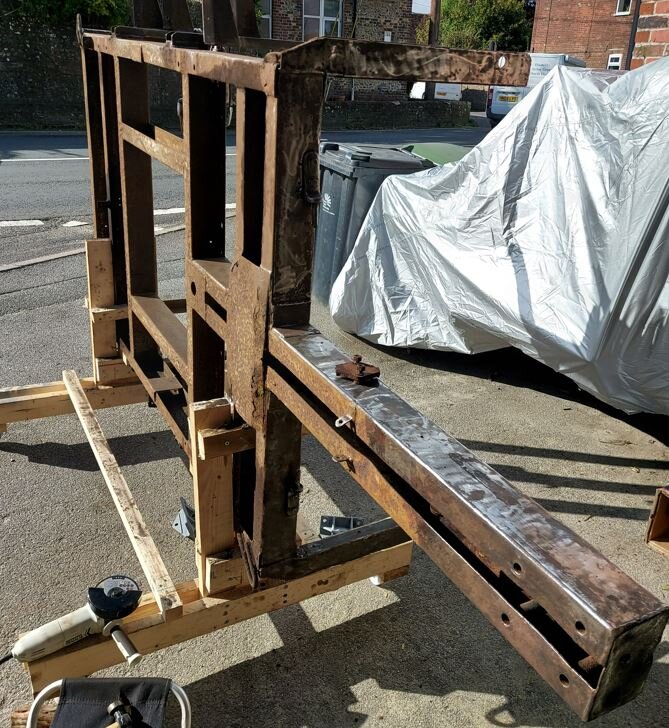
I finished welding the top during the week Over the weekend I painted the right side, flipped the chassis over it in its rig (sounds easy doesn't it!), cleaned and painted the left side Once that was done, I hoisted it up again and dismantled the jig so the chassis is back on stands ready to re-assembly The rig was then dismantled, I now have a load of kindling..! Loads of parts prepped ready for re-assembly Doing this single handedly and had a few hairy moments flipping the chassis over and getting off the rig.. but should be fairly smooth from here... famous last words!!


-
M16 Halftrack restoration/build. A long long road.
OzH replied to Chris Hall's topic in Tracked vehicles
Fantastic thread Chris.. I'd love a halftrack... Maybe one day!!


.jpg.63c391dfd35e00f8082a99606b92a1db.jpg)


