


42 chevy
-
Posts
517 -
Joined
-
Last visited
Content Type
Profiles
Forums
Gallery
Blogs
Events
Articles
Store
Downloads
Everything posted by 42 chevy
-

Ward La France Gallery
42 chevy replied to AndyFowler's topic in Transporters & Wreckers (All Nations)
This video was just posted on youtube. I was interviewed at the 2015 WWII weekend in Reading, PA. No script, just started at the front and walked around the truck. The girl operating boom was one of several kids I let "lift" the toy jeep. FINALLY a comprehensive walk around video of a series 5!!!!! John G -
Steve; Fantastic work as always. That seat must weigh a couple of hundred pounds. It reminds of what a church pew looks like, not very comfortable on the backside for a long journey! Are you going to add some cushions? John G Happy New to your crew
-
restoration the restoration begins on the 969A
42 chevy replied to 42 chevy's topic in Blogs of MV restorations
More detail work completed, actually, I am off on the time line as this was done before I started working on the cab. The trim piece was put around the base of the steering column. As Diamond T owners know, this piece has to be put on before the steering column is attached to the dash. When I got my truck, a field modification had be done to my truck to remove it without taking out/ loosening up the column. I got an original from one of my part trucks. I made a slit in it to get it around the column,, installed a new leather piece and Sam in AU made the new brackets to hold the leather in place. I screwed the brackets on, originally they were tacked welded. This was all done to assist in removal in the future should the need arise. Sam also made new the felts for the clutch and brake pedals, you can just see them behind the trim piece. I installed a 3 inch exhaust post muffler and added an aftermarket muffler that closely resembles the size of the original one as I did not want to ruin my original one. The 3 inch tailpipe really wakes up the engine as it is less restrictive then the factory 2 inch pipe. Why this was originally done is a mystery as the Autocar has a larger muffler and a 3 inch tailpipe from the factory. I had a local muffler shop bend the tailpipe to my specifications. I must say I am very pleased with the end result and the truck has a nice bark. I finally got the correct line fittings to hook up my viscosity meter gauge and it works, it makes a nice conversation piece. Pictured attached John G


-
restoration the restoration begins on the 969A
42 chevy replied to 42 chevy's topic in Blogs of MV restorations
I was able to get some free time today and was finally able to apply the undercoating, actually it is a product by UPOL, which is a truck bed liner, I had the KBS undercoating product but did not have the proper applicator gun to use it, so I used the UPOL product which I had used to coat the underside of the wrecker bed on the truck. I found a 3M product, a sound deadener in which the pattern closely resembles the pattern of the original sound deadener. Pictures attached. John G


-
restoration the restoration begins on the 969A
42 chevy replied to 42 chevy's topic in Blogs of MV restorations
It has been awhile ( a long while) since last posted, I keep getting distracted by other projects, however, a concentrated effort to move forward and finish the Diamond has commenced. Originally I planned to fill the seams with lead as was originally done, but after further thought I used a product called "Nu Metal" instead as I felt with my limited experience it would be easier to work with. The cab was painted with KBS Rustseal (in place of epoxy primer) then Nu Metal was placed over the repair seams, sanded, more Nu Metal added and sanded until I was happy with the contours. The doors were adjusted next and then removed. Then RAGE Extreme feather lite filler was skimmed over the surface, block sanded. This process was repeated several times (note to self, I would never cut it as a professional body man!!), then primer was applied, touch up done where needed. Next I will sand with 320 grit. The underside of the cabwill be painted with KBS undercoating. More to follow. John G -
Ward lafrance clutch problems
42 chevy replied to Petelgv1's topic in Transporters & Wreckers (All Nations)
That clutch saw some serious abuse for that to happen!!. Glad you got the problem figured out. John G -
The maximum rated speed for this truck is 23 mph. John G
-
Tool boxes Ward LaFrance
42 chevy replied to Stormin's topic in Transporters & Wreckers (All Nations)
Just above the spare tire(s) is a "lifting eye" that a rope would be put through. I use a forkilft as each tire/wheel weighs in excess of 250 pounds. John G -
Tool boxes Ward LaFrance
42 chevy replied to Stormin's topic in Transporters & Wreckers (All Nations)
The jeep was put in there for scale, it gives you an idea how big the Ward is compared to a Jeep!!:wow: But seriously, the Jeep was my sons toy when he was younger, when I go to shows I suspended it from the hook and let kids work the boom to raise and lower it and watch the big grin on their faces!!!! John G -
Tool boxes Ward LaFrance
42 chevy replied to Stormin's topic in Transporters & Wreckers (All Nations)
There has been some previous discussion on this topic, this is my view on the topic. I base my statements on research I have done thru pictures, TM's and discussions with other WLF owners. The picture/drawing in the TM shows a PLOMB toolbox, even thou a manufacture is not listed, I have a PLOMB toolbox that is spot on to the one represented and was installed on KENWORTH trucks, as PLOMB was based out of Los Angles, CA and Kenworth was based in Seattle , Washington. The toolbox used on the Ward LaFrance is of an unknown manufacture, but for the sake of the of this discussion I will refer to it as the Army Cars Holland toolbox. The reason I state this is that are far as I can tell, all of the WLF that were refurbished by Army Cars (including my truck) had the same box installed, a modern box that looks like the original from the exterior, I cannot tell what the interior looks like as I have not found an interior picture of an original box. The box that was on my truck had several pull out drawers and was originally red in color. After acquiring a PLOMB box, I decided to install it on my truck and outfit it was prescribed in the TM 9-796, page 84. I used a combination of PLOMB, and SK tools. My original box was attached to the bed with carriage bolts. If you look in the TM, you can see a lip on the Plomb box at it's base. I took the liberty of welding an "L" bracket to the box and bolting it to the bed. John G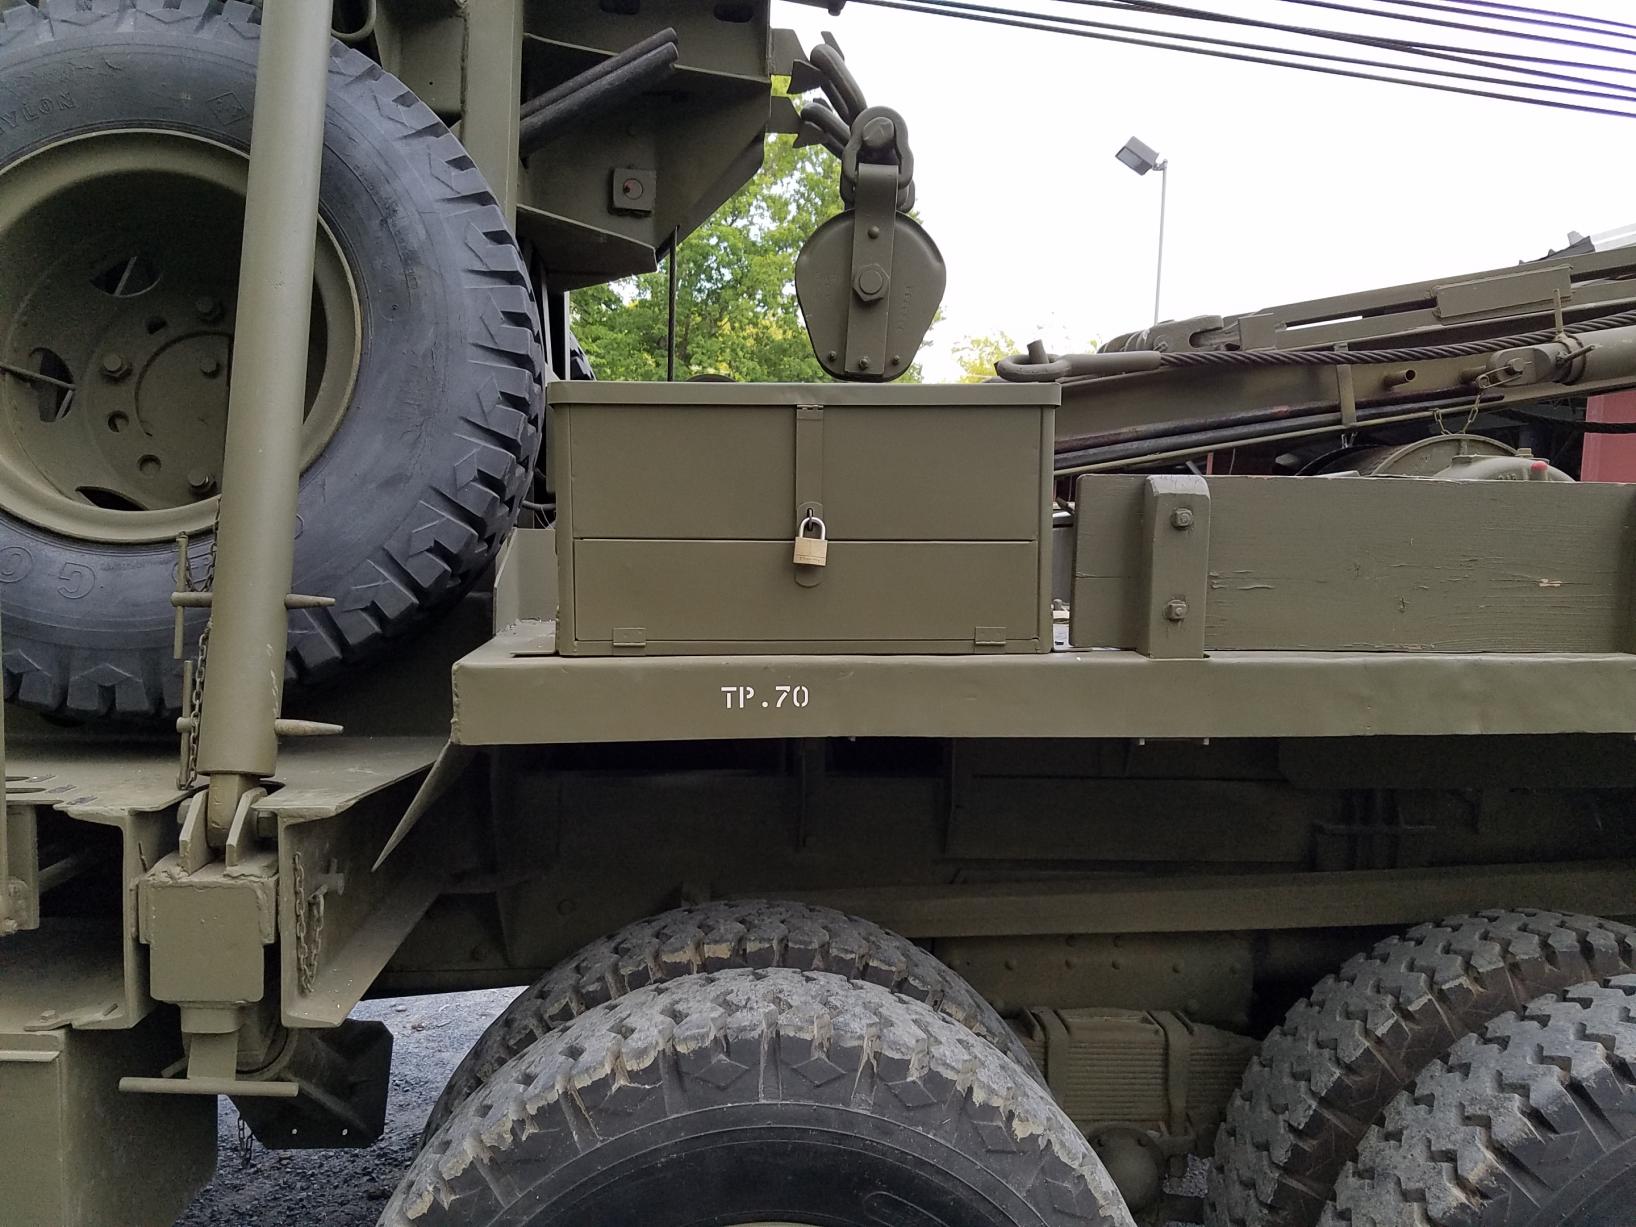


-
Over the past several weeks before I start my new career on Monday (retired from the first one after 28 and 1/2 years) I have been spending quality time with with the Autocar. A new water pump was installed, rebuilt the carb, rebuilt the fuel pump, installed an NOS distributor, rebuilt the rear brake chambers (leaking) attended to a few other air leaks, fixed the exhaust leak, changed the coolant, gear oil and engine oil 2 twice, it was time to take it on a shake down run, which was done last week at the steam association I belong too. Today, I let my 17 year old son operate it. He certainly has the shifting down, making his dad very proud. Attached are some you tube videos I took today. John G https://www.youtube.com/watch?v=k52TM_5XJ2oh
-
Ward La France Gallery
42 chevy replied to AndyFowler's topic in Transporters & Wreckers (All Nations)
All; An article on my truck from the Daily Diesel Dose website. The video was taken at the the 2015 ATHS connection in York, Pa. in May 2015. John G http://dailydieseldose.com/tow-trucks-of-the-ages/ -
All; Just found this old thead, I see the last post was made by me 8 years ago:wow: Further thoughts on this subject. My first truck was a Chevy G7112. I then acquired a 969A, then a series 2 and then a series 5. The Diamond T Hercules engine and the WLF Continental engine are very close to horsepower and torque ratings. With the Diamond T weighing about 5 tons less then a WLF, it is a more peppy. Having discussions with friends over the years, we all came to the same conclusion that the WLF is underpowered, We can only assume that Continental engine corporation was the only manufacture that was able to supply enough engines to WLF, as Hercules was probably maxed out on capacity. I would have thought the Hercules HXDE as found in the Brockway 666 would have been a more appropriate engine. I agree with Mike that the 969A is suitable as wrecker with the Holmes setup and the WLF as a crane, however, the Ward can flat tow very heavy objects. As an example, I have posted on this forum in the past, pictures of Jeff Jensen's WLF flat towing a 132,000 pound load (Steam boat on a trailer). The truck was rated to tow 50,000 pounds, as aside, Jeff has used his 969 A (rated for a 25,000 pound tow) for the same tasks, albeit, with a heavy ballast load in the bed. I enjoy operating the Diamond T and the Ward, 2 different trucks setup to do 2 different jobs, although, sometimes they each did jobs that other was designed to do. John G
-
11.00 20 bar grip tires
42 chevy replied to 42 chevy's topic in Transporters & Wreckers (All Nations)
Sean; Still just a dream at this point! John G -
Absolutely fantastic!! A great sense of pride and relief amongst your crew that it is going along smoothly, well at least I think it is. Getting over the sensory overload with all the pictures. Thanks for the update. John G
-
I hope you all had a nice and wonderful Christmas. So I guess you will be having a work party soon. Looking forward to updates on this project. fingers crossed!!! John G
-
Gordon; Saw your psot on the WAI. A couple of tires have some weather checking. I think the 11.00 x 20's give it a tougher look. Main goal is to make it a reliable runner and enjoy it at the moment. John G
-
Gents; Yesterday we went to Philadelphia , Pennsylvania to pick up the newest addition to the motor pool. A 1944 Autocrat 7144T with 10 ton trailer. The truck currently has 11.00x 20's on it. Engines runs smooth, several bits to sort, nothing to difficult. The carb needs attention from sitting, the water pump leaks and a electric fuel pump was installed. I have a NOS water pump and fuel pump in stock. So, a fresh tune up is order and thats where we will stop. John G


-
Marco; Wants up with the front springs. A noticeable difference between the front 2 springs. John G
-
restoration Autocar U8144 van truck restoration
42 chevy replied to TooTallMike's topic in Blogs of MV restorations
Mike; Any updates on the rebuild, only asking because an Autocar G510 followed me home towing a 10 ton trailer:-D John G -
Something to check on your truck. That particular model is prone to rust out on the bottom of the doors and rocker panels. May I sugges you pull the door panels (cards) off and have a peek inside. John G
-
Diamond T 969 A and 968 for parts
42 chevy replied to 42 chevy's topic in Transporters & Wreckers (All Nations)
Took advantage of the good weather and removed the cab from one truck and also the engine/transmisson. The engine is going to a new home. It helps when your friend has a mobile service truck with an air compressor and a cutting torch (gas ax) and we also had a forklift. As anyone who has worked on a 969A knows, I do not think you can remove the engine and transmission as a unit, certainly not if the cab is still on!!. We removed the cab first, then the cowl and used a gas ax to notch out the frame on the passenger side. We actually removed the engine from the drivers side as the forks on the forklift were not long enough to removed it from the front as is the way it was down in the factory and for field repairs John G


-
All; Look what shows up at the 5:27 mark!! John G
-
969A winter jobs
42 chevy replied to greyhound32122's topic in Transporters & Wreckers (All Nations)
Sam; The CV joint is packed with grease, the "wipers" on the knuckle are for keeping dust and dirt out, nothing else. John G -
969A winter jobs
42 chevy replied to greyhound32122's topic in Transporters & Wreckers (All Nations)
http://hmvf.co.uk/forumvb/showthread.php?9939-the-restoration-begins-on-the-969A/page10&highlight=969a+restoration Post #76 and #96 on my blog should help you out John G


