


Zero-Five-Two
-
Posts
1,773 -
Joined
-
Last visited
-
Days Won
15
Content Type
Profiles
Forums
Gallery
Blogs
Events
Articles
Store
Downloads
Everything posted by Zero-Five-Two
-

introduction Hi, Nice to meet y'all.
Zero-Five-Two replied to Gerrysea's topic in Introductions & Welcomes
Hiya Gerry, Welcome aboard, bit cheeky asking for Craftsman on your first visit? Still if you dont ask you dont get. -
Welcome aboard, and dont worry about the bad English, it wont be any worse than the rest of us. Looking forward to seeing some pictures of your models
-
I know there's a wall Sarge, but the "Sat Nav" says go straight on
-
show report Great Dorset Steam Fair
Zero-Five-Two replied to Smithy's topic in The meetings log and photobook
Many thanks to all for the info on the Les Tite Militant. It makes it all the more interesting when you find out a bit of the history of a one off motor that that. Thanks again. Zero-Five-Two -
show report Great Dorset Steam Fair
Zero-Five-Two replied to Smithy's topic in The meetings log and photobook
Great pics, in the sunshine. Photo 12 650 UXK looks like a right Heath Robinson job. Militant cab, but odd radiator, Matador chassis? only 2 axles? HIAB on the back or drill rig. Can someone enlighten me, what is it? Zero-Five-Two -
question Mk1 Militant Starter
Zero-Five-Two replied to Zero-Five-Two's topic in Lubrication, Batteries & Electrics
Both terminals on mine are the same size, about the same amount of rust as Julezee's as well -
Hi Guys, Need a bit of help with the starter wiring on the old Militant. 2 main terminals, which I assume are 1 positive and 1 negative, but which is which? They are both the same to look at, and there is no markings on or near either that I can see. I have put a test meter on them and neither of them run to a body earth. Also the soleniod/trigger feed, this also has 2 terminals, and again no markings. Can anyone help me sort out the pos from the neg? dont want to have a disaster by getting them the wrong way round. Thanks Zero-Five-Two
-
restoration Civilian Mk1 Militant
Zero-Five-Two replied to Zero-Five-Two's topic in Blogs of MV restorations
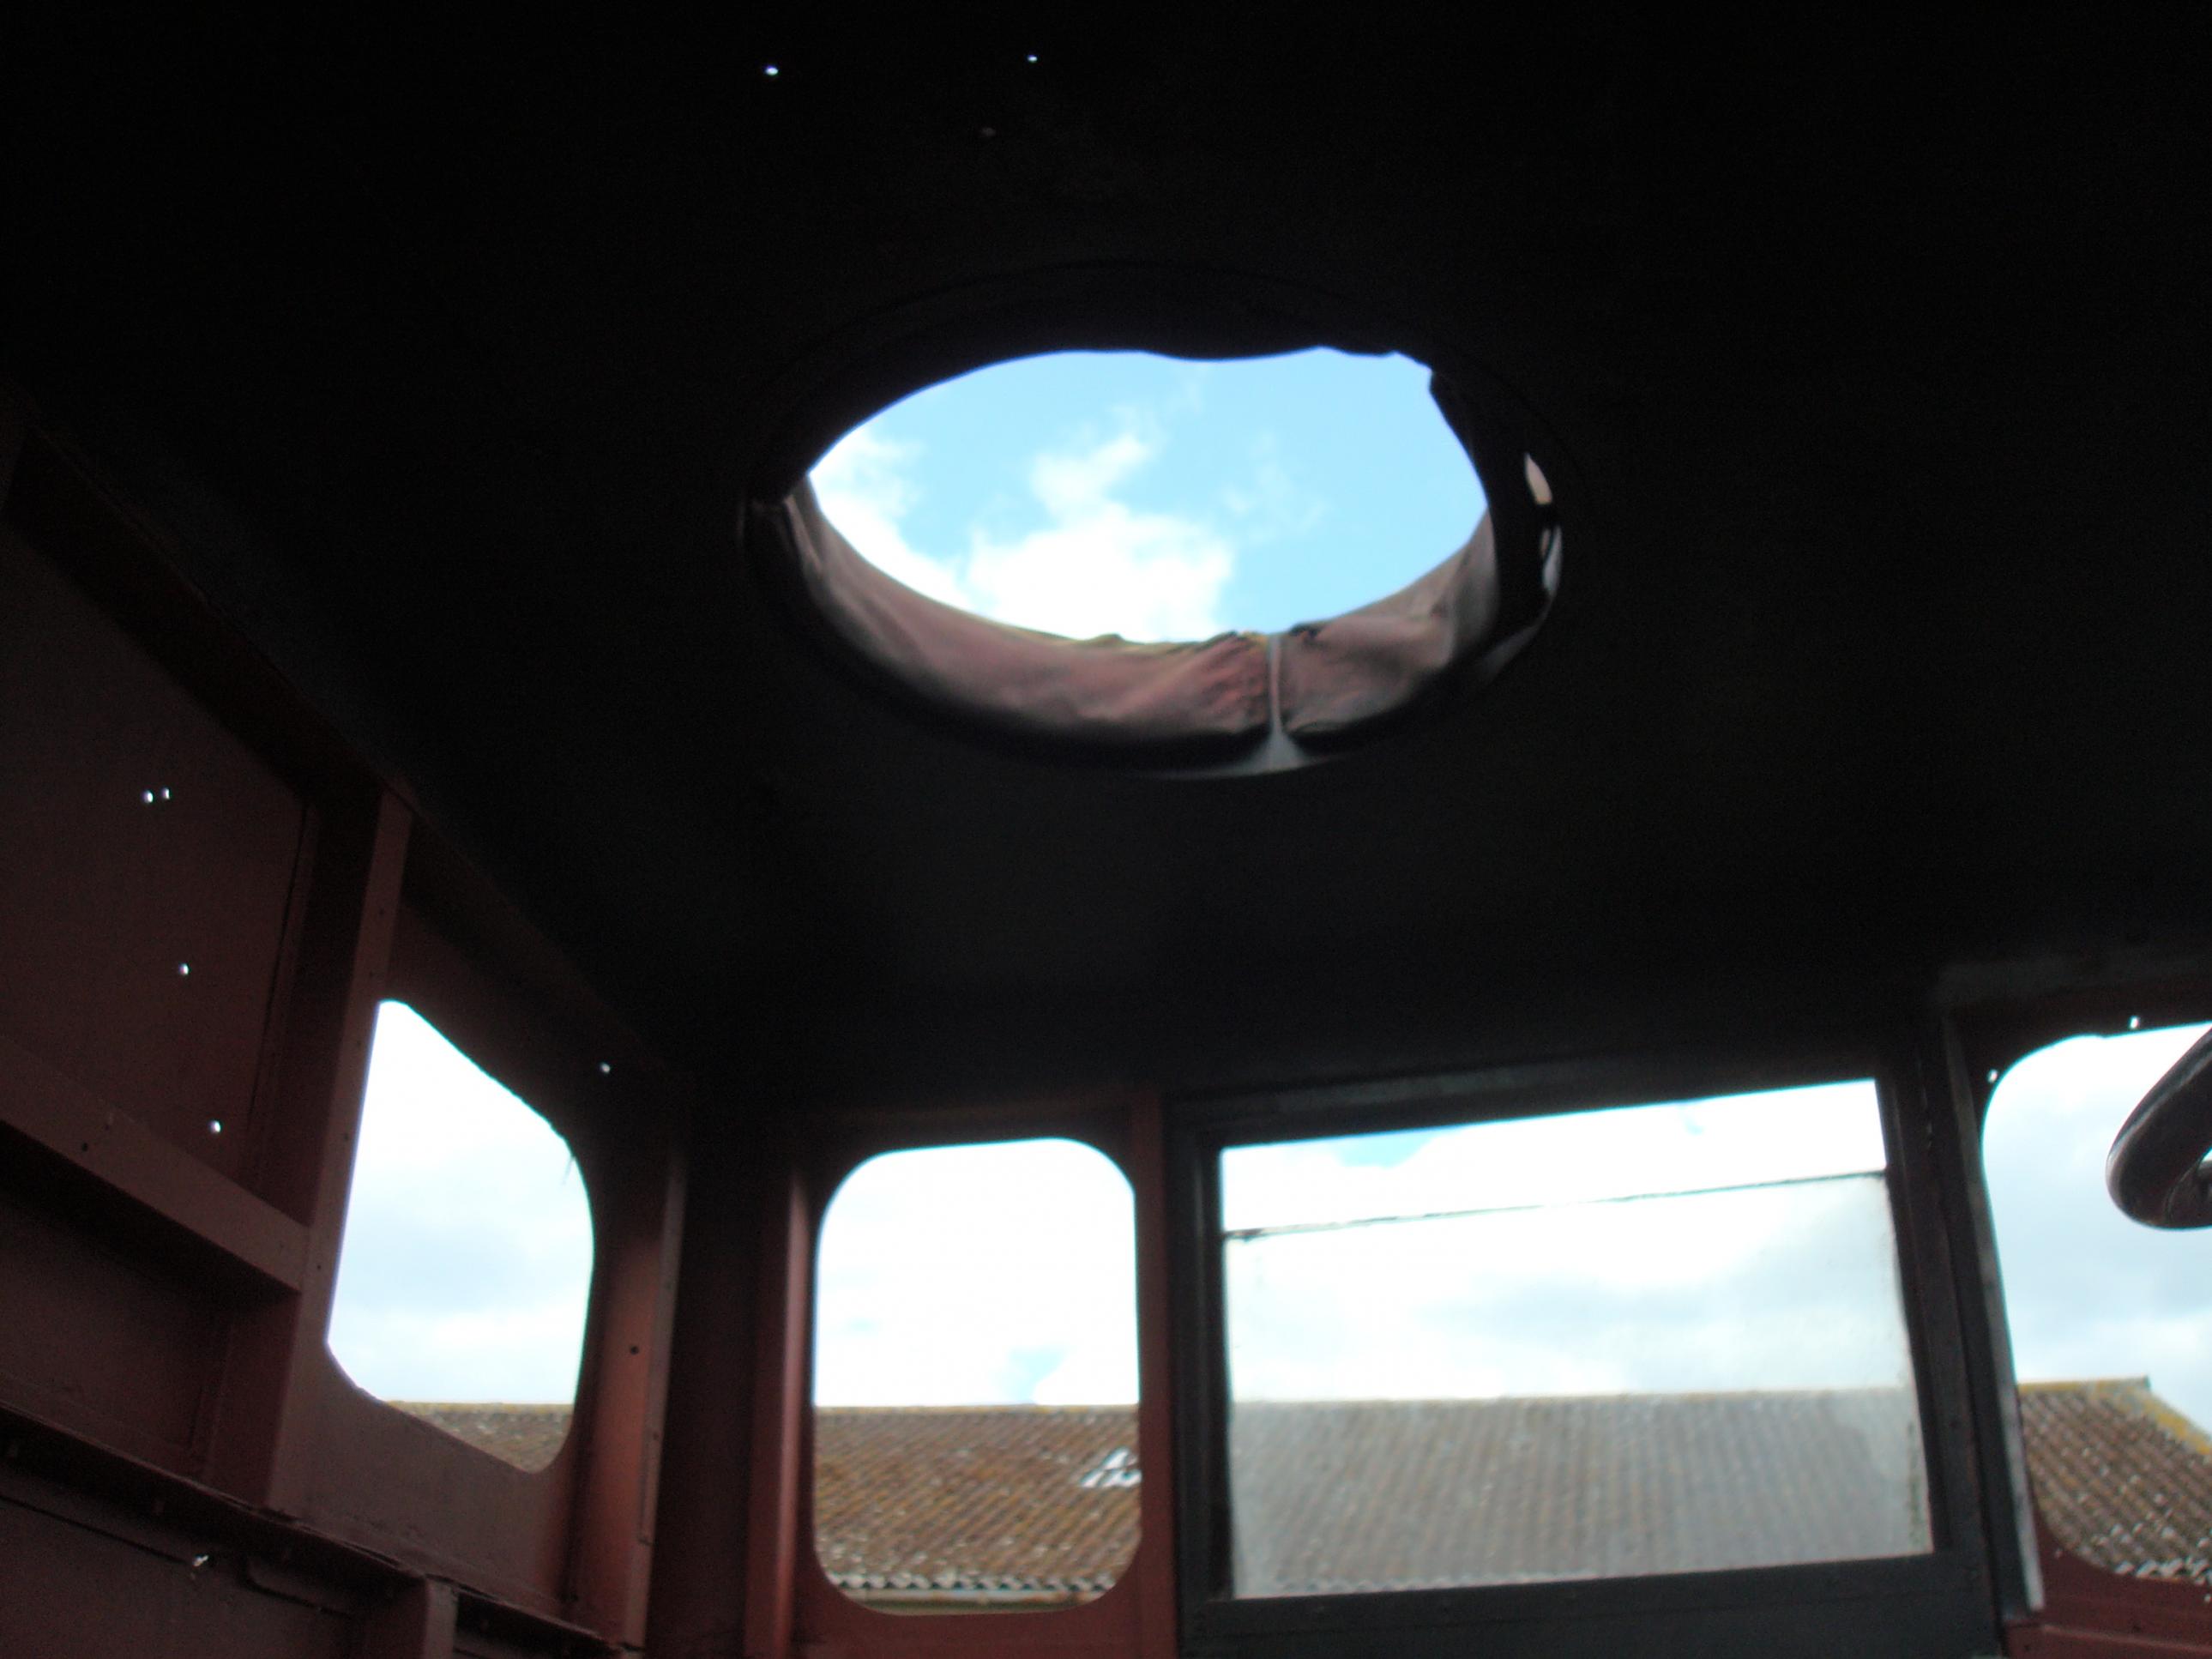
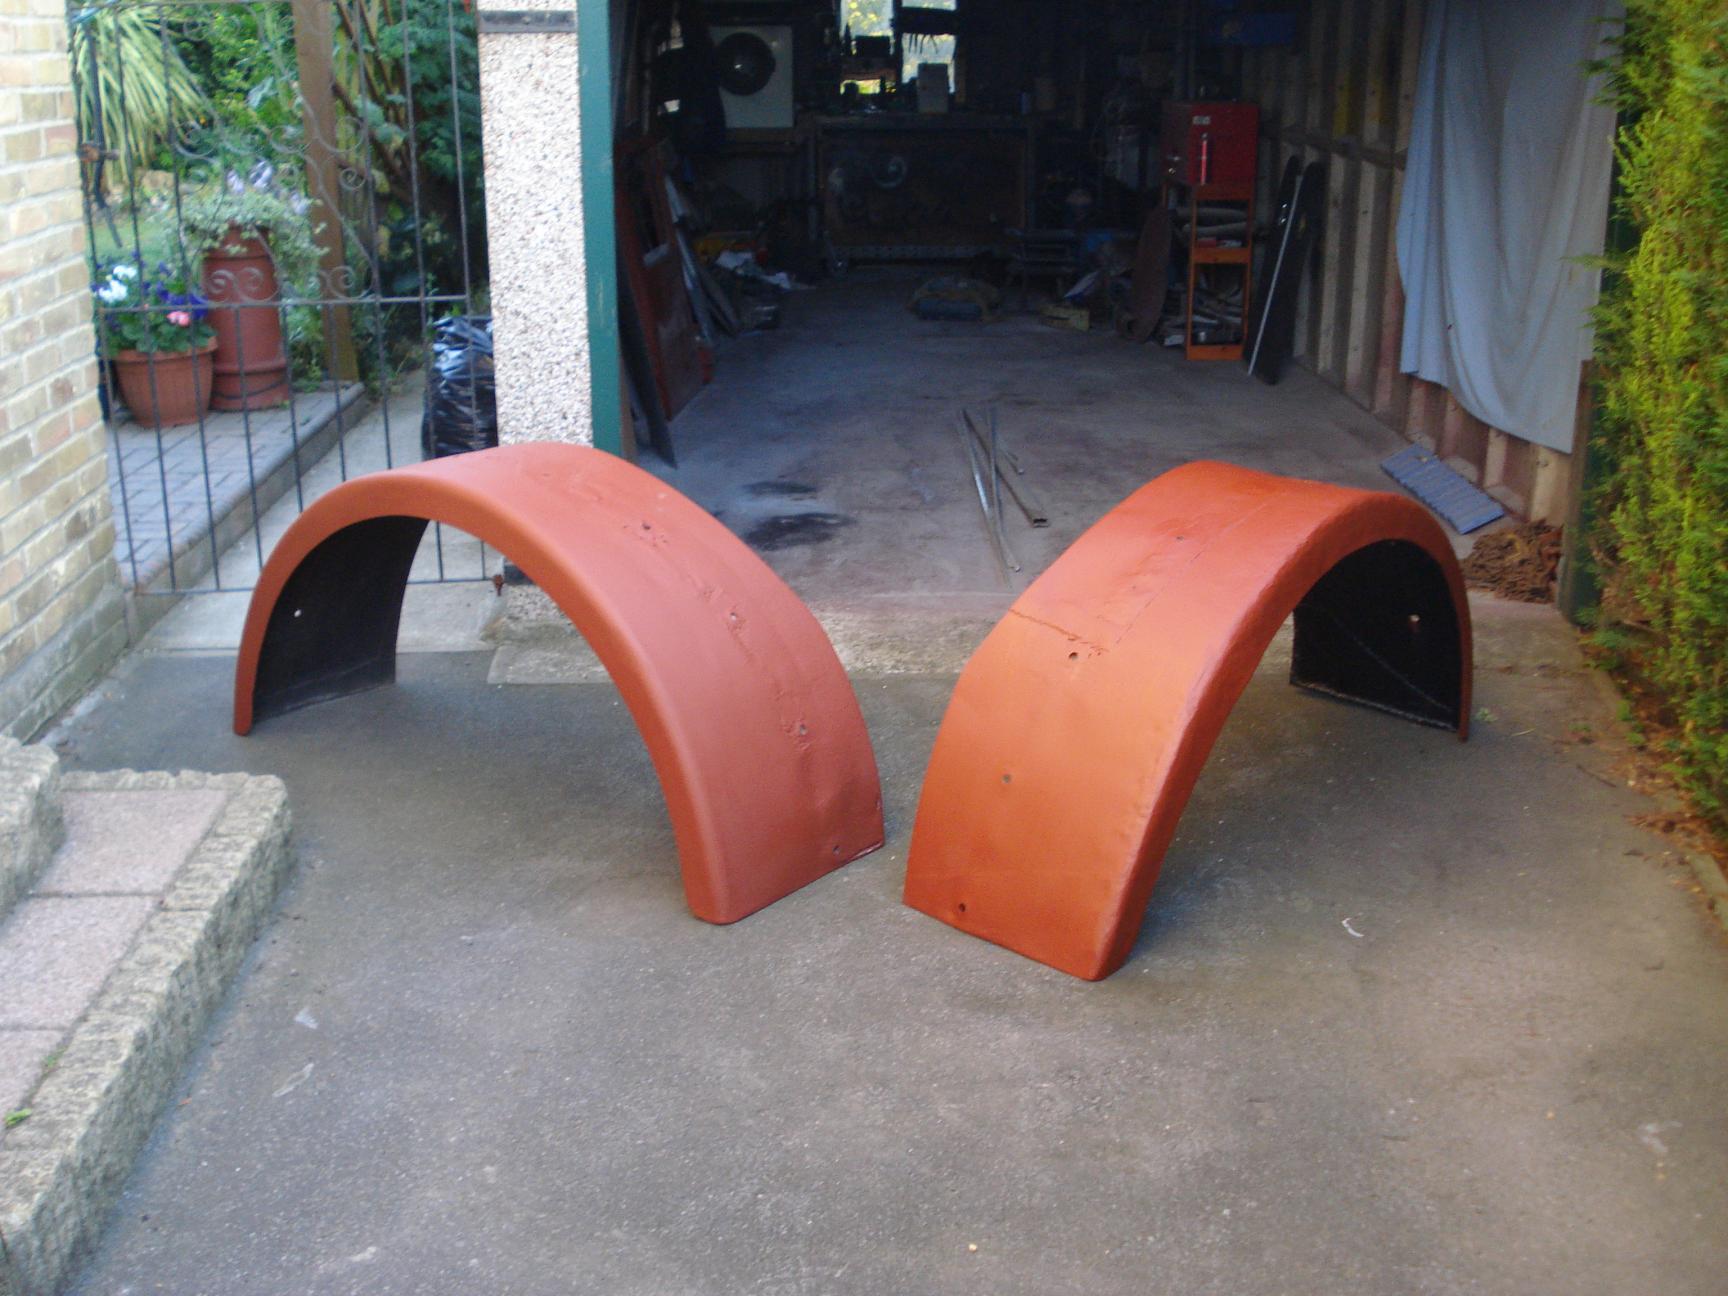
Part 3 Just for a change it is raining, again. Another weekend of limited truck work due to the inclement conditions, so might as well sit at the computer and finish off the history, and bring you all up to date with the restoration so far. Although much of the work has been on the inside of the cab, the outside has had its share of the effort as well. This seems to have survived better than the interior, mostly. The odd crinkly edge around the seams and joints but nothing too serious. Except that is for the roof! The suspicious looking silver tape had to be hiding something. Got to say it was good tape and a hideous job to get off. It was a sort of tar based stuff. It wouldn’t peel off, a scraper only got stuck to it. The final solution was a grinder mounted wire brush, which flicked the sticky muck everywhere, but it did get rid of it, and then the remainder soaked in thinners until it became soft enough to wipe off. Underneath it, the remains of the roof section and a lot of soggy cornflakes of rust, slowly eating their way into the inner panel. I was in 2 minds as to whether to remove the cupola as well, as it is to be a civilian vehicle and just have a straight flat roof, but once the rest of the roof panels were removed I realised that the cupola frame made up the greater part of the strength of the top of the cab, and decided it was best left alone. The front bumper should have been an easy part to do. Big heavy lump would just want de-rusting and painting, I thought. Not so easy! Having removed the mounting bolts and lifting eyes, the thing still did not wish to leave the vehicle. A further inspection revealed the lower edges to be welded to the chassis rails. Unable to gain access with even the smallest grinder, I resorted to an air chisel. Several hand numbing hours later, and now, completely deaf, it finally came off. Carried on with the deafness, needle gunning the crap off. Free off the seized winch rollers, repaint, and refit with fresh bolts. With the bumper out of the way, next up the radiator. This was fairly easy, the cores look pretty sound, they aren’t leaking and apart from a few spiders in residence were OK. A gentle rinse through with a pressure washer to get rid of 50 years of road dirt, and the spiders! Nitromors on the outside took care of the green/purple/yellow/green paint, then sanding off and fresh Hammerite all over. Refit front grill with its shiny badges, very sexy. Both front wheel arches needed a bit of work, the tin worm had left some quite big holes on the inside. The near side arch has had a fairly hefty whack at some point, which had been roughly knocked out and then covered with a half inch thick layer of filler. It looks much better now, with just a little bit of pug on it. The radiator cowling, door hinge protectors, mirror brackets all came courtesy Nathan. I should have picked up a couple of the grab handles as well, as I now find I am 3 missing, but that’s not a problem as new ones are still readily available. Yes, that is a vice on the right hand end The whole lot is now covered in zinc oxide ready for finishing and top coating, but I want to get it inside for that, which means getting the engine running again. Last time she ran was Feb 07, but I’m confident she will fire up ok. Just got the small matter of electrics to sort out first. Fortunately I was listening the day we did electrics at college, and I do own a soldering iron, so we're OK. I did try tracing wires and working it out as I was taking it apart, but I couldn’t find the diagnostic socket for plugging in the laptop! and anyway you have seen the before pictures, it all became a bit pointless. Removal was then dead easy. No finesse, just a big pair of wire cutters, scoop the whole lot up and launch in the direction of the dustbin! I did keep all the little brass ferules from the remains of the armoured conduit and all the yellow tags! One thing I did notice. No fuses or any form of circuit breakers! Was this normal for the early Militants? I would have thought there should be some form of system protection, can anybody shed any light on this? Went on holiday to the Yorkshire Dales back in ’08, visit the in laws and so on like you do, but it chucked it down all week, couldn’t do anything. Only one answer, adjourn to the pub! Managed to acquire some paper, and spent a reasonable 5 days under the influence of the local brew, and designing a new electrical system. All I’ve got to do now is make it fit, given a bit of peace and some sun shine. I’ll let you know how it goes. Rob Zero-Five-Two


-
Hi and welcome to a fellow Robert Smith, There's a lot of us about Rob. S Zero-Five-Two
-
Hi Andy, Just read Daisy's life story, and I've got to say that is a "proper" job you are doing. Wouldn't worry about how long it is taking, and anyway what's 5 years between friends. She will be the absolute mutts when she is done. Like everyone else I look forward to seeing it out and about, if you have any money left for petrol Rob Zero-Five-Two
-
restoration Civilian Mk1 Militant
Zero-Five-Two replied to Zero-Five-Two's topic in Blogs of MV restorations
I'd best have another look at the seat base, I thought it was just a bit of angle iron done for the transit seat. It is certainly different from the one I got from Nathan. As for the floor plate, I made a note not to throw anything away until the project was finished, just in case I needed something. It sounds much the same as yours with a broken corner and a fair amount or corrosion. I did investigate getting it repaired by a local welding company. They reckoned they could build up the corners with weld then grind it back to shape, but having got a good one from Nathan I didn't go any further with it. Free to good home if you want it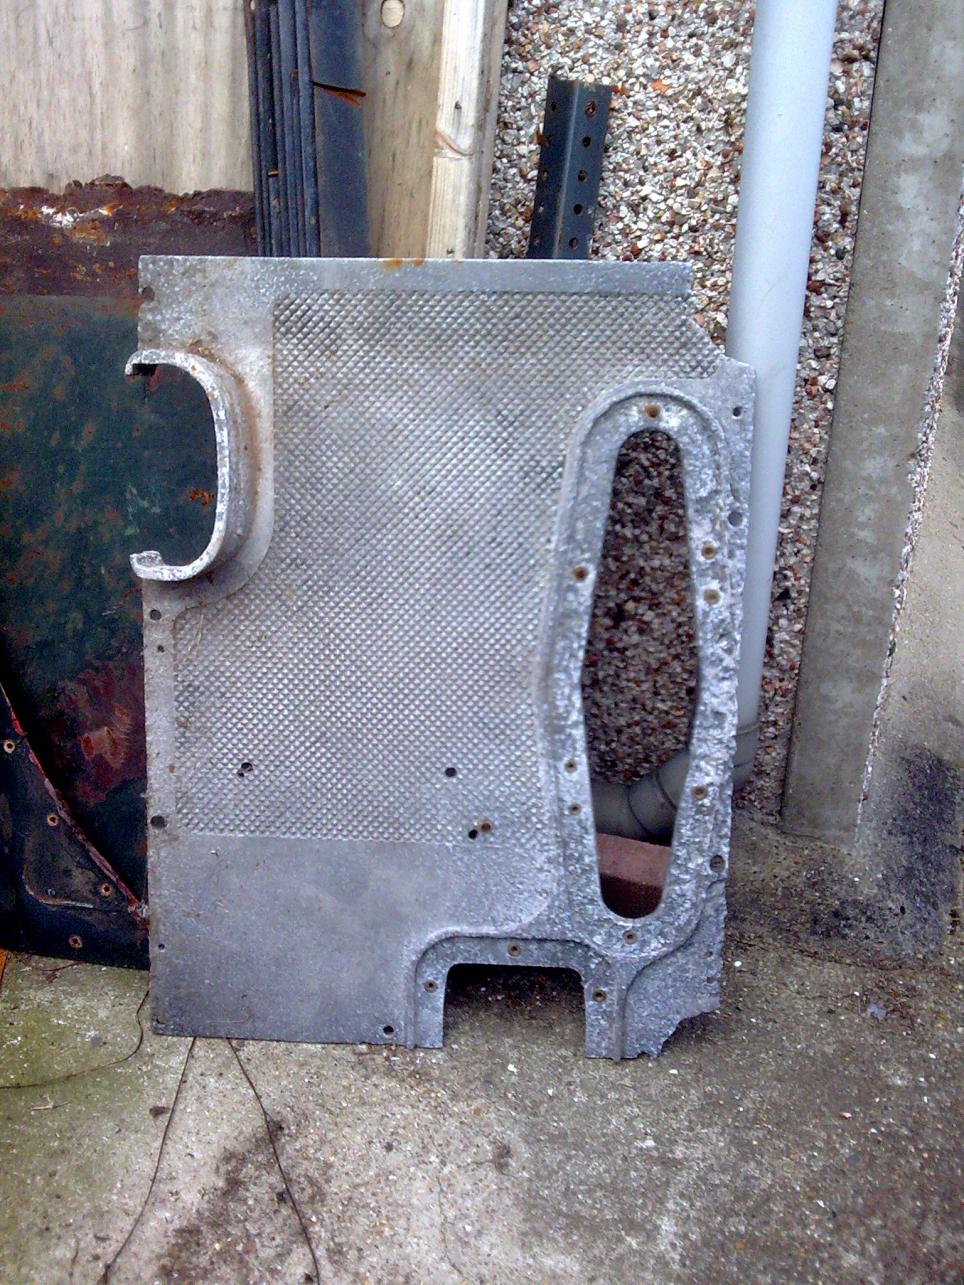
-
restoration Civilian Mk1 Militant
Zero-Five-Two replied to Zero-Five-Two's topic in Blogs of MV restorations
Funny you should mention buses, Andy That's the day job that helps pay for all this Rob Zero-Five-Two -
restoration Civilian Mk1 Militant
Zero-Five-Two replied to Zero-Five-Two's topic in Blogs of MV restorations
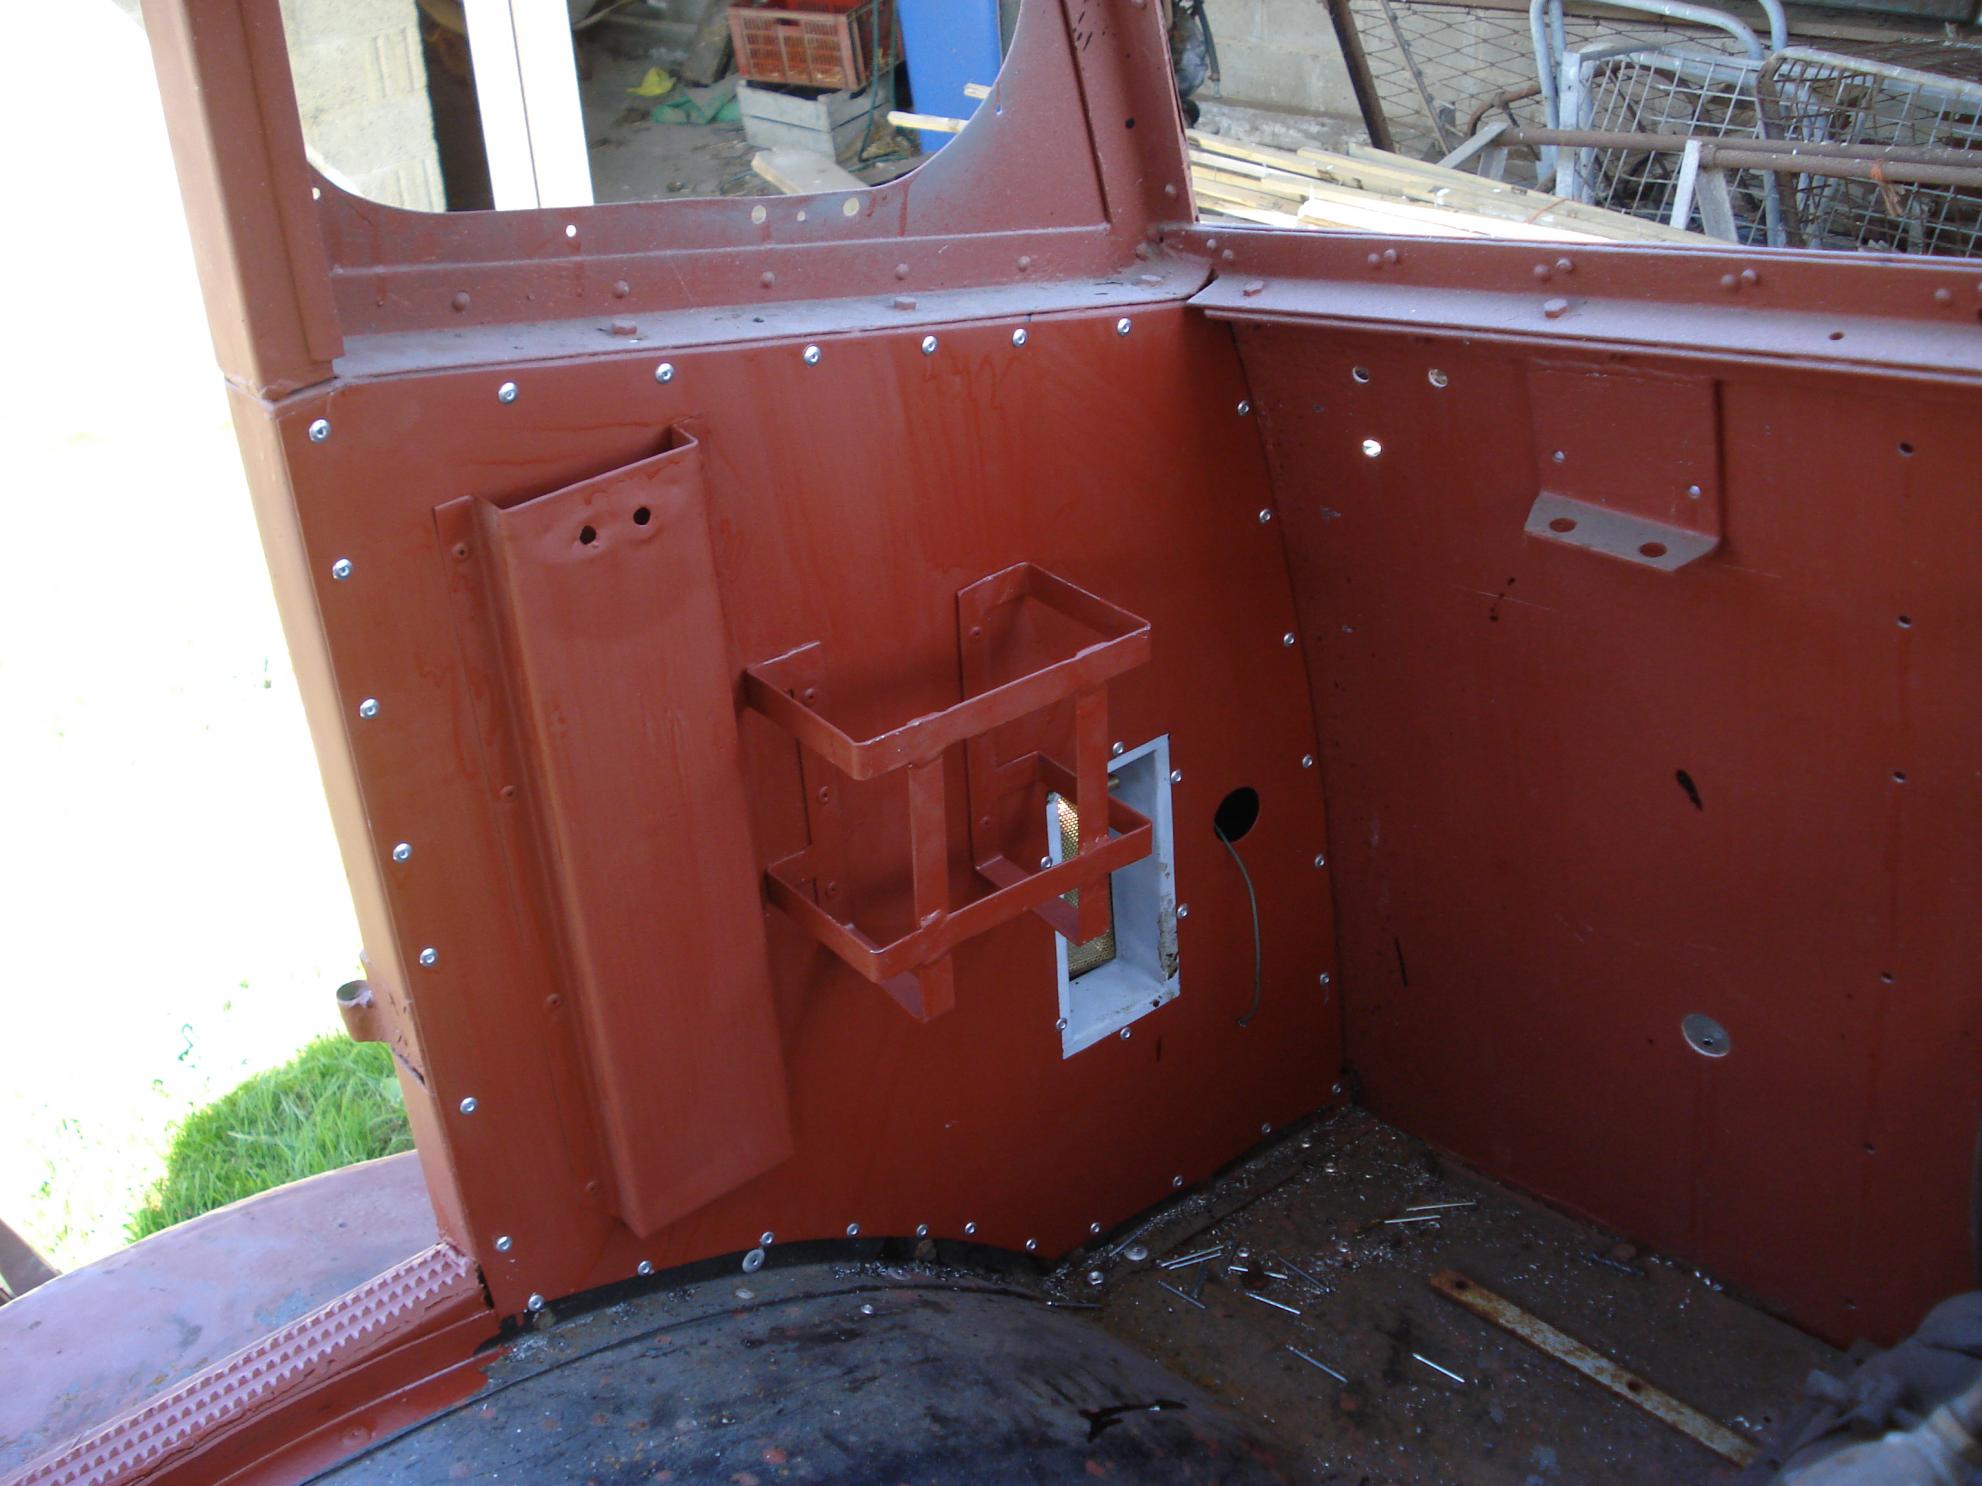
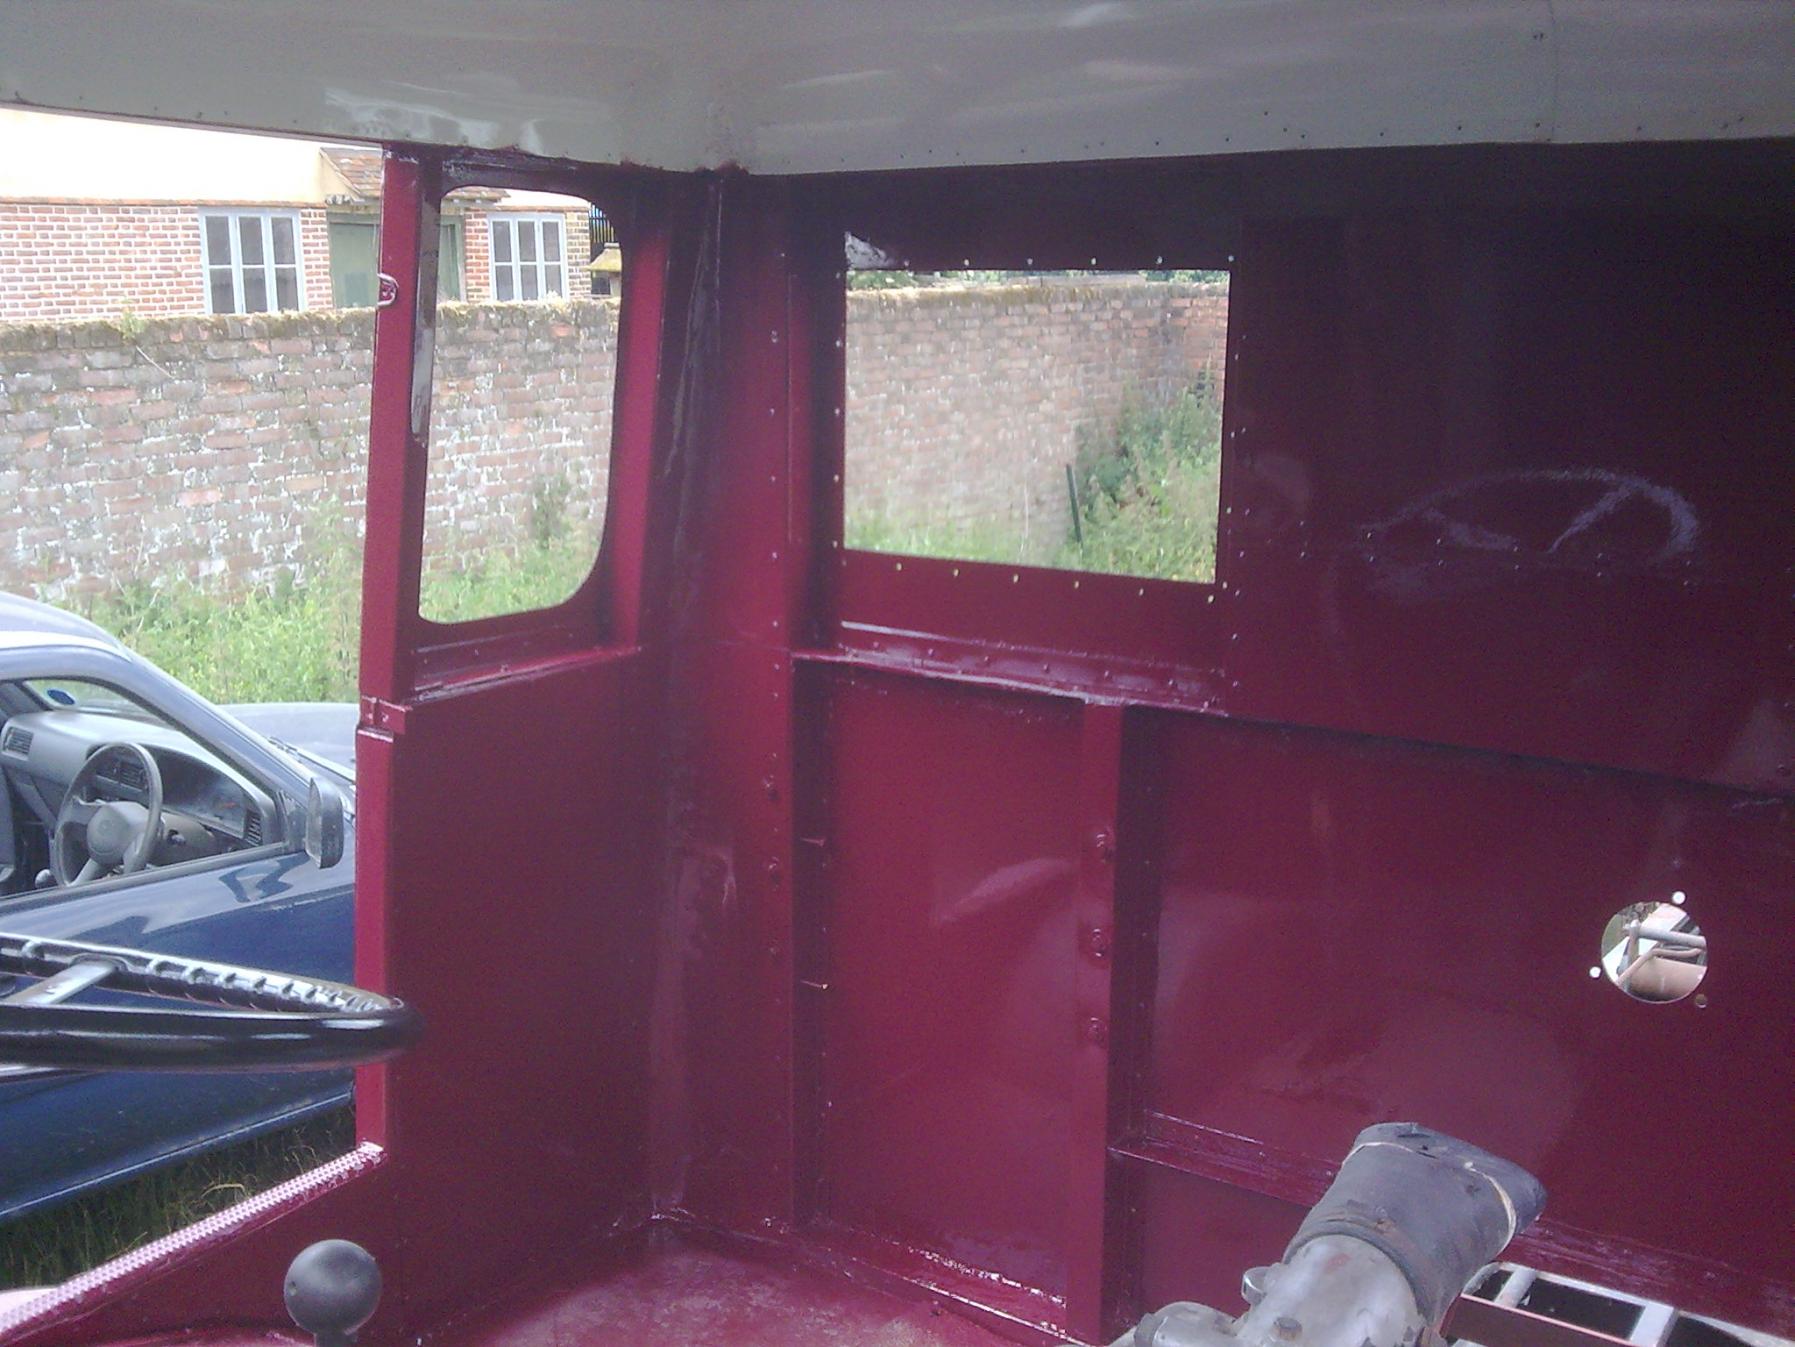
Part 2 Where do you start? Or rather where did we start? The basic decision was cab first, then mechanical stuff to get it running, and finally to do something for the back. Still haven’t decided what I want to do with the back. I think that will depend on what is available, and how much the wife will let me spend at the time. Wont be ‘til next year, at least. The plan of action for the cab restoration, was to take it apart piece by piece, each bit would be photographed and tagged, then taken home to be stripped of the green gunge, repaired if necessary then repainted in primer or Hammerite, and finally stored ready for refitting when the time came. Good theory, but now I am putting it back together there are still questions like “Where does this bit go?” as I sit there staring at a photograph without a clue. First thing out was the drivers seat. A non original item, looked more like it was out of a Transit, and mounted on a dodgy angle iron frame. Next the engine cover and its side panels. These became the guinea pigs for repair techniques and the test bed for the final colour. In the main it was a case of strip off the old paint, bit of touching up here and there and then on with the new. Thick layer of zinc oxide to help keep the tin worm at bay, filler primer to flatten out any last faults, and lastly 2 pack top coat in Red Wine to finish. Deep Bronze is OK, but we, (the Militant and Myself) are civilians now. We don’t do green anymore!! One thing I did notice fairly quickly, underneath years of paint and dirt there was an awful lot of brass. Window frames, side vents, electrical connectors etc. I’d seen a militant on the AEC website looking very shiny with its brass window frames, and decided this was the way to go. Polish everything!! Not a good idea, talk about making a rod for your own back!! I spent many hours during the winter 07/08 just polishing bits of brass. Luckily I have a polishing wheel fixed to the bench grinder which helped. Work on the rest of the cab started on the passengers side. Decided to start here after my son put his boot through the floor while taking the seat out. Removal of the floor and wheel arch section allowed the rear of the cab to droop alarmingly downwards, turns out only the floor had been holding it together. Some hasty supporting and levelling had to be done to prevent a total collapse Near side floor with boot damage at rear Not a lot holding this corner up! Son Stuart attacking rear of engine cover Engine cover jigsaw Many of the interior side panels were deemed to be beyond worth saving, except as a pattern for a new piece. A lot of it is just flat sheet cut to shape. Fortunately my work at the time gave me access to off cuts of what is known in the coach industry as stretch panels. These are the long side panels that run the length of a coach. Just over a metre wide and made of good quality galvanised steel, ideal for that door skin or panel. Door Repairs Take one knackered door Rip off all the scabby bits Fit new skins Bit of filler and repaint. Easy! Did you know Morris Minor window winders are the same as Militant ones? It very quickly became apparent that there was a lot of parts that were beyond repair or were missing altogether, and the shopping list for replacements was getting longer and longer. Prayers were answered and a saviour arrived in the shape of a geezer called Nathan who was advertising a Mk1 as breaking for spares, most parts available. Early one Sunday morning myself and my 2 boys tooled up and headed for Nathans place near Tidworth, Hampshire. It took us about 3 hours work to strip as much as we could load into the wifes Audi estate. Seats, dashboard electrics, bits of plate, brackets, radiator cowl, aluminium floor panel, and anything else that looked like it might be useful. Good days shopping. Thanks Nathan if you are reading this. Sons Stuart and Philip Salvaging useful parts Nice new floor courtesy Nathan:thanx: Got a bit too busy at work last year, so not a lot got done. It seemed that whenever I did get a bit of spare time the weather was naff. A change of job at the back end of the year has given me a load more free time and I have been cracking on with things. Most of the interior structure is done now, repaired, refitted and painted in top coat. Feels like I am making progress, at last. I can actually see the results of all that hard work. Primer first Top coat second Eggshell on ceiling, Red Wine on sides. Very shiny


.jpg.60497142f4198003bcdc8882d2b36ab8.jpg)
.jpg.04f9c202955462de6d0133f2960c88ae.jpg)

-
restoration Civilian Mk1 Militant
Zero-Five-Two replied to Zero-Five-Two's topic in Blogs of MV restorations
Hi Simon, Thanks for the write up, especially the bit about the headlamps being in the wrong place. I've just had a quick look round a few other pics in the forum, and they do sit back a bit from the bumper. I'd never noticed before! learn something new everyday. I'm up your way for a wedding early next month, might have to squeeze in a quick visit to Leeds, get a close look at yours if I may? Just putting together the next lot of photos and blog etc to catch up on the last 4 years worth, so you'll see how far I've got. Rob Zero-Five-Two -
restoration Civilian Mk1 Militant
Zero-Five-Two replied to Zero-Five-Two's topic in Blogs of MV restorations
Many thanks to all for the encouragement. The dates on some of the pictures tell lies, they were all taken early 2007 and much has been done since. I will post more soon. Zero-Five-Two -
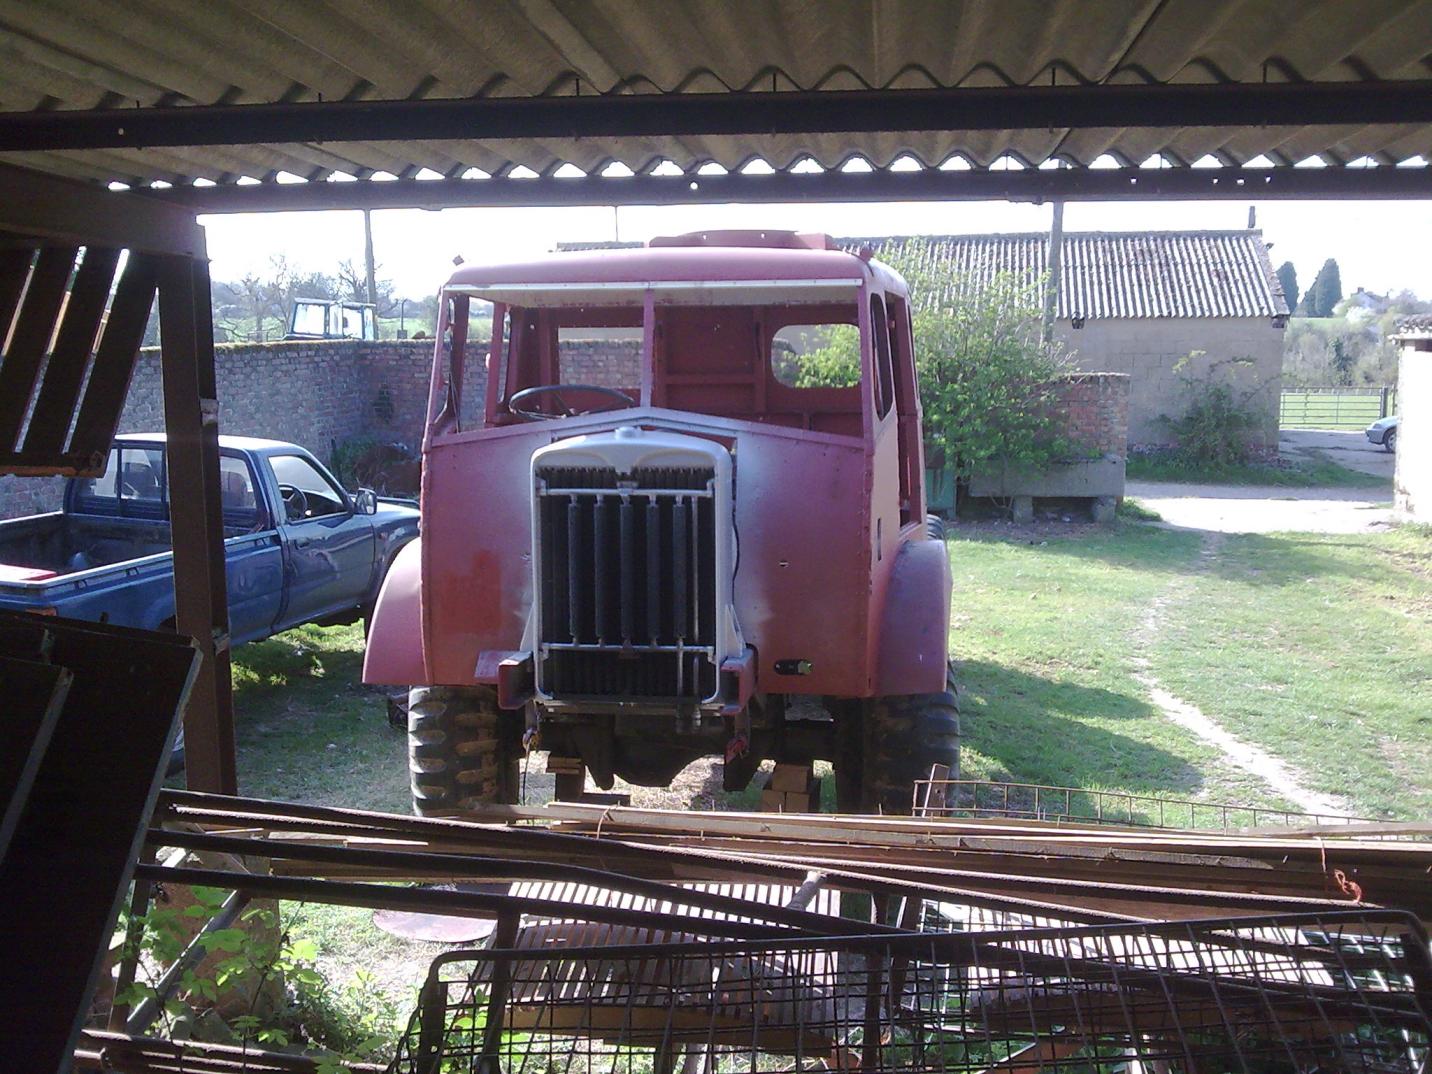
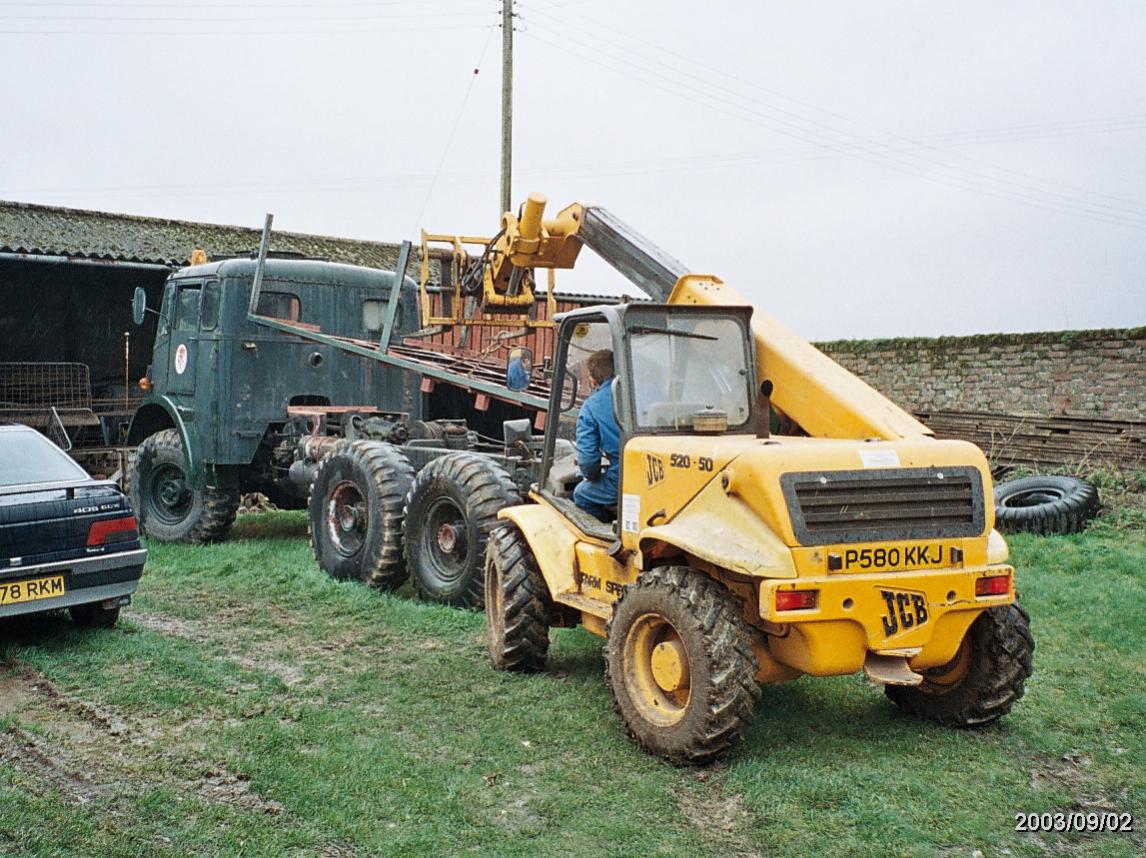
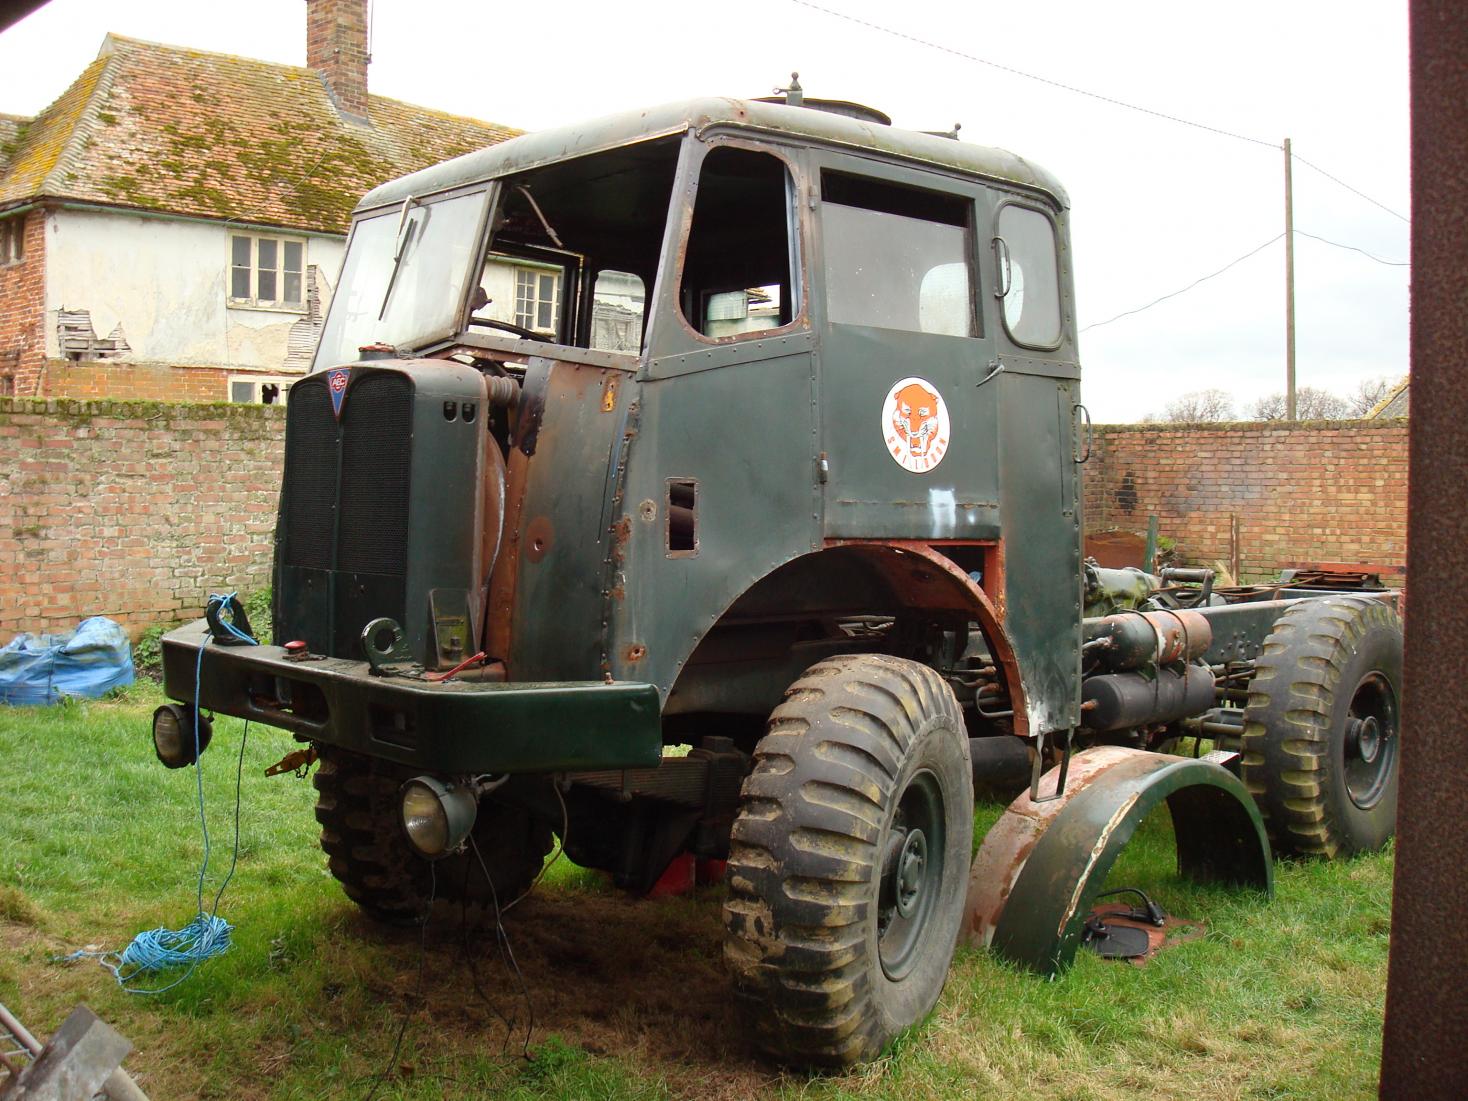
It has only taken me 4 years to notice this forum, despite spending hours trawling through the internet looking for information, photos etc for Mk1 Militants. So now I am here I thought it would be a good idea to share my restoration with you guys. Having said that though, now I have seen the standard set by Simon Daymond on his motor, I know I still have a lot of work to do. Firstly, history. Why have a Militant anyway? Well, back in 2006 the wife suggested that I needed a hobby of some kind, as I was cluttering the house up at weekends and getting in the way. I've done some restoration work on cars before, I used to have a thing about the big sixties Fords Zephyr, Zodiac etc, but I fancied something different, not necessarily military, but bigger than normal. Looking around the net I stumbled accross the Milweb site and amonst all the other stuff a Mk1 Militant. Listed as "good runner in need of restoration". When I was a kid I always fancied a Matador, but I had driven Militants in the Army, passed my heavy goods licence in one many years ago. and well, there's just something about them........... The Militant in question was located in Norfolk, not too far away from Kent, so one sunday afternoon we went for a look. As you all know you cant just look, there was a test drive, lots of chatter and "when I" etc. The good lady said she liked the noise it made, something to do with the exhaust being held on with jubilee clips and blowing well, I think. Anyway there was haggling over the asking price, a brief handshake, coin of the realm changed hands and I became the proud owner of a big green pile of mainly rust, but a lot of potential. Knowing what I know now, the vendor did tell me some awful "porkies" about it. How it had been in the reserve and never been used, it had been parked up for years etc. Some confusion over its registration number and so on. I am not disappointed with it, nor do I wish to "Flame" the Geezer by suggesting that he ripped me off, I think he just didn't know, and made it up as he went along. Anyway, a fortnight later, I borrowed the wrecker from work and collected it. As we were loading, the seller expressed surprise that I wasn't going to drive it back to Kent, he would have travelled anywhere in it!! But, from my point of view, as most of the visible things such as lights etc didn't work, I didn't have much confidence in the rest like the brakes and the M25 and Dartford Tunnel seemed a bit much. Do excuse the view of my backside, sometimes you have to get down on your knees and pray for these things. The oil bath air cleaners complete with mounting brackets dropped off the back of the cab on the way home! Damn nearly s**t myself when it went, thought the whole thing had come adrift of the wrecker. Arrived at its new home without too much grief, and she settled in just down the road at my Uncles farm surrounded by several hundred best porkers in the sty next door. nice location but gets a bit ripe when the sun is on it. So What have I bought? Well, for those of you who like the detail here's as much as I have been able to find out; She is an early 6 x 6 gun tractor FV 11002 Chassis Number 0860 0211 from contract DO/6/VEH/15762/CB27A This is page one of the original sales order from ACV Ltd, further pages detail things like the type and serial number of the fuel pump etc Military registration number 01BP60. She served with the Royal Artillery and spent some of her time at Napier Barracks, Dortmund before joining the TAVR at Edinburgh on 2 June 1970. I found a copy of the movement order/Route card for the journey stuffed in the bottom of the passengers door pocket, along with an empty packet of Woodbines. This is page 1 of 4 showing details of the route, timings, fuel stops, ferries, all under the command of a Major NM Sharp RA. Sadly the gentleman concerned is now deceased. Demobbed in 1977 she passed to Angus County Council in Scotland. Registered as PSR 293R, she was painted yellow and converted into a snowplough. Sometime in the early eighties she came south to Twyford Logistics of Blackheath, London. who used her as a recovery vehicle and for winching duties on Dartford Marshes. According to the MD of Twyfords (Mr Twyford, himself) they passed it to David Crouch in 2000. David thought he remembered it when I spoke to him, but he could not be sure as he had seen so many over the years. After this it becomes a bit vague. At some point the rear wheel arches and the tipper style body were removed, and replaced with this nasty ballast type box made of plywood and old floor boards. The nice maroon paint was covered over in green using a big brush and no finesse. The guy I bought it from was a bit reluctant to reveal where he got it from, or how long he had owned it for. Somehow he had got a new "first use" registration number of 375 UXK and a new logbook on 15 April 2005. This has left me with a blank. DVLA wont give me any detail on PSR 293R because I do not own it. 375 UXK has no history because it was only registered in 2005!! Anybody able to help with this? I am quite confident they are one and the same vehicle. Under the green paint there is maroon, and under that patches of bright "snowplough" yellow. There was even the remains of the Twyford name in the roof. My intention is to restore it to good useable condition, but in civilian colours rather than to military spec, so perhaps in some respects I am on the wrong website? Right, first job, get rid of that awful floor board bed Easy when you can "Borrow" the right gear Doesn't look too bad underneath. The dismounted Aircleaners are on the floor behind the front wheel. At times like this you wonder where to start, or indeed if you should have bothered in the first place. The theory is; keep scraping the rusty bits off, and eventually you will come to good metal! So long as you keep all the bits in a big box in the shed, you should be OK I hope this has wetted your appetites, I will post more next time it is raining too much to be playing out


-
Well done Onthecorner, you have passed your vehicle identification test. For a better view of the assembled plant Try this The other items are, on the left Terex TS8 Scraper, Volvo 4400 Loader, and on the right a Hamm roller, and you can just see a Henley Hercules forklift. The Crusader definitely has a near side screen, and the picture looks a bit wobbly as it was taken from the top of one of these cranes. on the other side of the square.


-
I found these pictures the other day, while looking for Muir Hill photos for Robin Craigs thread. Thought I'd post them on here as they are bound to bring back memories for some and nightmares for others. 43 Plant Squadron RE flexing it's considerable muscle on a new super highway accross Soltau Training Area Germany in the late 1980's. Terex TS14 scraper, powered by 2 Detroit Diesels, 6 Cylinder 2 stroke. One on the front pulling and another at the back pushing. Good fun to drive, and the noise at full load is absolutely awesome. Have you noticed the slight lean to the right on one of those trees? Never mind, rescued by a Cat D6C. Oh, dont forget to stand clear of the winch rope. As promised, Something for those with a Scammel (Leyland?) addiction Crusader and Terex 82-30B Dozer
.jpg.1457b3ad153d534b834ac00053e34f0e.jpg)

.jpg.2c4e91807a9cb0a0831c117a79f8eafb.jpg)
.jpg.273e03acc0aad94b86fead3eac1d6ab0.jpg)
.jpg.87acceac805ce6fa927e3311e5145bb9.jpg)


-
Hi Guys, I Cannot say I have ever seen a Muir Hill, in preservation, but I do believe the National Coal Board had a few way back in the day. I have found a few photos of the Royal Engineers at play that you might like to see, in particular the armoured version which as you can imagine makes for quite interesting driving with all that weight on one side. I wonder if this is why they called it a TILT trailer!! Bucket Loader. Or Forklift This one has been camouflaged to look like a JCB, for use on the streets of Ireland, when the Army was pretending not to be the Army. Finally, formation dancing team, Salisbury Plain Circa 1979.


-
Hiya, and thanks for the welcome folks. Cheers for the spares info, Simon, I'll have to write a list, for you.
-
Hi to everybody, my name is Robert Smith, and I am currently living in Sittingbourne Kent. Married to Helen and have 2 adult sons. I used to be a Plant Op Mechanic in the Royal Engineers until the cutbacks in 1994. They offered me a large sum of money to go away, and it seemed rude to refuse. They called it early retirement (I was only 34!) Anyway, eventually, I got the hang of being a civilian and I am now a Project Engineer for a local Bus Company. I bought my Mk1 Militant in November 2006 from an advert in Milweb. It said "good runner in need of restoration". This meant that although the engine started, everything else was either totally knackered or it had been robbed! Still, I am getting there with it, hope to have it running again later this year. If I can work out "How to" I will do a restoration blog for it, soon, with loads of before and after photos. In the meantime, best wishes to all. Rob. S


.jpg.60497142f4198003bcdc8882d2b36ab8.jpg)
.jpg.04f9c202955462de6d0133f2960c88ae.jpg)


.jpg.1457b3ad153d534b834ac00053e34f0e.jpg)

.jpg.2c4e91807a9cb0a0831c117a79f8eafb.jpg)
.jpg.273e03acc0aad94b86fead3eac1d6ab0.jpg)
.jpg.87acceac805ce6fa927e3311e5145bb9.jpg)


