


Old Bill
-
Posts
1,669 -
Joined
-
Last visited
-
Days Won
33
Content Type
Profiles
Forums
Gallery
Blogs
Events
Articles
Store
Downloads
Everything posted by Old Bill
-
Thanks John. We didn't use any padding as I have seen no evidence of it in any of our photos. Seems like a good idea though. There are enough rattles without adding to them! We will put something in there next time we get on to it. Steve
-
Thanks for that Tomo. They are certainly glazed with something so I now have precedent. Interestingly they are a different shape from most Thornys as they tend to have semi-circular ends rather than being plain rectangular cut-outs. You learn something new every time you look in this game! Steve
-
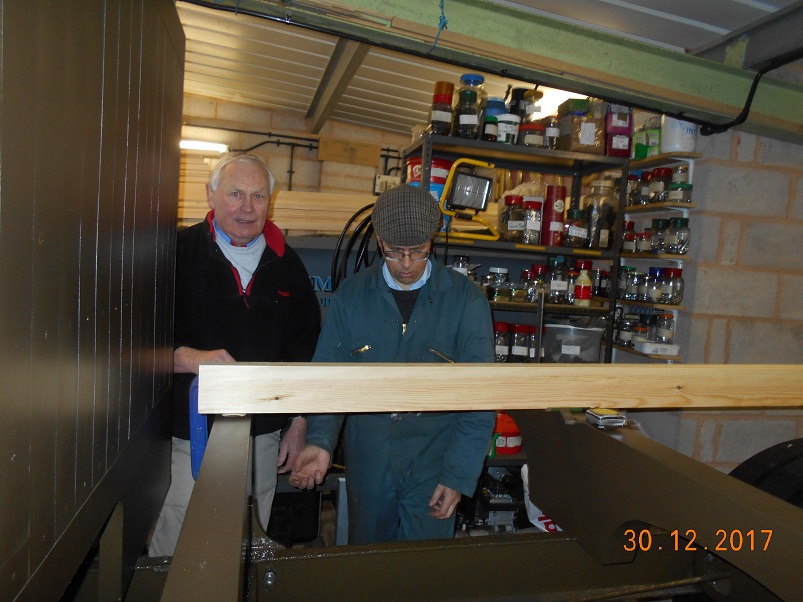
Well, we have had a productive day but, as usual, never quite as fast as we would like! Roy came over again with his big sash clamps and battery drill, both of which proved very useful. We started the day by screwing down the floor boards. This proved hard on the knees but with Roy's clamps to pull them all up, it all went well. When we reached the last plank, they were over-width by 3/16" so I ran a pencil along the last one and then planed it to fit. The challenge was in holding it but we pushed it up against the post of the garage and my big plane soon made short work of it. Mind you, this was helped by the quality of the timber which was beautiful. It is softwood but has a lovely straight grain and no knots. I don't know how Mark gets it. It certainly isn't from B & Q! A test fit and all was well. We removed the kerb rails so that Dad can paint them separately. Once that was done, we turned our attention to the water elbows. Dad drilled the bolt holes in the last one and it was fine, except that it fouled the radiator stay bar so I had to file a bit off the top. Eventually, all was well so all we need now is some hose and we can fit them permanently. That really will be a landmark event. It is back to reality tomorrow, getting ready for work, which is a great pity as I am just getting some momentum going. Oh well. Time to study the job list! Happy New Year everyone! Steve


-
Greetings to our Colonial Cousin! Many thanks for your thoughts on bending. They are most useful and get me over the first hump of learning the process. Saves me a lot of trial-and-error! In the past, I have had bending done professionally but now that I have a press, I thought I would have a go myself. As always, there is more to it than meets the eye! The joy of this website is being able to tap into so much knowledge from around the world and I thank you all for it. Just going outside to do some more woodwork . More later. Steve
-
We have only one target and that is to drive on the Brighton run on 6th May. To be honest, it is going to be extremely tight to achieve and with around 70 tasks to do, I need to complete them at the rate of four per week. I have, this Christmas, written them down so that I can accurately monitor progress and must focus on those which will require input from other people such as my pattern making and getting the wings made. Once I have everyone else working, I shall focus on the last bits of the engine. We are quite close to having a fuel system and a water system, the exhaust is almost there and there remains only the oil filler and gauge, the magneto coupling, HT lead tube and the controls before we can run. We will be out this year but May? Well, that is going to be touch and go. Watch this space! Steve
-
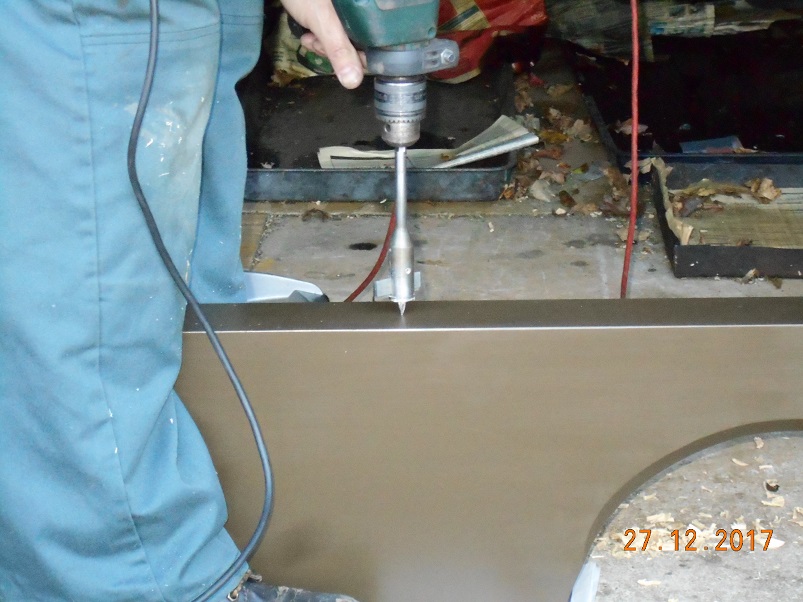
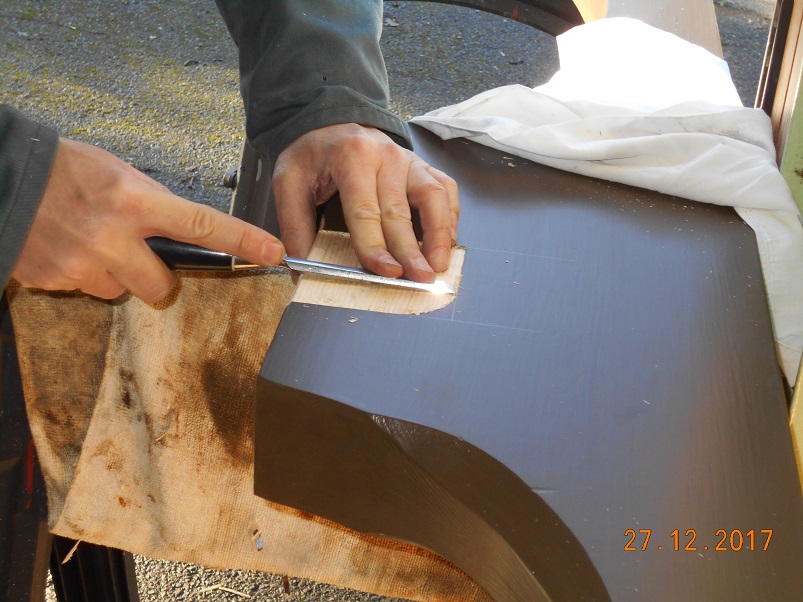
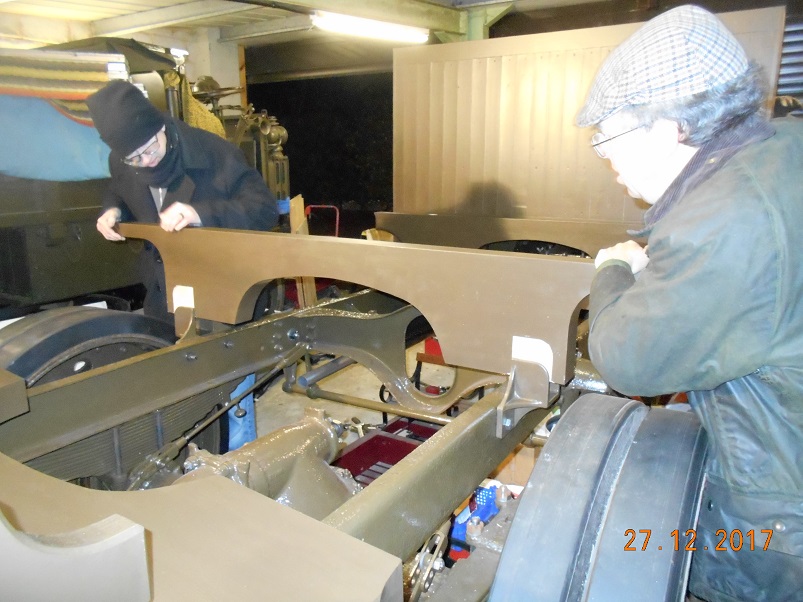
More body work today but is nothing straightforward? As always, a simple job always seems to take ages messing and fiddling to get it right. Oh well. It takes what it takes. We wanted to get the floor down today so we started with the kerb rails. We drilled the ends of the cross- beams and then lined everything up. This was the point at which I realised that the lorry is hump-backed by 1/2". And then that the chassis has a 1/4" bow as well causing the ends of the cross-members to misalign with the kerb rail which is straight. Cross-members number two and four float so they were easy to bring into line. Number three, however, is held in the centre castings and had to be removed and adjusted. This was all successful but time consuming. Roy and I finished drilling the bolt holes whilst Dad was cutting down coach bolts to suit. The kerbs were bolted down. Then we tried dropping the floor planks into place. These are tongued and grooved with loose tongues inserted. Big Mark provided us with a couple of packs of tongues which he had had cut for us and they all went together very well. The last plank ended up just 1/4" too wide so that will need trimming to fit. We plan to screw them all down tomorrow and then cut the last plank and plane it to suit. It is looking much like a lorry now so it is exciting. However, the work list still has over 70 items to complete so I am going to have to increase the work rate by a significant amount if we are going to finish in time. Steve


-
Thanks Adrian! There is always something to be learned! Steve
-
I think you have caught me there! Dennis definitely had a panel of transparent material in the window. I have no evidence that Thornycrofts left anything but a hole. However, it does stop the draught going down the back of the neck! I don't know what Dennis used but we do have a couple of pictures which show something there although in each case, it is cracked. Could it have been a celluloid material at that period? Mica would have been too fragile, I would think. I will have to investigate early plastics. Steve
-
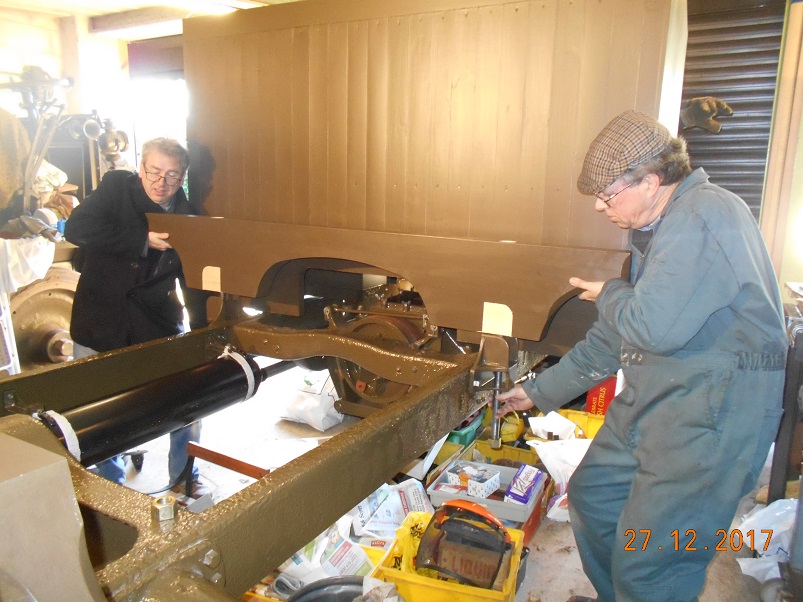
We have had an interesting day. Firstly, Mark turned up with another load of timber including side planks, kerb rails, head and tailboard planks. He wasn't sure about the position of a small moulding which is along the bottom edge of each plank as I hadn't positioned them on the tailboard drawing. We quickly looked at the photos and Mark cut it there and then with a router. We then had the problem of where to put it all as we are a bit tight for space! Father and I then went off to see Jim Clark at 'Allied Forces' as he has just finished making up all the canvas for us and it was ready to collect. This was the sight which met us: It is a lovely piece of work and we are very pleased. Jim enjoyed doing it too as he says it makes a nice change from Jeep hoods! Of course, then we had to pack it to take it home. Whilst not heavy, it is large and awkward and relatively delicate. We did not want to spoil it before it even goes on the lorry so we wrapped it first in a tarpaulin and then clingfilm. The clingfilm worked well and we placed the lot on a flat bed trailer and strapped it down. The cushions, doors and main sheet all went in the back of the car and are now safely stowed ready for the big day. Many thanks, Jim. You have done a super job and we are very pleased! Tomorrow, we will fit the kerb rails and screw the floor boards down. At least, that is the plan! Steve


-
Not much progress today. However, we did manage to fit the final cross member. It needed drilling and also relieving where it sits in the casting but that was all OK. The bolts needed dressing for length as well but all was successful and the five cross members are now in position. We are off to see Jim Clark at Allied Forces tomorrow to pick up the canvas. That will be exciting! Steve


-
Thanks Glen. All useful stuff. We have been outside again today between visitors. Progress is slow but we have done a bit more. We started on fitting the body cross-members. Two of them have 1" bolts right through to hold them down into the mount castings and this was a bit of a challenge. I started by7 using my adjustable drill bit to cut the counterbore in the top for the end of the bolt. Then I used 28mm bit in the battery screwdriver to drill half way through wauth Father watching to keep me vertical. Turn it over and back from the other side. Not quite in line but good enough. A trial fit showed that I had got my castings too tight. So I made a cut-out to allow it to fit. This took a few goes to get right but all was well in the end. I poked a reamer up from underneath just to clear the hole. Father had previously made the 1" bolts so we fitted them and trimmed them to length. Then it was on to the centre cross-member which was also too thick so I cut some more out of there. After about six goes at it, all was well and the beam was installed. Dad took the opportunity to drill the bolt holes in the water suction elbow so that can be fitted now as well. It gives me the position of the end of the elbow to the pump so that can be finished of too. More guests tomorrow but we hope to be able to fit the last cross-member during the day. This was going to be an easy job but it has been a real pain! Steve


-
Yes, we are keen to start the engine too. Unfortunately, there have been an awful lot of the ancillary bits and pieces that we have had to make so that has rather delayed the job. I don't want to waste time lashing something up so it will happen when we are ready! In the mean time, I am concentrating on getting all the things to be done by other people in hand. We really are tight for time with this one. I have identified 65 items for the work list still to be done so we need to clear them at the rate of four per week if we are going to do it! Today has been a rather fiddling and messing day again, mostly in trying to get the exhaust system to fit. First job was to cut the tubes using Dad's band saw. This is a great tool. Then it was a case of cleaning out the ends of the elbow casting and dressing the ends of the tube until they fitted. Horrible job. Eventually it was done. Next part was to fit the down pipe. I had previously cut the flange so that was tapped onto the end of the tube and knocked into alignment. This will be brazed at a later date. The pipe was trimmed to length and the elbow fitted and bolted in. This was satisfactory but then highlighted the challenge of pushing the pipe into the end of the silencer and the elbow at the same time. We disconnected the front end and managed to slide the ball up to the silencer dodging bits of chassis on the way. That done, the down pipe was wangled in and the alignment checked again. All was well so the silencer was finally secured and the tail pipe pushed in. This will need securing, probably by use of a split pin right through. That little lot took all day with a lot of messing and fiddling to get it right and it is only two pieces of straight pipe! I cut out the swearing and cursing and the number of times it was tried in place! Anyway, I finished up by finally fitting the fuel tap and drain plug to get two more pieces out of the way and safely in place. We will start on the body cross-members tomorrow if we don't have too many visitors! Steve


-
It has been a busy day but we have managed to fit in a few workshop hours.We started off when Tim fitted the body mount brackets. He and Father then brought the cross-members back in and left them ready for drilling. The next objective was to get the fuel tank fitted, as much to get it out of the way as anything else. I fitted the securing straps, previously painted by Father, by rivetting them on using Andy Pugh's rivet squeezer which I have yet to return after making the tank! It worked very well and is simple to use. A most useful tool, Andy, and thank you for the loan. Both straps fitted. We wrapped the straps to avoid scratching the tank whilst wangling it into position. Once in place, I adjusted the original packing blocks using the belt sander and then inserted them on the rests. They were satisfactory although the roughest pieces of wood you can imagine. Thornycrofts obviously weren't known for their finesse! I took the packing out and we tightened them down. Now we could fit the instruction plate. This has been on my wall for 25 years so I am very pleased to see it in its proper place. Very satisfying. We then started fiddling with the silencer. We fitted the bands over some heat resistant tape it is too wide really. We then lifted it up to the chassis and inserted the bolts. The holes in the chassis could have done with being closer together and in line but alas! It is looking promising and ready for some pipe fitting tomorrow. Progress at last! Steve


-
Yes, there is a pronounced radius there so I will try that. Thanks. Happy Christmas everyone! Steve
-
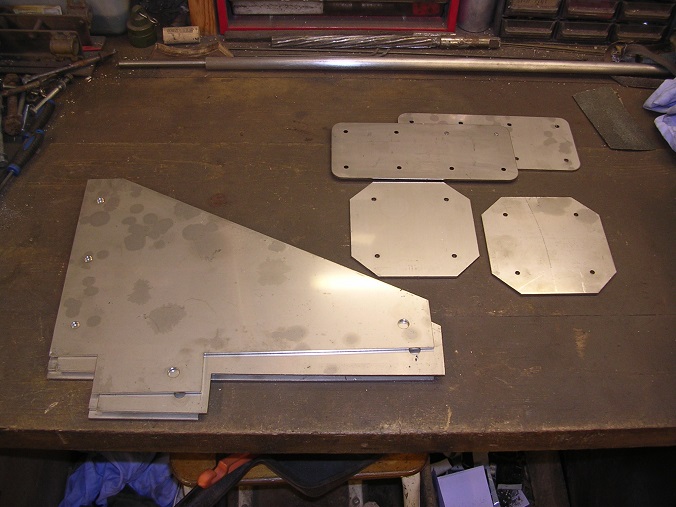
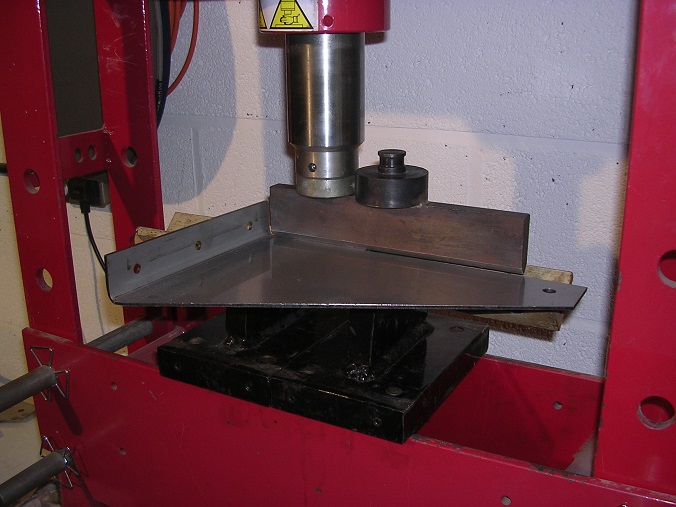
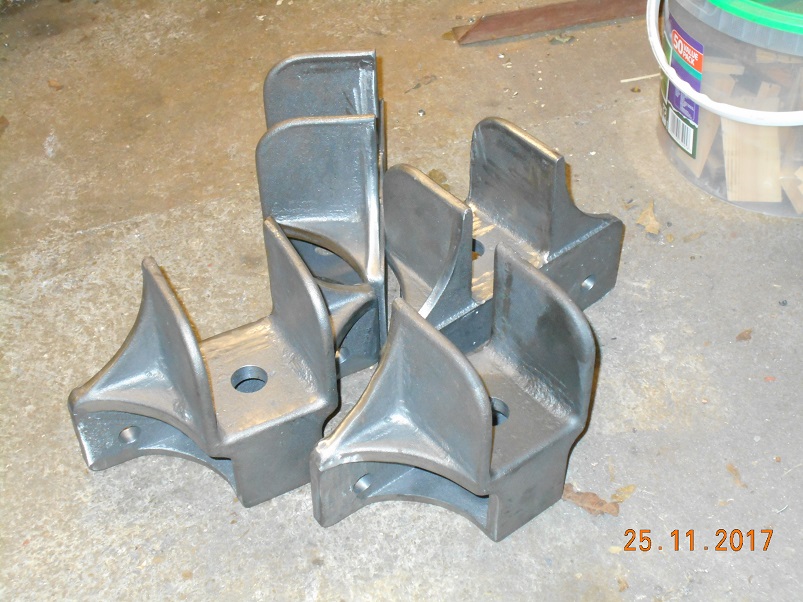
Still pressing on with preparations for the body build, Adrian has kindly cut these out for me with his water jet machine. They are the corner braces for the front of the body, the hoop bases and the tow hook protector plate for the tailboard. He even put the screw holes in so the first job was to countersink them. The corner plates have a 90° bend in them so I have made a bending attachment for the press. Something is not quite right with the geometry of it as I can't get very crisp bends but these parts will be fine. Then on to the hoop bases. These have two 90° bends at 90° to each other. To try to tighten the bend, I pushed them hard into the bottom of the vee but this caused an over-bend. I rectified this by pushing a piece of round into the bend to ease it back. This worked OK but I need to refine the press some more. The second bend was a bit trickier as my tooling is not robust enough to bend away from the centre line of the ram. I took the blade out of the ram, moved it to one side and pressed on the top of it with the ram flat face. It was a bit of a lash-up and took some setting up to get it all aligned but it did work. Two bases of each hand: Two coats of Bondaprime all over and we are ready to go. Getting exciting now! Steve


-
More Christmas preparation going on. This time, I have been working on the body side braces. They are simple bits of bent angle but still take some time. First job was to cut and drill the angle remembering that they are handed! Then set up my welding kit. This is an exercise in optimism as you all know my skill level for welding! I wound up the current and welded a gusset in from both sides. I was distinctly heavy handed but the angle grinder soon took it all off again. Much to my surprise, the joint held up when I heaved on it in the vice. A quick dress of the corners and a couple of coats of primer and we are all ready for the off. More steelwork still to do and we are hoping to take delivery of some more timber this week. Fingers are crossed! Steve


-
That's what this website is all about. Shared knowledge and enjoyment! Dad has started on the water suction elbow. First job was a general clean up all over with file and emery. The big challenge was how to hold it which Father resolved with a wooden vee-block and a variety of clamps. Something of a lash-up but good enough to allow some gentle cuts to squate up the face. Now it just needs the stud holes and it can be fitted to the radiator. Another piece for Christmas! Steve


-
Good thinking Andy. I will keep it in mind the next time I draw one up. Father also picked up the water spigot. There is an interesing mark on the side where I suspect that the pattern broke at the joint and they have done a repair. They didn't mention it so I shall have a closer look over Christmas. I should have spent a bit more time with the glass paper though.! Steve


-
Dad has been to the foundry this week and has picked up the propshaft ends. As you can see, they have come out very nicely and we are very pleased. The foundrymen did comment, though, that printed patterns are much more difficult to get out of the sand as they have no bulk into which a screw can be driven. A bit of repair work will be required if we ever need any more castings. Let's hope that we don't! Thanks for the pattern Barry! Steve


-
The only reason I can see for the 'box' brackets is that the 1" holes spaced apart give the main hold-down bolts some stability to hold the cross-members upright. The wings on the sides may not fit tightly enough to grip the timber otherwise. 1" bolts seem a little overkill just to hold the body down. Steve
-
The planks have arrived! Dad has been busily painting the undersides because it is so much easier to do than upwards from underneath. Aluminium primer on wood. And the usual top coats. There is nothing like using your project as a work bench! Steve


-
That's interesting Barry. I have never heard of such a thing before. Do you need flux as well or is the Argon sufficient on its own? That is another string to your bow anyway! Dad has been pressing on with the Thorny in the paint shop. The body mount brackets are now ready to fit. Five coats of paint I think! Steve


-
Adrian has very kindly welded a block onto our exhaust elbow where the mounting should be. He used nickle rods after pre-heating the casting in the Rayburn for which use I must thank Fay! He increased the weld preparation to 1/4" all round which meant that I could tidy it up with a file with no danger of detaching the block. I also drilled the pilot hole out. That completes the last component of the exhaust system so there is something else to put together over Christmas! Thanks Adrian! Steve


-
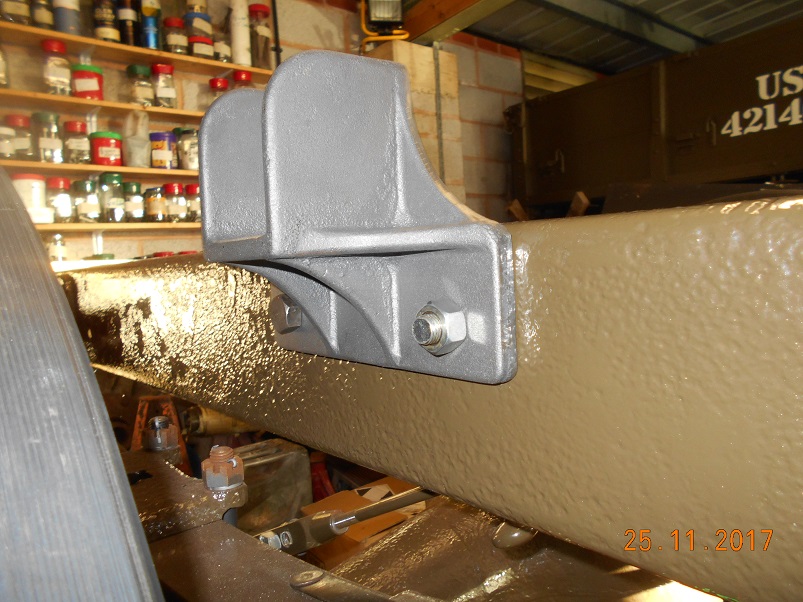
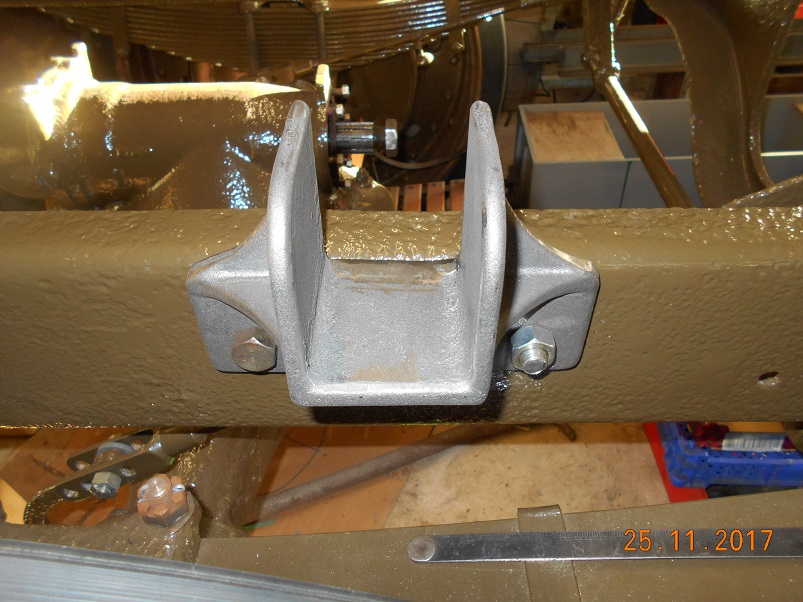
Still preparing for the Christmas push, Dad has drilled out the body mount castings to match the holes in the chassis. A trial fit of the first one and it looked good so he carried on and did the rest. The fun then started with the front and rear ones as they have a hole through for a 1" bolt. Dad's biggest chucks are half-inch which made the job look tricky until I realised that we could use a 'blacksmith's bit' which has a half inch shank for all sizes of drill. A visit to my local Toolstation provided a 15 and a 25mm bit so we put the 15 through first and follwed up with the 25, finally finishing off with a hand reamer of 1". It was all fun and games as the mill was set to maximum height and the quill would not drop low enough to do the hole on the other side. Once the first one was through, we had to lower the head to allow the drill to reach right through! It all worked in the end and the castings are now in the paint shop. Still lots to do! Steve


-
Hi Mike. I think Tim is right and that your first rad is definitely from a later J with the correct hole through the core. I suspect that the other two are just a little later and from something else. We are building the body by copying the Carlton Colville lorry which I have no doubt is the original Thornycroft body. A couple of plank ends have been replaced but other than that and being painted red, it is untouched. It is unusual in having some exceptionally wide planks in the sides which we are not replicating as we have photos of more evenly matched planks on other lorries. However, there is a small moulding at the bottom edge of each plank and we have asked Big Mark to reproduce that in each case. I spent a lot of time measuring it up and we have a lot of photos as well so what we build should be pretty close by the time it is finished. Steve


