


HWade
-
Posts
975 -
Joined
-
Last visited
Content Type
Profiles
Forums
Gallery
Blogs
Events
Articles
Store
Downloads
Everything posted by HWade
-
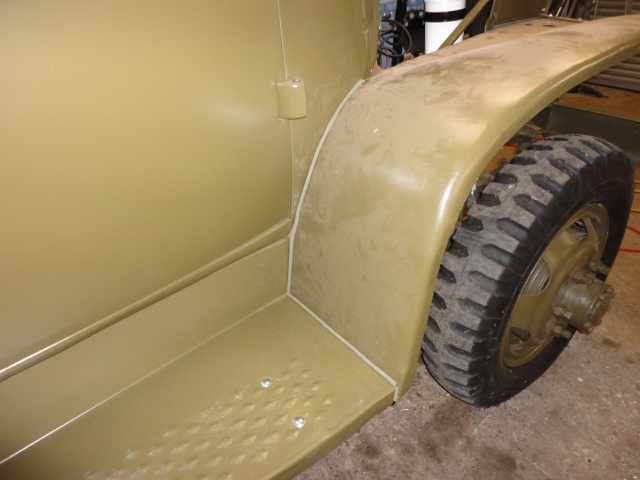
Bit more progress on the dump truck, ive fitted the remaining rear wheels, also fitted one of the front wings along with bottom panel, also cut and fitted the canvas beeding between wing and body and running board,also made up one set of wires from the connector block that fits on the bottom panel that the wires go through to the head light and blackout lights.just got to source some discreet front indicators to fit under the front wings.More to follow. Howard

-
I picked up a little charging set the other day it was heading for the scrapman, its powered by a JAP engine, its missing the Carburetta, the carb looks like it clamps onto a small stud coming off the engine. I will post a couple of pics later.I could not see it go for scrap. Howard
-
Thats going to be a real nice truck whens its done, glad to here you managed to get her started, and even better moving her under her own steam onto the loloader, did the air compressor still build up air while you were moving her, or has the tank got holes in.Good luck with the restoration.Howard
-
Twotrumbones, with regards to the cab, I was lucky in that this one did not need to much panel work repairs, a common place for these to rot out is on the back of the cab along the seam, also the rear window and floor of the cab, i suppose it depends where its been stored. Any way regards repairing if you are replacing an area of tin work take your time I always cut a card pattern first, i also blast my parts i am repairing first a well. you can see extactly what you have and its clean metal to weld to.If you have not opened window yet, give all parts a good spray with some WD40 or alike, dont force the window, these are getting very hard to find now, ive just finished putting one back together, and had to make up part of the centre pillar as could not get a inside section anywhere.Just take your time,also regards the screws in the cab I recon i had to heat nearly every one in the cab i have just done and i managed to get 95% out, so i could reuse them. Well all the best. Regards Howard
-
Hi Gas 44 Its a blend that I get mixed, a top secret mix of course, but can be supplied, its a eggshell finish so it wipes down without leaving marks on the paint,unlike matt finish paints. Its made by Dacrylate paints. 5 litres £50. Regards Howard
-
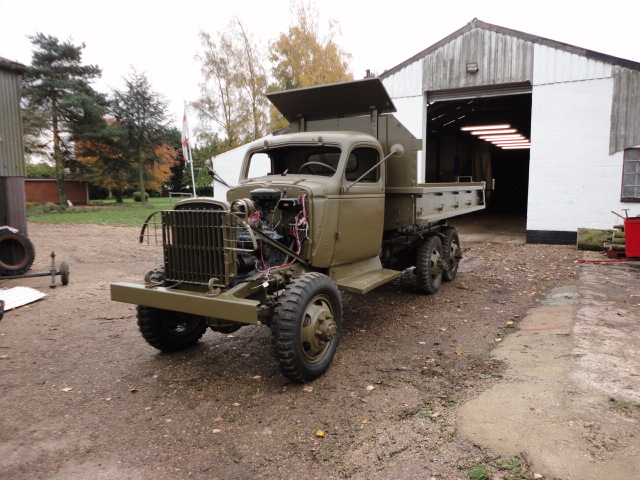
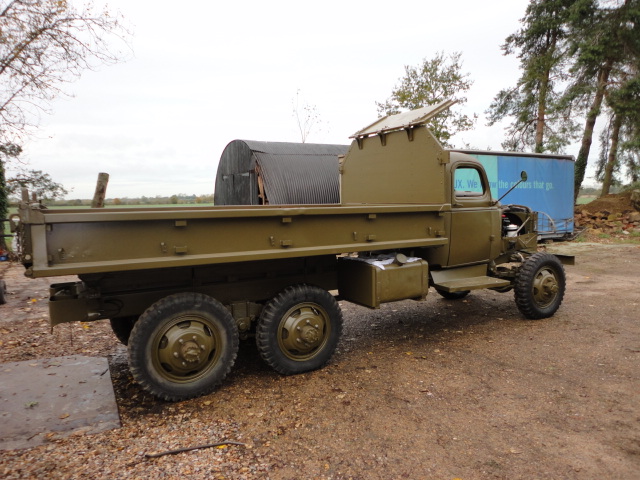
Well its been a while since adding to the blog, Ive been waiting for parts, but now the build is back on, the exhaust system is now back together and all connected up and no blows anywhere, I used a copper sealing ring in the end, and a mild steel exhaust syatem from stock apart from the tail pipe that was ordered in. I fired up the truck and tested all the tipping gear to make sure that it was all working before attempting to refit the dump body, infact this went back on alot easier than I expected bearing in mind I did it single handed.What would I do with out a fork lift!. All of the Radiator is back on and plumb in and its antifreezed up ready for the winter.Once the body was fitted I also fitted the head board and the cab guard,I also have the other rear wheels to fit. heres a few pics still a bit to do but its coming together now. Howard.


-
Well spent abit of spare time on the genny, it been stripped blasted and painted, renewed some of the wiring repainted the amp gauge.All back together and pleased to say running as she should.I do have to take the magneto apart to prep and paint that. heres a few pics.Howard


-
Now the generator is all up and running i have decided to strip it right down and blast and paint it, i may also replace some of the wires, pics to follow. Howard
-
Well I had another look at the little generator today, i took the fuel pump apart and made a new diafram from a piece of inner tube just a a temp fix. I also tested the charging relay and found that there was a short in it. So i replaced the relay with one from an old truck control unit, After working out the wiring i connected all up and and after running it up it all runs fine and now charges the battery.Howard
-
Thanks for that NOS. Howard
-
Not a great more done at the moment have made new wood spacers for under the running boards,other than that waiting on some parts to progress with the rebuild.Will add more to the tread as and when things move on.Howard

-

question Wartime Bowser or not?
HWade replied to Willyslancs's topic in Trailers, plant and equipment
That looks like one of the early Chafer tanks that they used for chemicals on farms, then again might be to big, they were galvanised. and that one there looks like it is.Nice fins all the same. Howard -
Hi NOS thanks for to the trouble of taking a picture of that, Mmm thats the seal I had come with the stainless system that we sent back, it has worked for you it may be how I will have to do it but are wait to see if I can track down the other seal first. Thanks Howard
-
Well after fitting new lights in the workshop, I decided to have a look at getting the little generator running. I did the checks plugs clean and check gap, fuel, points. anyway i soon discovered the timing was out, so after sorting this out i managed to the little gem to run. I attached a flood light and sure enough it came on.It appeared to use a bit of fuel, so on further inspection i found that fuel was getting into the sump the diaphram had a hole in it letting in fuel. With no new diaphram I made one from a piece of inner tube. Not sure how long it will last with this modern petrol.After draining the oil from the sump and fresh oil added I gave her another run, there is a small water leak on the bottom of the rad, a bottle of sealer was added a run for 25 mins and the leak fixed.I also noticed it was not charging on the DC side of the unit so I may take a look today if I get a spare hour or so. I get a great Deal of pleasure and satisfaction getting some thing like this running again. Howard.
-
Hello NOS, thanks for the info, it was good to catch up earlier, wait to here from you on friday. Thanks Howard.
-
Hello Andy Thanks for that, the same thought went through my mind, but it just does not look right, and it also means the down pipe is then put out of line by about 5-10mm,looking in the manual it says there should be what they call a flange seal and then the gasket, the flange seal is nothing like the seal thats in the picture. Recon we will contact Mr Wildenburg see what stock he has. Howard
-
I went to put the exhaust together today and more problems, or am i missing something, I have been supplied with the gasket and the sealing ring, but when you fit together and try and clamp it up with the three bolts the sealing ring will not compress enough for the gasket to seal, has anybody else had this problem, should it be a copper ring and not this steel ring, the last jimmy exhaust i did I am sure there was a copper compression ring, heres a pic of ring and gasket. Howard

-
Well the dump truck is resting on her new rubber. With all the hydrovac connected up and the fuel tank and fuel lines connected, I gave her a test run, well was going to, only to find it would not run very well without having the choke on,Mmm, sucking air some where, Firstly we disconnected all vac pipes to the the manifold, and covered the holes, and the engine then ran fine, after checking a bit, and isolating various things, the fault stems back to the Hydrovac, not sure what is causing it,unless its a sticky valve, so going to have to take this off and investigate further, what a pain.Will keep you all informed as to how I get on.Howard
-
Hi NOS I would have had that dumper my self had I known it was for sale, a handy little bit of kit. Howard
-
Hi Sadly the little fella is not mine, I did a bit of research and found the pics on the net, I was curious to see what it looked like, now i know I will keep my eyes open, I think this one was in the US, proberly where you would find one. I meant to ask how is are friend Wayne getting on with that diddy Dumper, It looked like a nice project.
-
Hi NOS, one of these then!


-
Hello John Yes i do have some of the panels are take some pics when painted, the onw around the tipper and lower buck levers is just a bit of thick felt with a strip of metal each side holding it in place.The one that goes around the starter pedal was missing so are make this one.Cheers Howard
-
I bought this little gem the other day, nice little US Generator made by Onan, its a two cylinder side valve water cooled. the radiator even has its original honey cone radiator which is in very good condition. They fitted very similar generators like this in the GMC workshop trucks.I thought it might be nice to use for the power if I convert a shop van for living in at shows, i would build it on a slide out cradle.I will proberly do this as a winter rebuild, i have had it running and it generates electric.Howard


-
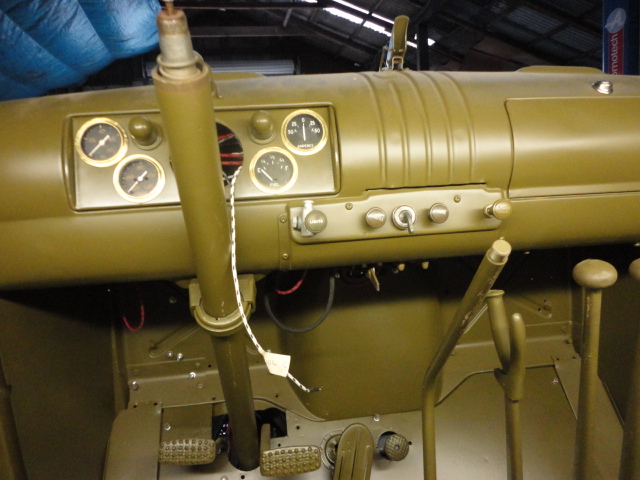
Well more done on the dump truck, i fitted both floor panels today, also wired in the new headlight dip switch, or as the book calls it (dimmer switch), I also fitted some of the new tyres on the painted rims, and very nice they look to.Ive also managed to sort out the wiring to the rear and got the rear lights wired in and tested, I also blasted all the wheel nuts and masked up the threads and painted those.we also managed to source the correct horn this has also been painted and fitted and wired up.I have also painted the mirror arm brackets, managed to source the early ones that fit to the door hinge.Still got a problem with the stainless exhaust in that it fowls up and does not allow the silencer to fit snugly into the bracket, making it fowl up with the spare wheel holder, I am waiting for a steel down pipe to turn up and use this.Also got most of the dials fitted in and connected up for testing. here are a few more pics.Howard


-
Hello Richard Ive just looked at the thread, makes perfect sense I suppose, thanks for that. Howard


