


jdmcm
-
Posts
185 -
Joined
-
Last visited
-
Days Won
1
Content Type
Profiles
Forums
Gallery
Blogs
Events
Articles
Store
Downloads
Everything posted by jdmcm
-

Clutch won't disengage on T-54
jdmcm replied to sexton's topic in Russian-Eastern block-Warsaw Pact Vehicles
Hi Malcolm yes sorry, I re-read what I wrote and went back and fixed it, clutch is indeed between transmission and transfer case, what we did was remove the transfer case which allowed access to remove the clutch while leaving both engine and transmission in place, this way you don't have to disconnect the transmission control rods, fan drive, air compressor etc., but removing the transmission would take the clutch with it as well and give a great opportunity to clean out the accumulated fuel-oil-dirt mess. Ours is a Chinese Type-69 captured in Iraq during the Gulf War, same drive-train as the T-54. Does yours have the hydro-boost assist for the clutch and steering? Sometimes this can cause grief as well...but my guess is you have had a spring failure inside the main clutch...very curious to see what you find once you have it open, please keep me posted, not so many of these girls in Canada


-
Clutch won't disengage on T-54
jdmcm replied to sexton's topic in Russian-Eastern block-Warsaw Pact Vehicles
I took a bunch of photos this weekend, will post them tomorrow, clutch is attached to the transmission and then to the transfer case with a sliding coupling. Once you have the rad out and oil cooler out you will be able to remove the air cleaner box and bracket, this will allow you to disconnect the engine from the transfer case and the clutch from the transfer case. The transfer case has a unique mounting, the bolts closest to the left side of the hull are 32mm bolts which are threaded into the mounts so they will come out relatively easy from the top, the other two are actually installed from the bottom of the transfer case with nuts and cotter pins on top. Remove the cotter pins and nuts and you will have to drive the two bolts down through the transfer case and mount. This will take some effort as they have a machined shank which helps locate and align the transfer case, be aware of the location of the shims which are likely to be under the transfer case. With the whole rear engine deck removed this box will pretty much lift straight out, hope this helps. And yes we are installing a new engine and have taken the opportunity to clean up the years of oil and diesel sludge in the hull of the tank...it's a mess....and on that note, be very careful using a torch in the engine bay...that oil diesel slurry will catch fire and the garden hose won't put it out... -
Clutch won't disengage on T-54
jdmcm replied to sexton's topic in Russian-Eastern block-Warsaw Pact Vehicles
Man I forgot just how packed that engine bay is with everything in place, she's crammed! -
Clutch won't disengage on T-54
jdmcm replied to sexton's topic in Russian-Eastern block-Warsaw Pact Vehicles
Ok, the two sliding couplings that connect the gearbox and steering clutches will for sure slide back enough to allow gearbox removal, I have recently done that job myself. I can take some pictures of our engine clutch setup on Saturday if that helps, is there no sliding coupler between the clutch and transfer case? -
Clutch won't disengage on T-54
jdmcm replied to sexton's topic in Russian-Eastern block-Warsaw Pact Vehicles
Malcolm I have an English manual for T54 series, I will check it tonight, our entire drivetrain is out of our T69 but I believe clutch can be removed on its own. Is it possible it is stuck in gear and the problem is in the transmission? John -
Clutch won't disengage on T-54
jdmcm replied to sexton's topic in Russian-Eastern block-Warsaw Pact Vehicles
Have seen this before when the T-54/5's are left in gear and allowed to sit, did the tank sit all winter? -
question Does anyone know what became of the Fast & Furious film tanks?
jdmcm replied to terryb's topic in Tracked vehicles
I believe Carl Brown was selling the actual Fast and Furious tank for a customer of his...not sure if it sold The other tank was a mock-up on a truck chassis with tracks that rotated, for the high speed work, was also for sale on Milweb a long time back


-
It is always nice to see some of your collection even though it is a long way from restored...but still nice having your morning coffee and seeing a tank or two around...instead of hidden under tarps or stacked in 20 different pieces, tanks, even beat up old range tanks just look happier with their tracks on...and yes it is going to get a gun barrel to aid in guard duty
-
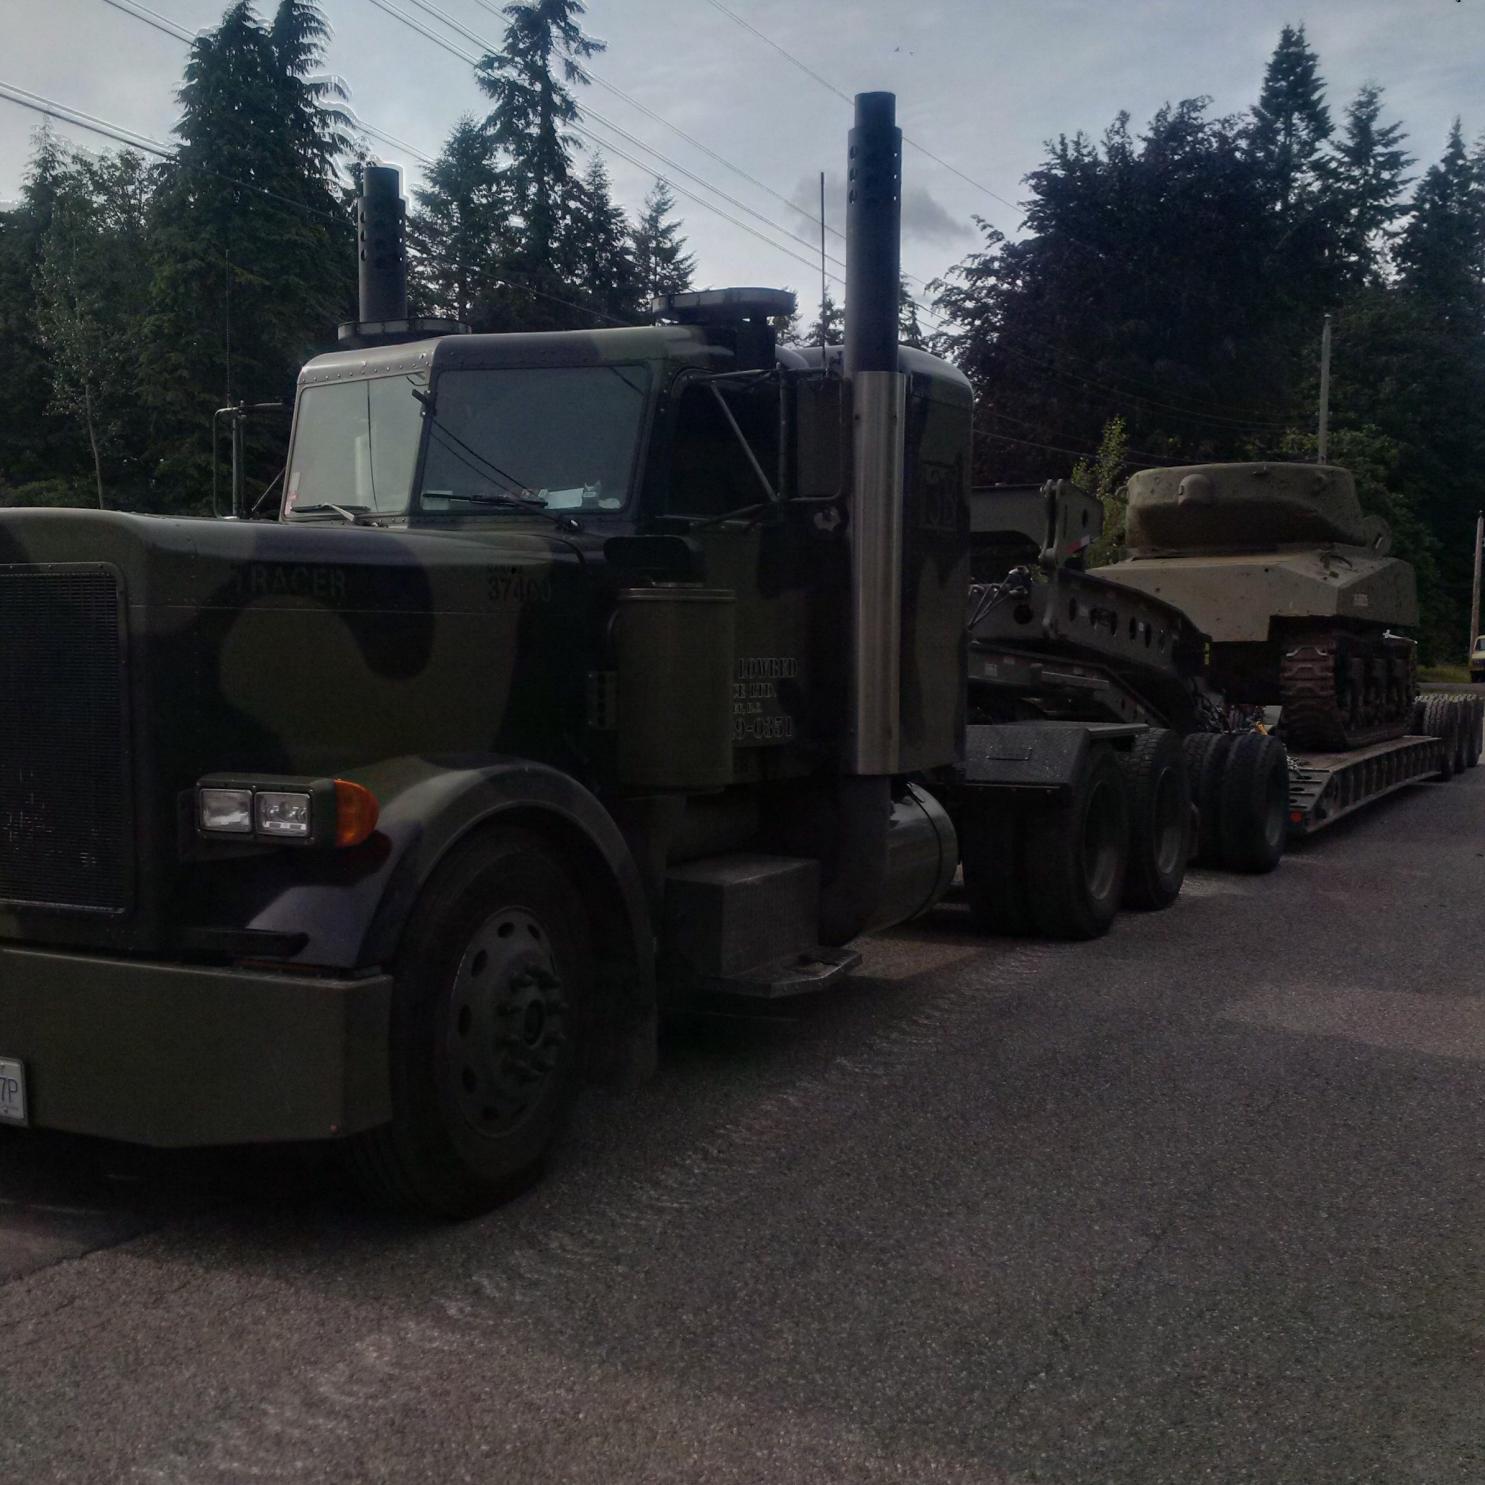
That is a brand new custom built lowbed as we call them in Canada, the trucker just picked it up a couple of weeks ago, he has jeeps and boosters to handle right up to Chieftain and possibly more. The tractor is a truck I built myself a couple of years ago to pull my own vehicles around but Brent fell in love with it and had to have it...now he has the trailer to match. The trailer was made locally here by a company called Pacesetter, it set the owner back right around 200k Canadian for trailer only.
-
Jumbo #73 update...mocked together with standard differential and M62 mantlet to stand guard until restoration begins


-
Thank you for the reply Adrian, would you have any measurements you could share? I am hoping to build a set for my tank but have very little in the way of a jumping off point, the last turret box I saw in the flesh so to speak was on a Grizzly for sale in Southern California. Do you think the rear plate box would be out of place on a Sherman III? John
-
Thanks for the information Andrew! John
-
Andrew quick question, when re-using old fasteners, especially unique ones that are difficult to obtain, what do you do to prepare and preserve them? Are they blasted and painted or given some other type of coating to ensure they do not rust? Was that a concern with the assembly of the tank originally or was life expectancy short enough that rusty bolt heads were a non- issue? Thanks John
-
Hello does anyone have measurements or even better yet plans for building the blanket box and tool box seen often on the back of the turret and rear armor of British and Canadian Sherman's? I use the picture of Adrian's M4A4 as an example without permission. I am sure that I read in Adrian's restoration blog he had constructed both boxes himself. As always any help is greatly appreciated. John

-
Chieftain Mk10 Armored Searchlight Housing and Searchlight
jdmcm replied to davebane's topic in HMVF Classifieds
PM Sent -
Both vehicles fall under the Controlled Goods Directorate and require you to register with the program before importation. Both vehicles would be eligible for import under CGD. Don't worry about Transport Canada, not their department as they are considered "ground fighting vehicles" and import and export is controlled. Hope this helps. John
-
Lying on its side sure beats lying under it to try and paint the bottom! Fantastic work Andrew! John
-
Very nice work, boy they are sure spending a few bucks down there, might finally have a reason to travel down under...Crocodile Dundee and Kangaroos just ain't cutting it....but tanks...now that makes sense
-
I am in search of wheels but not sure of the difference between late and early, it is my understanding very early or even prototype Chieftains had smaller diameter wheels which gave them poor ground clearance...so it was decided to fit them with the same wheels as Centurion...I am ready to be corrected if I am wildly off base here John
-
Thanks all, this has been most helpful, our M4A3 was destined for the scrap pile and came along with the Jumbo for parts. But as I have said before, I figured too much left to scrap...will it ever be a 100 point restoration? ....Uhm...No! But it will make a neat looking piece, especially with some in theater style up-armoring...and hopefully I will never be able to answer the question if it really works as supplemental armor against rocket attack...besides I don't think the local constabulary has access to panzerfausts.
-
Some excellent points raised, as the end connector on the VVSS track has an integral track guide, this is the part I was referring to as being welded to the hull, and I did not notice the flipped over guides in the picture, which allow the track to lay flat or flatter as it were. You would think that stick welding on the armor plate with such little point of contact as the point of the end connector would be hit and miss in holding what would be very heavy steel track, probably easier when welding on individual blocks. I have some spare steel chevron track and am tempted to give it a go welding it on my M4A3 as it comes together...I have always been fascinated with the in service pictures of field expedient up-armouring.
-
Thanks Maurice John
-
Ok when you see WW2 Sherman's, festooned with spare steel track links as extra armor, are the tracks affixed by simply welding the tips of the end connectors to the hull or is there another method, like bolts or standoffs welded in place that the track hangs on?

-
I think I can make sense of that...thanks Jim! John
-
Thanks Jim....how do you remove the HST center pin to get to the bearings? Or....you don't ? John


