


mazungumagic
-
Posts
230 -
Joined
-
Last visited
Content Type
Profiles
Forums
Gallery
Blogs
Events
Articles
Store
Downloads
Everything posted by mazungumagic
-
restoration From the other side of the Pond Studebaker US6
mazungumagic replied to Lowrdrbird's topic in Blogs of MV restorations
That's first class work, Ken. Hats off to you for saving that engine - surprising isn't it, that after all that exposure, it is still salvageable. BTW there's nothing wrong with your welding - you're near the top of the class ! Jack -
The Restoration of Austin Champ 1824
mazungumagic replied to mazungumagic's topic in Blogs of MV restorations
No pictures today - it was too hot for the camera ! Managed to remove the radiator which was still holding its quota of water, as part of the prepping for engine removal. Also took off the brake master cylinder and have now disassembled that. It does look the best of the three I have and I will probably have this one re-sleeved. The generator panel which I've also got at home now, is the later type, ie No 1 Mk 2/1 I didn't notice the difference when I was removing it, but on the bench the lighter weight and distinctive shape gave it away. I will have a closer look inside today and compare the innards with the original type. Jack
-
The Restoration of Austin Champ 1824
mazungumagic replied to mazungumagic's topic in Blogs of MV restorations
I was able to finish off the unbolting process on Wednesday (it was a mere 38 degrees C) and remove the body from the chassis. I must say, I'm surprised at how easily most of the bolts and nuts separate. There were more than a few holding the rear mudguards on, which needed the attention of the angle grinder, but the majority of the body bolts were a simple spanner job. The body has several areas of rust which will need to be plated once everything is cleaned up, but that's just a matter of time. With the body off, it was much easier to examine the drive line - I'm hopeful that the rear diff will be in good shape. It seems to be. Next week, I'll be prepping for the engine/gearbox removal

-
The Restoration of Austin Champ 1824
mazungumagic replied to mazungumagic's topic in Blogs of MV restorations
A before and after shot of the ignition box cable - The brass junction box end of the cable is very tricky to disassemble - it has a couple of circlips which are extra difficult to access, but it can be done. The outer metal protective sheath isn't shown in the first picture, but it wasn't a pretty sight. Although it was broken in two places and rusted through in other areas, I was able to solder it all together and fill in the holes. With a coat of paint and judicious placing of the yellow descriptor band, it doesn't look too bad. Jack

-
The Restoration of Austin Champ 1824
mazungumagic replied to mazungumagic's topic in Blogs of MV restorations
Did a little bit of work on 1824 yesterday - more removal of body mounting bolts, most of which came off easily, but one or two needed persuasion from the angle grinder. Some of the captive nuts have broken away during the process, but surprisingly few, really. I've found that the body has a couple of half inch welds on the RH side, holding it onto the scuttle and wonder if they were post production mods or not. Regardless these have been cut, with the exception of a third one at the RH rear. It is very close to the mudguard, so I'll have to remove the guard to get the grinder into it. I didn't play with the Champ outside for too long, yesterday - it was 41 degrees C here in Perth and that's set to continue for about a week ! I've also put in a bit of time into getting a few other things up to scratch, including this instrument panel carrier - The rubber connectors and their bases, generally seem to have weathered well and apart from cleaning, only required a tin strip over the top and bent to follow the contours of the rubber carrier, to restore their shape and make sure that the connectors would be held securely in place. I've also done the instrument wiring and managed to salvage most of the descriptors for re-use. Jack


-
The Restoration of Austin Champ 1824
mazungumagic replied to mazungumagic's topic in Blogs of MV restorations
The rear section of the body is removable. The scuttle and forward of that, is welded to the chassis frame.
-
The Restoration of Austin Champ 1824
mazungumagic replied to mazungumagic's topic in Blogs of MV restorations
Thanks to you both for the advice and help with bits. I am about to get into contact with Russell Altman and obtain a few items that will be needed. I undid a few more of the bolts holding the body onto the chassis on Wednesday and also removed more of the ancillary bits eg steering wheel, fuel filter, seats, rear diff cover and what I think was a farmers replacement for the "winch" cover. I also removed the handbrake assembly because I wanted to see what shape the pawl and ratchet were in. I had another assembly which had a very worn ratchet and was hoping that 1824 might have one that was not so bad. This first pic shows the shape of the two ratchets I started with: This shows the two after some adroit teeth cutting, with an angle grinder. I may have to adjust the tooth angles after it is all re-assembled but its good for now. I think I'll be using the ratchet on the left - we'll see.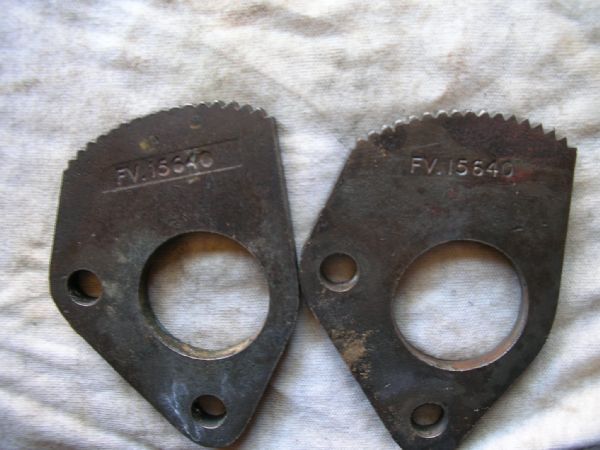

-
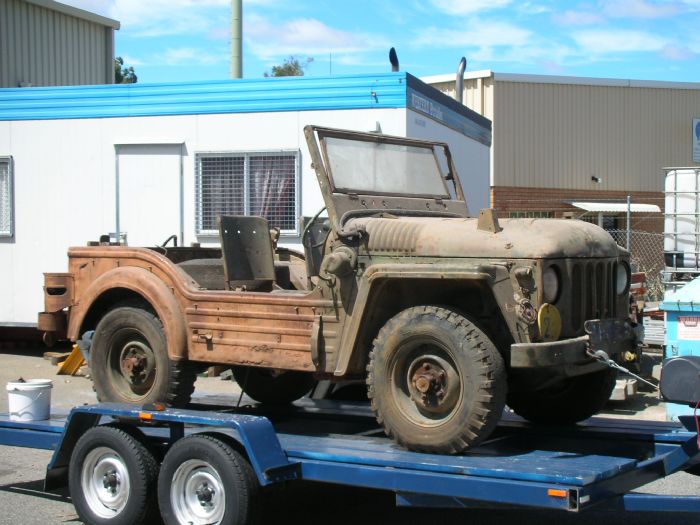
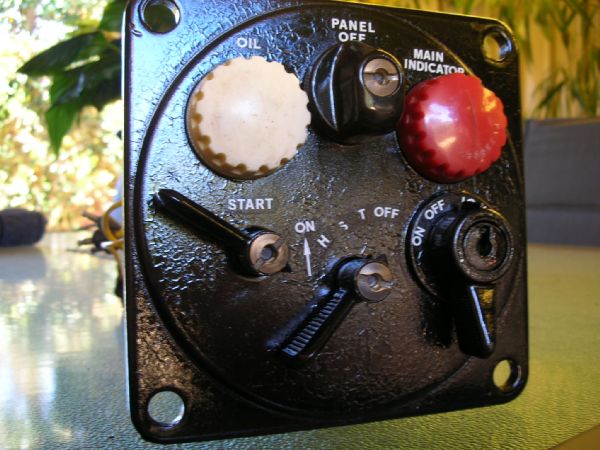
This vehicle is one of a significant number imported into West Australia, by Archie Marshall probably in the 70s. It was found on a farm near Wubin north of Perth and I bought it from the finder just before Christmas. This restoration will be a slowish process, as I'm only able to work on it on Wednesdays, so most posts here will be on the following day. Details are: Engine # 3097 No body # found yet, though there is a welded tag on the LH dumb iron with 43/400 stamped on it. I'm advised this is a rebuild embellishment. Anyway, here it is as found: So far, I've started to remove the bolts holding the body onto the chassis and also taken off a number of the bolt on bits. The speedo registered 12,000 miles and still had the lead seal on the speedo cable plug screwed onto the speedo head. That made me optimistic about the condition of the engine, till I found out it is a replacement motor. Why would it be necessary to replace a low mileage motor and how used is the replacement ?? We'll see. It still has the hinged type reflectors on the bumperettes, which I'm told are indicators of BAOR service. Unfortunately the only remaining rear glass lens (RHS) fell apart when I came to remove it from its threaded holder, so that'll be an expensive replacement. To date, I've found that the nuts and bolts are surprisingly easy to remove - did the makers use some form of anti seize ? Whatever they did or did not do, the dismantling process is a lot easier than I thought it would be. My first mistake is shown in the pic below. I rewired and painted the instrument switchboard. I had been given decals for the switches and put them on - not without a lot of breakage (they're extremely flimsy) and misalignment. Then following the instructions, I sprayed on a coat of clear acrylic to glue the decals in place. I would guess the black paint was incompatible with the acrylic and has now bubbled up to give a very creased appearance, not unlike "hammerite". The only options I think I have, are to make the speedo housing look the same or find some more decals (very difficult) and repaint. I might try to stamp in the wording, but I'll have a think about that and maybe do some trialling, if I can find a set of 1/4" number stamps. Jack

-
Thanks for that confirmation - I had not heard of the 16th Irish in Palestine. Curious then that the Ford would be in what appears to be a desert type colour. As far as I can see, the artist seems to have represented everything else correctly. Jack
-
I'm three years into the restoration of a 1917 Model T, which is intended to be a replica of the vehicles used by the Australian Light Car Patrols, in that area. I have the same problem as you, in that I too have to guess at the colour used in the area of operations. I've been delaying making that decision, waiting for some form of inspiration - which hasn't arrived yet. Needless to say, I've found no colour photos to give me any idea of the paint used for these desert vehicles but there is an artist's depiction (water colour) of one in use by the 16th Irish Div - not sure how that formation came to be in the desert. Could the artist have been Irish ? The colour shown is reasonable for the time and place, so I'll be going with that darker yellow style, when I give my T the final coat. I'd imagine that your truck might have been painted in the same livery ?

-
Thank you to those of you who helped and particularly to Chrisg, who found the answer in the linkage. I am starting to assemble a few bits and pieces prior to commencing the restoration of a Champ. I had picked up this carby, which had the first stage of the linkage attached and had completely forgotten what bits were linkage related when I disassembled, cleaned and re-assembled the carby. It's an embarrassing lesson learnt and I appreciate the help recieved, even though I inadvertently sent you off on a false trail. Jack
-
Clive, Thanks for the follow up. I've attached a couple of photos showing both ends - the hole is the same diameter top and bottom. You can see that there is a shoulder above (or below ?) the narrow portion. There are no numbers on the piece. Tomorrow I'm taking it along with the carby, to a long time Champ owner, who I hope may be able to shed some light on the where the extra bit should go. Jack


-
Yes, it is holed. Once I had re-assembled the carby and noticed this left over bit, I took the carby apart again but could not find any suitable location for this stepped collar. It has the two flats on it that you can see in the picture, but no internal or external thread and as I'm sure you'll agree, it doesn't appear to be shown in the exploded diagram. Another mystery. I'll try to find a second carby to strip and see if I can find the location/purpose of this part. Thanks again. Jack
-
Thanks for those replies and the diagram - it's much clearer than the one I have, which I've now attached. You can probably see that the original EMER # was D574 wehich has been amended by some one to E024-1 and it is for Wheeled Vehicles. I'm not familiar with the EMER publications and only a little more aware of the EMEIs. I've also attached a pic of the part in question (on the left of the photo) together with the choke arm for perspective. I can't see the brass part in the exploded diagram that you sent, FV1609. It may be hiding somewhere. Appreciate your help.


-
I've just disassembled a Champ carby (Solex 40WHNEO/2) and have one part that I can't identify, or to put it another way, there's one part left over when I re-assembled it. Can anyone provide a legible copy of EMER E024-1 (if I'm reading it correctly) Issue 1 18 Apr 55 page 10. The page that I have has been over photocopied and the diagram is hard to decipher.
-
question Dodge WC51 electrical problems
mazungumagic replied to Joris's topic in Lubrication, Batteries & Electrics
Joris, Could anyone have swapped the terminals on the ammeter ? Jack -
Thanks Baz. I initially used a sample Leyland paint called Sand Glow, but I need to get more to finish the job - not much is needed really. I've always liked the look of the RR armoured cars. I remember reading a very funny story about them in Bill Slim's book "Unofficial History". Jack
-
Baz, At the risk of diverting this thread temporarily - I like the vehicles and particularly the colour ! I'm building a Ford T similar to those used by the Light Car Patrols in WW1 and I'm trying to find a reasonably authentic paint colour. Can you tell me what paint you used. Jack

-
question WWI Ford Model T Ambulances
mazungumagic replied to plastic constructor's topic in Pre WW2 vehicles
Hi Nick, Have a look at the Australian War Memorial site (once you're there click on Collections and type in whatever you are interested in seeing); http://www.awm.gov.au/ Here's one photo from that site, showing a pre 1917 Ford. I don't know that there were many 1914 ambulances - the bulk of the motorised stuff, came a little later during the War, I think. Jack -
That is an exceptionally neat job on an early WC51. Can you tell me the chassis # ? Jack
-
Stuart from the Tank Museum, came up trumps with a scan of the painting - thanks mate (sorry about the cricket result). Here it is: Jack

-
Received a reply from Stuart at the Tank Museum: "We believe that the colour of the Model T Ford – Light Patrol Car which would have been used in the theatre would have been a light brown colour. The only reference material we have is an illustrated colour plate in the old C.Ellis and D. Bishop Bladford Press book: Military Transport of World War I and so we can not be certain. This website also shows other Light Patrol Cars http://www.diggerhistory.info/pages-armour/allied/aust-ww1.htm." I've asked him for a scan of the photo he refers to so we'll see what eventuates. Jack
-
Hi Steve, I contacted the Imperial War Museum about this and the reply I received today from a fellow named Peter Collins, reads in part: "Unfortunately, the Imperial War Museum does not hold any technical details on this vehicle or any other First World War Scout Car in the Museums collections, as it does not have an example of this vehicle in the collections. It is very unlikely that any scout car operating in the Middle East during the First World War would of carried the same camouflage scheme as those employed on the Western fount, as it was noted on uniform and other equipment from various wars of the 19th Century that yellow, brown and pink were best colours to be used in this type of operational area. If a piece of equipment was, of course, moved from the Western Fount to the Middle East it is likely it would of carried green and dark brown scheme which would then be repainted to a desert paint scheme at the earliest opportunity May I suggest contacting the Tank Museum based in Dorset who should have the information on the colour scheme you need as they have examples of First World War Scout Cars in their collections and have technical details on various types of Scout Car." So I'll pass this query onto the Tank Museum and see what it produces. On a point you raised about Peerless - I have a radiator shell for my 1917 Ford T, which has embossed on it the brand name 'Peerless' and the fact that it was produced for Ford by Corcoran of Cincinnati. Strange isn't it ? Jack

-
Thanks Hanno - I look at that site every so often. I'm just not sure that they have the WW1 background that some of the contributors here, have. I might see what I can glean here first. Jack
-
I'm in the early stages of restoring a 1917 Model T, to replicate the type used by the Australian Light Car Patrol in Palestine during the Great War. This pic was lifted from the Australian War Memorial's site and it's the basis of my restoration, however, I can't find any substantial clue to the colour, in this or other photos on that site. The AWM obviously has more important things to do than answer silly questions about vehicle paint jobs, so I thought that after having read the RR armoured cars thread here, I would see if anyone here has an idea of the right colour. Given the dark shade of the Lewis (although that could be just shadow) and the radiator shell (normally black) compared to the rest of the car, it might suggest that the metal colouring is a khaki or a light brown, maybe sandy tint ? I gather that the vehicles used on the Western Front were a dark shade of green, but those in Palestine employed in chasing Johnny Turk, might have been camouflaged to fit their surroundings ? Jack


