


fv1609
-
Posts
11,563 -
Joined
-
Days Won
35
Content Type
Profiles
Forums
Gallery
Blogs
Events
Articles
Store
Downloads
Everything posted by fv1609
-
Thank you Chris & nice to have those rear shots, so often vehicles pics are just full frontals. Good to see the sand bag arrangements.
-
Yes there are quite a lot of EMERs & AC books, that are approaching a couple of feet thick. I go to WTiV was going to take the Pig last year then moved. I might take the Shorland or Wolf this time. I see a PM has come in.
-
Nigel do you have the Servicing Schedule? There are things to bear in mind, for instance do not put gear oil in the gear box, use engine oil SAE30. So hopefully it will be at the shows this coming season, where are you located or more to the point which shows will you take it to? I am in S.Wales if you within range I can show you the pitfalls & things to look out for on my FV1609. PM me your email & I can send the limited info I have on yours.
-
 Richard yes I'm sure you are quite right that originally not everything was covered in engine paint. For those who want to be spot on typical specs for SII. Chassis: Shot blasted then Pinchen Johnson red oxide primer 0541 Primer (Stoving) followed by Berger Chassis Black SB.1179 (Stoving) Springs: Carrs chassis black Not sure how long that daft chassis under-sealing went on for.
 -
Bit of a As far as military Land Rovers go it is as well to ignore most Land Rover forums, where there is talk of Duck egg blue, Duck egg green etc The correct colour for a rebuilt or preserved (preserved may not necessarily mean rebuilt) is BSC 381C No.101. But looking at a number of documents laying down the design specifications for military Rovers produced in 1959, 1961, 1962 & 1963. All the specifications accept the manufacturer's standard engine colour & all of them quote it as: Engine enamel grey Donald Maphearson LSW 703 I sent a message to these people, http://www.macphersonpaints.co.uk/Pages/default.aspx "I am doing research into Land Rover engine colours for some contracts for the MOD in late 1950s-early1960s. The enamel engine paint is specified as Donald Macphearson LSW.703 I wonder if you are able to still supply that paint or at least equate it to a BSC 381C or RAL? I have searched your site & googled but the only results I get are where I have posted the subject on Land Rover forums!" Had this reply: "Thank you for your enquiry with reference to old colour codes for Land Rover. Unfortunately on searching our records we have no information with reference to the colours used. It is possible that this was before Macpherson became part of the Crown Paints." I would have thought they would have known when Macpherson became part of Crown Paints. So anyway no definition of LSW.703. See what I mean? That is just the engine colour. The bodywork would normally be high gloss heat resisting Deep Bronze Green BSC 381C No.224. Then we get into the worms again as many will argue that around 1970 IRR NATO Green BSC 381C No.285 was introduced. Well there was no such colour in BSC 381C until 1980, there was no Defence Standard on IRR paints until 1980, there was no document introducing the use of IRR paints until 1980. During the 1970s there were various schemes & intermediate colours used. I am writing an article about this based on the documentation of the time so I may be a little while.
-
MI I think wait until you get your history back then you ought to decide what particular era you want to depict. This will determine the colour of the top coat & whether you want to choose an era compatible with fancy unit & formation markings. Even the engine colour, as it was not delivered from the factory in Sky Blue No.101.
-
Well done on getting that chassis plate picture, it is difficult getting the camera & your head in there. The belly plate is from a Pig rather than a Hornet. The exhaust pipe on a Hornet exits in front of the O/S front wheel & the cylindrical silencer was under the front of the engine. So it needed a rather bulged belly plate to accommodate the silencer. I knew that there must have been something on the plate on the right corner. I thought it was my bad eyesight rather than a word being chiselled out. A normal Pig chassis plate has just on the top line 'TRUCK 1 TON ARMOURED' there is no other word. The spacing showed that there was another word up there. Despite what they have tried to remove the Hornet identity is there in the Asset Code 310125.01.777 that for a FV1611 was 310118.01.777 both of these variants were based on the FV1601 which was 311135.01.777 All Hornets were based on FV1601 & not as some drivel in books & the internet say they were modified Pigs. So I think your Hornet was re-bodied from a knackered Pig & a replacement engine fitted from 27 BK 08. This Pig was FFR & had the 2-speed generator which would explain why yours has one. Pigs Mk 2 were not all 2-speed generators there are some single speed ones. But your Hornet history is not just evidenced from the record card & Chilwell register but you have that Asset Code 310125.01.777 evidence on the plate, nobody thought to hide!
-
Thank you that looks all standard Mk 2 & fits in with the Asset Code on the bonnet 1760-2501, other than an ammeter/voltmeter on the dash. Such a meter was not part of the Hornet set up. The engine is not original it should be 7858. What you have I think is 8528 & that was originally fitted to 27 BK 08. That was a Mk 2 & is no surprise as there were often engine swaps in NI. Any chance of getting a bit more of a view of the right side of the chassis plate please? It would be interesting if it says "Launcher" & if it displays the FV code. Not easy taking photos up in there I know! A bit easier, have you a view of the front belly plate as they were different.
-
news is this a record breaking mileage ferret?
fv1609 replied to jim fl4's topic in British Vehicles
It comes from a table in Defence Council Instructions (Army) 40 Part IV Annex issued 18th Feb 1970. As it happens I had gone through the whole DCI (Army) & DCI (General) for 1970 today, teasing out details. It took a while as the DCI pile for that year is 3 inches thick. It just happened to be in front of me otherwise it would have taken a while :-D -
news is this a record breaking mileage ferret?
fv1609 replied to jim fl4's topic in British Vehicles
The annual permitted mileage in 1970 for a Ferret was: 3,000 in UK except: 5,000 in Armoured Reconnaissance Rgts 3,500 in Armoured Rgts 3,000 in BAOR except: 3,300 in Armoured Car Rgts 4,000 in Near & Middle East 2,000 in Far East except: 6,000 in Malaya 5,000 in Singapore -
question Army Clansman RACAL antenna aerial mast tool kit PU12
fv1609 replied to Surveyor's topic in British Radio Equipment
Richard my database shows I have this, but only the first three pages! If I come across them I will see if they have anything useful & scan them. The trouble is I have fair number of documents here although they are unpacked from a recent move they are in no logical arrangement. So I usually give up looking for stuff & only find it when I am looking for something else. At the moment books are stored in the loft & two rooms. I have a lot of fiche I haven't catalogued yet so there may be something there, if I can find the box! -
question Army Clansman RACAL antenna aerial mast tool kit PU12
fv1609 replied to Surveyor's topic in British Radio Equipment
The parts catalogue is Army Code No.61456 -
The 12v coil would have about twice the resistance of the 6v coil. So when fed with a 6v supply it would nowhere near saturate the coil core with magnetism to give the full HT output. You need to establish whether the coil is for a negative or positive earth & that it matches the polarity of your vehicle. To ensure not only that you are getting a negative spark but you are not having to fudge it with a wrong polarity coil wired in reverse to give a negative spark. If it is the latter case you will lose 600v of HT compared to the correct coil. Not a vast voltage but may make all the difference up hill.
-
I'm afraid I know nothing about the electrics in a Dodge, whether it is an insulated or earth return system, if it is earthed whether that is positive or negative, or whether it has been changed & whether the LT connections have been swapped or whether a proper coil has been fitted wound for the appropriate earth polarity. The practical point is to establish the polarity of the spark in the present set up. I use an old analogue Avo, using the highest voltage range (1kV or 2.5kV) hook up a wire from the negative prod to the junction of a sparking plug & its connector. Take the positive lead to chassis assuming it is an earth return system. Briefly crank the engine. An upward rise of the needle indicates a negative spark. Downward a positive spark, so swap the LT terminals on the coil. There is something to be gained (600v) using a coil of the correct earth polarity rather than the quick trick of swapping the LT connections. This is from an article I posted on here about screened ignition but the spark polarity issue is the same. I have edited to suit. It is important to verify you are using the correct type coil. It is also important to confirm that it has been connected up correctly. The wrong polarity of coil or the correct one incorrectly connected will have three consequences. 1. The polarity of the HT spark will be reversed. The ignition coil doesn’t mind the change of polarity but the sparking plugs do not function so well. Engines are designed so that the polarity of the sparking plug terminal is negative. If the polarity of the spark is wrong, it would need a greater voltage for proper functioning. This is because a spark finds it easier to jump from a hot central electrode than from the cooler side contact that is in thermal contact with the engine casting. If the polarity is wrong up to 40% more HT may be required to create a spark at the plug. 2. Sparking plug life will be shortened as metal will be lost from the side contact making gap adjustment short lived. The central electrode is much longer and is designed for this erosion. 3. Similarly there will be increased erosion of the rotor arm. This will be explained in the distributor section later. I know of one Rover that left Army service with the connections to the coil reversed. The engine ran poorly and needed a lot of choke, the rotor arm and the adjacent lead terminals were markedly carbonised. Correcting the polarity of the LT terminals on the coil gave easier starting, smoother running and more power. Modern unscreened coils have terminals marked – and + so that in a negative earth vehicle the – terminal supplies the contact breaker, which on older systems was marked CB. Older coils used in a positive earth vehicle should have the + terminal supplying the contact breaker. In either case the other coil terminal is fed with the energising supply originating from the ignition switch that used to be marked SW.
-
Yes of course Chris being a bit dim tonight (esp)
-
A while ago I was out metal detecting on a beach not too far from here. Talking to someone else doing the same thing, he told me of a medal he had found there earlier in the year that had a good result. http://www.southwales-eveningpost.co.uk/family-reunited-lost-world-war-medal/story-29298542-detail/story.html
-
Chris so it got through the second layer of armour, where did the projectile end up? In the other side of the Pig or did it whizz around inside?
-
Yes there was indeed Richard I have a picture somewhere I'll post up when I find it.
-
Something to check is that you are running with a negative spark rather than a positive spark which will be less effective at high load & high revs. Are the coil LT connections the right way round? Are you certain that the coil is of the correct earth polarity for the set up in your vehicle? If the polarity of the earth has been changed sometimes people simply reverse the LT connections on the coil so as to give a negative spark. But that way you lose appx 600v of HT compared using a coil designed for the specific earth polarity of your vehicle.
-
Has this always done this during your ownership or has it always worked fine & then started playing up?
-
A couple of these became Flying Pigs, 07 BK 39 & 12 BK 30. Thank you once again Chris.
-
The trouble is Terry, people might not realise the significance of all that mess & assume you have just been using it to play paint-ball?
-
Catalogue of Ordnance Stores & Ammunition Section H1(a) Paints, dopes & varnishes 1978. Any other editions (or of Vocabulary of Army Ordnance Stores - VAOS) 1950s-70s would be welcome & indeed most VAOS/COSA of any other Sections are of interest either to buy or pay for copies/scans. I have the 1980 edition above, but I am after the preceding edition 1978 & earlier.
.jpg.611cd628a58c2348caae5c3fd9d98571.jpg)
-
The first Pig has new front wings these have no lockers & of a thicker steel supported by two parallel wide top-hat sections underneath. So they didn't normally sag like the earlier ones which would often reveal the pattern of the cruciform reinforcing strips underneath. The view of the rear doors open is interesting & suggests this is after March 1975. On the right hand door to the left of the red handle for the use of the crew, I can just make out a small horizontal bar. This was so that the driver could lock the rear doors once the crew had debussed to protect himself & the empty Pig. This bolt was formed by a small rectangular piece of bar with an end piece bent up at the end for the driver to operate. It is a shame that the man with the red paint brush didn't highlight the end of this bar, unlike most of the other red paint, this might have been useful for the driver scrambling into the back in the dim light trying to secure the vehicle to see this small end of the bolt. This modification was not in an EMER, rather than the time delay in getting MVEE approval, it was locally designed & implemented as: N IRELAND LOCAL E AND M ENGINEERING INSTRUCTION WHEELED VEHICLES N 257/2 (N IRELAND) MOD INSTR NO.1 The last Pig looks as if was a part-time Flying Pig. You can see a wing supporting strut above the rear wheel arch where the lockers once were. At first I thought it was 11 BK 68 but that was struck off (& not recovered) in 1967, I think it is 11 BK 56 which was indeed a Flying Pig.
-
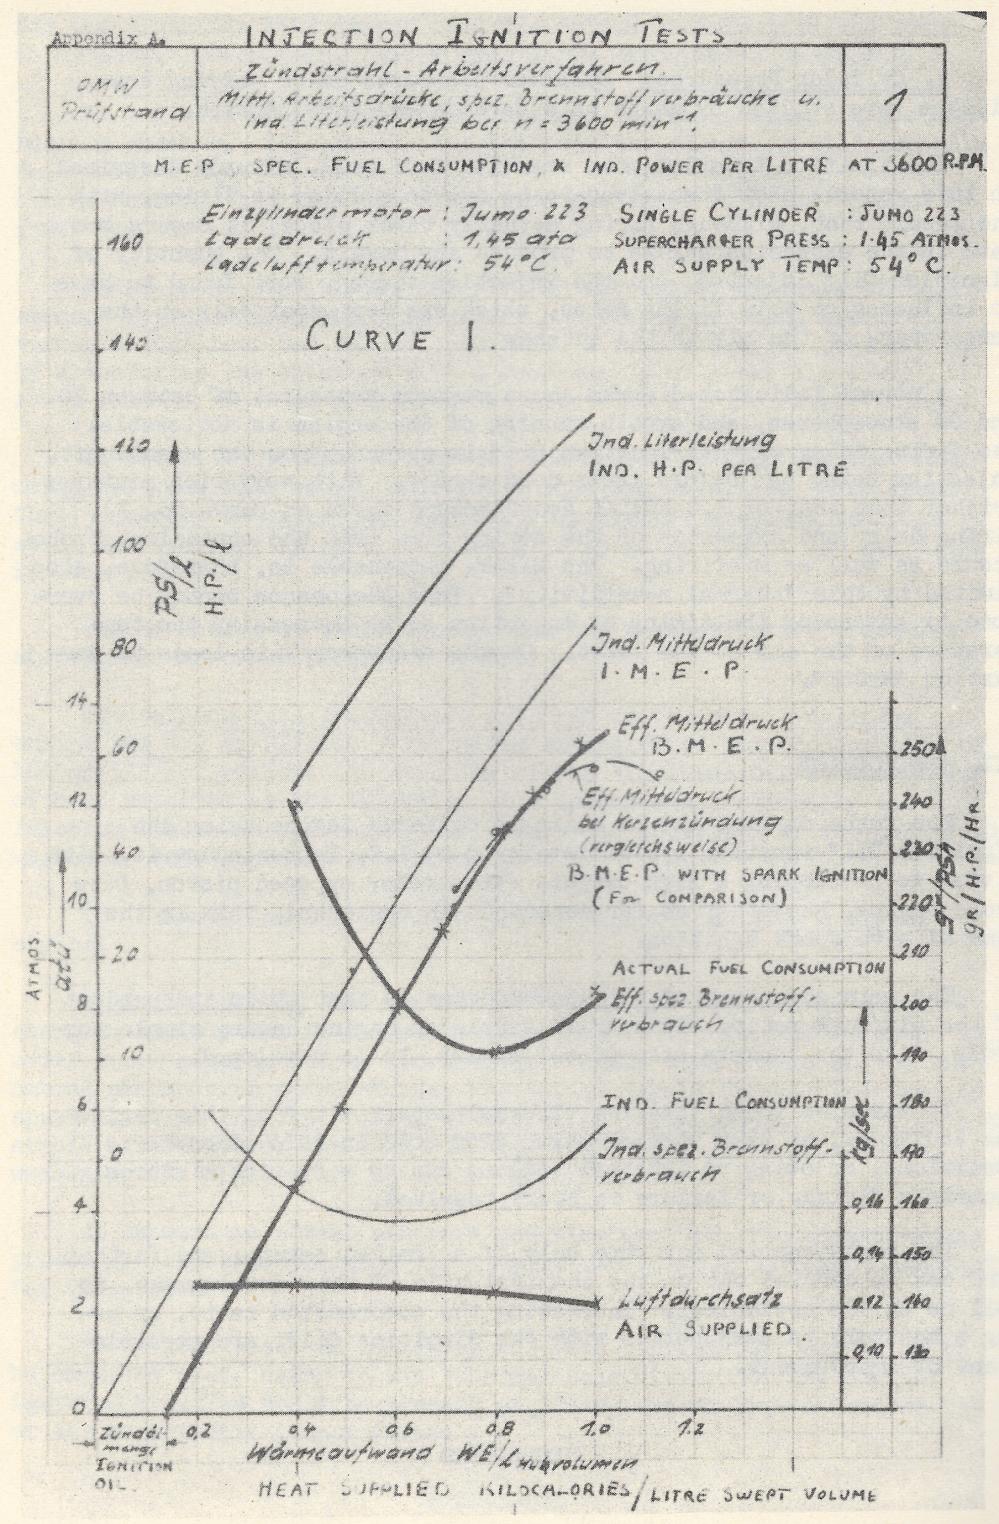
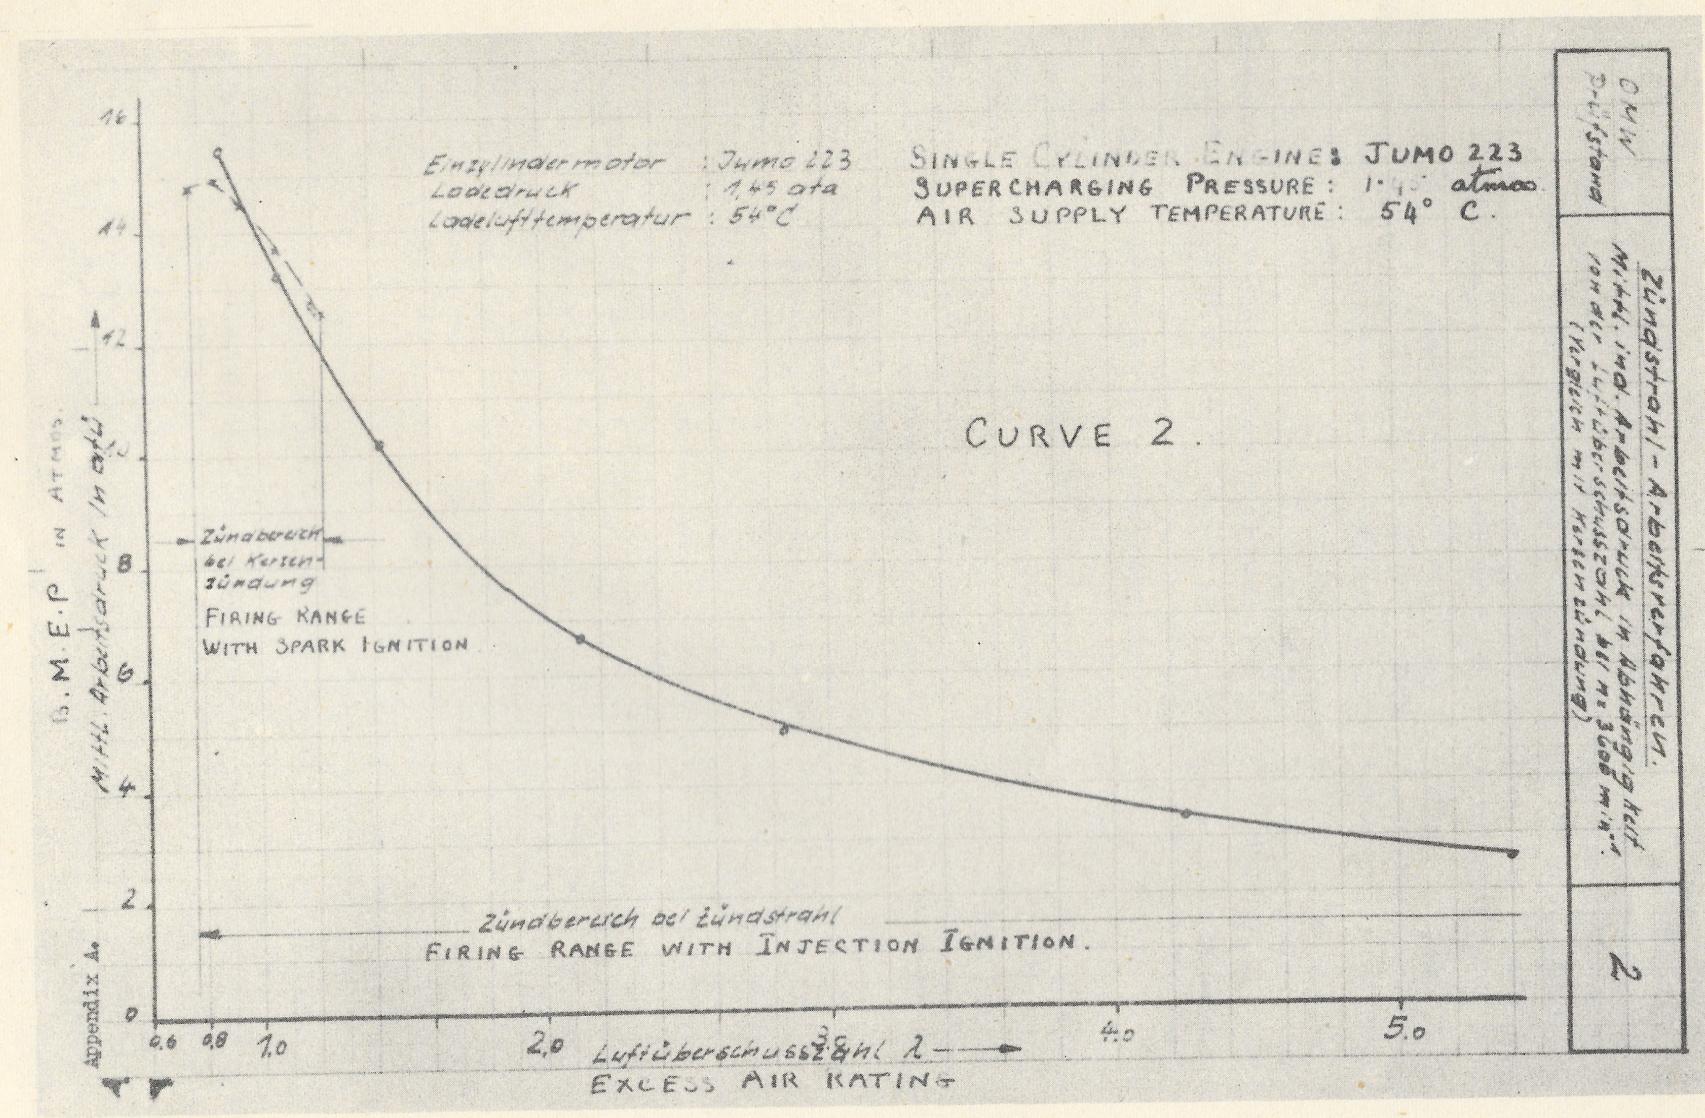
The graphs now have translations.


.jpg.611cd628a58c2348caae5c3fd9d98571.jpg)


