


.JPG.ce5d5173b9120e587cf914646a67c75d.JPG)
Pete Ashby
-
Posts
1,697 -
Joined
-
Last visited
-
Days Won
8
Content Type
Profiles
Forums
Gallery
Blogs
Events
Articles
Store
Downloads
Everything posted by Pete Ashby
-
I was very fortunate some time ago to have the opportunity to purchase a set of blank pressings produced by Richard Taylor. The pressings have to be worked up from the blanks and then modified to fit the specific area under repair. the first two photos are from Richard's post, I forgot to take photos as I worked up my pressings so I include them here to show the work required. These are my pressings drain and drain channel at the bottom of the photo and the seal channel and the repair to the top of the scuttle at the top Without these pressings making a good workable repair would be very hard indeed the seal panel and the drain channel have to be welded together to form one unit before welding into the scuttle. Here it is tacked into position Pete


-
After a couple of weeks in the molasses tub the vent parts were fished out washed off and given the standard treatment the lid will need a touch of spray filler to finish it off, the glove box hinge has also crept into the act in this photo Meanwhile it was out with the slitting wheel take a deep breath and bash on.......... no turning back now This photo shows all that remained of the seal trough and drain, ah well there we are then. Pete


-
Effort over the last couple of weeks has focused on the scuttle vent, the vent lid and operating gear fortunately were in not too bad a condition the seal channel, the drain and surrounding area was just toast. So first job was to remove the lid and operating gear View under the dash complete with original return spring which is nice Lid and operating arm removed Lid, operating lever and hinge bracket disassembled ready to go into the molasses bath for a couple of weeks 4 Pete


-
Very nice car Lenny it's good to see young guys getting involved welcome to HMVF Pete
-
.thumb.JPG.fbe532a8a386c5010fe8daa1ff85aa23.JPG)
Can anyone tell me anything about a Bedford QL my grandad is driving
Pete Ashby replied to gloves's topic in British Vehicles
Looking up the census number on the door gives the following information: Bedford QL 3 ton General Service (that's the rear body style so used for any form of goods haulage) this truck became the British Armies standard general service load carrier during WW2. Census numbers for this this contract ( that's the batch of trucks delivered on a particular contract) L6124332 to 6128331 Contract number for this particular batch of Bedford QL 3 ton GS trucks is S7918 About the photo: As Richard notes above the truck is a late war production 1944/45 but the photo will have been taken prior to 1949 as the numbering system changed at this time. The white bar above the unit identification located next to the radiator in the photo may indicate Corps troops so possibly Royal Army Service Corps or Royal Army Ordnance Corps for example. Pete -
I've been using Warpaint G3 15% for the past year on a couple of projects both spray and brush for closed areas and Iv'e found it very good to work with it thins well and holds the heavy pigments without splitting. Pete
-
Excellent photo of the Churchill and your carrier looks fair decent as well Tom , I agree the Churchill photo looks to be untouched but a word of warning is perhaps in order, when using period color photos as tonal matches it's worth remembering that different manufactures of film used different emulsions and dyes in the film to replicate the colours. It was also highly dependent on the skill of the printer before automated colour balanced printing machines came into being, I seem to remember war time Kodak film was very reactive in the red and blue spectrum for example. Out of interest is that War Paints G3 you are using on the carrier? Pete
-
An awful lot of band width has been burnt up on this subject on virtually every military vehicle forum on the web. Everybody has a an opinion and a very few will claim to have definitive proof so that researching the subject can be like trying to knit fog. My advice for what's it's worth is to start your research with these two publications: British Army Colours & Disruptive Camouflage in the United Kingdom, France and NW Europe 1936-1945 by Mike Starmer available from the author at mike starmer@hotmail.com And: Tilly colours by Mike Shackleton and Mike Starmer published by Trackpad publishing (no ISBN No) In the muddy waters that accompany the discussion on shade,pattern and colour these two publications may help to add a little clarity or at least a starting point. Pete
-
PM sent Pete
-
Thank's yes it was certainly 'tricky' I used several other descriptors for it while doing the the job, if it had just been in the horizontal and vertical plane it would have been fairly straightforward however as the upward curve begins so the whole molding starts to lean back into the scuttle something like 15 to 20 degrees from the vertical following the pressing for the door post. The difficult bit was trying to form a series of bends and depressions two of which form 90' bends into three orientations while not introducing distortion, needless to say the first attempt ended in the scrap pile Pete
-
A bit of an update regarding work on the scuttle in the last set of photos I posted I'd started to repair the RH side screen recess after a couple of false starts it's now complete. originally the whole panel was stamped out in one hit probably hot and by a break press. As I don't have such luxuries I ended up making the repair patch out of 4 separate pieces welded together and then ground to shape. It looks a fairly simple repair however the indented pressing has to curve upwards and also lay back following the contour of the scuttle to get an idea how it all worked I made a pattern out of some very thin steel cut out of a biscuit tin it was thin enough, 0.8mm to let me to shape it easily but stiff enough the hold the form once made So this is how it looked when I started this section That's what is going on here Here is the first section in place, welds ground down and awaiting the addition of the curved section, the trial pattern is on the scuttle The finished 18 gauge section welded in and ground back, some lead work will finish this off after blast cleaning Next job is to tackle the the vent and drain............ some serious tea drinking needed here I think Pete


-
I fairly certain it's a 43 pattern cab because these were a modified front end construction being wider to take four men in the cab. A number of these trucks were taken out of service and refitted with GS bodies after the concept of transported A/T guns was went out of fashion in favor of the 17pdr trailed gun, the Bofors mounted variants continued in service however. Pete
-
I take the opposite view I don't think of it as depressing, I consider it as a part of my rational for spending so much time and money doing what I do. Without wishing to get too heavy about it all for me my vehicles have never been just diversions or trophies to show off, to me they represent a three dimensional tangible piece of world history that had a profound effect on people who lived through the period and shaped the world that exists today. I do agree with you that we are merely custodians of our vehicles not least because no one person can own history, I also believe with the custodianship comes a certain responsibility particularly as the generation who's history the vehicles represent have now all but passed, it's are turn now. Will there be people to continue after us ? a few perhaps, but here I agree with you in that what I find depressing is how the quickly the world forgets the hard and painful lessons learnt in the head long rush to a bright new future. A much wiser man than me once said 'when humanity forgets it's history it is doomed to repeat the same mistakes'. Pete
-
75 CRE (Works) RE Palestine Trans Jordan WWII
Pete Ashby replied to B series's topic in British Vehicles
Excellent photos and very interesting introduction, my Father's CO in the REME was Maj Hugh Macniven an ex Anglo American Oil company Mechanical engineer he took command of the mobile Field Workshop in North Africa and commanded the unit in Sicily and Italy leaving in the Autumn of 1944 when he was posted back to the oil fields in Iraq. Pete -
I think the truck going into the water trough is a No 43 cab Chevrolet or Ford Gun Portee for the 6lb A/T gun the screen could be folded flat to enable the gun to go into action forward. Having said all that the rear body doesn't look right it shouls be a 7H1 body which was basically a flat platform with tubular hood frame and I can see a tail gate and full sides, perhaps re bodied as GS at some point by local workshops?? Pete Additional: The 43 cab was also used for Bofors gun mounts only on Fords I think designated as F60B's.
-
Congratulations on a wonderful restoration Pete
-
Fortress Head Quarters Gibraltar Garrison Pete
-
I think there are two possibilities for the location of of the photo the Div sign is for the 2nd Div and by the style of uniform worn by the chap in the photo I'd suggest it's tropical kit either in Burma 1944, or Malaya at the end of 1945. There is one other possibility as 5th Brigade group of this Div went on Army of occupation duties in Japan
-
There you go then a genuine Pass plate well done a very rare item indeed. This side will have the original vehicle colour under the red paint and PASS will be either white if the base colour is G3 or black if it's light Stone. Pete
-
Interesting photos suggest you upload them into a separate thread in British Vehicles section with an appropriate title . The Unit plate is is also very interesting not least for its genuine authenticity . I think your correct with 10 Corps this is the early design I believe white disc and white bar on red background, later it could be found as the same design but on a green background, I'd be intrested to know if there anything on the reverse side ? as it appears to be a pass plate, note the hole for a split pin top center to keep the plate from jumping out of the carrier bracket. As to the 2719 number I can't find a reference to it the nearest is a group of numbers issued to RAOC Forward Ammo sections in the 2700 range. These were GHQ Middle East Forces numbers so it is possible that the 2719 number was also part of this number allocation although it's unusual being displayed on a plate at Corps level ( the Corps sign ie disc and bar and not on Black later to become Blue Red Blue flash of the RAOC) Pete
-
It could be a Dodge D15 Kevin
-
Pleased to be of help Kevin I always think there's no point in having information if it's not shared
-
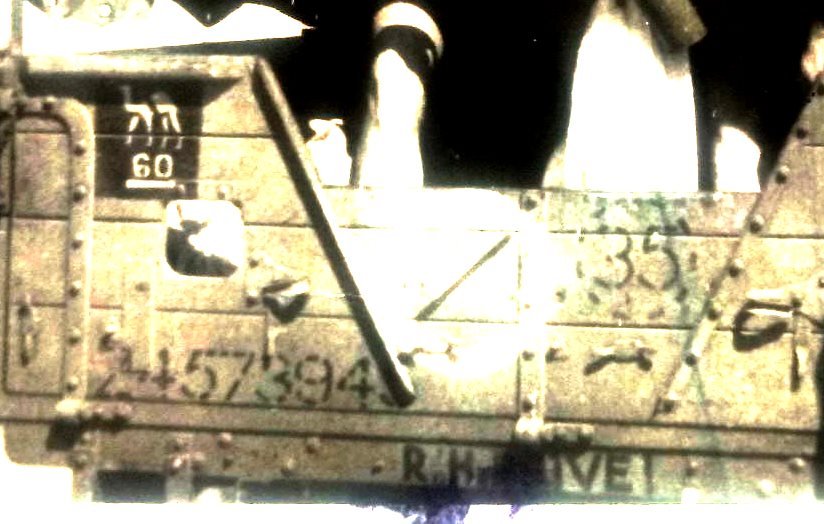
OK Kevin it looks like Wally is right about the no hand signals I've photo shopped your photo to bring out more detail and below the hand is written R H DRIVE ! The white bar under the 60 denotes GHQ troops and for MEF this could be Motor Battalion the Camel we have already discussed The 35 in a circle is a max speed limit sign The truck reg number is Z457394 this is a Ford WoT2 15cwt GS on contract V4433 Pete
-
The Camel was GHQ Middle East, brown or yellow camel on a black background the 60 will relate to the specific unit that the truck belonged to, I can't say Iv'e seen any reference to the hand marking though Pete
-
I would suggest you try the independent book sellers I have done this on numerous occasions for out of print books. Put the title into google with the ISBN number and mark for sale and you'll get a spread of realistic prices, I did this only last week for a book that on Amazon was advertised at £60, when printed it was £38, I bought a brand new unused copy from an online independent seller for £14.50 post paid. Pete
.thumb.JPG.fbe532a8a386c5010fe8daa1ff85aa23.JPG)


