


Danny P
-
Posts
299 -
Joined
-
Last visited
Content Type
Profiles
Forums
Gallery
Blogs
Events
Articles
Store
Downloads
Everything posted by Danny P
-
question metal spring hose for battery cables bedford MW?
Danny P posted a topic in British Vehicles
I don't know if this is a good description but let me name it "metal spring casing" which were around the battery cables of my bedford MW. The longer one was around the positive cable and the short one around the negative cable of course. Is this correct? I don't know if this is an original bedford MW part but its function seems logical to me. It will prevent wearing of the cables entering the battery box. But how are they held in place? I'm sure somebody knows. Thanks, Danny
-
question Negative battery cable earthing on Bedford MW
Danny P replied to Danny P's topic in British Vehicles
Thank you all, that's useful information! I'm afraid I do not really understand why the starter motor or ignition system will not work without that earth lead as it was not connected and my truck started very well? Could it be that the motor is running less smooth without it (hope this is not a very stupid question ... but it may explain why my truck is running not quite optimal at the moment). You're only stupid if you ask anything at all!:-D Danny -
Question: There was a ground strap secured with the negative earthing battery cable on the chassis cross member of my bedford MW (see arrow in below picture). Where is the other end of that strap attached to, if there is supposed to be a strap at all? Thanks, Danny

-
Below two pictures of the battery box in my late bedford MW at which the fire extinguisher is mounted. I also found some comparable pictures on the Forum at which the holes for the fire extinguisher are clearly visible (Rampant Rivets restoration). And a picture of Maurice his bedford if I remember correctly. I assume this is no coincidence! Can anyone confirm this is the correct location for the fire extinguisher since I mostly see them mounted on the floor, especially at early bedfords. There are no similar holes in the metal floor plate of my late bedford MW. Danny


-
Hi Dave, I would let the original one on your Bedford, it looks pretty good and more valuable. Danny
-
Hi Davey, Pipe size is 5/16. Danny


-
restoration Bedford MW restoration project 2012/2013
Danny P replied to Danny P's topic in Blogs of MV restorations
Thank you Jeremy! The stays and wings were a long time on the shelf but now finally fitted. It was a long time ago Guy but thanks again! Danny


-
restoration Bedford MW restoration project 2012/2013
Danny P replied to Danny P's topic in Blogs of MV restorations
Maybe some more nice detailed pictures now I have some time today And I almost forgot to mention the fitting of the second petrol tank


-
restoration Bedford MW restoration project 2012/2013
Danny P replied to Danny P's topic in Blogs of MV restorations
Found the way to fit the spring for the rear gear and have sandblasted some parts from below the cab. Gear box cleaned and checked Furthermore some pictures of the rotten cab frame All parts below the cab fitted, new petrol pipes and a complete new frame Next step would be the bottom plate of the cab As can be seen from the picture there are two reinforcements welded. I was wondering how to restore the inner side of these? Does anyone have an idea? Danny


-
I know this topic keeps coming once in a while but I'm still confused. So here is my direct question, can I use a mineral 85W-140 GL-5 EP doped gear oil for my bedford MW gear box? Danny
-
There is also a plate under the hood on the left side of the bulkhead. On this plate I found the chassis number and engine number. This plate will tell you if you have the original engine with the truck. As you know the engine number is on the right side of the engine. Hope the missing contract numbers will turn up in the near future. Nicky, do you know how many digits the Catalogue ref. number exists. Thanks Danny
-
Thank you Nicky, Yes, the plate is on the right top of the dash. Info I've got so far: Chassis number MWC 66674 with original engine, number MW 72177. Production date according to chassis number is dated 1945 with contract number S-8216. Rear shock absorbers are dated April 1945.


-
Hi Richard, There could be a 2 at about 7 to 8 mm from the beginning of that section but it is smaller than the digits of the chassis number. How many numbers should be there? Danny
-
Richard, Do you perhaps have the Z-number for contract number S-8216 belonging to chassis number MWC 66674 and engine number 72177 ? Danny
-
Thank you both. So post war without pin up needle, no value! Danny and Bas
-
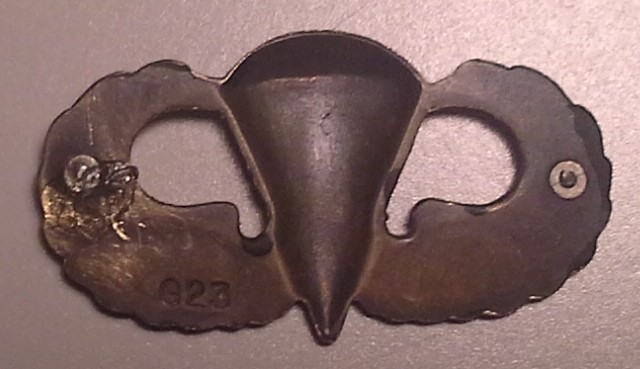
My son found this paratrooper jump wing and likes to know its origin. I'm not familiar with this topic so help on this is much appreciated. Looks like the wing is bronze and it is signed on the back with G23. Thanks, Danny and Bas
.jpg.996d34b6243cb29daa8f495f4ed4a25b.jpg)
-
This is very different depending on the part. I have a copy of the Bedford MW service parts catalogue listing all the nuts and bolts and thread sizes for GBP 20,- excl. postage costs if you are interested. Regards, Danny
-
Thank you very much Richard, appreciate your help! Danny
-
I mean the cylinder head of coarse for a better understanding. The tightning diagram in the manual is only mentiond but not the strength of tightness (moment in Newtonmeter I was thinking of). Danny
-
How tight is the valve block bolted on the engine of a bedford MW? Regards, Danny
-
Hi Jeremy, I've measured an inner radius of 19 cm (7.5 inches) and with a tube diameter of 2.5 cm or 1 inch the outer radius is 21.5 cm (8.5 inches). Regards, Danny
-
Hi Jeremy, I can measure it somewhere this week if this is OK with you? Regards, Danny
-
restoration Bedford MW restoration project 2012/2013
Danny P replied to Danny P's topic in Blogs of MV restorations
Hi Jeremy, Master cylinder is not overfilled. A 1-1.5 mm fiber gasket was fitted and seems to be insufficient since the brake fluid creeps up . The outside top of the master cylinder is wet. I'm sure it is the gasket. Did you perhaps used a paper gasket? But does paper not leaking through? How thick should it be? I have tested a black loctite paste in brake fluid which should remain pliable and flexible but the paste dissolves in the alkaline brake fluid, so this is not suitable. Anyone else familiar with this? Danny -
restoration Bedford MW restoration project 2012/2013
Danny P replied to Danny P's topic in Blogs of MV restorations
It's been a while but here's an update again: Waiting for a lot original 5/16-18 carriage bolts from my friend in the UK to finish the rear body so in the meanwhile I started with the cab. Frame work wasn't so bad actually but the rear beam towards the body has a lot of woodworms. So had some free meals each time I was busy in the garage. Don't ask me how I did it but I managed to close the cab hermetically with wood boards, hard boards, sheets, paper, rubber seals etc. ect. and sand blasted the chassis part. I took me about a week to prepare to be reassured that no grit would come through. Everyone would have declared me crazy but I succeeded, however with some panic attacks in the cab during blasting. I wish I had taken a picture of it but I was happy to break it down at the end of the job. Everywhere grit but not outside the cab. Can you believe it? YES!!!! :nut: Primer as a next step. Working on the gear box and master cylinder and therefore have some questions. How is the spring reverse trigger on the speed lever fitted? The pencil in the pictures is pointing to the hooks of the spring which both fit the small openings on the trigger. So I assume that both hooks should be in these openings pointing upwards if I'm right? I assume the long end of the spring is located between the lever and rod but how to fix this? It has to be pushed down somehow with some tension. I also assume that the rivet has to be replaced? Furthermore the master cylinder is leaking at the top cover. What is the best replacement for the gasket as it looks like the nasty alkaline brake fluid is going everywhere! Thanks, Danny


-
restoration Bedford MWD restoration
Danny P replied to rampant rivet's topic in Blogs of MV restorations
Hi Jeremy, First of all, very nice restoration you're doing! Always follow with great interest. I'm working on the gearbox of my MW at the moment and was wondering why you haven't sand blasted the compressor cooler on the gearbox (see page 9). It looks like it is all steel to me? I'm planning to sandblast the compete gearbox without taken it apart and cover some sensitive parts with ducktape and using fine grit. Any suggestions of other members are welcome too? Regards, Danny


.jpg.996d34b6243cb29daa8f495f4ed4a25b.jpg)


