


BenHawkins
-
Posts
861 -
Joined
-
Last visited
-
Days Won
3
Content Type
Profiles
Forums
Gallery
Blogs
Events
Articles
Store
Downloads
Everything posted by BenHawkins
-
I flatted back the paint on the bonnet last night but now I have seen them in daylight I think there is a bit more work to do on them before the (hopefully final) coat of paint. We have had a power cut on one of the phases most of today so I couldn't use the lathe or mill. However I have been getting the shaper sorted recently and the vice squared up. I am running this on a single to three phase inverter and using a worm drive box to get back down to similar RPM to the original line shaft drive. It seemed like a good way to square up the universal joint socket after the band sawing. It is my first time using a shaper so I used relatively low feeds and speeds. I will flip it over and tidy up the other side before machining into a rectangle (well actually a rectangle with the corners missing). It should then be relatively easy to scribe the profiles on the ends and finish it off with a combination of the shaper and milling machine.


-
I had a number of other tasks to complete this weekend but still managed a few jobs on the lorry. I started with the drag link earlier in the week by blasting and priming the ball joint sockets. Then cut new threads on a longer piece of bar. Followed by giving it a coat of paint.


-
There have been a few distractions this week including a trip to Yorkshire for work, visitors on Saturday and gardening/DIY today. I just fitted a few tasks in, the first was to blast and prime the gearbox supports. I machined some 1-3/8" diameter EN3 steel down and threaded the ends. These will later become the front wing brackets. They need bending, trimming to length and then some convex steel welding to the ends. Back to the garage now to put another coat of paint on the bonnet.


-
I removed end caps from the drag link ball joints. The balls are prevented from rattling by a stiff spring and plunger. It was important to extract these as I was sure I would need to heat the assembly up to unscrew the rod and did not want to soften the spring. The slot and pinch bolt arrangement had allowed water into the thread and meant it took several hours of heating, oil and heaving on pipe grips to extract the rod. The other end was fairly greasy and came off with relative ease. In order to convert them to the earlier pattern I would have to weld up the slot, machine the end back and clean up the thread. I think I will just make a longer rod and keep them as they are as the parts are otherwise interchangeable.


-
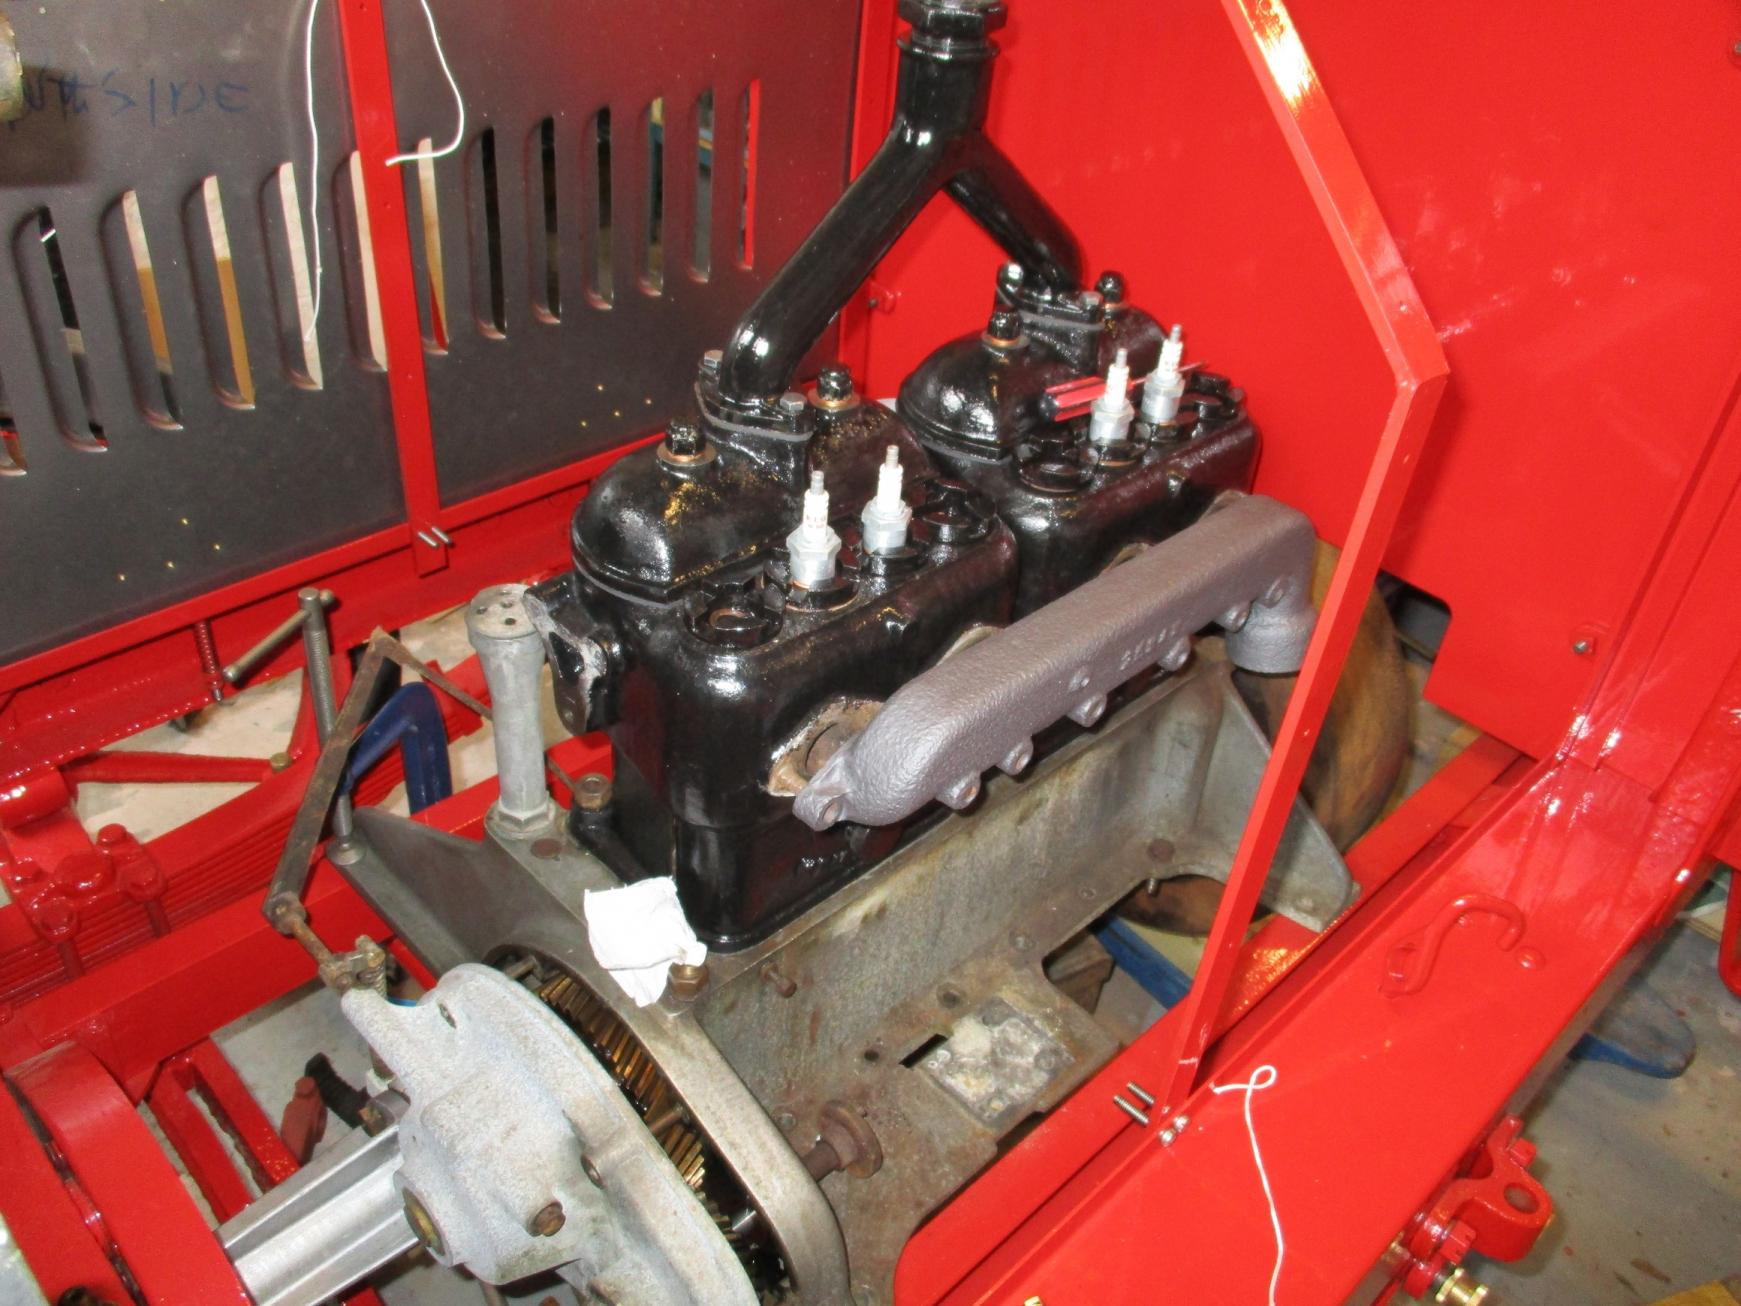
I purchased the correct thickness gasket paper for the oil pump (important to keep the clearance on the gears correct) and have now fitted the pump to the engine. I then put a gallon of oil in the engine which so far does not appear to have made it onto the garage floor. I had to adjust the bends in the steering arm slightly. I was concerned about it limiting the suspension travel and was unable to achieve full left lock. I think this is now resolved but the big lump of metal needs shaping into a nice boss to take the ball joint. I also put slots in the nut so I will be able to fit a split pin.


-
Having scribed some lines on the universal joint socket blank I was able to use a band saw to cut off the excess material. This reduces the amount of material I need to remove using the shaper/miller When I finished turning the front cover on the lathe I transferred it to the milling machine to finish it off. Then gave it a coat of primer. This cover allows a leather gaiter to be fitted to the universal joint.


-
This weekend was spent visiting friends and a restoration show. The "modern" transport needed a few running repairs but there was still time to complete a few tasks. I put the next bend into the steering arm and increased the angle of the first bend then cut it short so it would fit the gap. This should put the ball joint close to the centre line of the axle. I think I will put another slight bend in it to bring it closer to the leaf spring and allow slightly more suspension travel. I carried out a very basic test of the oil pump by submerging it in oil and spinning the shaft with a battery drill. There was decent flow and I could not hold my thumb over the outlet so I guess that is a pass. Once I have purchased some thinner gasket paper it can be refitted. After cutting a new gasket for the timing cover I was able to fit it. There is a front cover that I need to make for the rear universal joint so I have roughly machined a ring of steel to make it from. Most of it needs to be turned to swarf but at least it will be a lot lighter when it is finished.


-
All my friends need houses with massive garages and three phase yet all the new houses are exactly the opposite. This is obviously why the house we built won a "Built in Quality" award!
-
Every so often I find I can't move because I am surrounded by lorry parts. So in addition to putting up some shelves one of todays tasks was to do something about it. For example I made up the gaskets for the sump. Then bolted it into place.


-
Having cut a keyway and made a key for the steering arm the next step was to bend it. I borrowed some oxy-acetylene equipment to warm it up and had my glamorous assistant apply the leverage via a long piece of angle iron clamped to it. I then brought it back home to check against the chassis and mark up for the next bend. This is the track rod I intend to use. It is the later type with pinch bolts to lock off the adjustment rather than lock nuts. When I take it apart I will see if it is easily converted to the earlier type.


-
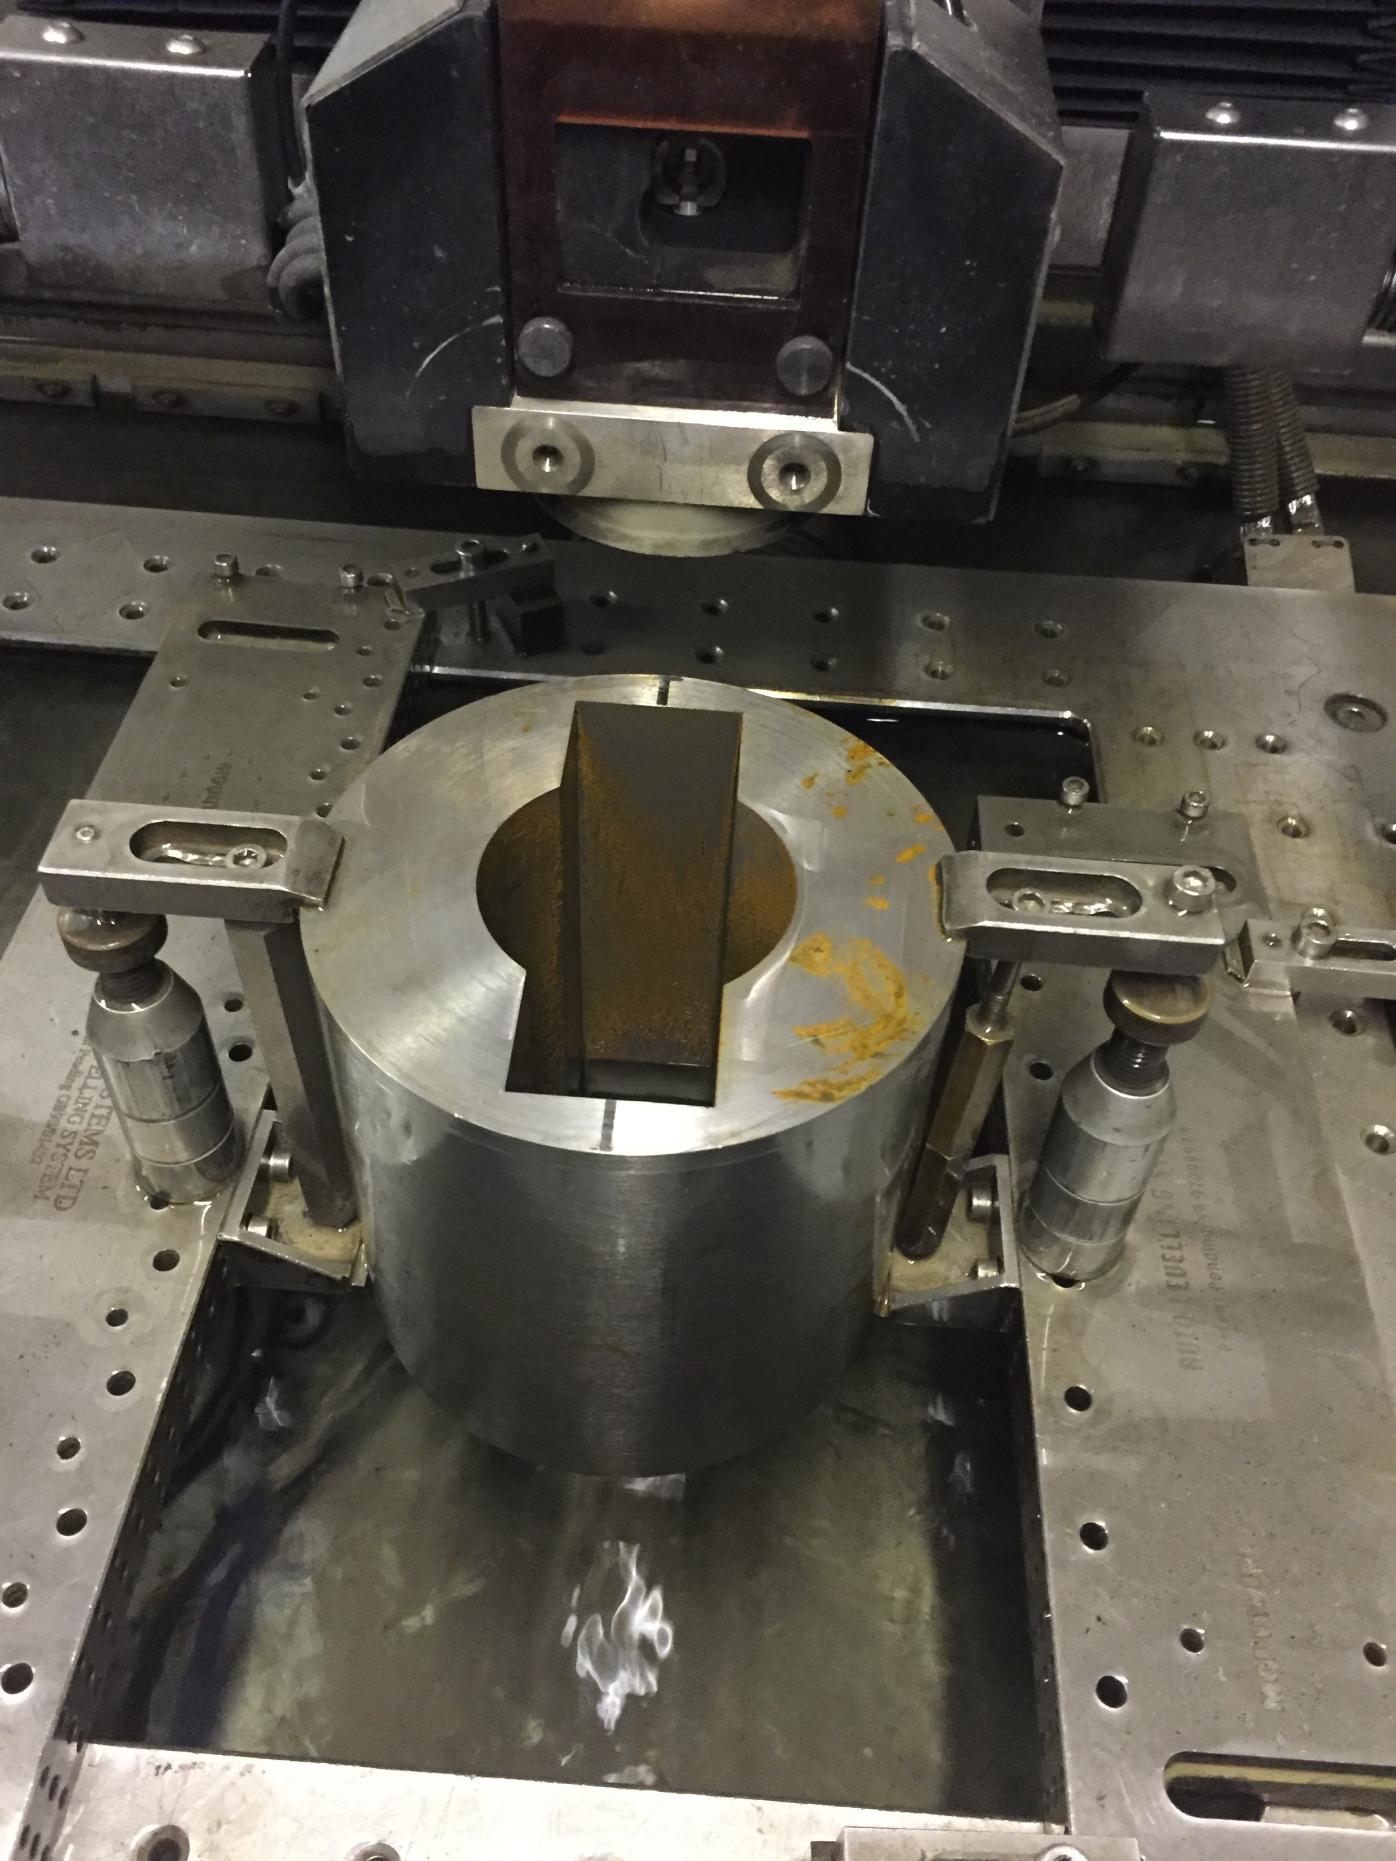
On Monday lunchtime I dropped off the block of EN8 at the wire eroders so they could cut the internal profile. It took 30 hours to cut the profile (due to the depth of the socket), but the machines can run completely unattended. They can even rethread the copper wire if it breaks. I have also finished turning the diameters for the male part. This needs the large end making spherical then cross drilling to accept a piece of 1-1/8 bar. I hope to make the end spherical using the boring head and rotary table on the milling machine. I purchased this several years ago with many parts missing but think I now have it working well enough to attempt this job.


-
As it is starting to look a bit like a vehicle I am beginning to think about how to register it for use on the road. Obviously it would be great if we could reclaim the original registration. We know if was delivered to Ernest Shentall in Chesterfield and although the delivery date is not readable in the Dennis records the final month the order appears in the order books is January 1914 so it was must have been paid for before February 1914. I have assumed that it was therefore delivered in January 1914 but can't be completely certain. When Dennis registered vehicles for customers or when they were showing them at exhibitions they would often register them in Stockport to get the DB prefix to the registration number. These records survive but there is nothing that appears to tie in with this vehicle. Also there is a photo that was taken just prior to dispatch and Dennis had not painted the number plates suggesting Ernest Shentall had not registered it prior to delivery. Derby City appears to have used the CH prefix and again these records seem to have survived in their entirety in the Derbyshire records in Matlock and we visited these a couple of years ago but the rest of Derbyshire started with the R prefix and it would seem this is the most likely place for Ernest Shentall to have registered this van. Sarah and I booked Thursday off work and visited the Kithead Trust in Droitwich. They are custodians of the Derbyshire vehicle registration cards and we did not really know what to expect from them. The card index seems to have been made in 1921 and therefore only shows those still registered there at the time. This card seemed to be the nearest match (R1693): But according to the period catalogues the chassis weight was 2tons 2cwt without the body so was probably under 3 ton unladen weight with the body. It is a shame around fifty per cent of the 1914 period cards were void and it does not really help narrow the search down at all. The trust volunteers were very helpful and it is great they have been able to save so many documents like this.

-
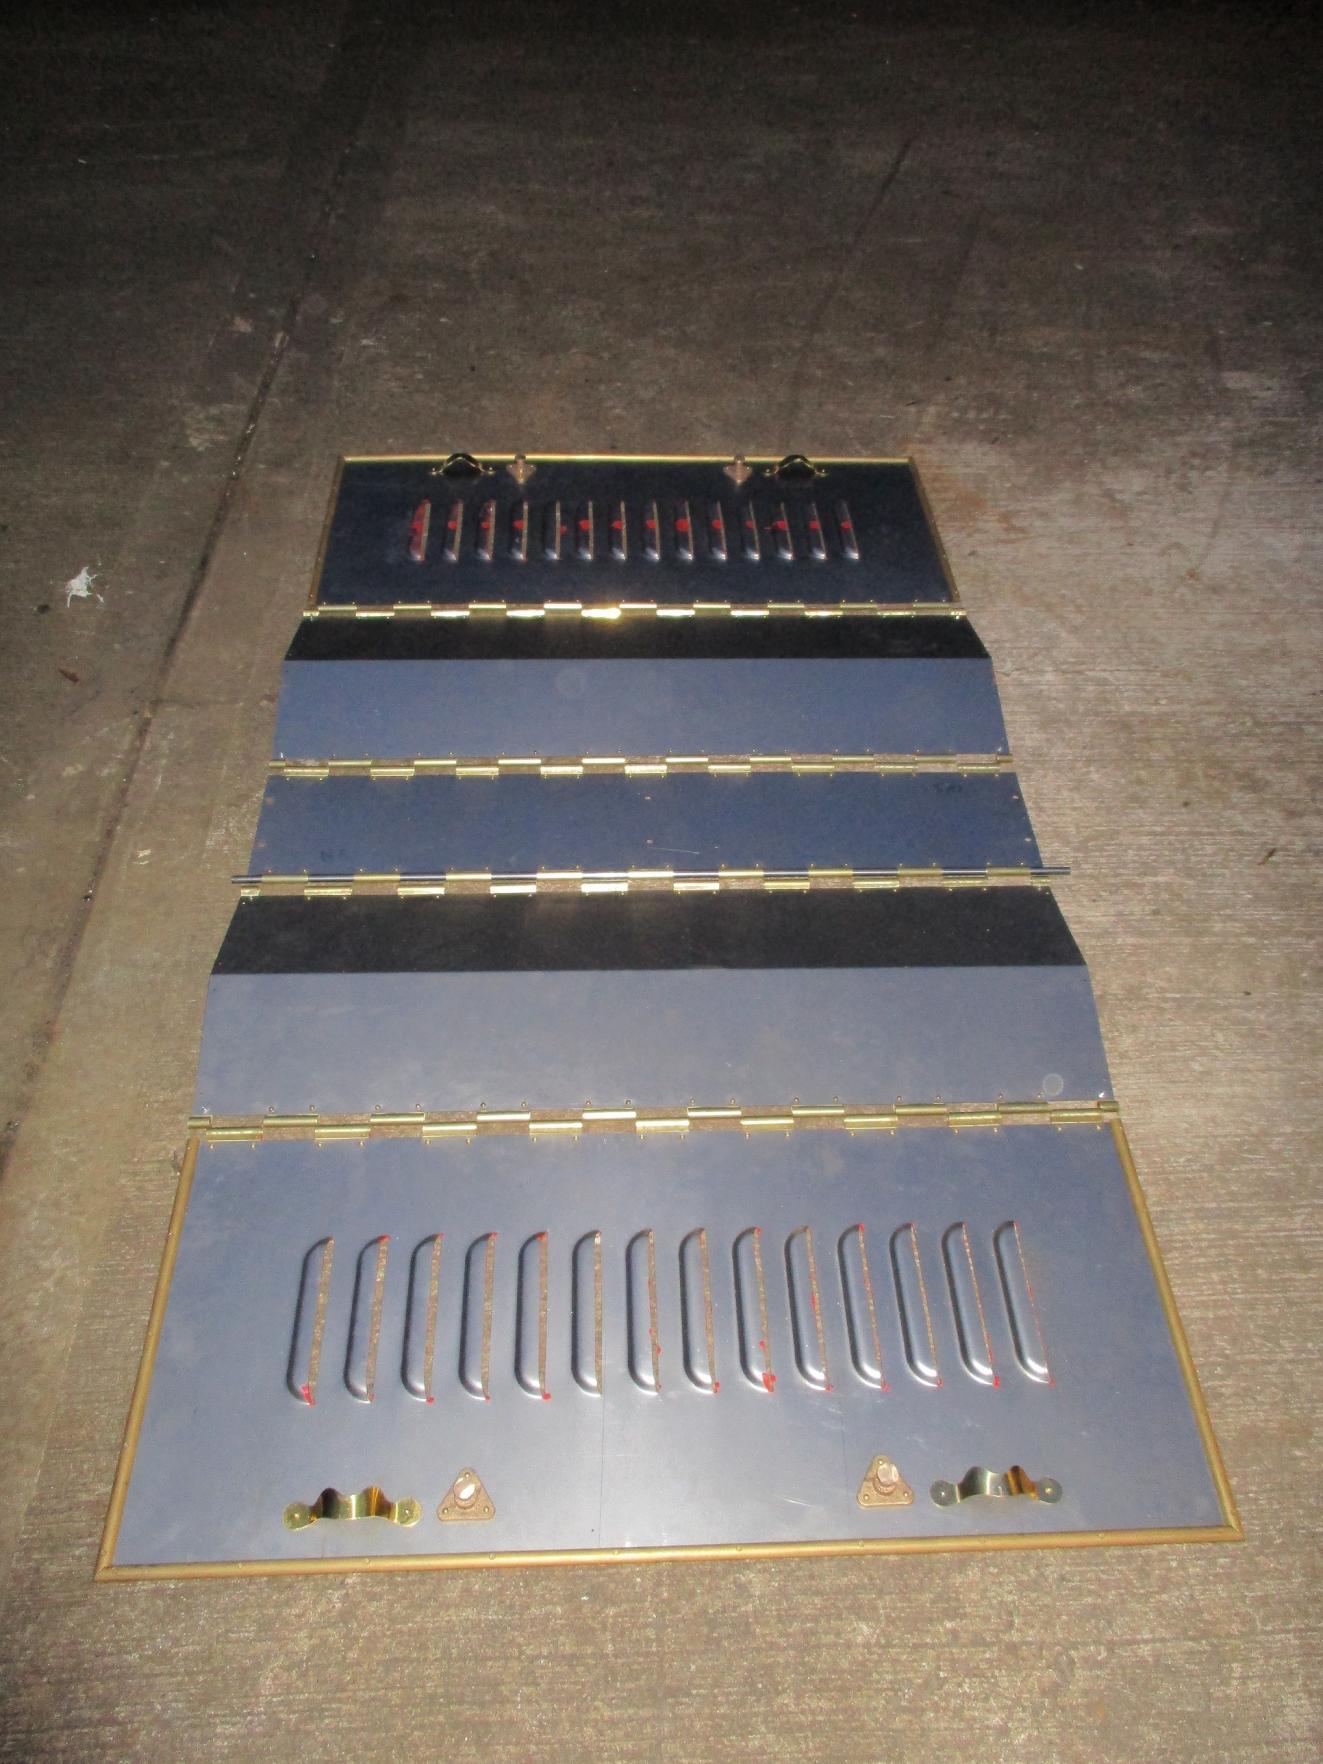
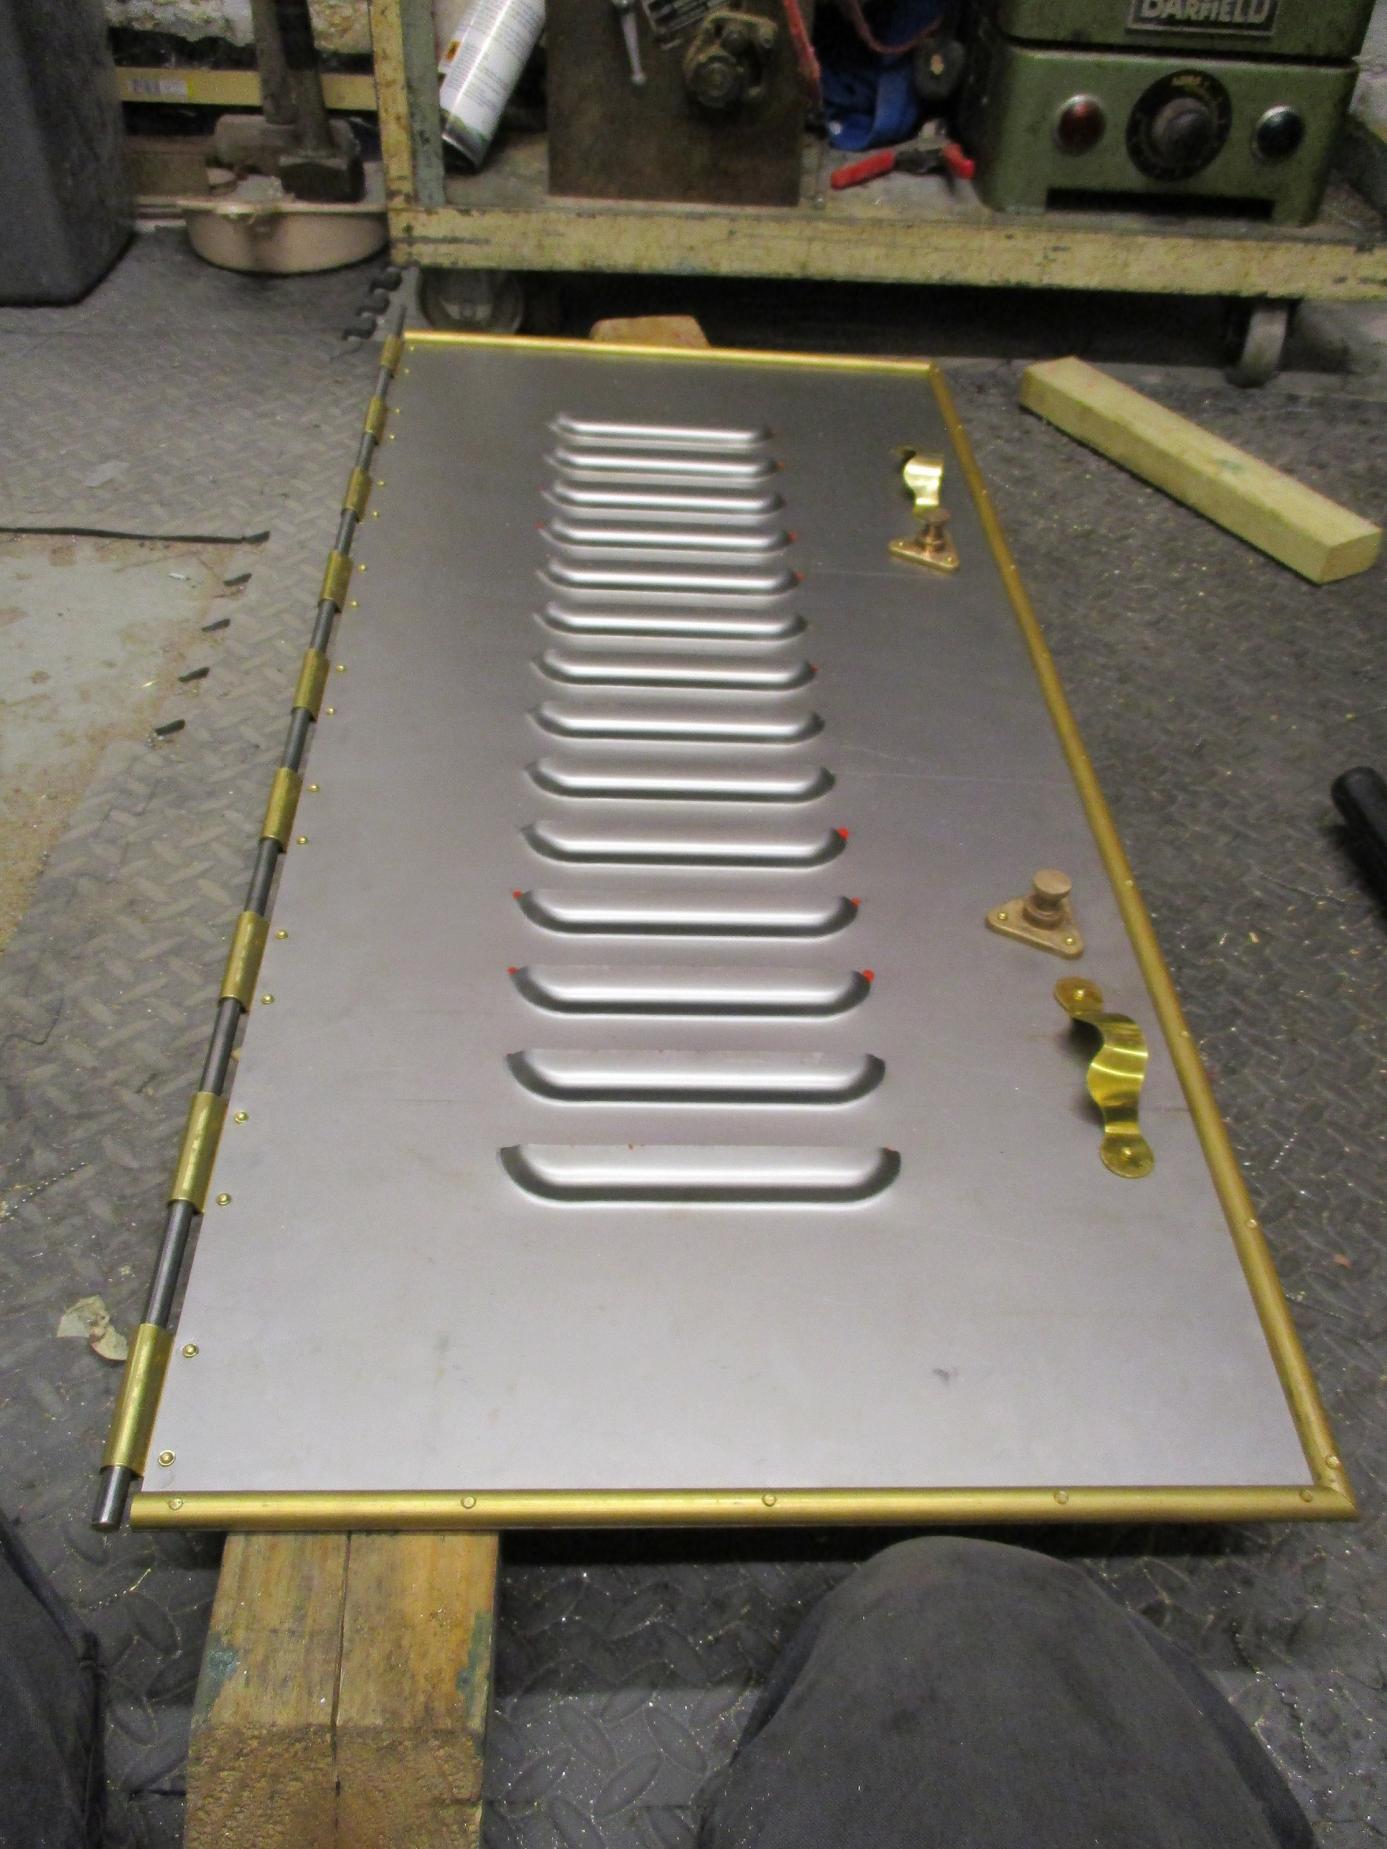
We certainly are! The evenings this week were all spent finishing the bonnet riveting and I have now managed to give the steel a coat of etch primer. That meant I could spend Saturday in London and return the borrowed riveter. Today was spent repairing my milling machine so I can use it for the propshaft work, when a couple of screws arrive I hope it can all go back together but until then the workshop if covered in bits of milling machine. Lunch times at work I finished machining the big lump of EN8 steel to length for the rear universal joint and I intend to take this to the local wire eroders tomorrow lunchtime and persuade them they want to cut the profile in the middle. The mating part gets pinned and brazed into the end of a piece of tube so I have faced off and centre drilled a blank for that as well. The exhaust gaskets arrived at the start of this week. I tried a few places in the UK but in the end had them made in Thailand for a very respectable price. I am still waiting for the "off the shelf" crush washers for the valve caps ordered from the UK on the same day!


-
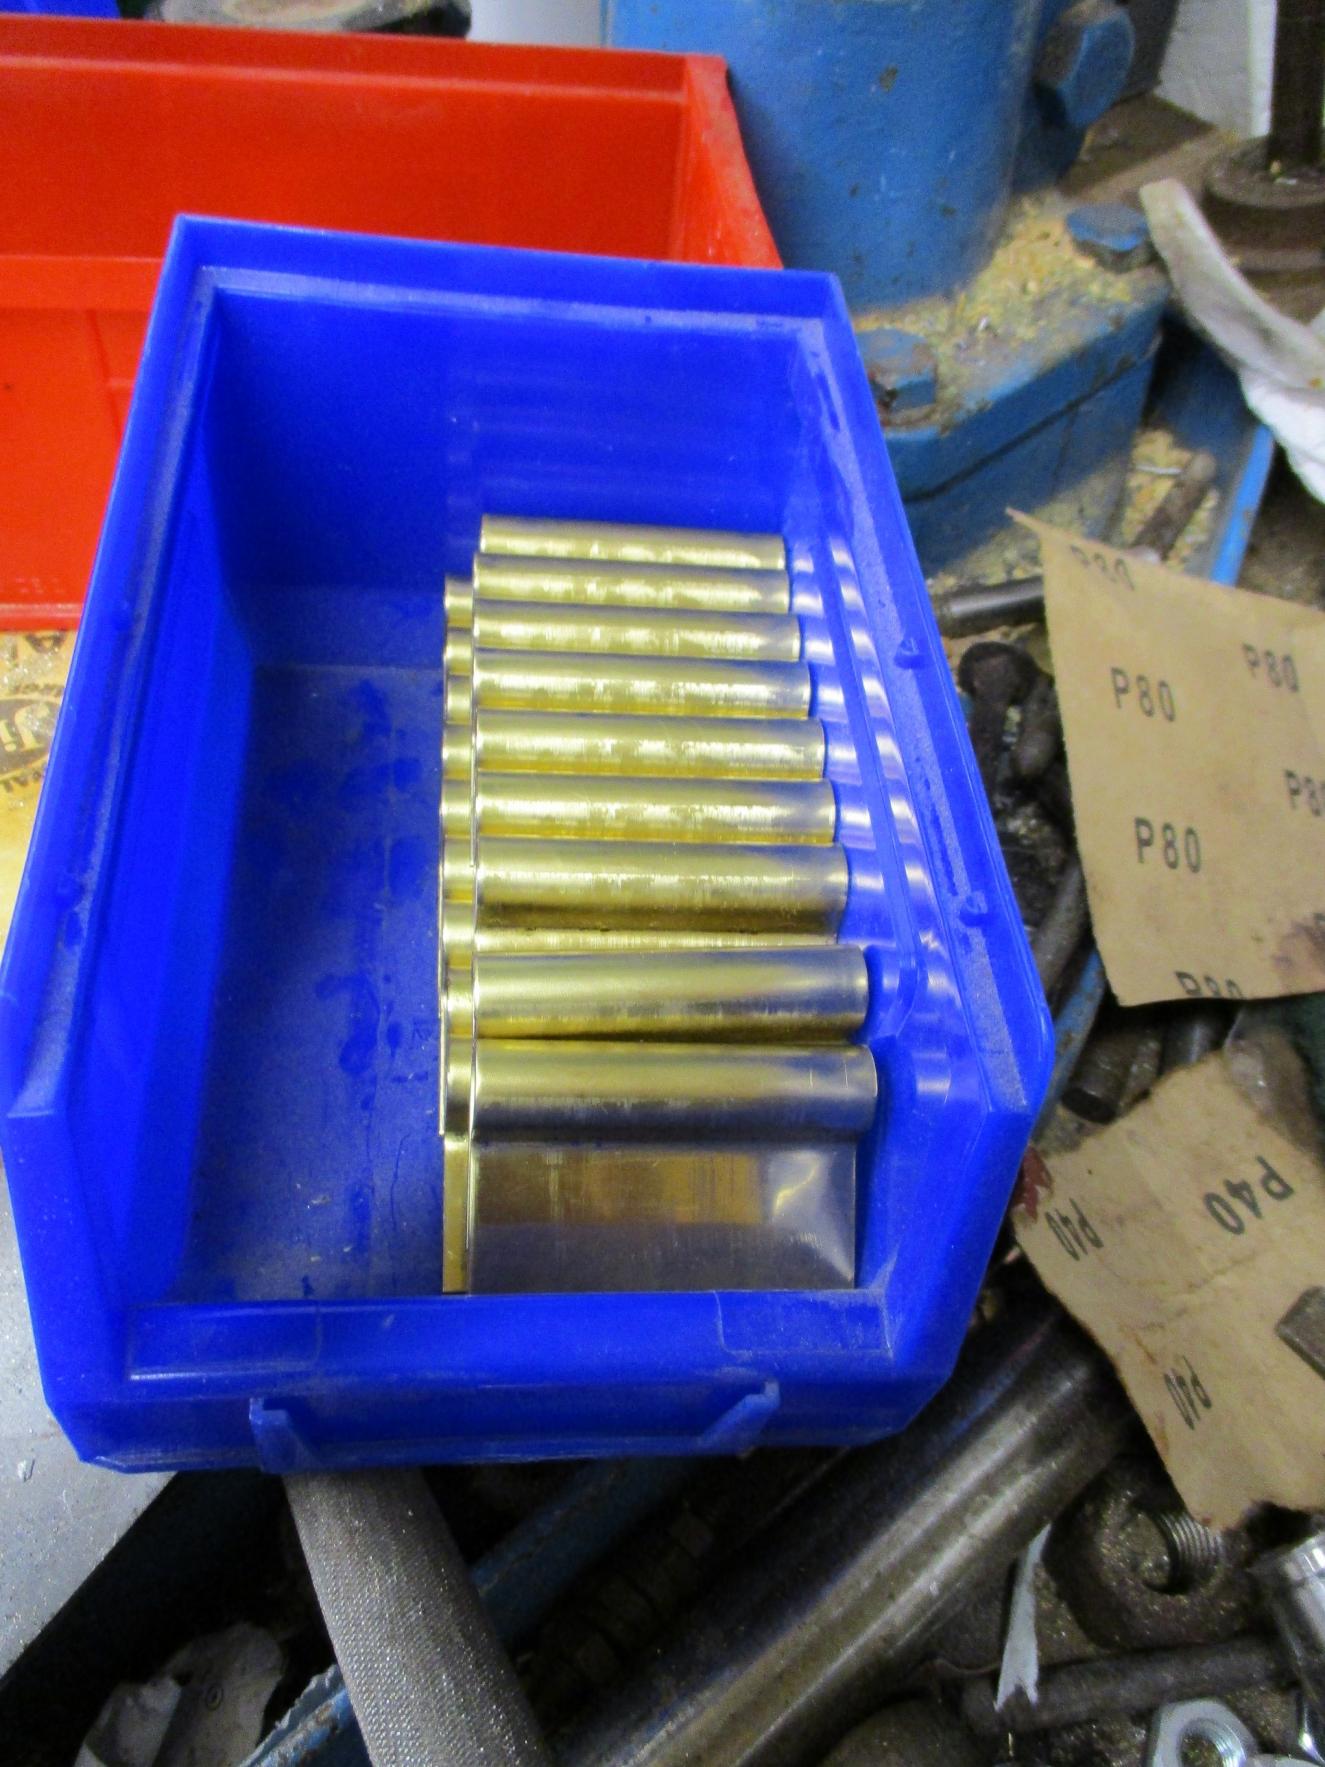
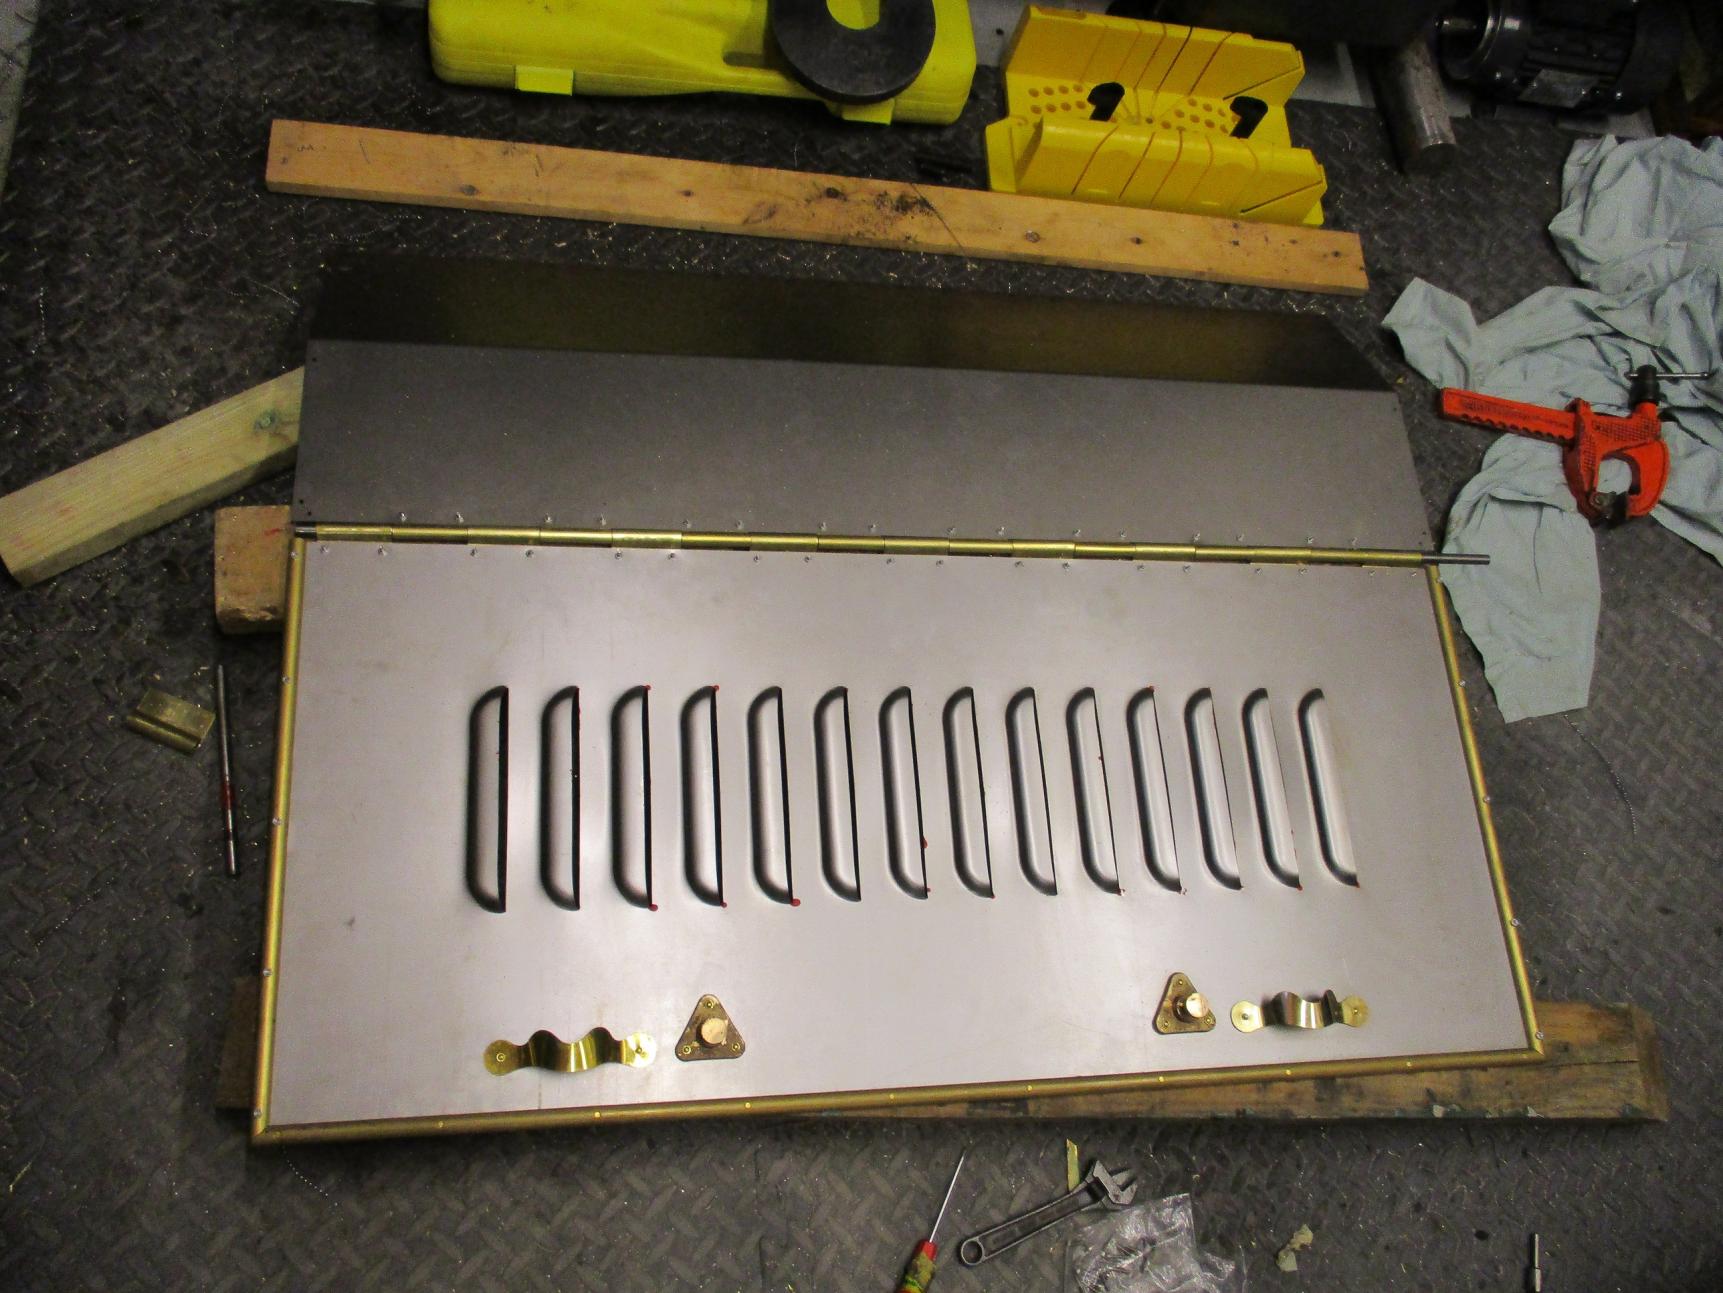
Between Sarah and I we pressed all the rectangles into U shapes. Then into Ps Then drilled and screwed the hinge pieces into place, checking things looked right along the way. Then replaced the screws with rivets. I am sure that counts as a romantic valentines weekend! Hopefully I can finish the last few bits of half round edging over the next couple of evenings and get a coat of primer on before it all goes rusty.

-
The glamorous assistant required some entertaining and dining this weekend but helped out in the garage for the rest of the weekend. I started on the replacement steering arm by facing and centre drilling a length of EN3 steel. Then turned the taper and thread on the end and checked it fitted the axle. Using a bent piece of welding rod to work out the approximate length required Then Sarah turned the diameter down for me. It needs a keyway adding to the taper before heating up and bending. Then it will need cutting off to length and a boss shaping for the ball joint to fit to. I need to machine a tapered socket for the ball joint and that is probably beyond the capabilities of my facilities.


-
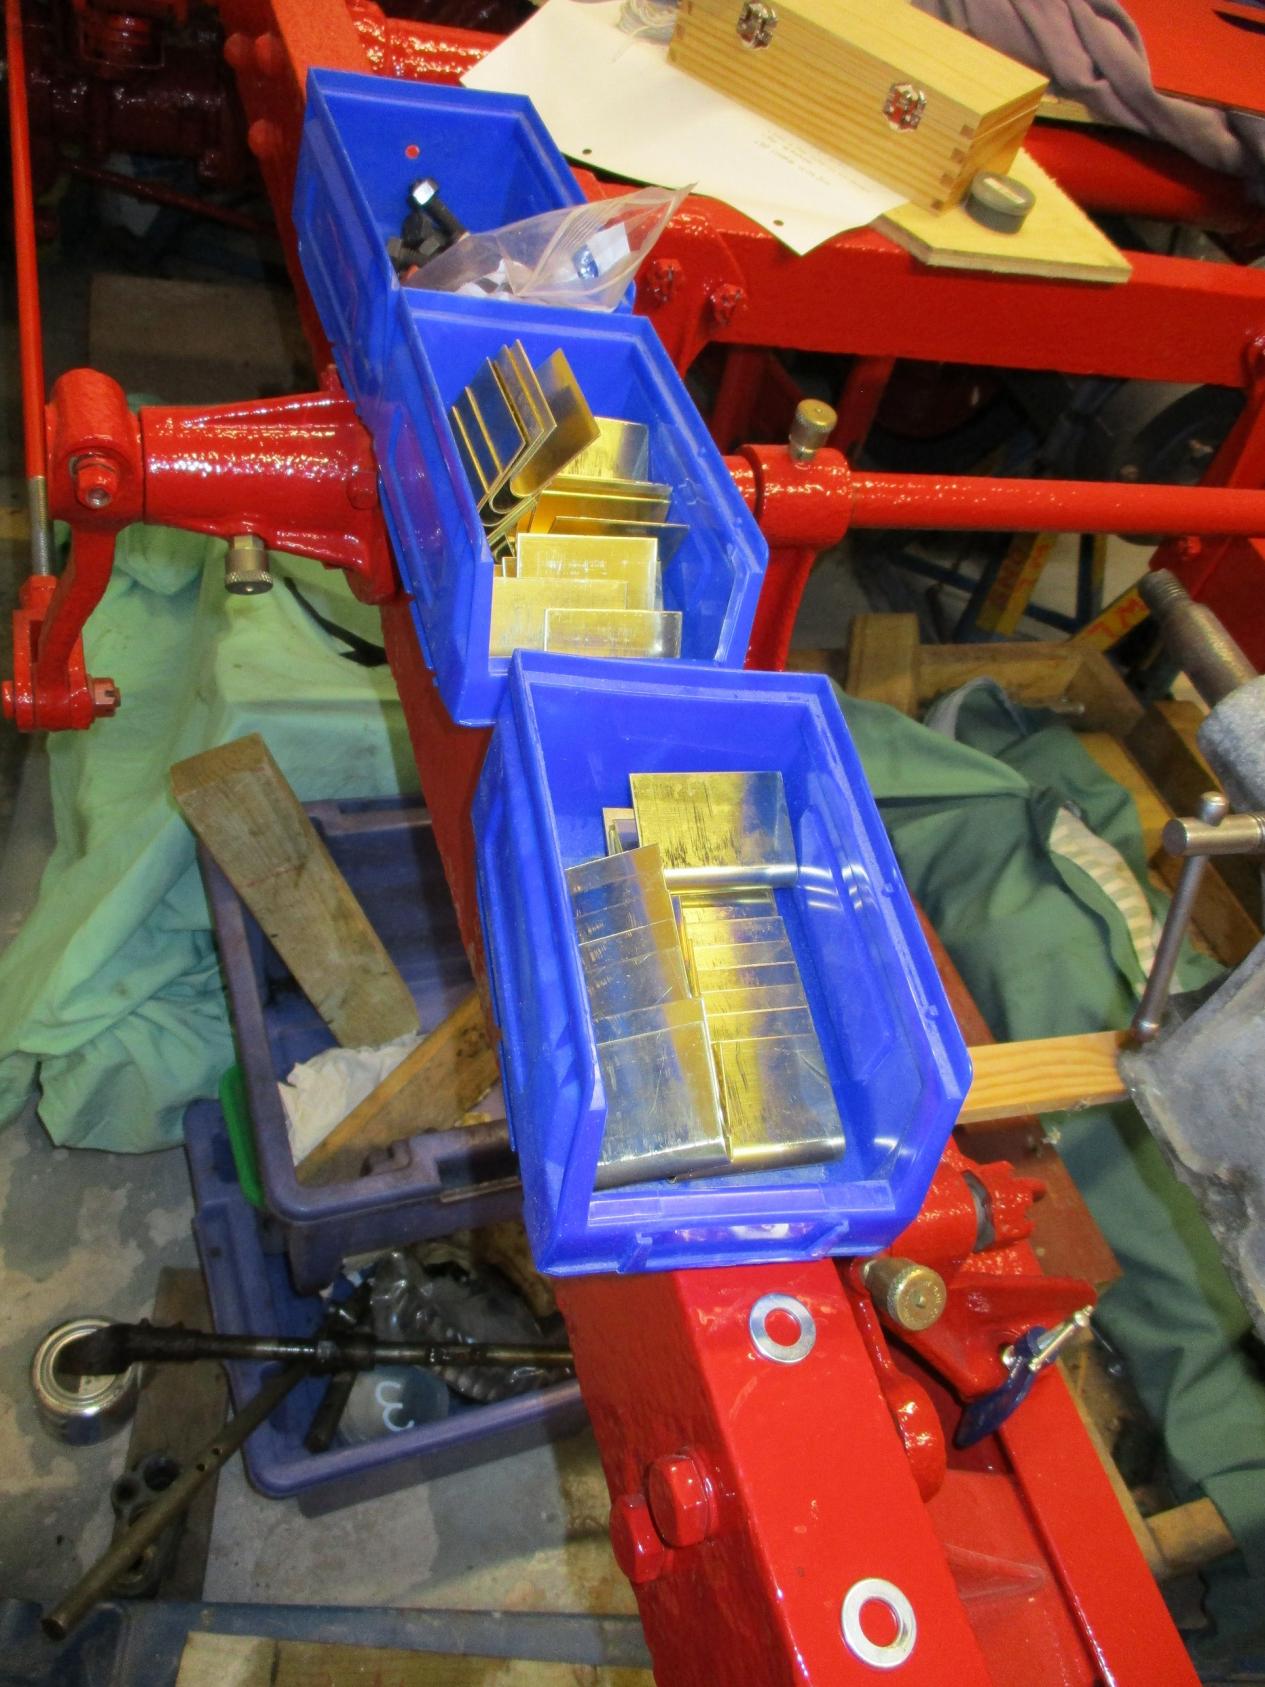
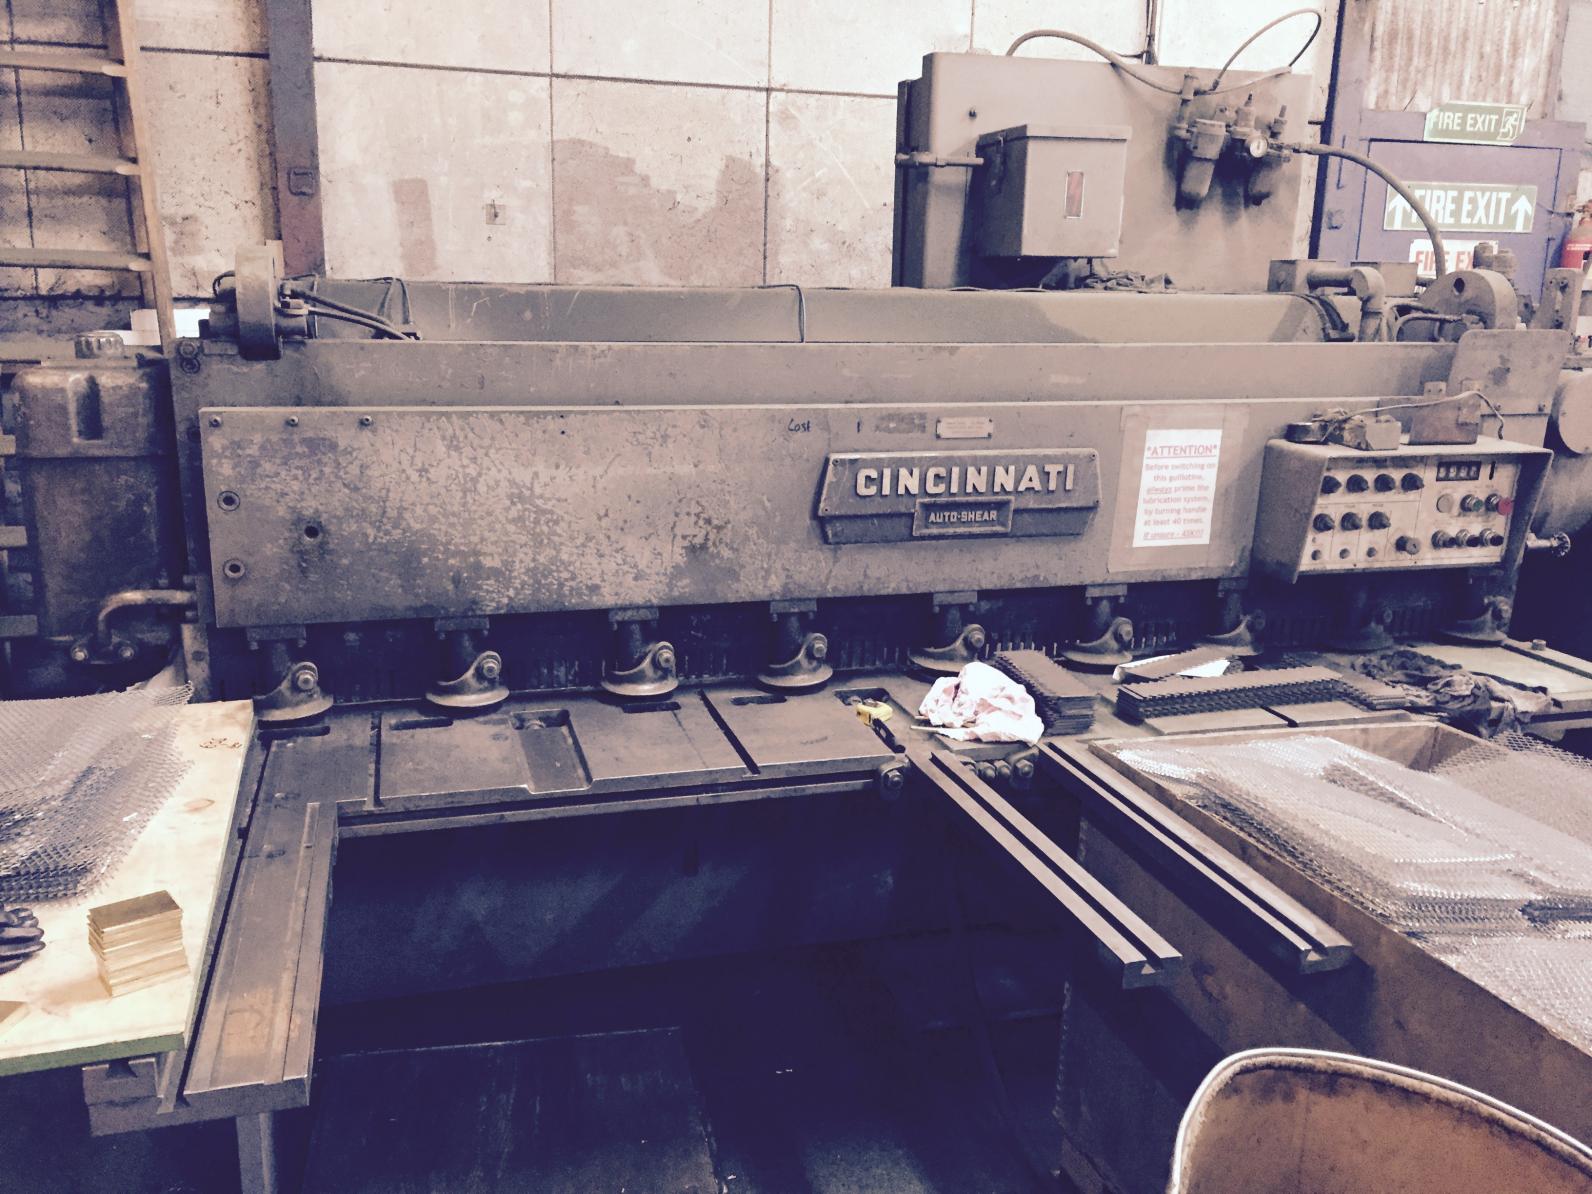
At the start of the week I spoke to the proprietor of a local engineering company. They were extremely generous in letting me visit on Tuesday evening to use their guillotine. This is a fantastic machine and could happily cut 2m lengths of 4mm steel all day long. Obviously it made very easy work of my little bits of brass. 60 rectangles in the time it would have taken me to cut one out! I previously purchased a large piece of EN8 steel and have started to clean it up ready to make the rear universal joint. The inner profile of this will be quite a challenge to machine as it is a 6" long.

-
There is no sign of this on the drawings or on the surviving fire engine with a very similar bonnet. The drawing for my bonnet has not survived so I am merging the information from other drawings and photos. I have scanned the carriage monthly article. Before committing to changing the design of the body or removing the lintel over the garage door I think I will see how much the springs deflect when I start to load them by installing the transmission.


-
I have started to look at the design of the body and made a quick sketch based on the information in the manuals and the photo as it left the Dennis factory. It looks like it should be a few inches taller than my garage door. The body construction is described as: "Sides and roof made of whitewood, ash framework, best finish. Top covered with zinc". There is obviously still quite a bit of work before I can write out a cutting list but I plan to copy the sizing of the ash frame from the plans for a postal delivery wagon in a July 1908 copy of "The Carriage Monthly"

-
The paint had dried on the selector gate and steering box bracket so I bolted them into place. This also allowed me to line up the steering column and drill the bulkhead for the top bracket so I could bolt that in place as well. The rest of the weekend was spent cutting rectangles of brass and filing them to the correct size for bonnet hinges. A guillotine would be the right tool for the job but I don't have one. I have made 1/4 of the hinges required and now have a sore arm. I then lined them up on the bonnet, drilled through the laser cut holes in the bonnet side and secured them all in place with screws. Followed by withdrawing the hinge pin to separate the panels, reinserting the hinge pin to keep everything aligned and removing each screw in turn to replace it with a rivet. If I can't find a guillotine to borrow this week I think I will cut out lots of brass blanks with the angle grinder and put 20 or so in the machine vice at a time to mill them to size.

-
Actually that is a very good point. The upper casing has a mounting flange for a PTO box at the front. As it is the front mounting that is particularly bad I could make an additional bracket to fit to that as well. Now there are holes through the water jacket tops it was easier to clamp them on the mill to reduce them to nearly the correct height. Then back onto the surface grinder to tidy up the mating face. Followed by putting them side by side to grind the manifold connection so they are both exactly the same height. I then cut some rubber gaskets and tried them in place.


-
And a few more small jobs: Threaded the ends of some 1/2" EN1A to take the previously made clevises for the radiator tie rod. Followed this with a coat of paint. Blasted, primed and a coat of paint for the "change speed and brake bracket" And the same for the steering box bracket. That's it for this week!


-
The weather was nice again yesterday so I spent it in the yard welding again. For the front gearbox bracket the base of the gearbox has a complicated shape. I had previously shaped each web to closely follow this shape. However for the piece that bridges the two I used a flat strip and then turned the welding current down so I could lay down a number of beads and grind them level with the flange. So it is now fully welded and a good snug fit. I have not had the courage to drill through the casing for the bolts yet!


-
After centre punching I started the holes with a centre drill. The big hole was made by working my way up through cutter sizes. Then after the other drilling and tapping operations I tried a first fit. They need machining down a little and hopefully I can get that done over the next week.


-
Annealing the brass strips after the first operation would probably allow me to close up the diameter further. Another variable to try out. I had a couple of work day trips and was otherwise occupied today but I still managed a few tasks! Using the milling machine I faced the top of the second water jacket. Then as it was difficult to hold in the vice to machine the bottom I used the surface grinder as it has a magnetic table. This gave me flat faces I could work from to mark out where I wanted to put the holes. One of the difficulties of working with castings is finding the part you want within them, it is quite easy to start machining and then find there is not enough material left where you need it.


-
The handbrake/gear change assembly needed modifying with the new laser cut profiles but also needed some curved bits of steel. In my stocks I found a piece of bar of the correct radius that I could use to press the curve. I then cut sections out and welded them in. Now it is fully welded and the welds ground flush I can blast and paint it.


