


Catch 22 LBDR
-
Posts
629 -
Joined
-
Last visited
Content Type
Profiles
Forums
Gallery
Blogs
Events
Articles
Store
Downloads
Everything posted by Catch 22 LBDR
-
Yes, the other seals are standard but not the swivel balls, the seals that were on it werent good enough to get measurements off. I can get them made but at £40 a pop i want to be sure there right.
-
I know this is a lot to ask, but would you be able to remove the seals for me:red:. I couldnt aford to ship the hole axle to Ireland. Thanks Ross
-

film/book review Restoration of GPW 192326
Catch 22 LBDR replied to Nigelr32's topic in American Vehicles
Looking good Mate, keep up the good work:-) -
Alvis Stalwart 18 ET 29 restoration project
Catch 22 LBDR replied to Catch 22 LBDR's topic in British Vehicles
Thinking about it Shaun, i dont think it would be necessary. The prob with Stolly's is there are too many places for the water to lie, and most people dont check under the load deck. They really need to be kept in doors or well covered and in true Army style, keep it painted, then she will last forever. If you think it need attention then i would see to it as soon as poss. They seam rot from the inside out so you might not see it all. Its also worth knowing that there are different grades of stainless and it can still rust:wow:. You also need to weld it with stainless rods or wire. not cheep Mate. Good luck and keep an eye on this thread, at the very least it will tell ya what not to do:nut:. lol. -
Alvis Stalwart 18 ET 29 restoration project
Catch 22 LBDR replied to Catch 22 LBDR's topic in British Vehicles
Thanks Mate, Im using a stick welder so i think i need to go shopping:cheesy:. -
Alvis Stalwart 18 ET 29 restoration project
Catch 22 LBDR replied to Catch 22 LBDR's topic in British Vehicles
This is what was left of the exhaust, the next part to rebuild.

-
Alvis Stalwart 18 ET 29 restoration project
Catch 22 LBDR replied to Catch 22 LBDR's topic in British Vehicles
The new bilge pump out let pipe, the middle pipe is what was left of the old one. I painted them with high temperature paint.
-
Alvis Stalwart 18 ET 29 restoration project
Catch 22 LBDR replied to Catch 22 LBDR's topic in British Vehicles
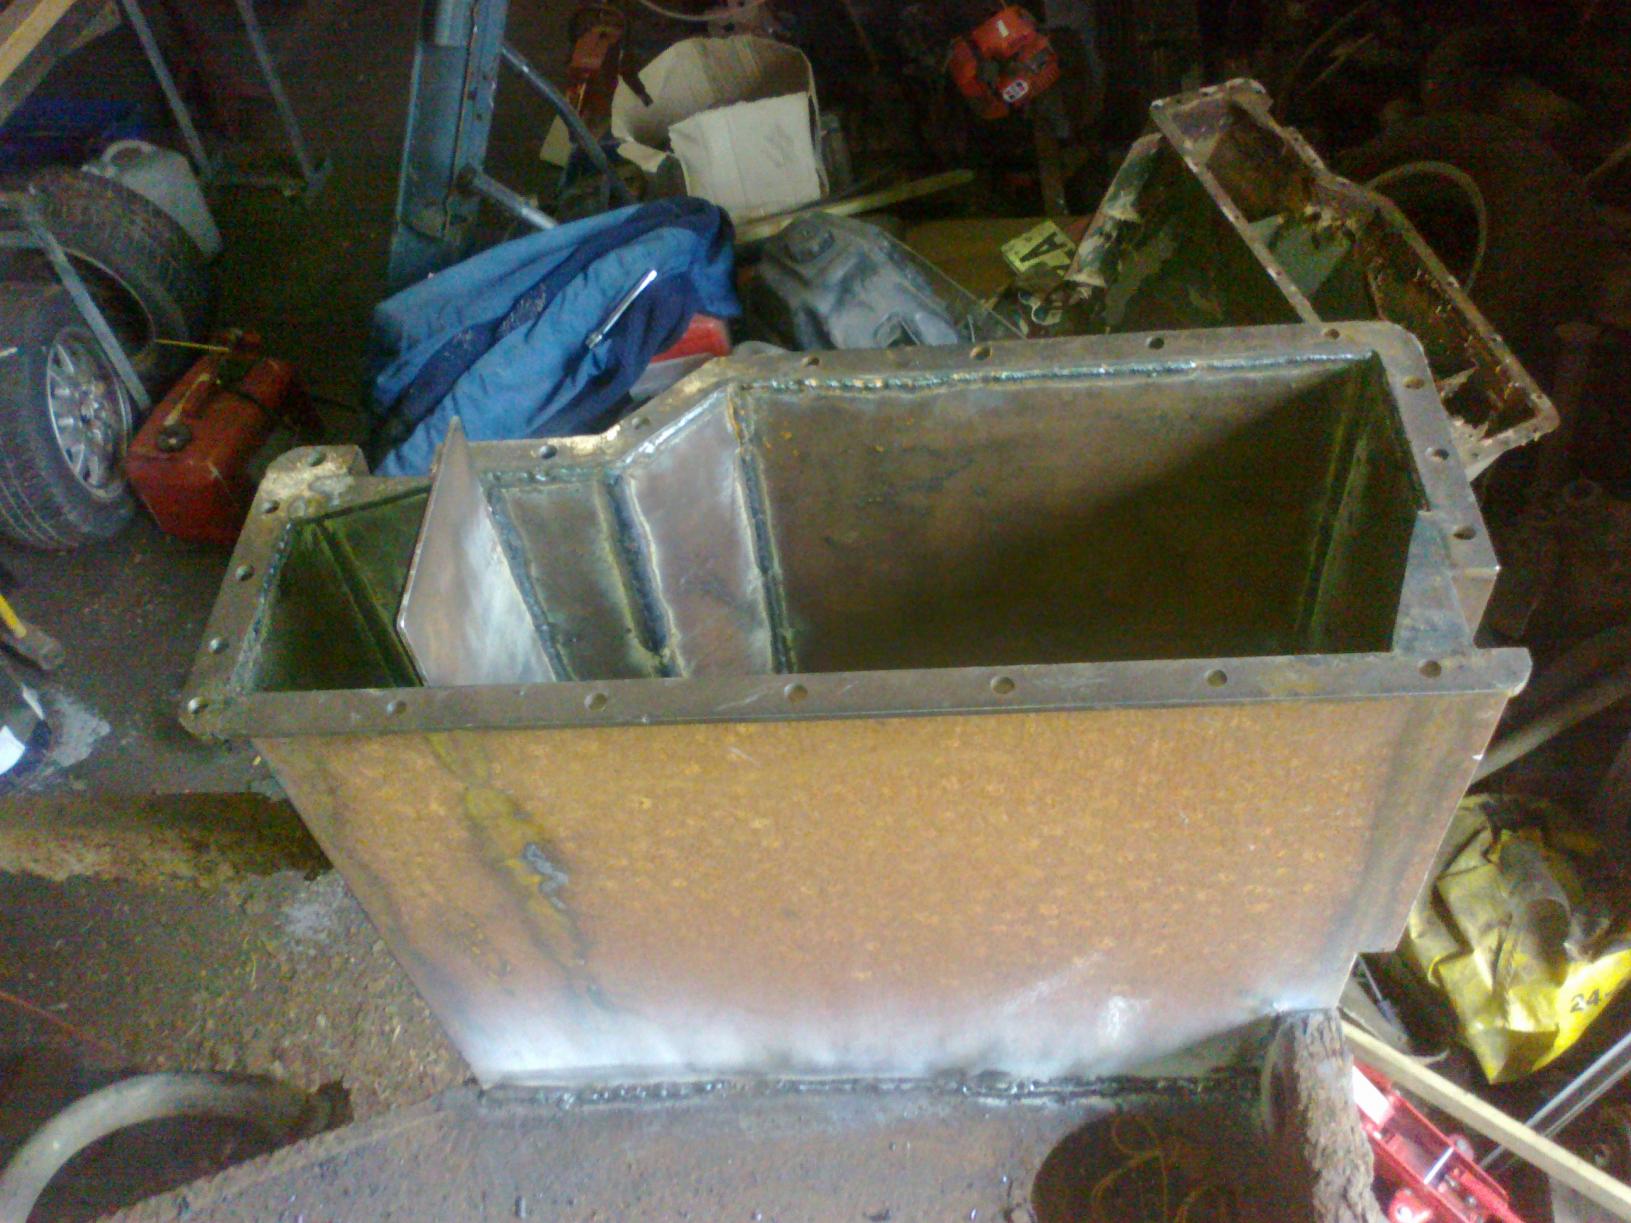
This is the newly made exhaust box being fitted, (The harry guy is my dad) It went together nicely but note the poor weld at the base, still having trouble there. was using Overcord Z's rods, but i am still experimenting Prob going to repeat this on the left side, not happy with my poor patch work. You can see hear where i welded each joint, the box was folded but i gave each one a nick with the grinder to make it easer to fold.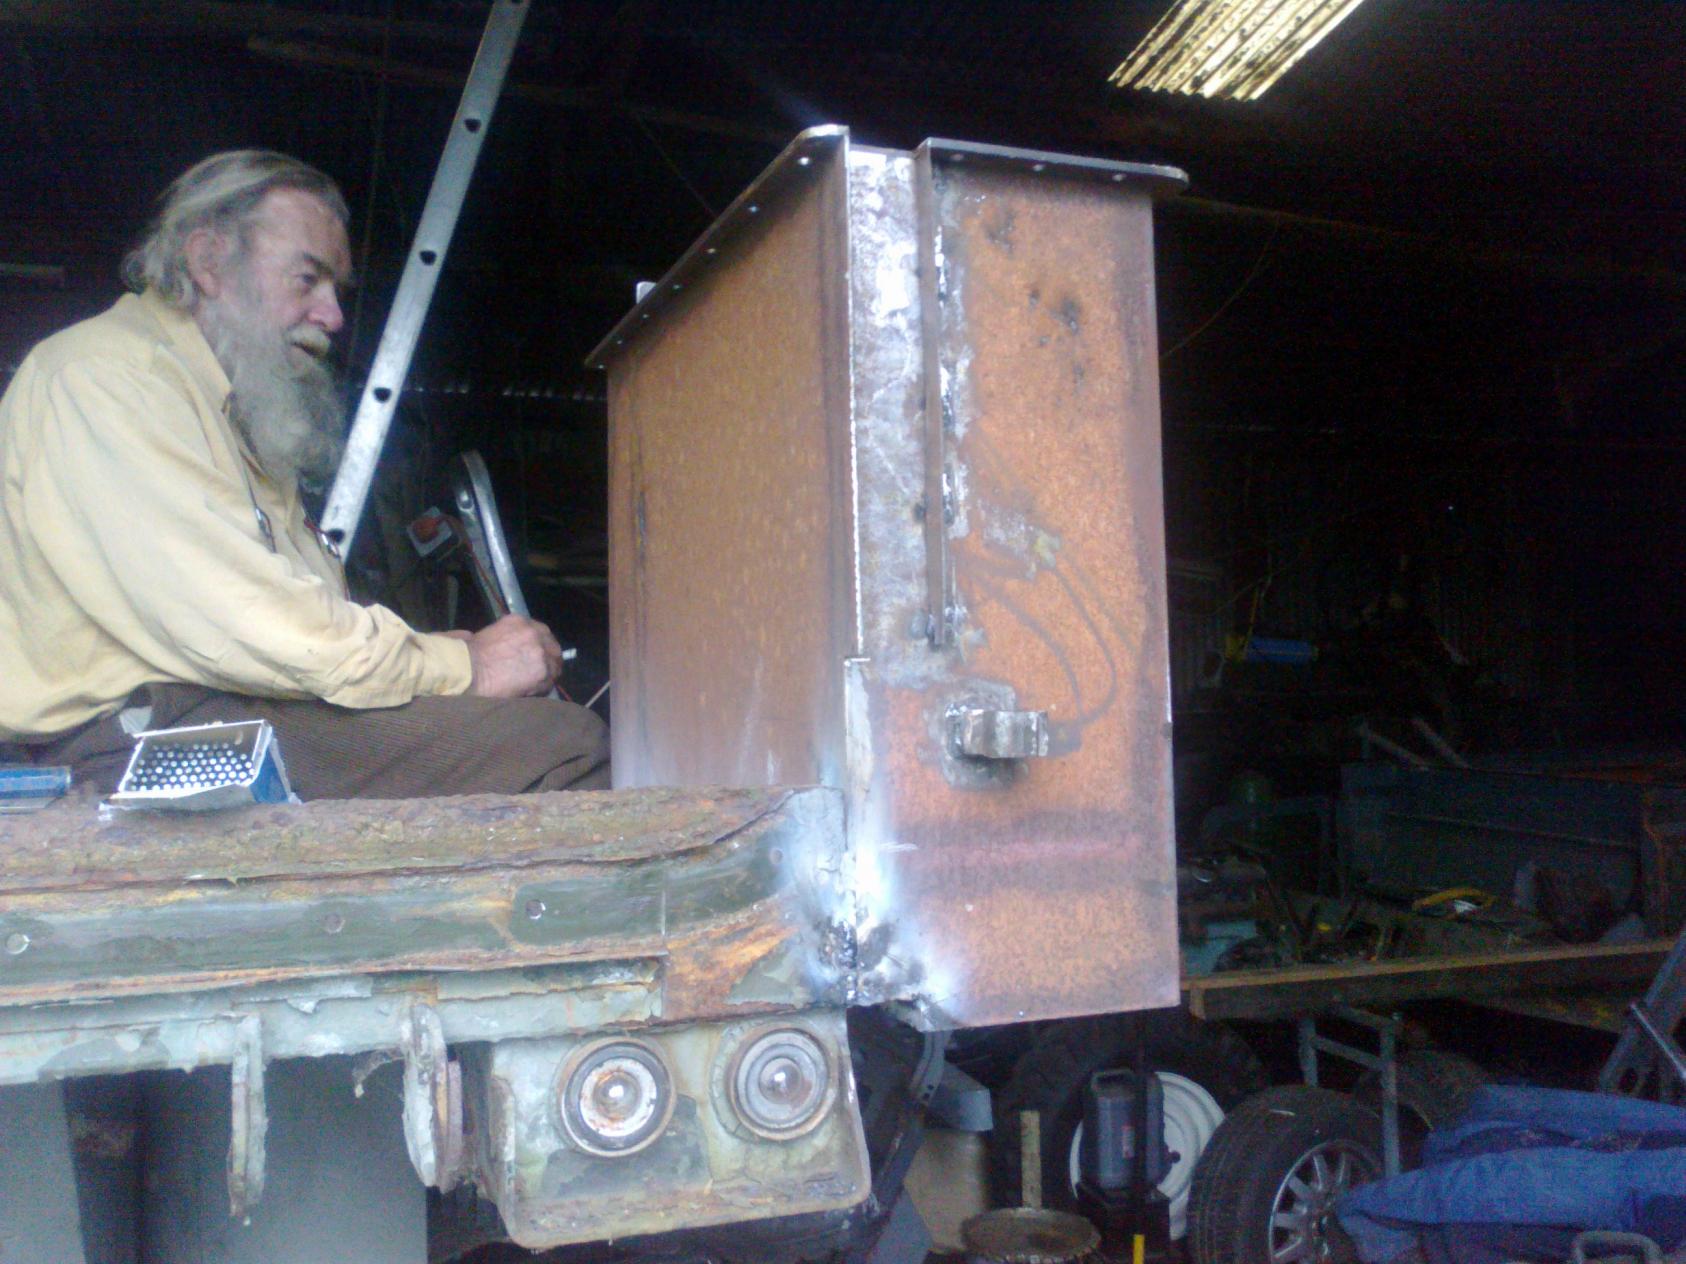

-
Alvis Stalwart 18 ET 29 restoration project
Catch 22 LBDR replied to Catch 22 LBDR's topic in British Vehicles
I dug out a very good book i got on e-bay a while ago. The Alvis Saracen Family by Bill Munro. In it, under the heading of 'Welding and Painting' it says the following. Cor-ten, (a low-alloy steel) was used in some of the prototypes. But due to the shortage of this steel the main production run was made from BS968 steel. It was also CO2 welded as this would mean it only needed to be welded from one side. BS968 is a High Tensile steel used for Bridges, etc. I dont know its exact properties. -
Alvis Stalwart 18 ET 29 restoration project
Catch 22 LBDR replied to Catch 22 LBDR's topic in British Vehicles
I have two Stolly's, one was a limber and had bean half striped. I thought it was the worst of the two, boy was i wrong, once i striped off the loan deck from the other one i found all sorts of horrors (this is the one im working on now). My advice is if you have any rot then nip it in the bud now, 'a stitch in time saves nine'. -
Alvis Stalwart 18 ET 29 restoration project
Catch 22 LBDR replied to Catch 22 LBDR's topic in British Vehicles
I have bean told its used in the manufacture of shipping containers, dont know if thats true, but, the guy i bought the Stollys off did own a lot of containers and is in the shipping business. So maybe it was steel he had for patching them, eater way i think it will have to go:cry:. -
Alvis Stalwart 18 ET 29 restoration project
Catch 22 LBDR replied to Catch 22 LBDR's topic in British Vehicles
Im guessing I would have to use Corten rods and i bet there not cheep:undecided:. For the time being Im going to work on the right side but get new mild steel folded for it, Im also thinking of going slightly heaver there too, just for ease of welding, maybe 3mm. I never heard of Ceramic exhaust coating before so i looked it up on line, it looks great but no one is doing it hear, is it easy to get in the UK? -
Alvis Stalwart 18 ET 29 restoration project
Catch 22 LBDR replied to Catch 22 LBDR's topic in British Vehicles
Have bean working hard on the Stolly the last few weeks but getting nowhere fast. Having a few probs with the welding, or rather, the steel im using. The steel came with the vehicle when i bought it and had bean folded nicely already, at first i thought i was going to have to eat some humble pie for Robin, till i did a few practice runs on a bit of mild steel. After consulting a few other people about it they thought it might be Corten steel and the primer that was already on it was very like Galvfroid, (forgive me if im spelling all this wrong) Bottom line, its a Git to weld.:mad:. So... Where does that leave me. I have replaced and welded the hole left side and where the welds are strong, (and when ground down and tided up) look good, but not water tight. Originally i was going to use filler on the out side but have since bean talked out of that. If push comes to shove I will cut it all out and start again with new mild steel:wow:. Not looking forward to that. (Any ideas people?) But its not all bad news:-D, Having hit a bit of a wall there I decided to move on to the Rear right side, the exhaust housing. After studding my one (and heard all the stories about how hot it gets) and seen how badly it rotted, the decision was made to cut it off completely and start from scratch using heaver steel. So far this is going well. pics to follow. The exhaust was well rotted away also so i will fabricate one using the parts that are remaining. My aim with this hole area is to make it last, hence the heaver steel in the housing, but the main reason for the bad rot is the heat. so i need to keep it away from the outer shell. The plan hear will be to make the exhaust out of heaver steel too, and rap it in exhaust tape, I may also line the inside of the box with some sort of heat resistant material. (What do you guys think?) -
Alvis Stalwart 18 ET 29 restoration project
Catch 22 LBDR replied to Catch 22 LBDR's topic in British Vehicles
Sorry, Didnt mean to thread on ur toes, advice is always welcome. bottom line is i dont have a mig plant, or gas, got to make do with what i have. -
Alvis Stalwart 18 ET 29 restoration project
Catch 22 LBDR replied to Catch 22 LBDR's topic in British Vehicles


-
Alvis Stalwart 18 ET 29 restoration project
Catch 22 LBDR replied to Catch 22 LBDR's topic in British Vehicles
so far so good
-
Alvis Stalwart 18 ET 29 restoration project
Catch 22 LBDR replied to Catch 22 LBDR's topic in British Vehicles
Mig is never as strong as arc, ya dont get the penetration with mig, not to mention the cost of the unit its self. if i was spending that kind of money i would gas weld it, thats how it was welded originally. Trust me it wont be a bodge job, ya wont even nottice when its finished. -
Alvis Stalwart 18 ET 29 restoration project
Catch 22 LBDR replied to Catch 22 LBDR's topic in British Vehicles
Would love one of those covers:D, only have use of the shed till xmass so i need to have her painted and weather proof by then. Talking of covers does anyone know what the proper load bay cover is made from, canvas or pvc, and its dimensions? will have to get one made i think. -
Alvis Stalwart 18 ET 29 restoration project
Catch 22 LBDR replied to Catch 22 LBDR's topic in British Vehicles
Its prob a sin in some peoples eyes, but im going to use filler (prob liquid mettle) on the outside, and weld it on the inside, thus avoiding any pin-prick holes when she swims. My nice neat welds wont be seen under the floor anyway:whistle:. -
Alvis Stalwart 18 ET 29 restoration project
Catch 22 LBDR replied to Catch 22 LBDR's topic in British Vehicles
Decided to start by replacing the hole left side as there are bad holes up both sids. The tool bin, there is meant to be a bottom in this:eek: Filled a wheelbarrow with the rust off one side. Hear is the first bit removed ready to be replaced. Some new bits tacked in place.
.jpg.a78361ed5e75df7d1ab20c32cc594720.jpg)

-
Alvis Stalwart 18 ET 29 restoration project
Catch 22 LBDR replied to Catch 22 LBDR's topic in British Vehicles
The first job was to get her running so i could move her into a shed, To do this i had to rewire the engine and bypass all the electrics and bypass the fuel system using a boat petrol tank plumbed straght into the carb. Surprisingly she started:D, however bleeding the clutch took a lot longer, two days longer, the system had to be pressurised to get the air out.:mad: Finally, with the old man in the engine bay acting as the accelerator we got her moving, no brakes, but the hand brake works. Now that its in the shed the first job is to get her weather proofed, so time to cut out all the rust and replace with new steel. This should be interesting as i only have an arc welder and im not that good:cool2:. lol -
Alvis Stalwart 18 ET 29 restoration project
Catch 22 LBDR replied to Catch 22 LBDR's topic in British Vehicles
Hear is an idea what i have ahead of me!!!


-
I finaly started to restore one of my stollys this year, so i thought i would start a thread and post my progress. Watch this space for updates. Ross:)
-
Hi Im looking to replace the swim gear in my stolly, the usual parts are missing, do you still have the parts mate. Your stolly looks well. Ross
-
Thanks Jules but i have tried that already,its hard to salvage them safely. would rather NOS or have them made. Thanks Ross


.jpg.a78361ed5e75df7d1ab20c32cc594720.jpg)


