


okdoky
-
Posts
188 -
Joined
-
Last visited
Content Type
Profiles
Forums
Gallery
Blogs
Events
Articles
Store
Downloads
Everything posted by okdoky
-
Thanks Paul Batteries, cables and clamps being worked on !!!! Still some tweeking and carry handles on the batteries to form too Nige
-
Every penny is a prisoner these days so it does help to recycle when I can !!!!!!!! A little more footering about getting the battery carrier mounted Just hope the aluminium u channel brackets survive through to painting and handling. Surprisingly rigid !!!!!1 Nige
-
A few tweeks on the battery carrier Trying out the placement before fixing
-
A very productive night building the battery carrier out of aluminium foil and minimum of plastic !!! Anyone know if you can buy individual batteries ready made ? Nige
-
I am getting into a point where I should really start painting things as it is starting to get too busy around the engine bay !!! Silencer and silencer guard Rehung the airfilter too
-
Thanks Tony ,,,,,,,,,,,,, It is getting to be a challenge to get as close as I can !!!!! I really do appreciate how tough it is for the master builders to get the real accuracy in other scales !!!!!!!! Hard enough for me to get close in 1/24 th but good fun trying !!!! Gerry can holder, air filter and tyre inflator mount brackets Nige
-
Hi and thanks for looking in Rear mudguards mounted Brackets from flattened solder Nige
-
A little more done on the Bedford TM scratchbuilding tool lockers, gerry can holder, side board bump stops, rear mudguards !!! Nige
-
Would be great to see your builds !!!!! Which kits and are they resin or white metal? ????
-
Morning Folks I have to say that I am getting heaps of help from all directions on the TM which is fantastic !!!!!! And more offers of pics under the cab due soon !!!!!!! ,,,,,,,,,,,,,,,,,,,,,, Can't thank them enough !!!!!!! Spent a couple of hours in the office pinning the leaf springs in place ready to tackle the brake actuators, stearing links and other bits and bobs !!!!!! Then had a go at making the step rings for the front wheels !!!!! Plastic tube from an old marker pen was the perfect outer diameter, still to be thinned out inner face a little more !!!!! Took the tin foil from Coffee Mate tub seal and embosed the detail from the saw blade thumb tightener !!!!!! Then wrapped around !!!!!!! Will add the tiny plates that the nuts lock the step rings to the wheel much later !!!! Nige
-
Axles and Leaf Springs getting attention http://i212.photobucket.com/albums/cc229/okdoky/1-24%20Bedford%20TM%20Build/20150213_004452.jpg
-
Been adjusting the stearing ball joint and axle !!!!
-
Hoping this passes muster to give enough of the look needed when break actuators, leaf spring hanging brackets and other wee bits are added !!!!!! Adjustments required to get the wheel track dimensions and accommodate leaf spring hanging brackets, etc !!!!!!!!!
-
This is what I am trying to work towards if I can But my fence has blown down last night so guess what job has to take precedence over the weeekend ?????
-
Some time in my fave office tonight working on my stearing for the Bedford TM !!!! Nicked a couple of plastic rods from my kids that had flags stuck to them !!!!!!!!! There were lovely plastic balls already stuck on the end !!!!!!!!! Bad Daddy ,,,,,,,,,,,,,,, Ha ha ha ha !!!!!!!!!!!!! Stopped for the night as there is a programme I want to watch and also felt I was going to give myself another bloody finger !!!!!!!!
-
This where I am for now !!!!!!!! Strip of tough steel that I cannot remember where I got from but is bent round at the ends to accept shackle pins to hang from the chassis brackets !!!!! Laminated up with plastic strip for three leaf at rear and only two at the front !!!!!!!! Front springs to be laminated up yet !!!!!!! Next to try is some shackles for the leaf to chassis bracket connections using U channel and off cuts of sprue Problem is kit parts can't really be cut and added to the scratch stuff as they tend to be either part of the chassis or part of the leaf springs !!!!!!! I also need to support the weight of four resin wheels and tyres when built !!!!!!!!!!!!!!! Also did some headlight guards
-
Love that model !!!!!!!!!! Do you have any video of it going cross country ???? Nige
-
I have been a good boy and kept of the hard stuff over Xmas and New Year !!!!!!!! Locked myself away tonight and got some work done !!!!!!! I wanted to improve a little on the bumper from the KFS one !!!!!!! Partly as my one to one dimensions did not fully tie in around the chassis sizes, the bolt holes and the lights !!!!!!! Minor tweeks on the front that might be due to the fact this is geared for a Trans kit using a typical truck kit chassis !!!!!!
-
Have spent tonight roughing out the axles and getting the diffs formed. Waiting for the white putty to set hard on joints before I add any more bits like the diff lock actuators, spring hangers and the like to them !!! Also got to figure out the front stearing hubs and try to add a bit of life there too with hopefully a robus, poseable joint !!!! Meanwhile popped the fantastic Gerry Mos Cad / KFS cast wheels and tyres on to get a feel for the poise of the truck !!!!! It starts to take life and makes me feel I want to keep going again !!!!
-
Thanks Paul ,,,,,,,,,,,,,,,,,,, It can be ,,,,,,,,,,,,,,,,,,,,,,,, but can also be infurating at times !!!!!!!!!!!!! As most folks know I try to build on a very tight budget and with no local hobby shop for supplies nearby my builds incorporate much recycling !!!! Even the family get in on the act by asking me before they dump the smallest of plastic scrap !!!! I thought I had been given gold by the mother in law in the form of a plastic tube that might have been suited to make brake drums !!!! But was just too large a diameter by mm's, from of all things ,,,,,,,,,,,,,,,,, a roll of puff pastry !!!! Last night I was over at the mother in laws and was offered hot chocolate mate in a Tasimo machine !!!! I noticed the sachets of choc, cofffee and cream were plastic !!!! Out with a knife and cut off the foil lid !!!! After a little cutting And I will have to thin out the wheel parts just a fraction to allow the new drum to fit snug inside Due to the way the sachet is formed there is a very nice centre tube which accepts a styrene tube in a very secure friction fit without any assistance which means I can form these as half axles to fit inside the proper axle !!!! NOW FOR ANOTHER 11 HOT CHOCOLATES !!!!!!!!! MMMMMMMMMMMMMMMMMM
-
Been working on the front cab supports and tilt point which I found out by chance fit snuggly over the front spring hanger bracket which was a fluke of fir as I built without dimensions or really knowing how they went on till I found one pic from underside !!!!!!!!!!!!!


-
Hi there Tony !!!!!!!!!!!! Thanks for keeping the faith !!!!!!!!!! I am trying to make sure I keep some momentum going on this but I reckon I am going to have to do a trip to Edinburgh for supplies !!!!!! I need to source the correct size of tube to make brake drums, hubs and stearing componants before I can tackle the axles properly !!!!!!! Meanwhile I added the anti-slip rubber surface over the cab valance above the front wheels !!!!! I have also made a start on the cab mounts front and rear but am leaving these to set hard before I do some sanding and drilling of detail that won't likely be seen !!!!!
-
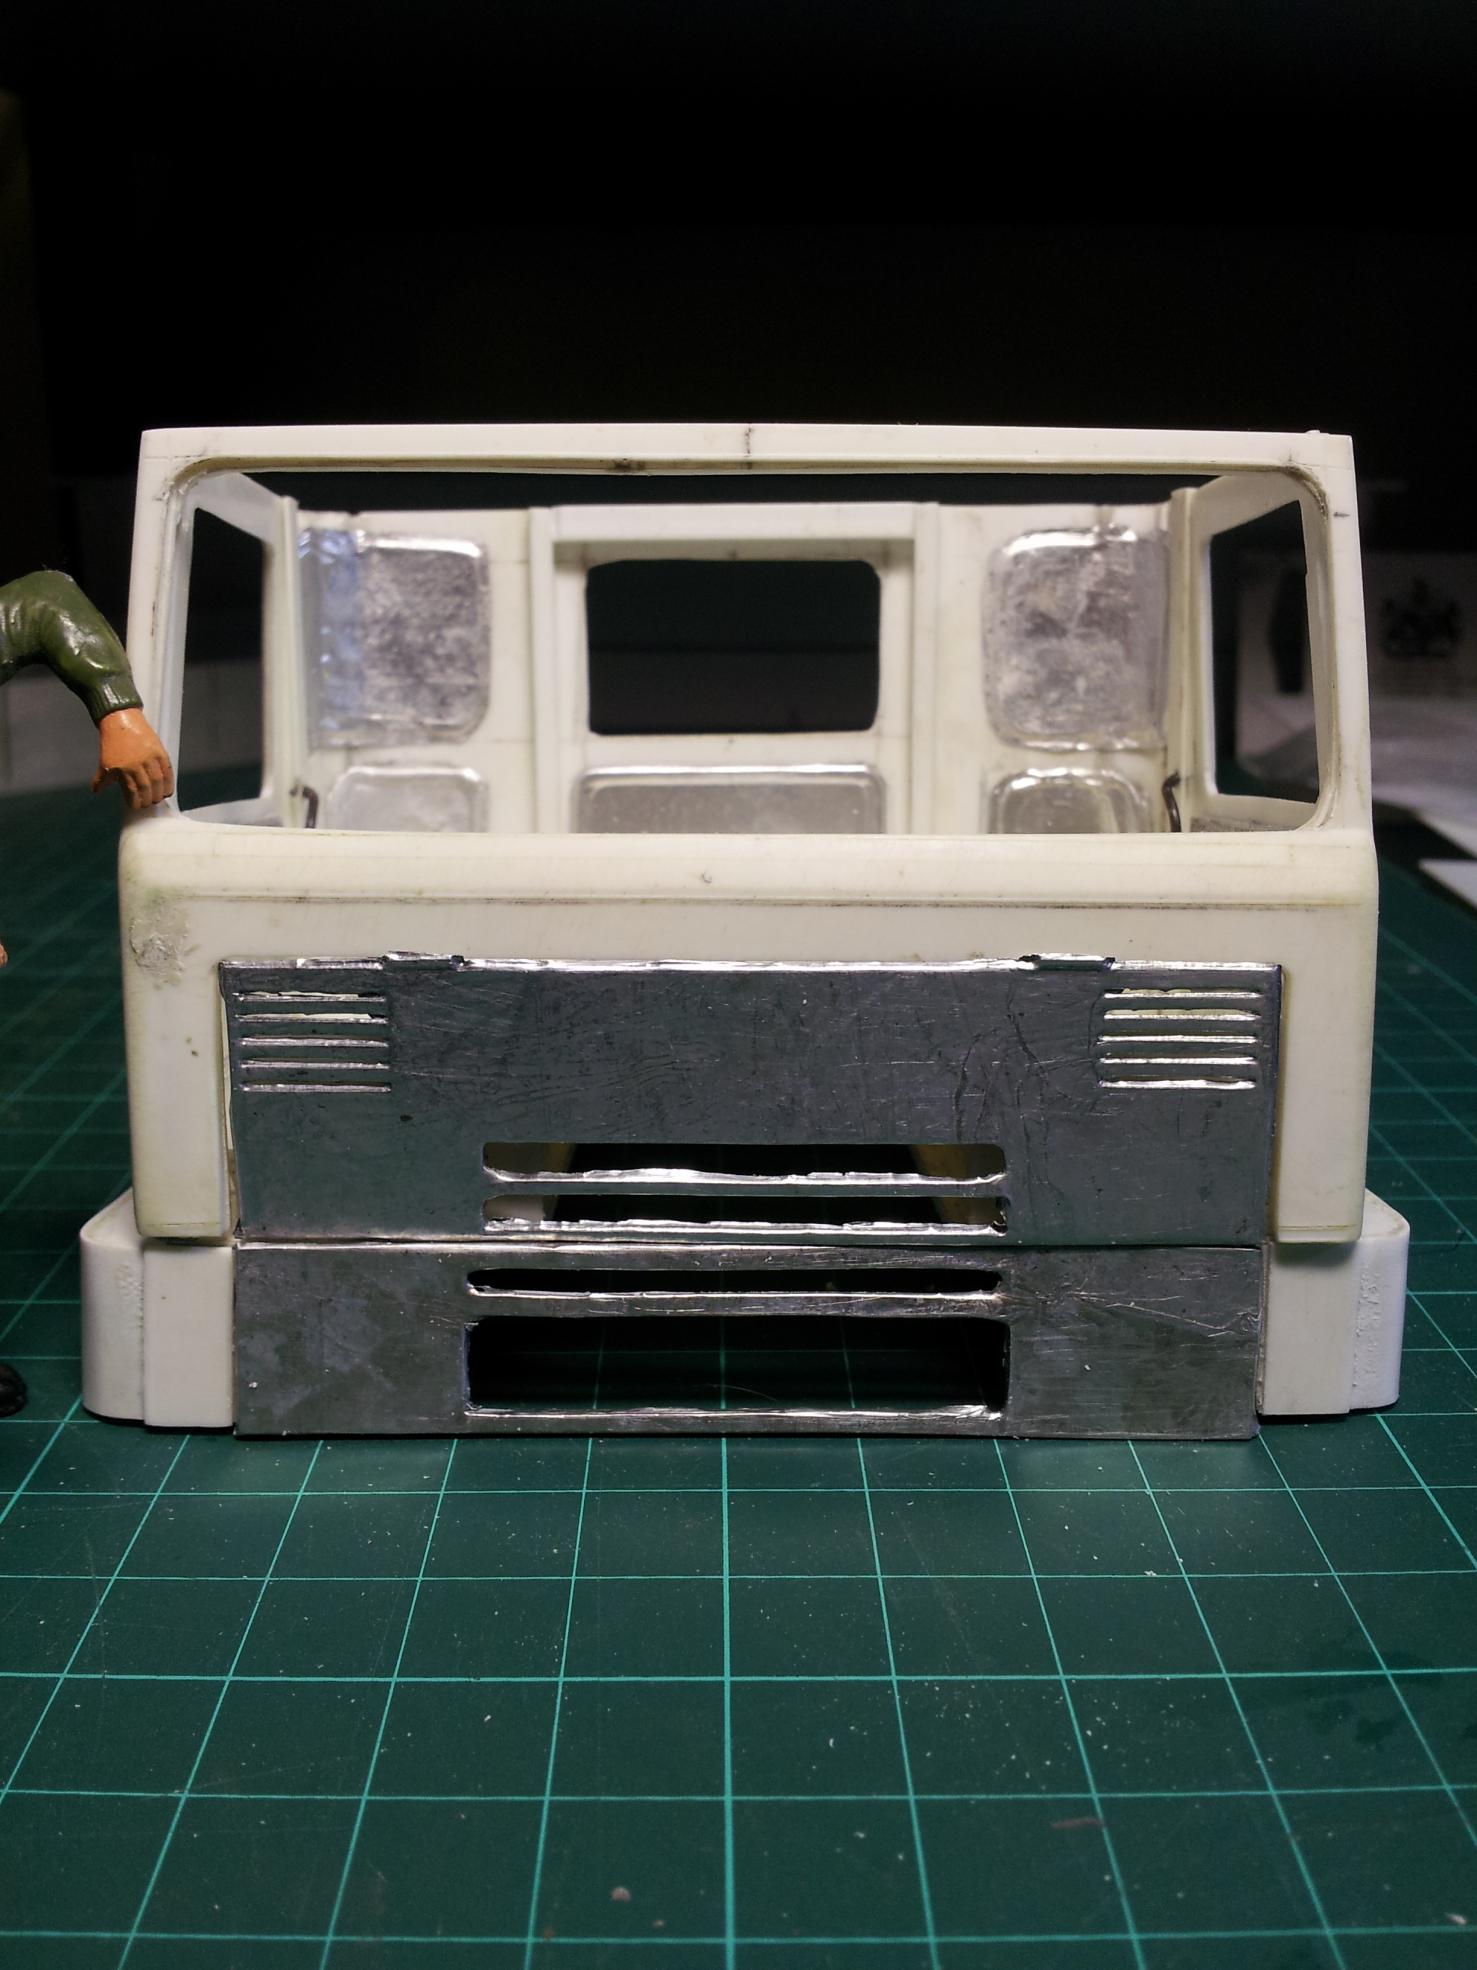
Oh ,,,,,,,,,,,,,,,,,,,,,,, has anybody seen a TM hiding in a corner ??????????? AH ,,,,,,,,,,,,,,,,,, FOUND IT !!!!!!!!!!!!!!!!!! And hopefully my mojo again !!!!!!!!!!!! Hi there folks hope you have kept the faith in me to get this one going again after such a bloody long model block !!!!!!!!!! Not much to show other than a couple of corrections to the front cab access panels to attempt to give them a bit of depth that was missing !!!!!!!!! Also working on the valance around the cab at floor level !!!!!! Used plasticard to form the shape then embossed aluminium foil from roasting tins over to give the panels that pressed panel look


-
Bedford TM 6x6 load bed photos or diagrams needed for a model project I am trying to put together !!!!! Any help greatly appreciated !!!!!! Trying to build in 1/24 scale but having problems finding any good photos of the load bed and arrangement of the tie downs and container lock down points compared to the 4x4 TM that I have full info on !!!!! Hope you guys out there might own one or even know of someone who owns one that could rattle off a couple of pics of top and underside !!!! Any other photos or info greatly appreciated !!!!! Am working on the 4x4 TM at the moment but building up the research to move on to the 6x6 either in parallel or shortly after !!!!! http://www.britmodeller.com/forums/index.php?/topic/234917334-124-bedford-tm/page-11?hl=bedford&do=findComment&comment=1599917 Lots of fantastic help from guys on here (you know who you are) already to get where I am with the build !!!!! Could not have got it as accurate without there valuable help !!!!! All the very best Nige
-
question Bedford RL passengers in rear?
okdoky replied to Easy easy's question in I may be stupid, but......
Elves and Save tea took all the fun out of the kit-kat arse seat rides with all the kit and caboodal in the back !!!!!!!!!!! I remember two demolition contractors vans driving opposite directions on the road near Rosythe collided head on with both carrying tools and passengers in mid 90's !!!! The scene was apparently carnage and was a big player in the isolation of load and passengers !!!! I suppose we all forget those times when the driver of the MK was lead footed on the break with a pile up on the head board the obvious consequence !!!!! OH HOW WE ALL LAUGHED !!!!!! Nige


