


guy66
-
Posts
744 -
Joined
-
Last visited
-
Days Won
5
Content Type
Profiles
Forums
Gallery
Blogs
Events
Articles
Store
Downloads
Posts posted by guy66
-
-
For the moment very slow progress on the Morris , looking to put some metal plate on to the wooden construction . A friend will make the front and rear louvres in to the plate work but for the moment he is to match involved in building custom cars,
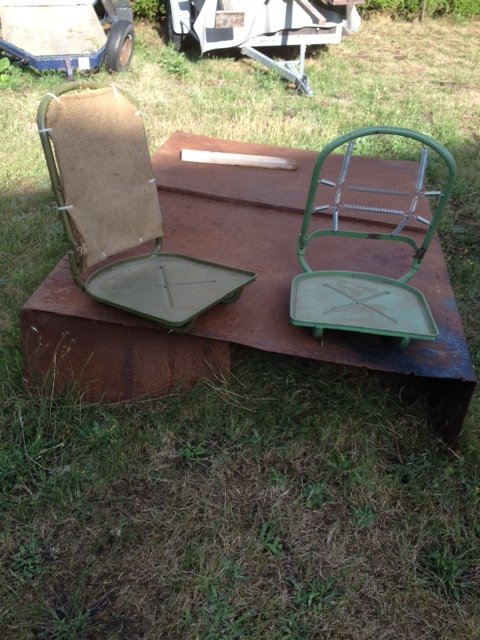
Did fiend some nice seats for the radio box, one is the right radio operator seat with a folding back side the second one will go in to the early warning Morris.
-
 3
3
-
-
hello , still have some screened ignition bits for Bedford engine . have a look at the picture , these are surplus to me.
Guy

-
Yes the generator is running , just some issues with fuel line and petrol tap.
-
hello I am looking for a connecting cable for my Petter 1250W generator and the switchbord .
The picture of the lead is from a friend , so not mine but that's the type I am looking for,
The extra pictures of my generator and switchboard that I need to connect with this cable to have a working battery charging unit .


-
Indeed, as Richard explains the setting are crucial . Not all the instruction manuels have the same settings , for my Ql I used the settings out of a original workshop manual.
Good luck .
Guy Labbe
-
1
-
-
The dealer is D. van Dam and the engine is in there Herkenbosch warehouse ,
they have a website but the engine is not on it, www.dvandam.nl
I have now links with this dealer .
Guy
-
There was a Tornycroft engine still in the crate at a military vehicle dealer in Holland,
-
4 hours ago, Adrian Barrell said:
I have a small stock of Lucas T1 tail lamps NOS.
Still can use a tail lamp for my Morris C4 project.
-
The engine is probably Morris commercial unit .
-
Hello, I have the remains of the axillary on board generator mounting base on loan out of a Morris W/T box.
It looks like the base frame is fitted on the wireless body floor ( very rusty) and connected to to top frame with the same type of rubber mounts used on wireless set 19 base frames.
I really think that there is need for extra sliding part where the generator is fitted on and this part can then be blocked with the clamps on the frame ?
Took some pictures with a chore horse generator just temporarily fitted over this frame with the top clamps fitted on to the generator frame work.
Can somebody help on this problem , is there a extra mounting base in existence for a chore horse are is there a different axillary generator on board ?
To my knowledge all the bigger generators to a chore horse need the extra switch panel to make it a working battery charger so I doubt that there is a bigger generator on board .
The measurement on the top base are 16 1/2" wide by 21" long.


-
1
-
-
Yes you are right Maurice, I have one Canadian wheel on the Morris but will keep this one as spare wheel. Just need to order a new tyre for my extra British rim that I have.
-
21 hours ago, 64EK26 said:
Andy
Tyres are Petlas 9.00 x 16 - from ToTec Tyres
They are a b***ger to fit, yes they do need to be shaved. I am preparing a document on how to do it, PM me you e-mail address and I will send you acopy of the document (when I have finished it).
That's really strange that these were so difficult to fit on the rim, I have the same on my Morris C4 and had now problem to fit them on the rims . Yes I used a lot of soap and some pressure to have them right on the rims . No shaving of the tyre was needed , and the rims are the standard 16" ones.


-
That's what we need for the back set up for are early warning Morris. Never thought that there was a complete early warning around !

-
1
-
-
hello .
I was wondering if these side lights where a original fitment on the CDF models.
It's just that I have a new light like that and didn't know where it was used, for sure it's a great Morris you have there !
-
some extra pictures, also looking to construct the roof section for the moment.


-
4
-
-
the side and the rear section are ready to receive some new plate work, just made de wheel arches for both sides of the box .
Looking to construct the upper section of the front wall , just need some more information and measurements for the front windscreen.


-
1
-
-
Never seen a picture off a set up like that, on the very few information I have about the equipment in the radio box most are with a set 19 with are without HP unit.
For this other project I am still looking what a early warning (radar) looks like in the inside of the box?
Guy
-
Great picture , looks like a late one with the wheel slings on it.
any extra info with the picture?
-
1 hour ago, majorjohn said:
If you're interested, I've got a complete gene, charging board and lead which I don't have a use for.
John
Hello John , I have a switchbord for my generator but very interested in a lead to link the generator to the switchbord . But interested in a complete set .
Guy
-
In the sample radar box I found some remains of the original paint for the interior . it looks like the interior was painted in to sand colour .


-
some extra pictures about the radio box construction, almost there with the sides .Only the wheel arches and the top of the front panel.


-
1
-
-
Small update on the construction of the radio box. Front wall almost ready just looking for some information go the front windscreen fits in to , are over the front of the box ?
The sample box I use is of a early warning Morris and these had no windscreen in the front and also no ventilated panels on the back and rear right hand side for the extra generator.
Made also a start on the left hand side.


-
 1
1
-
-
The wireless box back wall is assembled and ready , next will be the front wall but still looking for information about measurements for the front window. The box that I use as a template was a early warning truck and these did not had this small window in the front of the box.
 Start on the front wall


-
3
-
-
Indeed , backplate looks the same as my Morris Commercial C4.


MORRIS COMMERCIAL - restoration project
in British Vehicles
Posted
This is a link to a complete early warning set up, but the lorry is Fordson, very nice details in these pictures.
http://roverjoe.com/eng/_FordsonWOT2/index.html