


Old Bill
-
Posts
1,669 -
Joined
-
Last visited
-
Days Won
33
Content Type
Profiles
Forums
Gallery
Blogs
Events
Articles
Store
Downloads
Posts posted by Old Bill
-
-
Another finishing-off job, currently in hand is the rear lamp bracket. Detailed information on this is scarce and we had only this photo and the remains of the original article.


It is attached to the chassis rail but not to the underside of the channel but to the inside face of the bottom flange instead. We know this as that was where the original came from. It is a pain though as it meant an extra bend in the bracket. I guess we shall never know the reason why.
First two bends were done hot in the vice.

Then the big one, also hot, using my bending block and some pegs.


The ends were welded on by our welding instructor at work. You can tell the difference from mine!


It is now primed and ready for the paint shop at Christmas.

Just the last pattern to go now.
Steve
")
-
 2
2
-
-
I have just found this one on the 'Cornish Memories' website. Are you in it?

It is a nice pic and something to aim for!
Steve
-
We are getting towards the end of the job now and only the last few odds and ends remain. However, if we don't do them now, they will never get done! I have been given a copy of the Ministry of Munitions drawing for the standard chock or 'Scotch' as they call it so I decided to make up a couple to hang on the back. The drawing specifies Elm but I think we will settle for softwood. Fortunately, I had a spare plank in the shed. First job, though, was to sort out some bolts and fortunately for us, we had some in stock. I made up the square washers to the drawing.

Ten minutes with the band saw.

Interestingly, rather than screw the chain to the rear of the scotch, there is a hole in the centre so that it can go around the tie bolt.


Then we needed the rings for the end so I bent some rod, cold, around a bit of bar in the vice.


And then joined them using silver solder again.

There is a long narrow link between the scotch and the first ring. These were bent hot.


A bit of chain rescued from an old chain block and that is another job off the list!


The timber for the tool boxes is on order so we plan to make them up over Christmas along with re-fitting the fuel tank. Then we should be ready for a proper run!
Steve
-
2
-
-
I wish I had seen that ten years ago!
Thanks for sharing.
Steve
-
Thanks Marcel. Great find!
Did you notice at the end of the film where the Autocar was reversing into the building, the rear end of an FWD lorry on the left hand side? Another survivor!
Steve
-
Thanks for all of your suggestions chaps. Dad has been trying 'Fertan' so I am looking forward to seeing the results. We haven't tried electrolysis yet but it is one to keep up our sleeves. In the mean time, one of the chains has been in the molasses and has come out quite well.

Some of the links are still seized so it needs some more work but it is a good start.
We have been fortunate to have been given another P&H lamp. This is the same as the original pair that we have but has a much better casing so between them, we can make up a good pair.

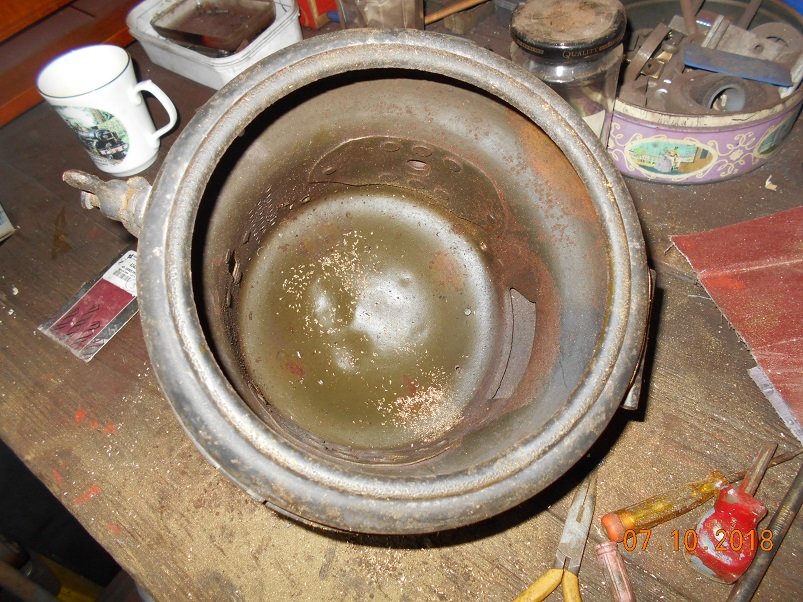
It is missing the badge but Dad has managed to salvaeg the one on the rotten lamp.


Into the molasses!

The new casing still had some paint on it so the molasses didn't have any effect in those areas and it had to be finished off with a wire brush.


Dad has had some new glasses cut for them.


Meanwhile, we cannot resist having a bit of a go at the job. We have decided that our Christmas project will be to pull the engine out and tear it down as we think that we have just enough space to do that. It is getting tight though!

Tim has taken the bonnet and top hose off and is looking to remove the radiator.

One bonnet catch remained on the chassis. We are going to need eight of these for the two lorries so I foresee some serious filing in my future!

We are going to need an engine stand as well. The Peerless engine sits on the chassis rails rather than a sub-frame so the engine stand needs to be wider. A little modification was therefore undertaken.


Must go and finish the Thornycroft!
Steve
-
1
-
-
Something else I have been up to is making up some rear view mirror brackets. I have tried driving without mirrors and it is foolhardy in the extreme so these brackets hang on the hood frames with wing nuts.


Safety concious as ever, I have made a carrier to go under the seat to stow a fire blanket.

Whilst on that theme, I have fitted a fire extinguisher under the seat.

All of this lot is in Devon now for painting. I also took down the fuel tank so Dad can paint that. We were caught out last time by the paint bubbling up but on taking some advice, this was put down to poor flux removal on my part. It has been recommended that we use washing soda this time so we asked Mother if she had any. Of course she had!

Mind you, I think it is nearly as old as the lorry!
Looking at the tank, Dad spotted two areas of damage on the back.

These turned out to be caused by bolt ends just fouling it. It is a good job that we took the tank off as they would have worked their way right through in the end. Dad has now trimmed them off.
The seat cushion is now fixed with a batten along the top edge rather than screws. They were beginning to show signs of pulling through so best to catch them early. The cushion has a flat strip along the top edge so the batten is just screwed through it and the cushion folds down over it.

We fitted the shovel and pick brackets so they are out of the way.

Dad has finished painting the head board so that is safely stowed in the back now.

These finishing off jobs take a surprisingly long time but are nearly all done. I will be making the rear lamp bracket next. The Peerless is looming!
Steve
-
2
-
-
We are not fitting sprags to either lorry as the current highways authorities are unsympathetic to holes appearing in thr tarmac!
The Dennis ones were operated by a cable with a large ring on the end. This ring sits on a hook on the side of the steering column until needed when it is released and the sprags are lowered.. Our column does have the hook fitted.
To be honest, I suspect that sprags dropped out of fashion very early in the war as you don't see them on vehicles very often at all.
Steve
-
I have just done another 'finishing off' task in the shape of the chock or 'Scotch' as it says on the drawings. I was given the chunk of timber in the summer so I have screwed the plate and ring to it and attached some chain. Once I had sorted out the right length, I bent up another ring from 5/16" steel and attached that to the other end.

I mounted a hook on the body and hun g the ring on it. The scotch can now be pulled out when needed and is readily available when hung on the hook.


One more job ticked off on the way to finishing the beast!
Steve
-
1
-
-
At long last, I have bitten the bullet and sorted out the fuel tank. My biggest concern with re-soldering it has been the possible presence of petrol /air mix in the tank going bang when I bring the torch near it. To avoid that, I have simply left the tank open to the atmosphere for six weeks after draining down and then started the exercise by poking my dust extractor hose inside and running for half an hour. Seems to have worked!

The next concern was that there might be liquid fuel between the two end skins so I drilled the outer and filled it with water using a funnel.

I tapped one of the holes 5BA and inserted a screw. Then it was simply a case of warming the joint up whilst pulling the screw.

Once the corner lifted I worked my way around with a pair of screwdrivers just lifting it until it parted company.
The water beneath was hot!

There was a gap in the seam right underneath the point where the petrol was coning out of the outer skin joint.

I think that this was my fault by being a bit heavy handed whilst tinning so that I squeezed the rivets up without the joint being fully closed. Soldering the end cover had allowed the solder to run out of the joint underneath. Interestingly, it did show some signs of the sealing material running through. The sealer, unfortunately would prevent the solder from re-running so I removed three rivets, un-soldered the joint and spread it with a screwdriver so that I could clean the surfaces with a thin file.

Once that was done, I pushed solder-paint into the joint and put 5BA bolts through it before warming it up. I then heated the joint with the torch and kept tightening the bolts to squeeze the solder out. This proved successful so that once it had cooled, I removed the bolts and replaced them with rivets before re-running the solder around the rivet heads.


I set the tank on end and filled it to the filler neck before leaving it overnight. It wasn't leaking this morning so I cleaned up the outer skin and sealed up the holes with rivets. before re-fitting it.

I just painted the joint with Baker's fluid and warmed it gently, working around the joint with a stick of solder.

The lumps of metal were there simply as weights to hold it down.

A good clean-up with a flap wheel and it is all ready for the paint shop.

You may recall that Father had a devil of a job painting it last time as the paint kept reacting with something. I am told that the problem was flux and that the surfaces must be washed with something caustic this time.
Steve
-
4
-
-
On 10/2/2018 at 10:55 PM, dgrev said:
Must have been a right sod to shunt into that location whilst having to lay flat on loco so as to fit under truck.......

Ah yes but having wheels does make it easier!
-
Thanks for the warning!
What is the chemistry going on in there? I wouldn't have thought a sugar solution was very aggressive at all. It works though!
Steve
-
Father has been trying out a new rust removal techniqued recommended to us by our antipodean friends and that is by using molasses. You may remember Father picking up the original lamp brackets complete with lamps.

He removed the lamps and dropped the brackets into a plastic dustbin containing a 1:7 solution of Molasses in water and has left them for a fortnight. They could be seen to fizz gently and developed a scum on the top in the shape of the brackets. When he pulled them out and hosed them off, rather remarkably, they were bright but went almost instantly ginger with rust.

The threads cleaned up very well.

A few seconds with a wire brush and they looked like this.

They are now in the paint shop to stop the rust forming again. Father was so impressed that he has picked out the sidelamp brackets that we found at the weekend and they are getting the same treatment.

Something we have been puzzling over is the best way to clean up the chains. This now looks to be the ideal way as it doesn't involve getting sand everywhere so once the brackets are out, it will be time to put them in. We will keep you posted.
Steve
-
1
-
-
We were fortunate to be down in Devon over the weekend and whilst still concentrating on finishing the Thornycroft, thoughts are beginning to turn to the Peerless. We want to start by getting the engine out and going right through it. This we can do with the space that we have without putting anything into storage so we decided to take the sheet off and have a look at what we have got.

We put the lorry ito Father's car-port about twenty years ago and packed all of the spares around it before sheeting it down. Tim started pulling bits out and we are amazed at what we have. One forgets after so long!


We had turned the wheels onto a hard lock to improve access to the back door of the house so the next task was to straighten them up. The steering had seized completely so I disconnected the drag link.

Still no movement until I realised that it had sunk into the tarmac by an inch! I jacked it and we put boards under the wheels whereupon they straightened easily and revolved freely as well.

After doing the same for the back, we rolled it back six feet to give us some acces for removing the engine.

Exciting times!
Steve
-
5
-
 1
1
-
-
On 9/24/2018 at 4:00 PM, Scott Sorby said:
Would those petrol can carriers not have holes in the bottom to allow rain etc to drain away and not rot the timber?
Good thinking! Thanks for the reminder.
I went down South this weekend and took the headboard for painting and the sump for fitting. I cleaned both surfaces and then applied a liberal coating of Loctite liquid gasket. I then fitted the patch and screwed it partially down until sealant came out all round. I left it for the rest of the day and then nipped up the screws on final assembly. It went down well and I am pleased. Proof of the pudding now!


Then fitted up the new gaskets with grease. This shot, taken whilst I was on my back, was just before the second fitting. We had fully bolted the sump up before remembering that the oil level float needed to be fitted first! You can see it on the LHS of the pic.

Oil pump re-fitted and starting handle in place again. Just need to sort the tank out and we can have another outing.

Dad has finished off the tin carriers.

They were held in place by the lifting table which was ideal for this. It is amazing, however, how long it takes to drill just five holes in the right place.

Success!


Both carriers fitted and our thoughts then turned to the Peerless. Something for tomorrow.....
Steve
-
4
-
-
Thanks for the update. It is looking really nice!
Someone here will be able to answer your questions for sure. Good luck with them!
Steve
-
On 9/13/2018 at 10:17 PM, lowfat said:
probably easier to make a new tank than dismantle the old one
Well, possibly but after the amount of effort we put into making this one, I don't want to give up yet!
Sorry it has been a bit quiet recently. I have spent a weekend playing with Sentinel Steam Waggons followed by a week house- sitting for a mate. I did have one exciting moment with the Sentinel when, whilst I was lighting up with a paraffin soaked rag, I suffered a blow-back and was momentarily engulfed in a red fireball. I was fortunate to get away with it as I was wearing gloves, flat hat and cotton boilersuit and I even have most of my eyebrows! Bit of a shock though. Getting into practice for fuel tank soldering.
Dad has been busy though, pressing on with the petrol tin carriers. I drew up the woodwork and Big Mark kindly made them up for us, much squarer and more quickly than I would have done.

Straight into the paint shop.

One end bolts to a cross-member and the other to a piece of steel angle bolted up through the floor. Dad found some oddments and cut these.

There is a thin wrapper plate which goes underneath and up the ends. It is a 4 1/2" wide strip bent into a 'U'. I did a detail drawing and these came back.

I still can't see how he mis-read the drawing but never mind. Dad has reworked them and only you will know.


Then it was onto the locking bar. This would probably have been a bit of blacksmiths work but fabrication suited us better.


Dad is into silver solder as well!


He then drilled the woodwork to mount them, fortunately realising that they are handed which is a point that I hadn't spotted.

Laid out for the catches.


They are now complete and in the paint shop. We plan to hang them, along with the sump, the next time I am in Devon. We are very close to the end now with only the headboard to paint and install and the toolbox to make up. Once the tank is sorted, we should be operational. Fingers are crossed!
Steve
-
3
-
-
Thanks for that Hedd. I will think on that one.
In the mean time, I have heard back from the Slosh people. Unfortunately, it is not possible to re-coat the inside of the tank as the new coat will react with the first and won't seal. They have suggested using an epoxy putty on the outside but that will leave an unsightly lump which I don't want. Can anyone offer any more thoughts please?
Steve
-
I don't think it really needs a patch on the inside as the surface is so much better. I only need to block the hole. I could nut it on the inside if it does work loose.
Not come across 'Tigerseal' before. I shall Google it!
Steve
-
Well, that one has prompted some discussion!
As it is non-structural and not pressurized, I think that four screws will be enough. I can always add more if necessary. With only four, however, I won't be able to get a good pressure on a gasket, rubber or otherwise so I think I will go for the liquid solution. Silicone seems pretty good but I will have to clean the surface fairly well. I shall use cellulose thinners to get a good clean ring around the hole. Oil in the hole won't matter too much as I am not trying to fill it. As long as I can get a continuous ring around the hole, I am sure it will be fine.
Many thanks for all of your thoughts!
Steve
-
I have managed to do a bit today and have fitted the patch to the sump. It started out as a bit of 20swg copper from the drawer suitably annealed.

Then a bit of tapping around using the bossing mallet and a panel beaters hammer, annealing between each go. I annealed it about twelve times altogether.


I drilled and tapped the casting for 2BA. The casting is horrible in this area, full of porosity and only 1/8" thick.

Then just screwed it down.

I shall seal it with modern silicone instant gasket which I think is forgivable in this case but that will have to wait until I get down to Devon again.
Wing mirrors next. It never had any but I have tried driving without and it is scary as hell! They will go on the cab frame under the wing nuts.
Steve
-
1
-
-
Well, we went to Beaulieu Autojumble last weekend but no great 'finds' unfortunately. We did see lots of friends though and a number from this forum which was wonderful although it is most disconcerting to be recognised! We also met an enthusiast for 'Radmill' lighting equipment. He has a significant collection of them but surprisingly, no gas generator so he was very interested in ours. It seems that ours is a lot rarer than we thought which is interesting to hear although somewhat unfortunate as we want another three! It looks like we will have to make them. Oh well.
We are still making some progress. I started on the headboard in Father's car-port before bringing it back here to Leicester for completion. This is now done and it is ready for the paint shop.


Adrian has very kindly given the sump a light sand blasting so that we can see what we have.

It appears to be a casting fault as there are several cold-shuts in the area and possibly a crack along the inside. I made the fatal mistake of poking it with a small screwdriver and going right through!


I have some repair paste but think that a patch might make an appropriate period fix instead. I shall try that solution tomorrow.
On the subject of fuel tank sealant, I have written to the suppliers to see if a second coat would be an acceptable solution. We will have to see what they say.
Steve
-
Yes, a bigger garage would be a great asset but we will have to live with what we have. Actually, more floor area would be useful for the next project! In the meantime, we are trying to push the Thorny over the finishing line but it is not giving in without a fight.
We took the sump off on Monday. We expected to undo the bolts and just drop it but famous last words. It stuck to the gasket and just would not shift. We had to strip down the oil pump and front of the engine in order to get at the joint.

Lots of knocking and pulling from awkward angles went on but it eventually let go when Father held a jemmy inside against the underside of the crank case and I hammered a chisel into the end joint. It took us three hours!

Dad wiped out the sludge which had accumulated in a surprisingly short time.

I now have it with me ready to fix the leak. I think it will be a Dremel and filler job. We shall see.

Steve :)
-
Well, we had a nice day at The Great Dorset on Friday and saw a lot of friends and old lorries. We have had a lot of opportunity to discuss the fuel tank as well. We have reached the conclusion that the lowest risk approach would simply be to Slosh it again as Barney has suggested. It is a bit pricey but offers the remotest chance of blowing ourselves up so we have, today, drained the tank down completely, removed it form the lorry and left it on end with the cap off to dry out. I'll order some more Slosh shortly.
In the meantime, we have been back working on the lorry. We have put up the hood frames and trimmed the longitudinals to length before drilling the ends and fitting them.


Next job is to make the wooden headboard up and then to remove the sump for investigation.
Steve
-
1
-


")


Crossley IGL 3
in Pre WW2 vehicles
Posted
Looking good. It is out of the way now as well!
Steve")