


.JPG.ce5d5173b9120e587cf914646a67c75d.JPG)
Pete Ashby
-
Posts
1,682 -
Joined
-
Last visited
-
Days Won
8
Content Type
Profiles
Forums
Gallery
Blogs
Events
Articles
Store
Downloads
Posts posted by Pete Ashby
-
-
4 hours ago, Nick Johns said:
were Jeep wiring looms ever fabric covered.?
No not to my knowledge Nick always tape wrapped, the best modern replication to use is black Self Amalgamating tape, does an excellent job fully water proof and looks the part exactly.
-
Particularly like the weathering very well done
Pete
-
Interesting choice of subject very well executed and displayed, thank you for posting
-
1 hour ago, dgrev said:
Us Aussies historically have had a problem with that concept.
Which means I should probably let discretion over rule my desire to comment.


Pete
-
56 minutes ago, dgrev said:
Looking at this from the other side of the world, I am just shaking my head.
Elitist Thunderboxes!
'Officers and Gentlemen' Old Boy.............. it's a class thing

-
Part number 608447 stock number G-85-34-473 I believe is for the US G506 1.5 ton truck running the US built 216 cu in engine.
This is an unopened kit sealed in the cosmoline wrapper and includes all items for major overhaul including the Metering rod and seat, (Chevs of the 40's kits do not include this item).
£75.00 p&p @ cost anywhere ask for a quote outside UK
Pete

-
The whole body of the distributor looks upside down to me. Have you timed the engine on TDC compression stroke for No 1 cylinder inlet and exhaust both shut?
Pete
-
PM sent to you David
Pete
-
Left and right fuel tanks and bracketry have been removed along with the chequer plate tank shields a feature of the water tank version of the D15 done to prevent damage to the fuel tanks by the operating crew when filling the water tank.


Both tanks seem to be externaly in good condition and both hold a small amount of very smelly old fuel so there is a possibility they made be usable after draining and steam cleaning the issue may be with corroded pick pipes but all that’s for another day.
The two half of the cab (as described in a previous post) have now been separated and will be lifted off the frame and stored awaiting their turn for repair and then media cleaning.

During the work to remove the cab bolts it was necessary to remove the rifle butts from the rear corners of the cab floor I assumed that they would be like similar Canadian and British fittings routed out of a solid piece of wood however once the dirt was removed it turns out they are open ended the bottom is closed off with a form of thick rubberized canvas? or perhaps rubberized asbestos? . They appear to be original and never to have been removed the bases are the same rubberized material that formed the draft seal on the pedals and steering tube. Small detail but not come across this type of rifle butt holder before,........ has anyone else seen something similar?

Pete
-
10 minutes ago, Gordon_M said:
Interesting cab construction, if a lot of work to pull down and put back after all these years. The US version of the cab is one welded assembly, which means it maintains a lot of structural strength and you can hack out and replace bits with wondering if it will still fit.
I expected a welded single piece unit as well Gordon,
I wonder if it's a pre-war design feature on Canadian civilian models to allow for construction of perhaps 1 ton panel vans using the same scuttle and front end sheet metal throughout the range ?? .
Fortunately there are no major repairs needed to the cab main structures, it's just some tin work in various place so it shouldn't need to get hot enough to distort anything.
I too was wary about removing the hinge pins with the risk of mashing up the door post if they proved stubborn however the door posts are sound and with a little heat and carefully balancing of the weight of the door on the crane they knocked out with no problem but I can see that if the pins are rusted and the knurling is tight in the top of the hinge there could be issues.
Pete
-
The strip down continues with the removal of the removal of the door way valances and side steps from both sides of the cab, it is interesting to note how much lighter the construction of brackets and fixings etc are reflecting the Dodge's pre-war commercial design compared with the contemporary CMP range of purpose designed trucks from Ford and Chevrolet.

The cab floor is made up of a two piece ply wood insert around the transmission and hand brake and then a two piece pressed steel toe board that forms the foot well

Here the floor plates have been removed and the battery tray is visible on the left

This is the other side and shows the PTO for the power pump, sadly the connecting prop shaft and pump have long gone I suspect when the truck was converted to a civilian recovery vehicle

A feature of cab construction that became apparent during strip down was that the front scuttle, the rear seat base and rear cab sheet are two separate units held together by a double row of slotted machine screws through fish plates under the floor secured with captive nuts. I had assumed that it was all one unit welded together as the joint and heads of the screws were hidden under layers of paint and dirt. This feature will make the handling and the repair of the cab a lot easier

The screws all came out intact using an impact driver WD40 and the hot air gun previously mentioned

Pete
.

-
Taking advantage of the recent dry spell the Retriever was moved from the barn into the new workshop with the help of Trevor the tractor and my wife Anne


Pete
-
 2
2
-
 1
1
-
-
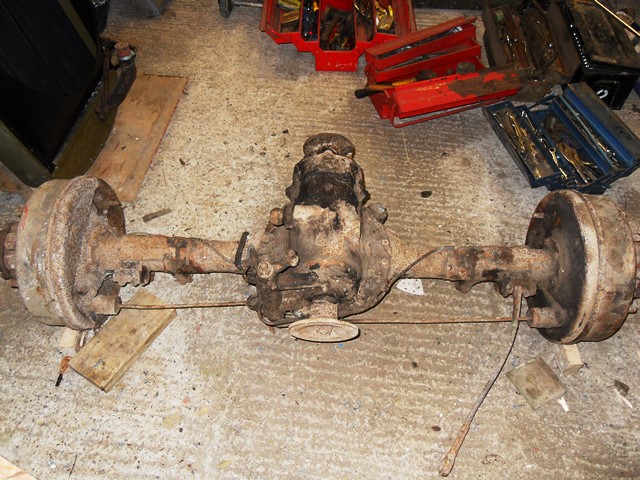
A little more progress to report the axle now has both back plates and hubs refurbished and refitted along with the brake pivot and bisector units. The whole assembly has now been given a coat of red oxide undercoat on top of the etch primer.


Pete
-
You could carefully trim the fins from the leaking tube dry it off and solder the split closed or for a short term bodge use something like "Wonder Weld" bodged on the outside of the tube. For the capacity of your rad you would need so much miracle jolop poured in the top it would not be cost effective.
Pete
-
Those are the storage loops one single where the front hoop remains in position and then a double behind to take the middle and rear hoops
-
3 hours ago, Maurice said:
Danny on the Early drop side bodies , there are no top tubes fitted , just the 3 bows like Jeremy has made them .
Maurice is correct the early 15cwt's were intended as open rear bodies with a flat sheet this design feature followed through into early Canadian 11 cab CMP's 15cwts as well the idea being that the hoops could be stacked into the front loops when not in use without having side bars to unbolt and store. The addition of canvas rear covers was given a separate identifier by the Chadians who classed them as 'Vans' usually seen in the personnel, anti tank gun tractor or FFW role, Iv'e not seen this form of nomenclature used for British trucks however.
-
56 minutes ago, andy1960 said:
Hi Jez ...Great work as always..looking good.
Just a point re saggy canvas .I am no expert but thought I read somewhere the canvas should be made over size to allow for 5%(?) shrinkage.??? May be get it wet before final tweaking ?
Good point well made, get it well wet then let it stand on the truck until it dries out again depending on the type of weave it may well shrink in both length and width by a noticeable amount
-
You could try Googling Paul Beck vintage motor supplies he keeps stocks of all sorts of taps and fittings
-
Looking good
Pete
-
On 3/10/2017 at 8:44 AM, Pete Ashby said:
Time for anther update, progress has been slow over the winter due to a combination of a cold workshop and a good wood burner in the house
. Having said that I have dug the intermediate axle out of the barn and moved it into the workshop ready for cleaning and strip down a few more pictures of work on this item will follow in due course.
After an epic struggle due to the brake shoes rusting onto the drums the brake drums were removed

I had to undo the pivots, anchors and wheel cylinders on each side to give some free movement if and when I could un-stick the shoes then with a combination of very controlled heating tapping and rotating the drum a fraction back and forth at last they came off and despite the effort needed to remove the drums the condition inside was not too bad.
Time for an up date I think on this project.
Back in March last year I started work on the intermediate axle everything has been taken apart checked for ware cleaned and the threads run over with the appropriate sized BSF dia or tap as required then put into various labeled boxes and bags awaiting reassembly.
I'm fairly certain this was the first time in 78 years that the oil and grease that had become baked onto the axle housing and various components had been cleaned having been mixed with paint and road dirt it had set like concrete. I had to resort hacking it off with a sharp knife and then rotary and hand wire brushing to remove the paint and rust a long job with a heavy piece of kit however it's come good in the end........ here it is with a first coat of etch primer and one hub and back plate refitted and the diff housing bolted back in place.

-
A bit more progress on the cab, the door glass runners and winder handles and mechanism have been removed and the glass has been successfully taken out from both doors a good clean with glass cleaner and they will be as good as new the winder mechanisms are also in very good condition and will need virtually no work doing to them except for a drop of oil on the operating arms and cams.
Next job was to remove the doors so the top and bottom hinge pins were driven out using a suitable sized drift with some prior heating of the hinge assembly by the trusty hot air gun the weight of the door was taken with a strop attached to the crane.


Pete
-
Is there a makers etch mark on the glass it will be in one corner usually. If your lucky there may be a year of production as part of the monogram if there is it that may narrow the field a little bit.
Pete
-
This is for all of you out there with a rubber fetish Nige if your lurking this is just for you
This is one of a pair of tires on the back of the truck and may well be original factory fit for the vehicle the date is right and the amount of ware could be right for the recorded mileage. Points to note:
they are Goodyears made for British wheels
Made in Canadan
synthetic (that's what the red dot means
Couple of photos fill your boots chaps


Pete
-
2
-
-
13 hours ago, Gordon_M said:
It is impossible to get direct replacements for those trim bolts. You can get 1/8" stainless coach bolts but the head is more domed. On plain painted steel trim you probably want plain carbon steel coach bolts, 1/8" I think, but you may want to reduce the 'dome' a bit.
Good call Gordon particularly as I've only managed to save a couple of the original ones. However you got me thinking and a poke about in the ''box of stuff under the bench that might be useful one day'' turned up some very ancient tiny Whitworth coach bolts the head size and shape is almost identical to the originals but the shank is a bit large but I think they'll do the job I'll just have to cut a bit more thread into the shanks and trim them to length.
Pete


Leyland Retriever
in Blogs of MV restorations
Posted · Edited by Pete Ashby
Time for an update, the spring packs for the rear bogie have been disassembled, cleaned, painted and re-assembled with new plain steel bushes fitted into the spring eyes.
The intermediate axle that I was working on in the last post has been craned into position and new shackle pins fitted, time for some photos.
Spring pack and axle in place
The new shackle pins, plain bushes and lock keys were machined by Jim Buckle ten years ago now and have been stored away awaiting their call to duty, Jim is Handy 18882 (1927 Vulcan 6x6 on this forum) Dad and an expert craftsman and machinist the quality and accuracy of Jim's work were self evident during assembly everything fitted perfectly without any need for reaming or adjustment.
Example of Shackle pin and lock key
Lock key shown in position, everything needs to line up perfectly to enable the lock bolts to pass through the axle brackets, shackle pin recess and lock key and of course with anything of pre-war British design all the lumps are massively engineered and very heavy.
Here is the finished job, lock bolts in and locked off, in this photo the spring pack is not sitting equidistant on the pin as the weight of the axle is still held on the crane when the rear axle is fitted and the weight of the truck is on the spring pack the bogie has a degree of side float controlled by torque rods on top of the diff housings and will self center.
Pete