


Rover8FFR
-
Posts
1,546 -
Joined
-
Last visited
Content Type
Profiles
Forums
Gallery
Blogs
Events
Articles
Store
Downloads
Posts posted by Rover8FFR
-
-
I see. John thank you for your assistance. As the flywheel is heavily rusted it's removal is a given.
I can then focus on removing all the flakey paint and replacing the core plugs etc.
Cheers
-
I have a Sealey 350Kg rated engine stand that has the 4 box section arms and sleeved lugs for attaching the engine too.
Having now removed the engine from my lightweight the brackets / arms on the stand seem more substantial than say the studs on the flywheel castings.
Can anyone share an image as to the best way to connect the engine to the stand.
Does the flywheel have to come off etc? Do I need some special brackets / bolts??
All pointers gratefully received.
Regards
-
When you see it, no nit-picking that it should be 5/8" thick to be authentic, I can only get 18mm these days:D
http://www.tipadel.co.uk/pdf/price_list.pdf
I wouldn't dream on Nit-Picking at your handy work.
5/8ths still available with some species mate.
-
Eh? If volts go up, amps go down:D
Hey you are the electrics Guru mate!
 I am just a humble ignorant uneducated architect. :red:
Hows the foot / ankle???
Article any closer, talking electrics????
-
This Landi's 12v.
Off work t'day, so a little more being done :-). Just refit 'propper' hinges on lft. side, perfect gap allround the door, closes with a little gentle push :shocked:
I guess they use the correct wiring colours? If thats the case they should be able to do 24v as the colours / sheathing are the same as 12v, but a higher amperage for the extra volts I would guess??
Keep up the good work
-
Ah well, I stand corrected, if some one wants to move the pic's thats fine by me.
There were 2 at Abbey Hill, shame not 1 of each, I'd probably seen the difference myself.
I would have called it the same mate as not an expert either. I've learnt something also and that is why we love this forum. To share. To master and to Learn.
Every day is a school day as they say! As trucks they are both impressive! Thanks for the sharing the pictures.
Next show ye and I will now know the difference between a Pioneer and Conquerer

Now I'm off to work on my 1/2 Tonne 24vFF winterised 'Jeep'...............:nut: LoL :rotfl:
Happy days!
-
Adam. Nice to see another local guy on forum. Welcome aboard mate.
Keep us posted on your hunt!
What are you after and in what sort of condition?
Regards
-
I went off piste slightly with another thread due to experiencing hardships with the engine and box removal.
All future updates on progress will be reverted back on here, albeit other thread has identified my woes were shared by other forum members!
Cheers
-
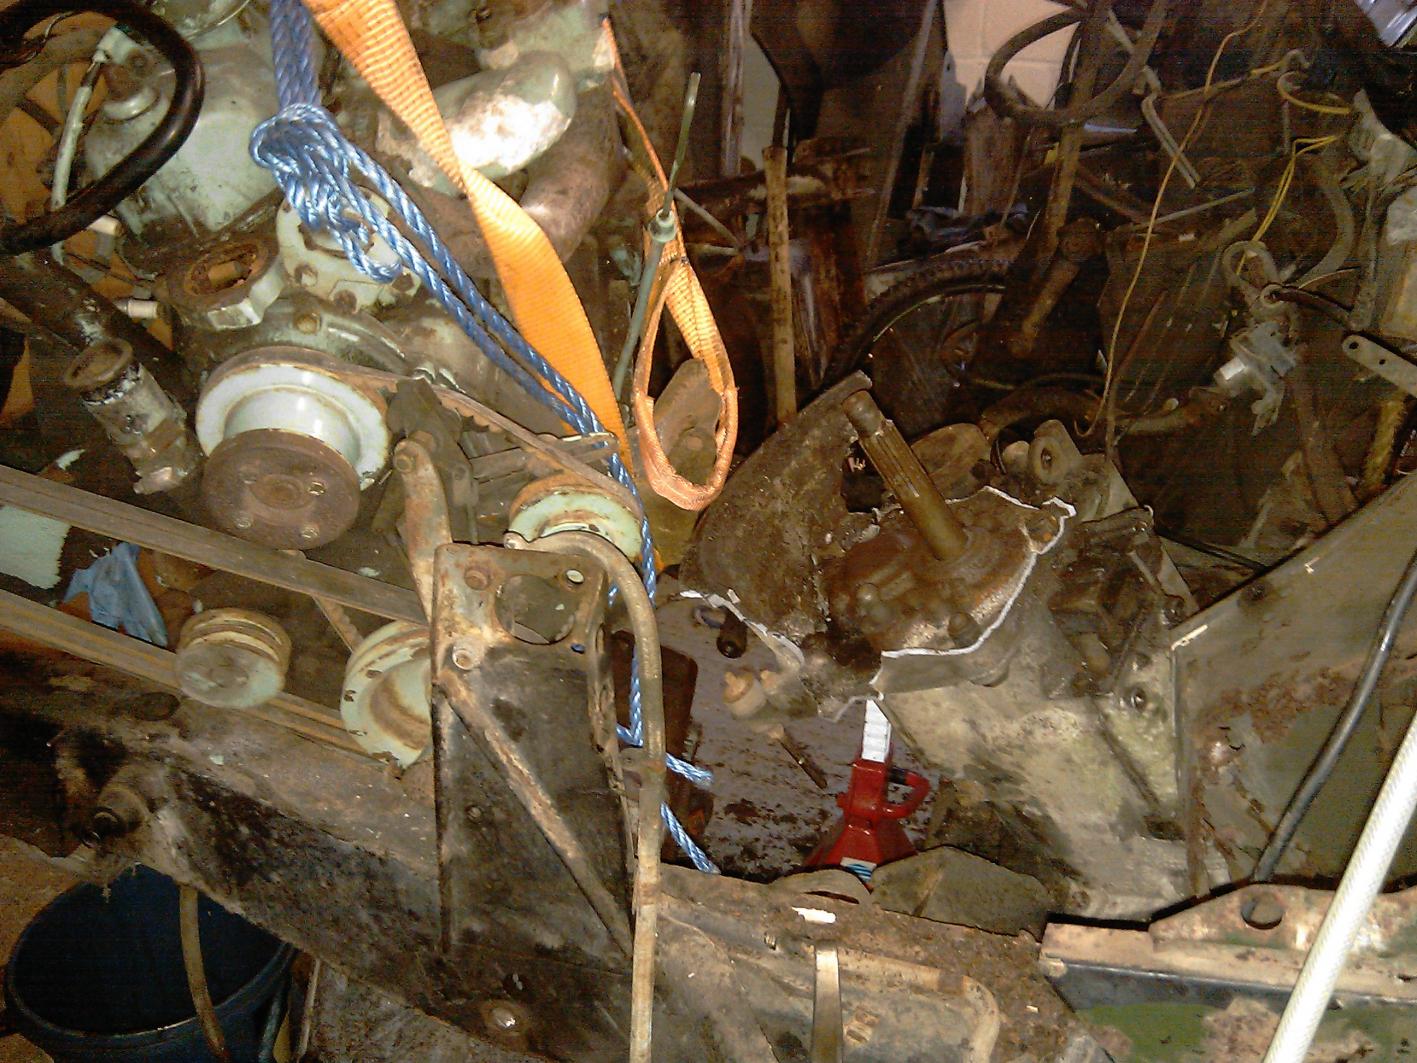
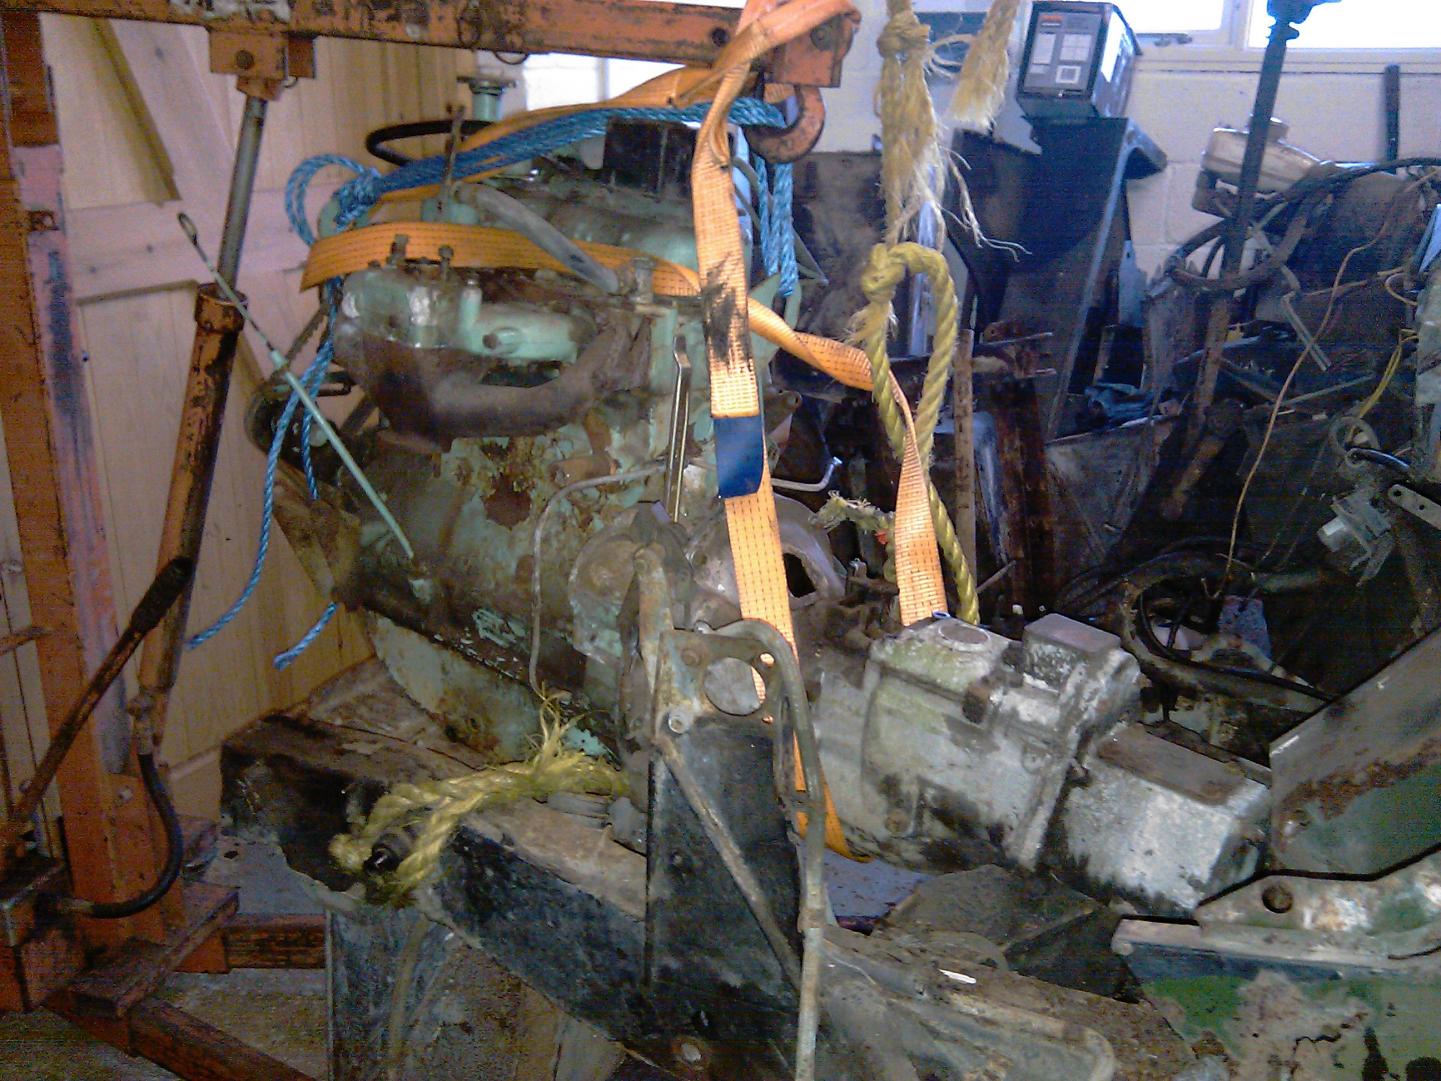
Thanks to all. Progress was as follows;
Undo Clutch through inspection aperture and blast with penetrating oil, leave, knock, tap, jiggle........NOTHING!
Destroy bellhousing, thrust bearing and clutch plate to expose splines against flywheel. Blast with penetrating oil, leave, knock, tap, jiggle..........NOTHING!
Leave a bit longer. Warm splines up with blow torch (gearbox believed to be unserviceable TBC so nothing to lose at this point)..........Blast with pentrating oil to get some expansion and contraction / shocking going on........
I then turned the engine by hand and guess what???? Newtons law kicked in!
I know it was 11pm at night when the seperation came, but I am sure the next county heard the 'Got you, you Beer Steward' Cry!
Can crack on now and hack up old chassis as I progress to make more room.
The new chassis on tressles build up is getting closer after this hick-up! :yay::yay::dancinggirls:


-
You should be able to get at the clutch cover bolts through the aperture in the bell-housing but it sounds like the friction plate will also be welded with rust to the flywheel and pressure-plate. You could try blasting with penetrating fluid & crane suspending with engine down & just off the ground, if worst comes to the worst - I think you may have to sacrifice the alloy bellhousing..
FT I have already come to the conclussion that the alloy bellhousing may be sacraficed to allow seperation of the main parts. The suspension of the parts near the floor over a 'drop cushion' is also a possible option???? However it would be my luck that the 2 would part company and the engine be damaged, even from a couple of inches. Series 3 gearboxes are plentiful and worst case I have a few S2a boxes to chose from.
I blasted the internals through the aperture again last night with penetrating oil, so I may be lucky when I get to her again.
Upwards and onwards!
-
It does seem as if the clutch plate splines & primary shaft splines have somehow become welded , any chance yet of getting a OE spanner on to the clutch cover set-bolts through the gap ?
Obviously you have removed all the fixings, recently I came to the conclusion I had the same problem on a Fiat Punto - after about 3 wasted hours I found I had not removed 3 small set bolts securing the lower tinware (despite having done several UNO & Punto engine changes). It was a case of setting off in the wrong frame of mind, things went wrong and just continued to go wrong all the way. I ended up with the alternator & throttle body suspended on bits of washing line from the wiper arm spindles. Nobody was more surprised than me when it fired up well first go and had continued to do so..
I always put a smear of Moly-Paul PBC on the splines.
Yes that very strong natural weld called RUST! Even with the engine in this state and things supported, propped etc etc etc The prising of the bellhousing from the engine did nothing. Some give but no seperation.
Decided after hours of frustration to just take the whole lot out in one as the hoist was man enough.
Re-assembly will be very different to prevent seizure!
-
I have had a few issues with my 1976 Lightweight Winterised Land Rover 24vFFR but wondered what pains, small or meaningfull that you have all experienced during a restoration, rebuild or general maintenance so that we can share the knowledge under one topic.
For example splitting the engine and gearbox on my 76 Landrover LTWT has been a pain.
A problem shared is a problem halved?
The pictures prove I could not split!

-
FT all I know is that it has been an absolute ##### to try and seperate both.
Last night I decided ' Bother ' do a full separation and forget about the bulkhead as it is 'Brown Bread'.
So I peeled away the bulkhead and exposed the Engine, GearB and TransferB and all as a 0ener!
The limitations of my garage and time at night meant that I could be only sensitive to noise, so I parked up knowing that the next phase would see engine and all extracted.
I am glad that ,the bulkhead is knackered otherwise the butchery would have been more patheology like!


-
Andy is your loom 12v or 24v?????
-
After vegetable curry the last thing you needed was 'Extra' lubrication :laugh::laugh::laugh:
-
That ankle looks quite nasty Clive. At least it didn't affect your sense of humor or appetite??
With that vegetable basket on the TUM you will need quite a few tins of Vindaloo to get rid of it all :cheesy:
Where will you stash the toilet paper? :red:
-
Army Pullover Heavy Knit still referred to under the Rifles Regiment Golden Threads dress regs. However they refer to OG for Barrack Dress!
Interesting to see a Desert one, even thogh Desert Bloody Cold at Night.
Nice addition
-
My son of 13 months is called Henri, as we believed the name of Harry was becoming too popular and a tradition to honor a Grandad was upheld. Ex Navy man called Henry. Albeit referred to as Harry, so hence the first angle on Harry!
Long may the tribute to the name of Henry continue, albeit with a modern twist.
Having been an avid watcher of 'Ultimate Force' I am sure his nickname will be 'Heno'!
I guess a lot of these old traditional names are being lost in modern culture in favor or Vogue titles. Or is it just me?
What ever happened to tradition?
-
Well I have removed a large proportion of studs, but not all. Removed the gear lever and inspection plate. Blasted with penertrating oil and left. then returned and wiggled at the engine hoist and still they won't come apart.
Looking inside at the clutch there is definate corrossion and I am guessing that the drive shaft from the gearbox is held fast on the end of the crank?
My only options are to remove the gearbox and see if that comes away easier or hack up the gearbox bellhousing and then use the Irish hammer. I do not know the worthiness of the gearbox, given its time outdoors unprotected and therefore suspect that it is only suitable for internal salvage.
From the feedback everyone appears to have had an easier passage so now know the outcome and assault under the cry of 'swift and bold' seem to ring in my ears.
Any other ideas anyone as I may be missing a trick here?
Cheers :blush:
-
I haven't had chance to get near the Lighty this bank holiday due to work stuff.

I have decided to remove the studs around the bell housing so ease the seperation as I know she can wiggle from side to side and the gap widens, but she wont come away at a sensible angle.
It is frustrating when it is so close but just seems to bind. I had managed to blast some penetrating spray in there incase it is the clutch / drive shaft etc.
It seemed easier when I last tried last weekend. Maybe after 2 weeks the penetrating spray may have worked itself in. I hope to have a better update this coming weekend, whilst the wife is watching the wedding.......
Fingers crossed :nut:
-
Wayne,
I just wanted to lighten the topic.

On my Toustie I had no problems spliting engine and gearbox, it has been restored, but a lot of parts 24v specifications is missing :-( unlike your original state.
My toustie holidays are shortened to one day>
(busy at work)I only complete seperating the rear axle and brakes.
[ATTACH=CONFIG]43629[/ATTACH]
photo of wings
thanks WayneJarda
Fantasic Jarda....Glad they arrived safely
-
OMG Now that is a talent!
-
I believe that Coke Cola has an effect or making metals patinate rapidly.
I believe that the VW boys splash it all over the Bugs and Campers to get that rusty old exposed steel look.
As with anything try on a spare piece first.
It may work and it may not but worth a try and you can drink the liquid if all else fails. :cool2:
-
Thanks one and all. Seems like the Machine Mart / Clarke one is well endorsed. The only shortcoming will be my compressor I guess.
Thanks to one and all for the advice.


Series 3 Lightweight 24v FFR Winterised
in Blogs of MV restorations
Posted
Popped into the garage tonight to do something else and before too long I had picked up the cut-off tool and put on some gloves.
I was amazed whilst sort of tinkering, just how much I had done. No photos but list of conquests tonight.
Remove rear lights and base plate bezels from rear tub.
Isolate main umbilicle cables along chassis rails and bulkhead and drape into rear tub.
Remove Larkspur co-axial cables from chassis rails and route back to rear tub.
Disconnect starter switch and battery cables.
Remove large amounts of winterised fabric and contact adhesive from rear tub/ wheelarches.
Isolate main wiring loom and pull through chassis to remove.
Didn't plan on doing so much whilst tinkering, but all positive work to allow if needs be the rear tub to be lifted away with some cabling attached. Plan to sit it on blocks/ tressles to allow clear access to work on and re-spray etc etc as part of rebuild.
Bulkhead can be completely removed now to allow parts to be stripped off to suit new/ replacement bulkhead.
Rear axle removal for refurb and repair.
Then hack up the old rotten chassis to make way for the new one and then as the Haynes manual says. Reassembly is the reversal of disassembly.....LoL. Hopefully some photos over the course of the weekend as I know how everyone likes pictures.
I did however come to the conclusion that the bitumastic paint that was slapped everywhere was a completely stupid idea and makes life really difficult.
The front wings inside as smothered in the stuff and removal is going to be time consuming to say the least! :nut: