


daz76
-
Posts
565 -
Joined
-
Last visited
Content Type
Profiles
Forums
Gallery
Blogs
Events
Articles
Store
Downloads
Posts posted by daz76
-
-
Thanks for the info Croc and Thor. Just didn;'t want to fill the old beast up with the wrong stuff and ruin something before I even get him back on the road! Got some winching of trees to do before long. Will take pics of course!
Andy-I'll get on to Morrisssssss's this week and post my findings. :cool2: Daz
-
According to my workshop manual OC600 for rear axle,steering box,steering linkage,swivel bearings,vertical winch,jib winch,clutch operating linkage,brake linkage,accelerator linkage,propeller shaft bearings,generator bearings and all lubricating nipples ! OMD330 front axle,gearbox and transfer box. OMD110 for Engine,air cleaners,air compressor,starter motor,steering cylinder,servo cylinders (front and main),winch dog clutch,jib winding gear,and oil can lubrication LG280 for fan and coolant pump bearings,clutch withdrawal bearing and front hub bearings. XG271 magneto greaser and front swivels ! :-D
Thanks Andy mate! Just need to find the modern equivalents to these so I'll get in touch with Morris oils and see if they can shed some light. Looking at this the whole rear axle (ie diff and walking beams) uses the same OC600 throughout whilst the front axle shares the same as the gearboxes. Great help Ta. :yay:
-
I was going to put 140 in the walking beams and rear diff as thats whats in them now and 90 in the front diff and gearboxes.
Further advice please chaps.:readbook:
Mmm- Seems like we've got partially conflicting info Rob. I don't know how different 90 and 140 are. Hopefully someone will shed some light. Hope the rebuild's coming along nicely. Daz
-
Hi. Can someone who has an Explorer on the road tell me which oils I need to get hold of as I want to change all the gear/axle/diff oils soon. This is what I understand so far:
SAE 140 for the rear diff
SAE 90 for the gear/transfer boxes and rear walking beams
Does the front axle use 140 or 90 and what about the winches, front swivel housings and steering box? I'd appreciate advice from anyone as I've heard conflicting advice. Don't want to order the wrong stuff obviously. Thanks. Daz :-D
-
Is that the same reg.no. as the Constructor in post 379 ?
FV11301, Thank you for a timely and interesting post, Reg No. is HFO 990 on both lorries.

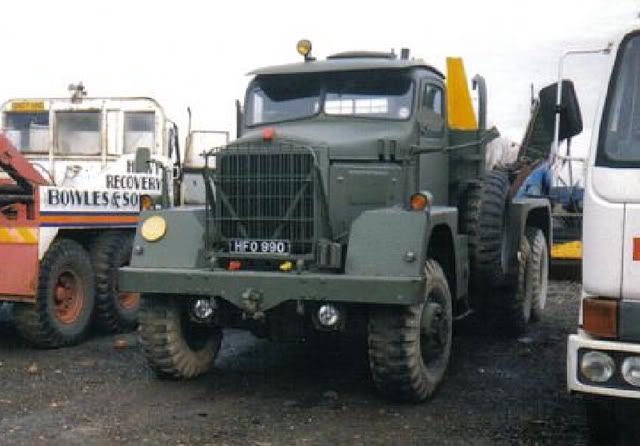
Mike- I have some photos of HFO 990 taken a few weeks ago by my Dad. Malcolm Bowles still has it and it is in pretty regular use. He has another constructor for spares. I have no way of scanning photos at my current location, but will put them on as soon as I can. Best wishes. Daz
-
Haven't been on here for ages. How's the cab coming along Thor? Glad the telegraph pole worked for the roof sides. I haven't worked for ages on my Explorer but hopefully there'll be time in the Summer. I've made all the panels, but need to get time to fit them now! cheers. Daz
-
Herman now lives with my pioneer as he was bought by my brother a couple of years ago to save him from being scrapped. He looks to have had a very hard life as the chassis is bent in front of the crane and at one time the front drawbar hook has been snapped off ,the pto on the gearbox has been broken off possibly caused by letting the clutch out while the winch was unwinding after winching in. But apart from its battle scars its got lots of potential and if live to 120 and win the lottery it might get restored one day.!!
Fantastic! Glad to know Herman is still around! I'm not at all surprised by what you say as he did some pretty serious jobs during his working life. Thanks for your info nptimber. I was pretty enthralled by this old Scammell as a boy.
-
That is Alan's (don't know his surname, everyone calls him Big Al) who Pickering Commercial entries until last year. It has recently been up for sale at I believe £12,500. I thought about buying it but I am not impressed with the winch. Some mountaineers had a reversing gearbox after the winch PTO so that you can pay out the winch under power, later ones went through the gearbox, as per Constructor, but this one is like the Pioneer/Explorer. and can only winch in. Leyland 680 (I think power +)
Mike- It's Alan Rogerson. An Explorer he was breaking yielded a cab/ bulkhead and loads of other bits to put mine back together. This Mountaineer was in fine fettle when I saw it.
-
Nice one mate ! They didn't like wasting paint at the Scammell factory ! Lucky they made them with such thick metal ! I look forward to seeing the face lift at Dorset if not the War and Peace show ! :-D
Don't like wasting paint in the Fowler workshops either by the look of your new Avatar Andy!. They look nice and shiny. So Daisy's going green then?
-
Nice one Daz ! You've done well to get her back to how she is ! We can always have a Scammell show as long as we finish em before the fuel runs out ! :-D
Thanks Andy mate. If I can get him back on the road before I'm too old and infirm to drive I'll be a happy man! The weather's been so bad when I've had the time to work that I've only managed a couple of small jobs since summer 08 and now the land rover resto is my priority. Still, the chance of getting a barn up is not to be missed and should speed things up.
-
Looks like fun Thor! Hope you've got a good heater. I think you should leave the panels off as there's less to rust later on and it's a huge saving on paint. It's been working for me for the last few years and I'm sure you'll get an extra 2 or 3 yards per gallon due to the reduced drag and weight :cool2: The 'bikini' look is all the rage on Explorers this season I believe. Good luck with the rest of the job mate. Daz
-
Removing the cab. I should have mentioned that the floor was completely rotten and held in place by bits of rubber matting. The first pic shows how bad the bulkhead was. You can see the holes in the bell housing firewall. Oddly enough the bulkhead was much worse from the centre to the nearside. We used a block and tackle to hoist the rear cab frame clear in one piece after removing the the (totally scrap) roof frame. At this time we still thought we had to rebuild the one we had as nothing else was around. The photo from above shows the rust on the nearside of the bulkhead quite clearly.
The 3rd shot shows the very impressive wiring layout! So much wire, yet nothing worked!
Wish I'd taken more photos at the time as these are all a bit general. I tend to get stuck into the job and don't stop for photos really. Sorry about that.


-
How I'd love to have a workshop like yours. Sadly my Albion has suffered from being outdoors for so many years, although fortunately my donor vehicle has much better panels on it.
Having a good workshop speeds things up no end, as you can lay things out to repair them and leave everything just where it is ready to carry on at the next opportunity. Sadly, all my restoration work will have to be done in the open in a field next to where I work.
Other peoples restorations are fascinating and we all look forward to the next set of pictures.

It was a lovely place to work and a nice change from being outside. Dad had it built for his retirement to restore tractors, but then my parents moved house!! :shake: Ever since it's been back to the good old tarps, but I've persuaded my in-laws that in return for all the free recovery I've provided there's room for a pole barn for the Scammell at their place. Roll on the summer!! :yay:
Sorry GPS- I'd put the kettle on any time mate, but sadly all you'll find in that shed now is plasterboard by the lorry load
 I could find space for a Yurt or Teepee if you don't mind a few sheep around the place? :rofl:
 -
Nice pics - will we see it on the rally field soon ??
I'd love to say yes Thor-it moves about (see HMVF TV) but has no brakes and no panels or electrics...May be a while yet :cry: Still, I get to play every now and then when other younger lorries get stuck on the farm and need a tug :cool2:
-
Thanks Antar. I can't find a Mountaineer gallery. If there's not one I'll turn this into one.
-
By this stage of the restoration we were concerned about what to do about replacing the cab. It looked like being a full rebuild from scratch.
-
The strip-down begins. It was decided to strip the cab and front end and restore this first as this would allow the vehicle to be moved around more easily. The cab was in a very bad way. All the panels apart from the upper panel in the middle of the back of the cab were rotten. We removed the doors and stored them to take a pattern for replacements. The badly made replacement screen was removed and the front of the cab just disintegrated. The roof cupola had been removed before my ownership and the hole patched over. The heater unit and all the pipework was removed. Many of the smaller air pipes to the wipers etc had been cut or badly damaged. The seats were intact but torn, so we found some suitable canvas and recovered them. The seat frames were cleaned, painted and stored. The radiator grille was buckled slightly, so this was removed and pressed straight. One of the air tanks was removed and a large leak repaired.
We sought advice from Duxford, who gave us the correct paint numbers and the front of the chassis was needle gunned and painted with grey primer after steam cleaning.
The two black pipes in the engine bay were quick replacements for the cracked water pipes. A proper set will be fitted at a later date. This is the end of 2000 and beginning of 2001.


-
One of the last jobs with the Scammel before it's strip-down was to remove some trees to make way for a new workshop. The tarps had to go! Finally installed in it's new shed.


-
My parents had recently retired from running a coach company. This was a huge advantage as they still had the yard with facilities for 'heavies'. The nearside walking beam had wedged up when coming off the transporter. I removed the grease nipple and regularly squirted thin oil into the hole. I applied downward pressure with the jack and after a couple of days it came down after running the lorry back and forwards a few times.
The scabby bulkhead can clearly be seen here. fortunately the engine side panels were still with the vehicle, although slightly damaged. The wiring in general was pretty poor and very few of the electrics worked.


-
Right, here's a few more pics.
This shows the intial inspection on getting the Scammell home. You can see the fairly typical rust in the side of the cab, doors and fuel tank surround. I had a new frame and tank surround made up and the tank professionally repaired as it had sprung a leak. The cab doors were really beyond economic repair as the frames too had rusted so badly. A favour from a friend sorted that out and we now have a beautiful set of doors waiting for the better weather to be fitted, along with the rest of the cab panels. More of that later. The front mudguards were removed and patched and painted ready to store. At this point the restoration was taking place under a tarpaulin. A new set of batteries was fitted and with a lot of bleeding the fuel system the Explorer was coaxed into life and ran well.


-
This is what I'm led to believe is a Mountaineer. I photographed it several years ago. It was owned by Alan Rogerson and beautifully preserved in fantastic condition.


-
There you go Andy! Sorry mate...:-D
-
Cor! That looks and sounds good. Thanks for posting Thor.
-
Thanks for the info Radiomike.


Scammell Explorer Gallery
in Transporters & Wreckers (All Nations)
Posted
Ps I think there's a couple of other companies too- Forest lubricants and another one. I'll try to find the best price. :sweat: