


DAN THE STEAM
-
Posts
217 -
Joined
-
Last visited
-
Days Won
2
Content Type
Profiles
Forums
Gallery
Blogs
Events
Articles
Store
Downloads
Everything posted by DAN THE STEAM
-
You are correct, and no the Halley doesnt have an impulse mag.
-
As far as i can find out, yes, this was the only source of spark. Don't worry, i drive a Ford Son standard N, i have plenty of practicewith handle
-
Hi all, sorry it's been a while, i have now finished all the loose ends and the Halley is now centre stage in our workshop. One thing i have done of recent was to find a magneto and have it rebuilt. It is a Simms mag, not the correct one for this engine but it will be fine nether the less.


-
Hi Brooky, sorry for the long weight, yes, it has had a Scammell cab fitted in some point during its working life.
-
Happy Christmas to all, from the Halley and I. Hoping to get some updates on here in the new year, but until then, have a good one.
-
Hi Enigma, i dream of the day i can drive it To be honest it's not that far away now, well closer than i have ever been to getting it running.
-
Hello adinmass, i have found an engine ID number [ RU.76847] also most of the casting numbers start with the letters RU. Any infomation or help would be very appreciated indeed, and maybe if identification can be verified then the quest for missing parts on the engine can begin/ continue on a new chapter. The parts that are my biggiest bug at the moment are the con rods and pistons which are missing, so to even get some measurements from one would be very helpful. Thankyou.
-
No sorry, it is a Unipower Forester.
-
Hi all, just thought i would bring you up to date, I have n been working on the Halley getting it ready for a few events, one of which is Dorset steam fair. All the bits for the steering box has been machined excluding the worm and segment, i have started figuring out the angles and ratios for the worm so should soon have the information i need to look at manufacturing. I also did some more on the engine block, namely cleaning and preping the crank case for welding/ welding up some cracks that i believe might have been caused by a thrown con rod? Also my dad and i made and fitted the floor frame work for the body, it is really starting to look like a truck. ps sorry if this turns out horrible, im seeing if i can do uploads from a moble phone


-
Hi all. Well i have been getting on with making parts for the Halley, so Friday i decided to machine the steering box arm which needed two tapered holes machined into it, the large end ( wayshaft end) was 1 1/2 id with 10 degree taper and the other end ( track rod end) had a 1 1/8 id with a 2 degree taper, this casting also needed to be machined down to some nominal sizes before i started to put any holes in it. I did make one mistake that caused a bit of an annoyance, machined the taper on one of the holes the wrong way, meaning that the drag link would hit into the tyre before full lock was achieved. So ended up machining the taper parallel with a step on end then machining up a top hat bush with the taper machined into it then pressing this into the new hole to rectify the mistake. Also i have machined the steering wheel casting that was supplied by the Goslings, this also has a tapered bore but only 1 degree and id of 1 1/8th, so this and the steering arm can now be sent off for keying, then i can start to draw up the steering worm and pinion. I am hoping to try and machine the steering worm and pinion myself for the challenge of trying, i just hope it turns out ok, so if anyone has any tips on machining such a thing or even how to figure out the parts of correct practices your advise will be much appreciated. i did try to upload some more pictures but am having trouble doing so, so bear with me on them. Dan.
-
Thanks for the pictures, infact if you look on the info board besides the Halley chassis there is a picture of my one before i got it ( well way before i was even on this planet). so news flash: on monday i went to the sawmills and ordered the wood for the rear body floor joists, i couldn't afford Ash so have ended up getting the joists done in a hard wood the same collcolour as mahogany, i can't remember the name of type of wood (i must be getting old ) Pictures still in progress of uploading sorry
-
Hello all, sorry its been a while since the last update "the prob with doing to much stuff" the progress is slow but steady. So the throttle handles, quadrant, cracks, bulkhead brackets, fork ends and linkage rods have all been made and fitted to the steering column/ bulkhead and looks awesome :kiss: Also the casting for the steering quadrant and swing arm were also delivered a few weeks ago, and since then the quadrant has been 70% machined and is a nice fit with no end float, so next thing to do is try and make the pinion to bolt to the quadrant. I am also in the process of ordering the wood work for the rear floor framework ( the floor joists and cross braces) and hoping to have this done and fitted before the beginning of September? Pictures to follow, this is just more to let everyone know that i'm still working on the Halley. :cheesy:
-
So today i finished and fitted the running board brackets Dan.


-
Thanks, yes, i cant wait to get all the castings back. Im hoping that i will get the castings in the next week or so.
-
This truck is really starting to come on now, well done
-
Thank you mtskull, so do i So a new update on progress: I finished the pattern for the steering quadrant and steering arm and the patterns are now in Sheffield awaiting casting in a grade of steel i cant remember. I also measured, drew up, and made the patterns for all the throttle parts including the levers and the quadrant that bolts around the steering column. These patterns are too at the foundry awaiting to be cast but this time in bronze. Also started making the running board brackets. And finally started stripping more bits off the engine crank case to prepare it for shotblasting and then to look at welding the cracks up. Anyway, pictures. So hopefully the next update will be the return of the patterns and complete with castings. Ok so i need some help finding out more about the engine im going to fit, ie what carb and mag should it have and secondly does anyone know of any suitable bits for sale for this engine. Also does anyone have an old flywheel from a period engine that could be used for this one, from memory i need it to be no bigger od than 18", but i will confirm this as well as the width, any help will be really appreciated as i would love to get this engine running this year. Dan


-
Thankyou, Egnima. Hi all, so i have started making some more patterns to try and finish the steering box and steering in general. So i have now made a pattern for the steering arm drive shaft, this is the part that goes inside the steering box and that the steering arm attaches to. I have also started making the pattern for the steering arm and the throttle and advance and retard leavers, both the steering box parts are going to be cast in steel. I have also started making the two brackets for the running board. steering arm 50% finished Dan


-
Great job on the ball joints, Steve. Keep up the good work guys.
-
Great job Guys. Sorry i couldn't make the talk as i had a break down with the land rover. wow i wish i knew about that tool when i was machining my track rod ends.
-
So spent most of today machining 1/4whit bolts for the waterpump and making the brass drain valve to the same pattern as the primmer cup found in the water jacket. So today concludes the completion of the first full componant of the engine. Dan


-
After some paint. Dan.^"^


-
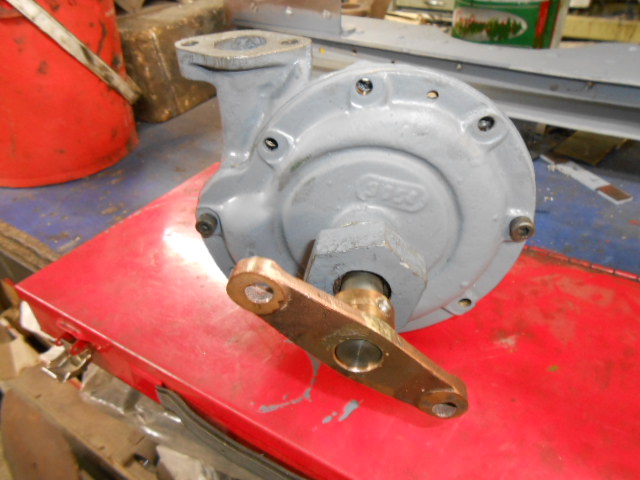
Thank you Toner. So i have now finished repairing and re machining the drive flanges for the water pump and magneto. Sorry the first two pictures are not in order, so the second picture is the state of the drive flange for the pump from the engine drive side, doesn't look to nice and wobbled on the shaft like mad. So cleaned out the bore then silver soldered a plug into the damaged bore then machined it back out to a nice tolerance fit, i needed to leave the spigot sticking out one end as the casting was not concentric to the bore and couldn't hold it by the shoulder of the casting. The next row of pictures are the water pump dry assembled to test the fit of everything before the top coat, the only things needed to do now is to machine up some new bolts for it and get a water drain tap for the bottom of the pump. This is the first full unit to be refurbished on the engine and not the last! Dan.


-
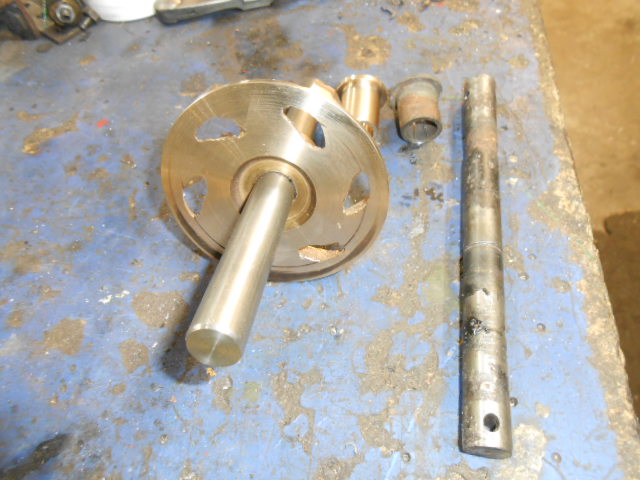
Happy new year everyone. so i started playing with one or two bits to get started back into the project. so last night i decided to look at the pile of rusty used and abused bits that is my water pump, so cleaned down the outer casting and the impeller and assessed it. Fist thing to do was to reface the impeller and also made a new drive shaft from stainless steel, as you can see from the first picture the old drive shaft had seen better days. Next i needed to re machine all the pitted faces of the pumps inside and then skim down the outer bolting flange to take any end float " that was actually quite a lot between the casting inner faces. so this is what it looked like after some work, like new there was also two new bushes made up for it, a new gasket and also drilled out some broken studs. Here is the steering wheel supplied by the Gosling's " thanks guys " so next job on this is to broach out the centre "square" Dan.


-
Hi all, this project has been to quiet for too long, so have started getting started on the Halley again :yay: As some of you would have seen the Halley made an apperance at the Great Dorset Steam Fair at which it was well received, and thanks to those who helped to organise that. So since the last post not much has happened "boo" but it hasn't been stagnant, just before Dorset one of my friends turned up a Halley radiator badge ( the scroll type across the rad core) so I fitted this just before the show. I also gave her a spruce up with some paint and started working on the rear hooks. And now I have a cast steering wheel from the Goslings Thornycroft project, thank you guys, so I want to start working on finishing the steering box, so watch this space. Dan. ps sorry to keep you all waiting for an update.
-
Morning all, sorry i haven't put any updates of recent but here they are after a long wait. The engine is striped down to its bare parts and i'v been getting things bead blasted, I had both cylinders blasted inside and out to remove the rust build up inside the cylinders mostly and the limescale and rust from the water jacket. In doing this it showed up some cracks, but one in particular as the number one cylinder has a crack running from the foot of the cylinder bolting face then up the bore and arching back towards the foot again and it total is about 2" long. On top of this i have also found the crankcase has a crack on the left hand side running from the flange for the sump then along the crankcase for a few inches with some other cracks coming off of the main crack, behind the magneto and water pump bracket, this goes well with the crack in the front of the sump and the smashed timing cover so all in all every main casting has a crack in it somewhere.:cry: 9. Looking down on number two cylinder. I will try and get some pictures of number one cylinder with the crack, for you all to see, plus have also finished adjusting the front brush bar heights as they were to high before. Dan.


