


.png.13c2ec34f1c53365a25f5885333b02b8.png)
johann morris
-
Posts
602 -
Joined
-
Last visited
-
Days Won
33
Content Type
Profiles
Forums
Gallery
Blogs
Events
Articles
Store
Downloads
Posts posted by johann morris
-
-
On 1/27/2023 at 1:30 AM, markyakyak said:
Thanks Mark, I had already found the site but I am not sure that they are worth the price being asked. I have previously contacted the person concerned but he said that he wasn't sure that they would be any good for what I wanted.
Evening all, it's only little old me coming out of hibernation. I thought that I would give you a quick update. I have been making quite a lot of changes as the assembly progresses, some out of necessity, others because I wasn't happy. I have changed most of the crimp connectors in the wiring for automotive connectors that won't pull apart easily. I have cut out any wiring in the old Jaguar system that aren't absolutely necessary and rerouted a lot of others. The light switch failed before it was ever used properly so had to be replaced. I couldn't find an all metal one apart from in the USA but in the end I settled for one out of a Jeep, not exactly what I was looking for, because of the push down button but after some modification it looks perfect. I had to make a new back plate for the switch that was a bit more in keeping.

I designed what I thought an original one might look like, printed on to water slide transfer paper and applied it to a aluminium plate that i cut out of a piece of old Land Rover body work. I applied the transfer and when dry, gave it a coat of vehicle paint lacquer.

And in it's final resting place.

One part that I hadn't made, were the cones that go on the idler wheel centers. A very enjoyable bit of fabrication.


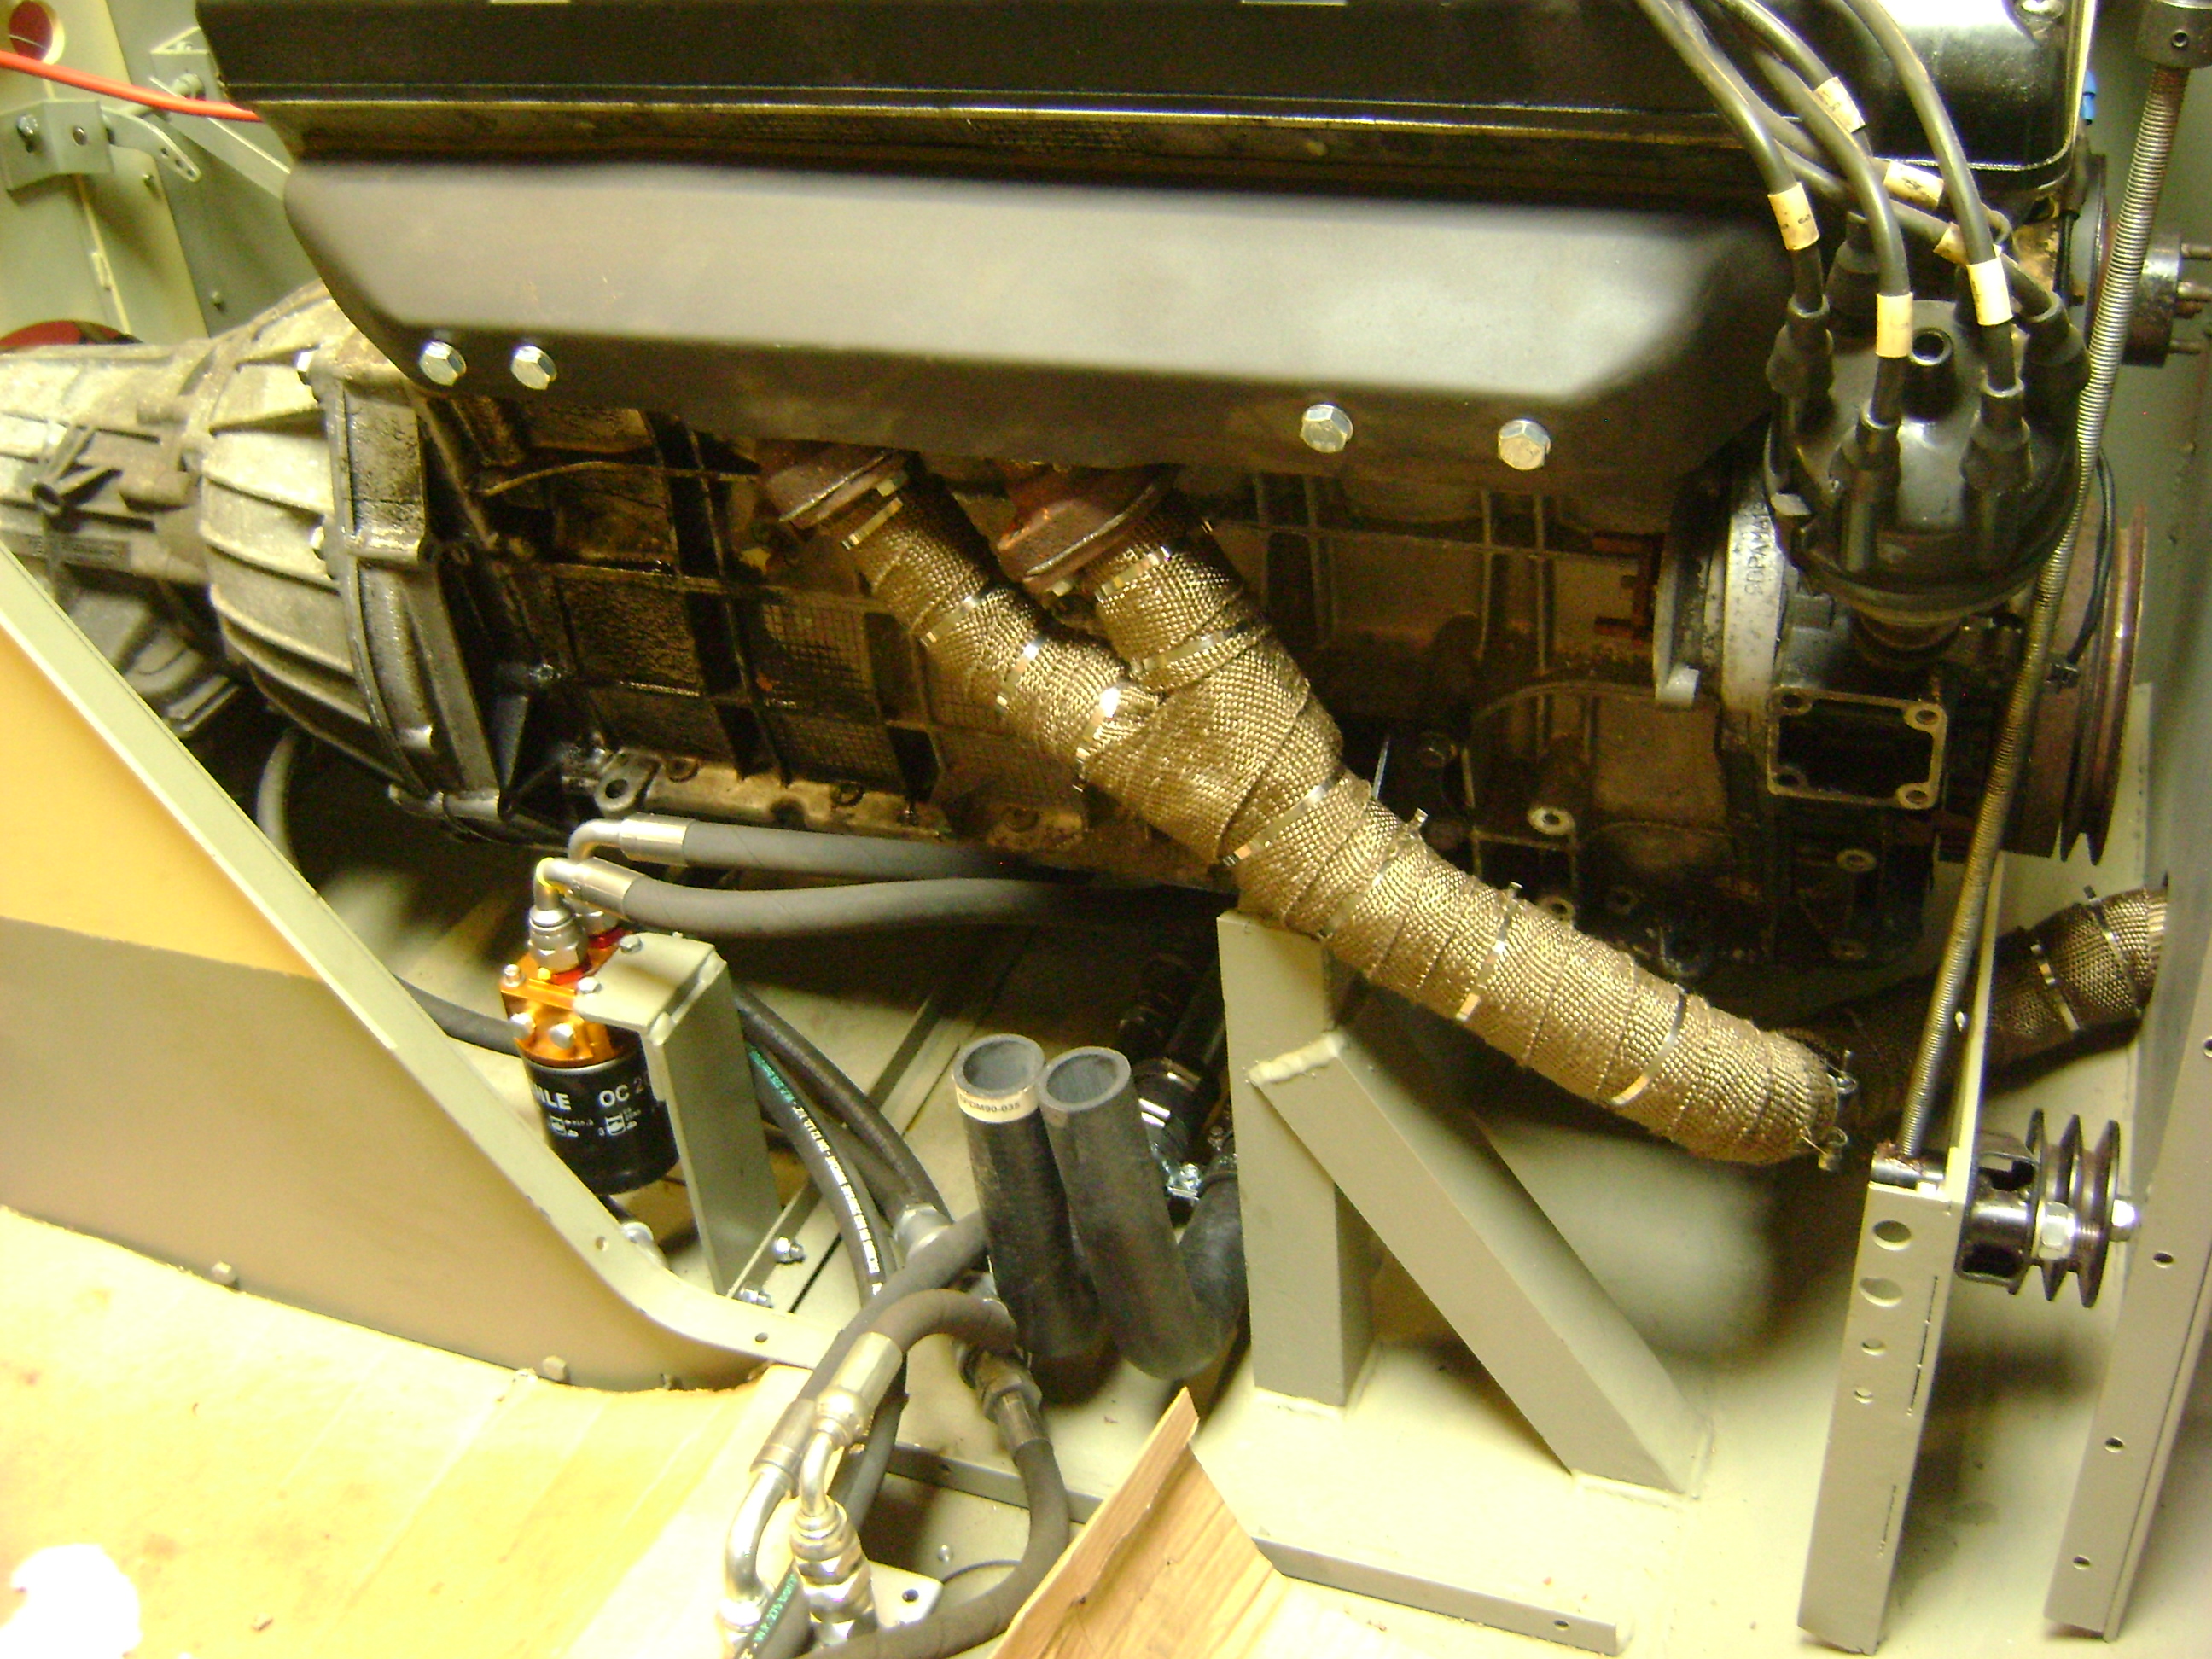
I have removed all the copper coolant pipes and replaced them with steel and rubber bends and joints, as I was worried that the soldered joints, in the copper pipe work, would fail through vibration. The plastic pipe clips that held the coolant pipes in place, have been replaced with stainless ones.

The exhaust has been wrapped and I have added a remote oil filter for easy access, along with a drain pipe from the engine sump, so that both are easily accessible. The pies from the engine and gearbox to their oil coolers now have quick fit couplings in the pipes.
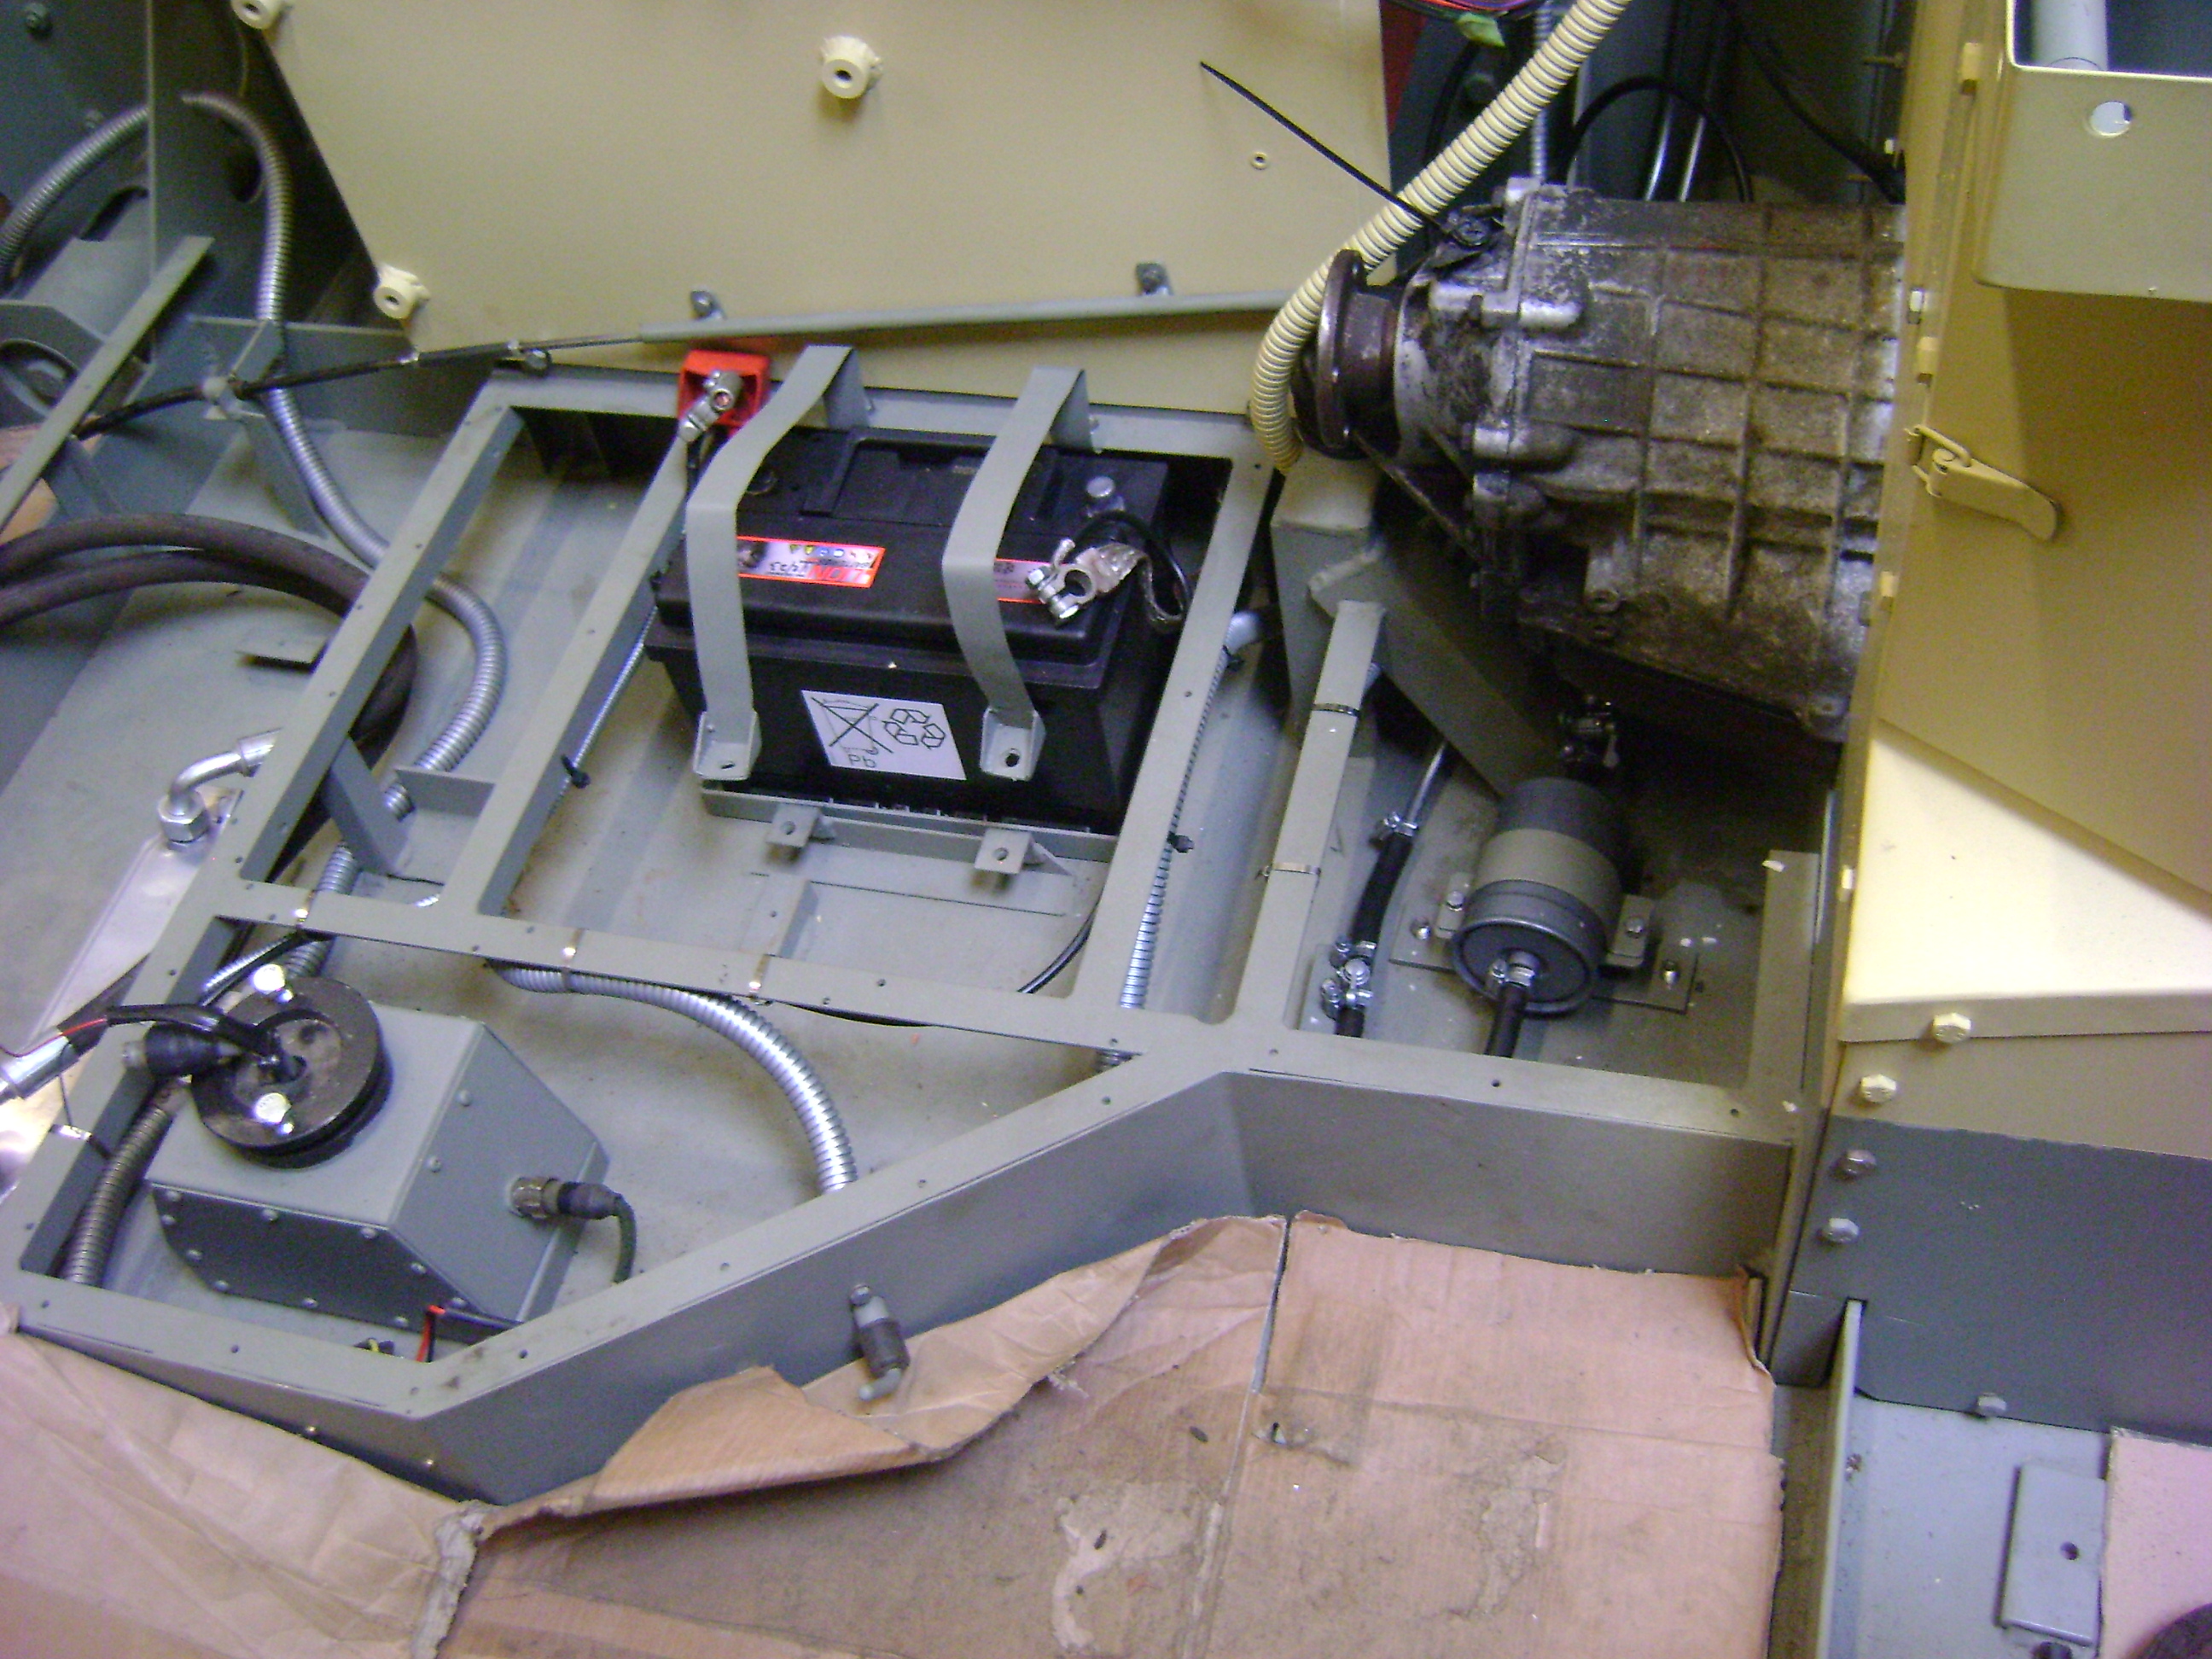
I was always wondering where to put the fuel filter as I didn't want to put it in the engine bay and eventually decided to put it under the floor panel in the crew compartment.

I wanted to put a stop tap either side of the filter so that when the filter was changed I didn't end up with a big puddle, so I ordered two taps online at the beginning of January. They turned up on Thursday this week, all the way from Manchester. I wen't to fit them yesterday afternoon and instead of being 8mm, as I had ordered, they were 6mm, bugger. Wales is a lovely place to live but getting anything locally is neigh impossible.
Now you can say what you like about Amazon but I ordered two replacement taps yesterday and they were delivered before lunch today, now that's good going.
Other than that, I have spent many cold evenings painting labels on many different internal boxes, brackets etc. and attaching leather retaining straps where required.
That's all for now.
Jon


-
 11
11
-
 1
1
-
-
1 hour ago, REME 245 said:
I did wash mine whilst in service and subsequently froze the next time I used it with all the feathers clumping together in side.
Same happened to me, so I decided to refill it with goose feathers from a duvet. It was a lovely sunny day, so I vacuumed out all the old filling and stuffed in the goose feathers. What a mess, goose feathers everywhere, luckily I had had the common sense to carry out the whole process on the front lawn not indoors. The neighbours must have found it quite strange to see me hoovering the lawn afterwards. The bag was never same same again, however several years ago I found a dealer at war and peace selling new old stock, so I bought two.
Jon
-
John,
I don't think that there will be a problem, there's masses of strengthening ribs as per the original and the plate thickness is only 0.35mm thinner than that on a carrier, only time will tell. Casting a set of tracks could be an option but first I am going to fabricate a set.
Evening all,
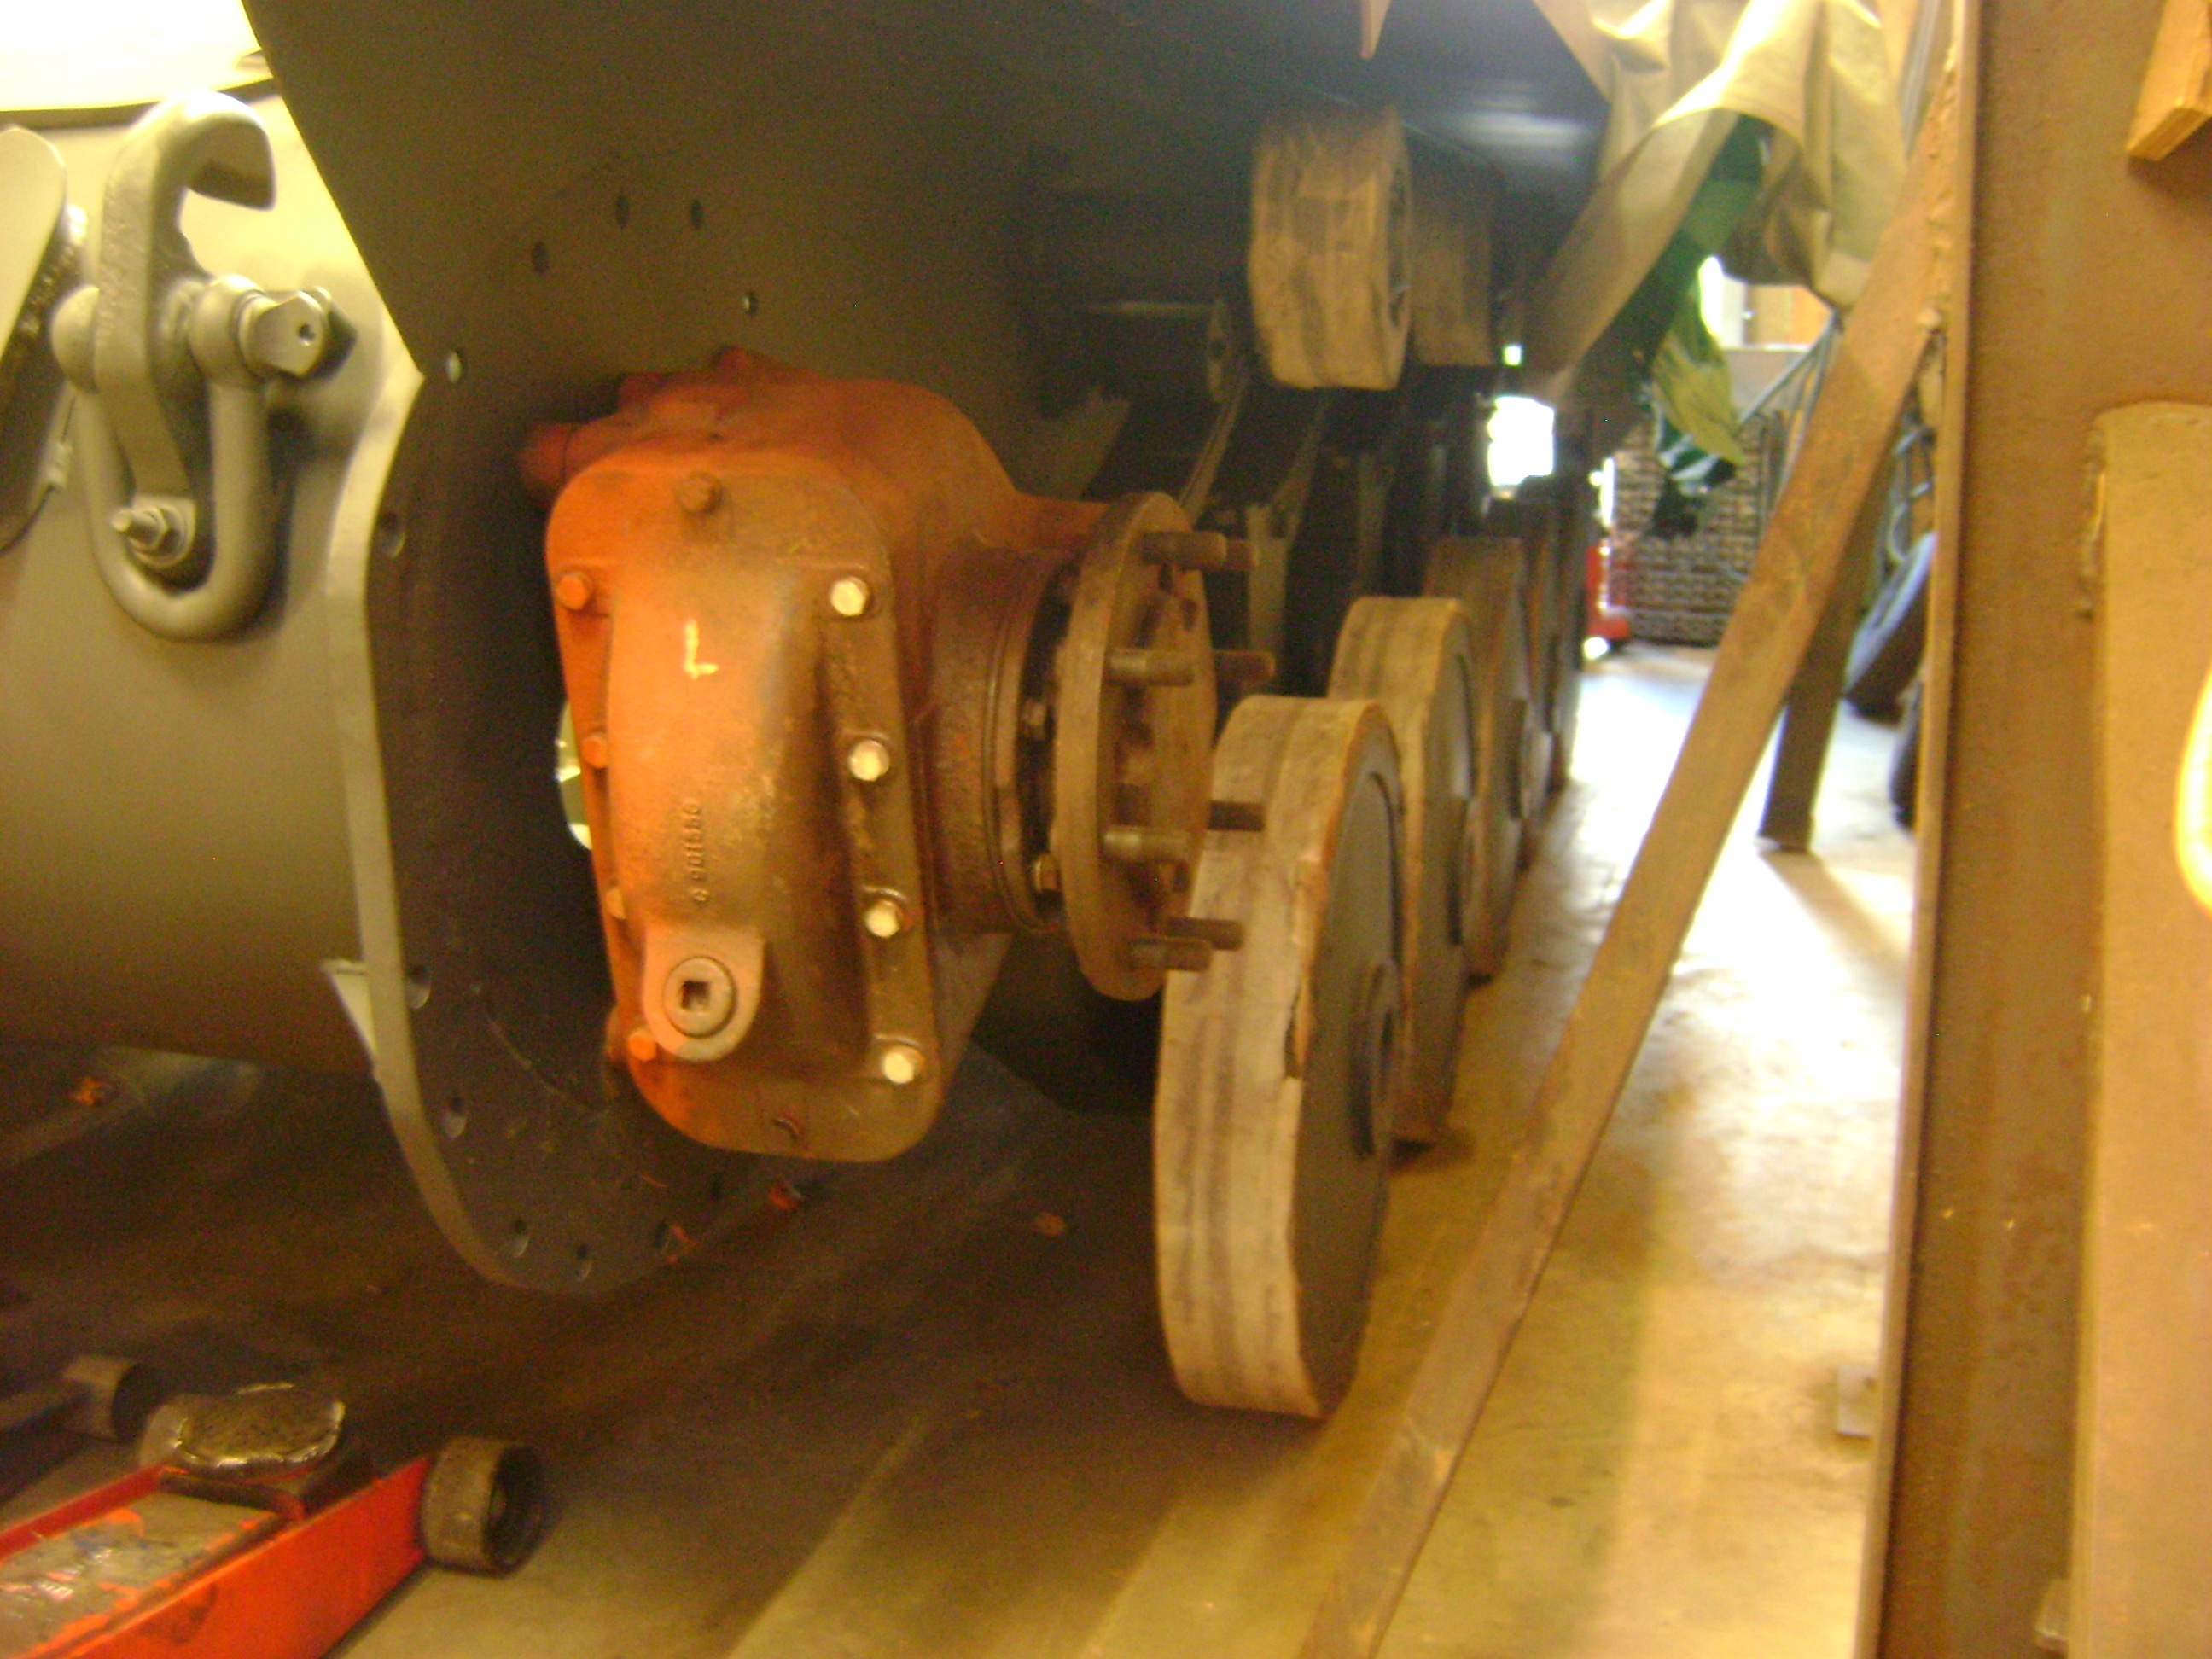
Another busy week but seeing what I have achieved you wouldn't think so. The final drive covers and running gear are all on and other than that it's been a case of spraying.


My plan to spray only the parts that I needed for the next job but one, went out the window and I have ended up spraying all the components that need doing in the colour that was in the spray gun at the time, hence I have painted parts hanging everywhere. However there is light at the end of the tunnel, if I can find time, in what will be a very busy week and get the small areas of the hull interior sprayed in cream, then next weekend I can start installing the interior parts and wiring.
That's all for now.
Jon
-
8
-
-
I would say that it is on a par with Brad sh*t in fury, I have tried to watch that film several times and the most I managed to watch was 10 minutes. In my humble opinion, if it's fiction they can do what they want but if it's meant to represent an historical event then they should do all they can to keep it historically correct.
jon
-
That's the plan but when, I wouldn't like to say.The tracks are still the main issue and what with the current financial situation, I can't see there being a cost effective solution any time soon. My intention is still to fabricate a set but speaking to my argon supplier, they expect the cost of gas to become almost unafforable, so fabrication may not be an option either.
I have given servicing a lot of thought and have started creating a manual of sorts, showing all the greasing points etc. I have put access holes in the hull base to get to the filters and drain holes. The engine oil filter is a bit of a pain, as to get to it at the moment entails removing the engine deck but I am considering adding a remote filter in a more accessible location. The good thing about stripping it all down and reassembling it, is that it gives you the opportunity to experience, see any areas that need improvement and deal with them.
Jon
-
3
-
-
Evening all,
Time for another quick update me thinks. This spraying is a chore but the pile of parts is slowly decreasing as they get assembled on to the hull. Today we managed to get the steering box in place and bolted in, which meant that the final drives could also be bolted on.


The only other job that I achieved, was fitting the bump stops on.

That's all until next time.
Jon
-
7
-
-
Very impressive I must say.
Jon
-
Yes. I was looking forward to watching something of interest on the TV but this wasn't it. The constant use of the F word combined with rather random and unconnected selection of music made it rather a chore to watch. The best bit was the end, so I shan't be watching any more episodes.
Jon
-
 1
1
-
-
Evening All,
Thanks Chris.
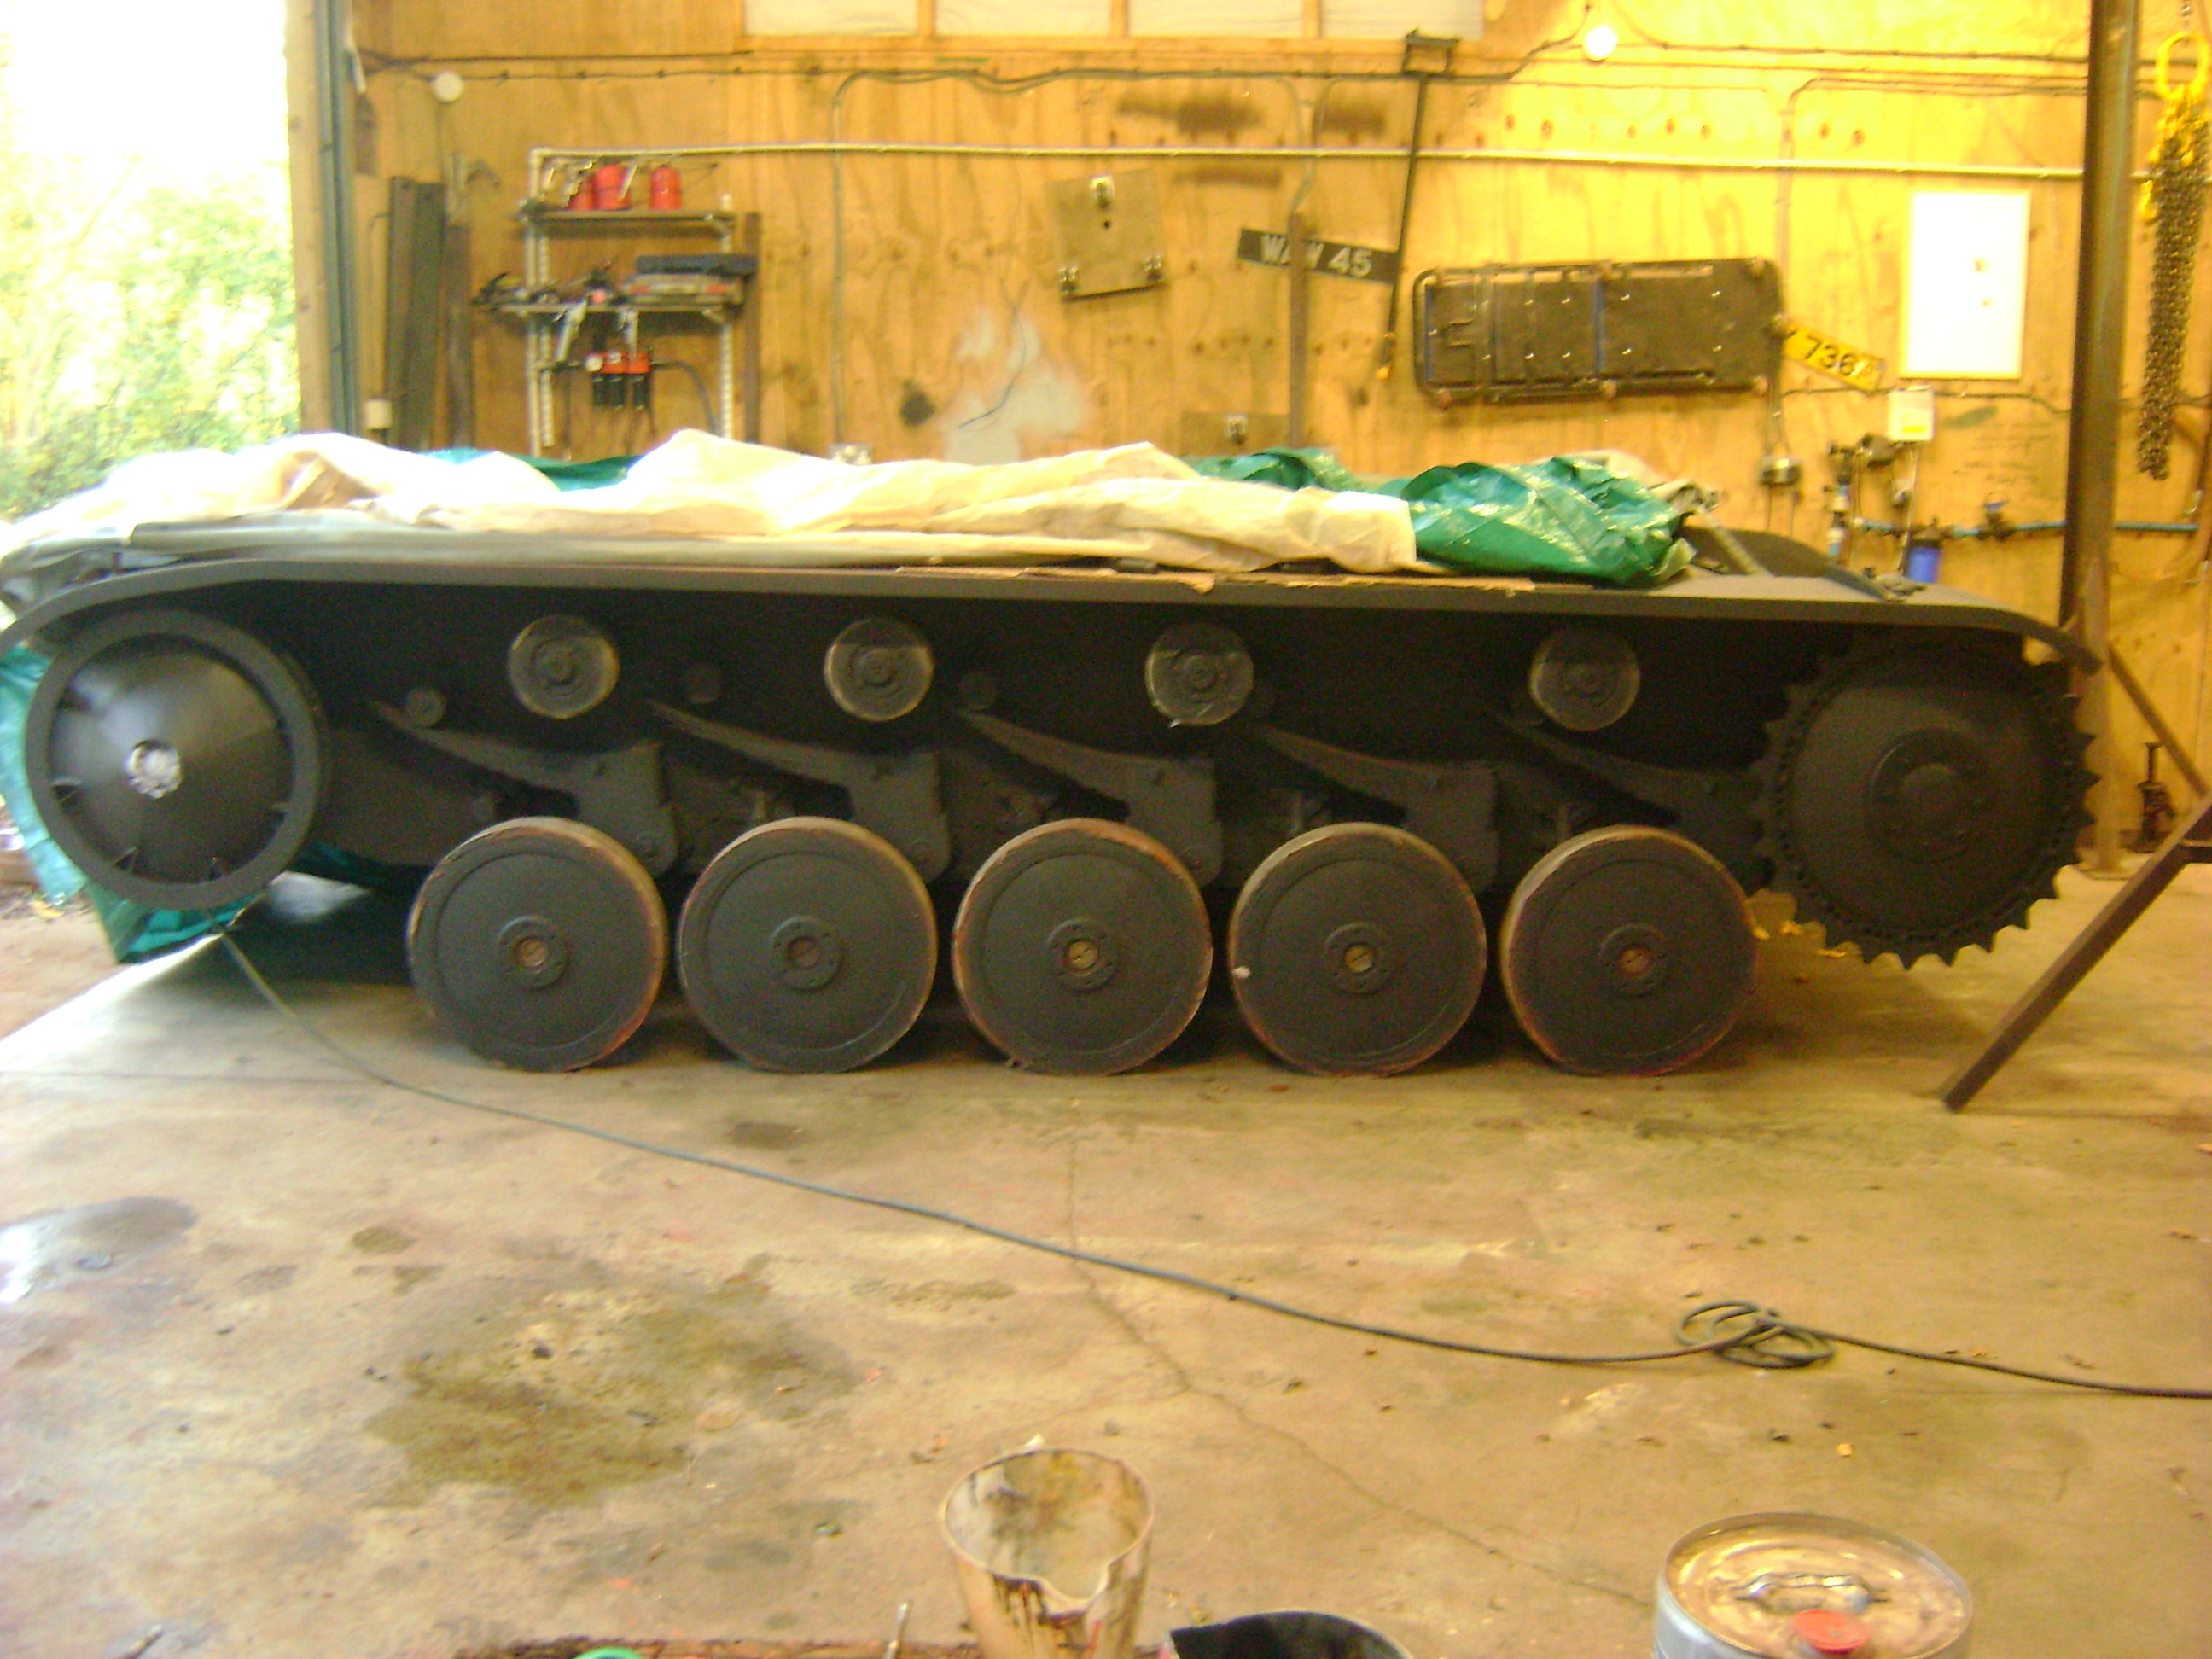
Today I achieved what to me seems a major mile stone, the assembly of the running gear onto the chassis.

And everything lines up, thank goodness.

That all folks.
Jon
-
11
-
1
-
-
Evening All,
As I look at all the parts in storage and realise that they all have to be finished sprayed I find it horrifying and yet I have a plan.
Progress is being made although it seems to be very slow. I am spraying and to create enough room to spray inside my workshop, I had to extend it, hence the slow pace. I am trying to only spray the parts that I intend to assemble next, so that I don't have to store loads of finished items and risk damaging them and I can create some extra room. The road wheels and the return rollers were a right pain to mask up, my son said that I should have just sprayed them all grey and let the tracks rub the paint off but I couldn't bring myself to do it as it seems lazy.


It's quite satisfying assembling it in it's finished state but I had noticed some areas that I thought needed alteration or lubrication points adding when I stripped it down, so I am making those alterations as I go along. Maybe I am being too anal but that's me.
That's all for now.
Jon
-
10
-
1
-
-
That's one fine looking truck you should be very proud.
Jon
-
1
-
-
On 9/12/2022 at 5:18 PM, matchlesswdg3 said:
Noticed with interest a Land Rover Lightweight just come up on Milweb for £25k! Admittedly, for what you get, its a much better buy than one of these J++p thingies at a similar daft price. It looks a decent enough late Series III truck from the few photos posted and declared rare because its an FFR and has some winterising equipment still extant. Well the FFR thing appeals to some folk and puts others off due to problems and potential expense, so that hardly justifies hiking the price, which means there is at least a £13k premium assumed for the winterised bits. But hey, if you don't ask, you don't get.........but I have found that the Landie mob are a stingy lot, so good luck to getting that offloaded!
I think you will find that we are realistic.
Jon
-
Lovely work and very inspiring.
Jon
-
1
-
-
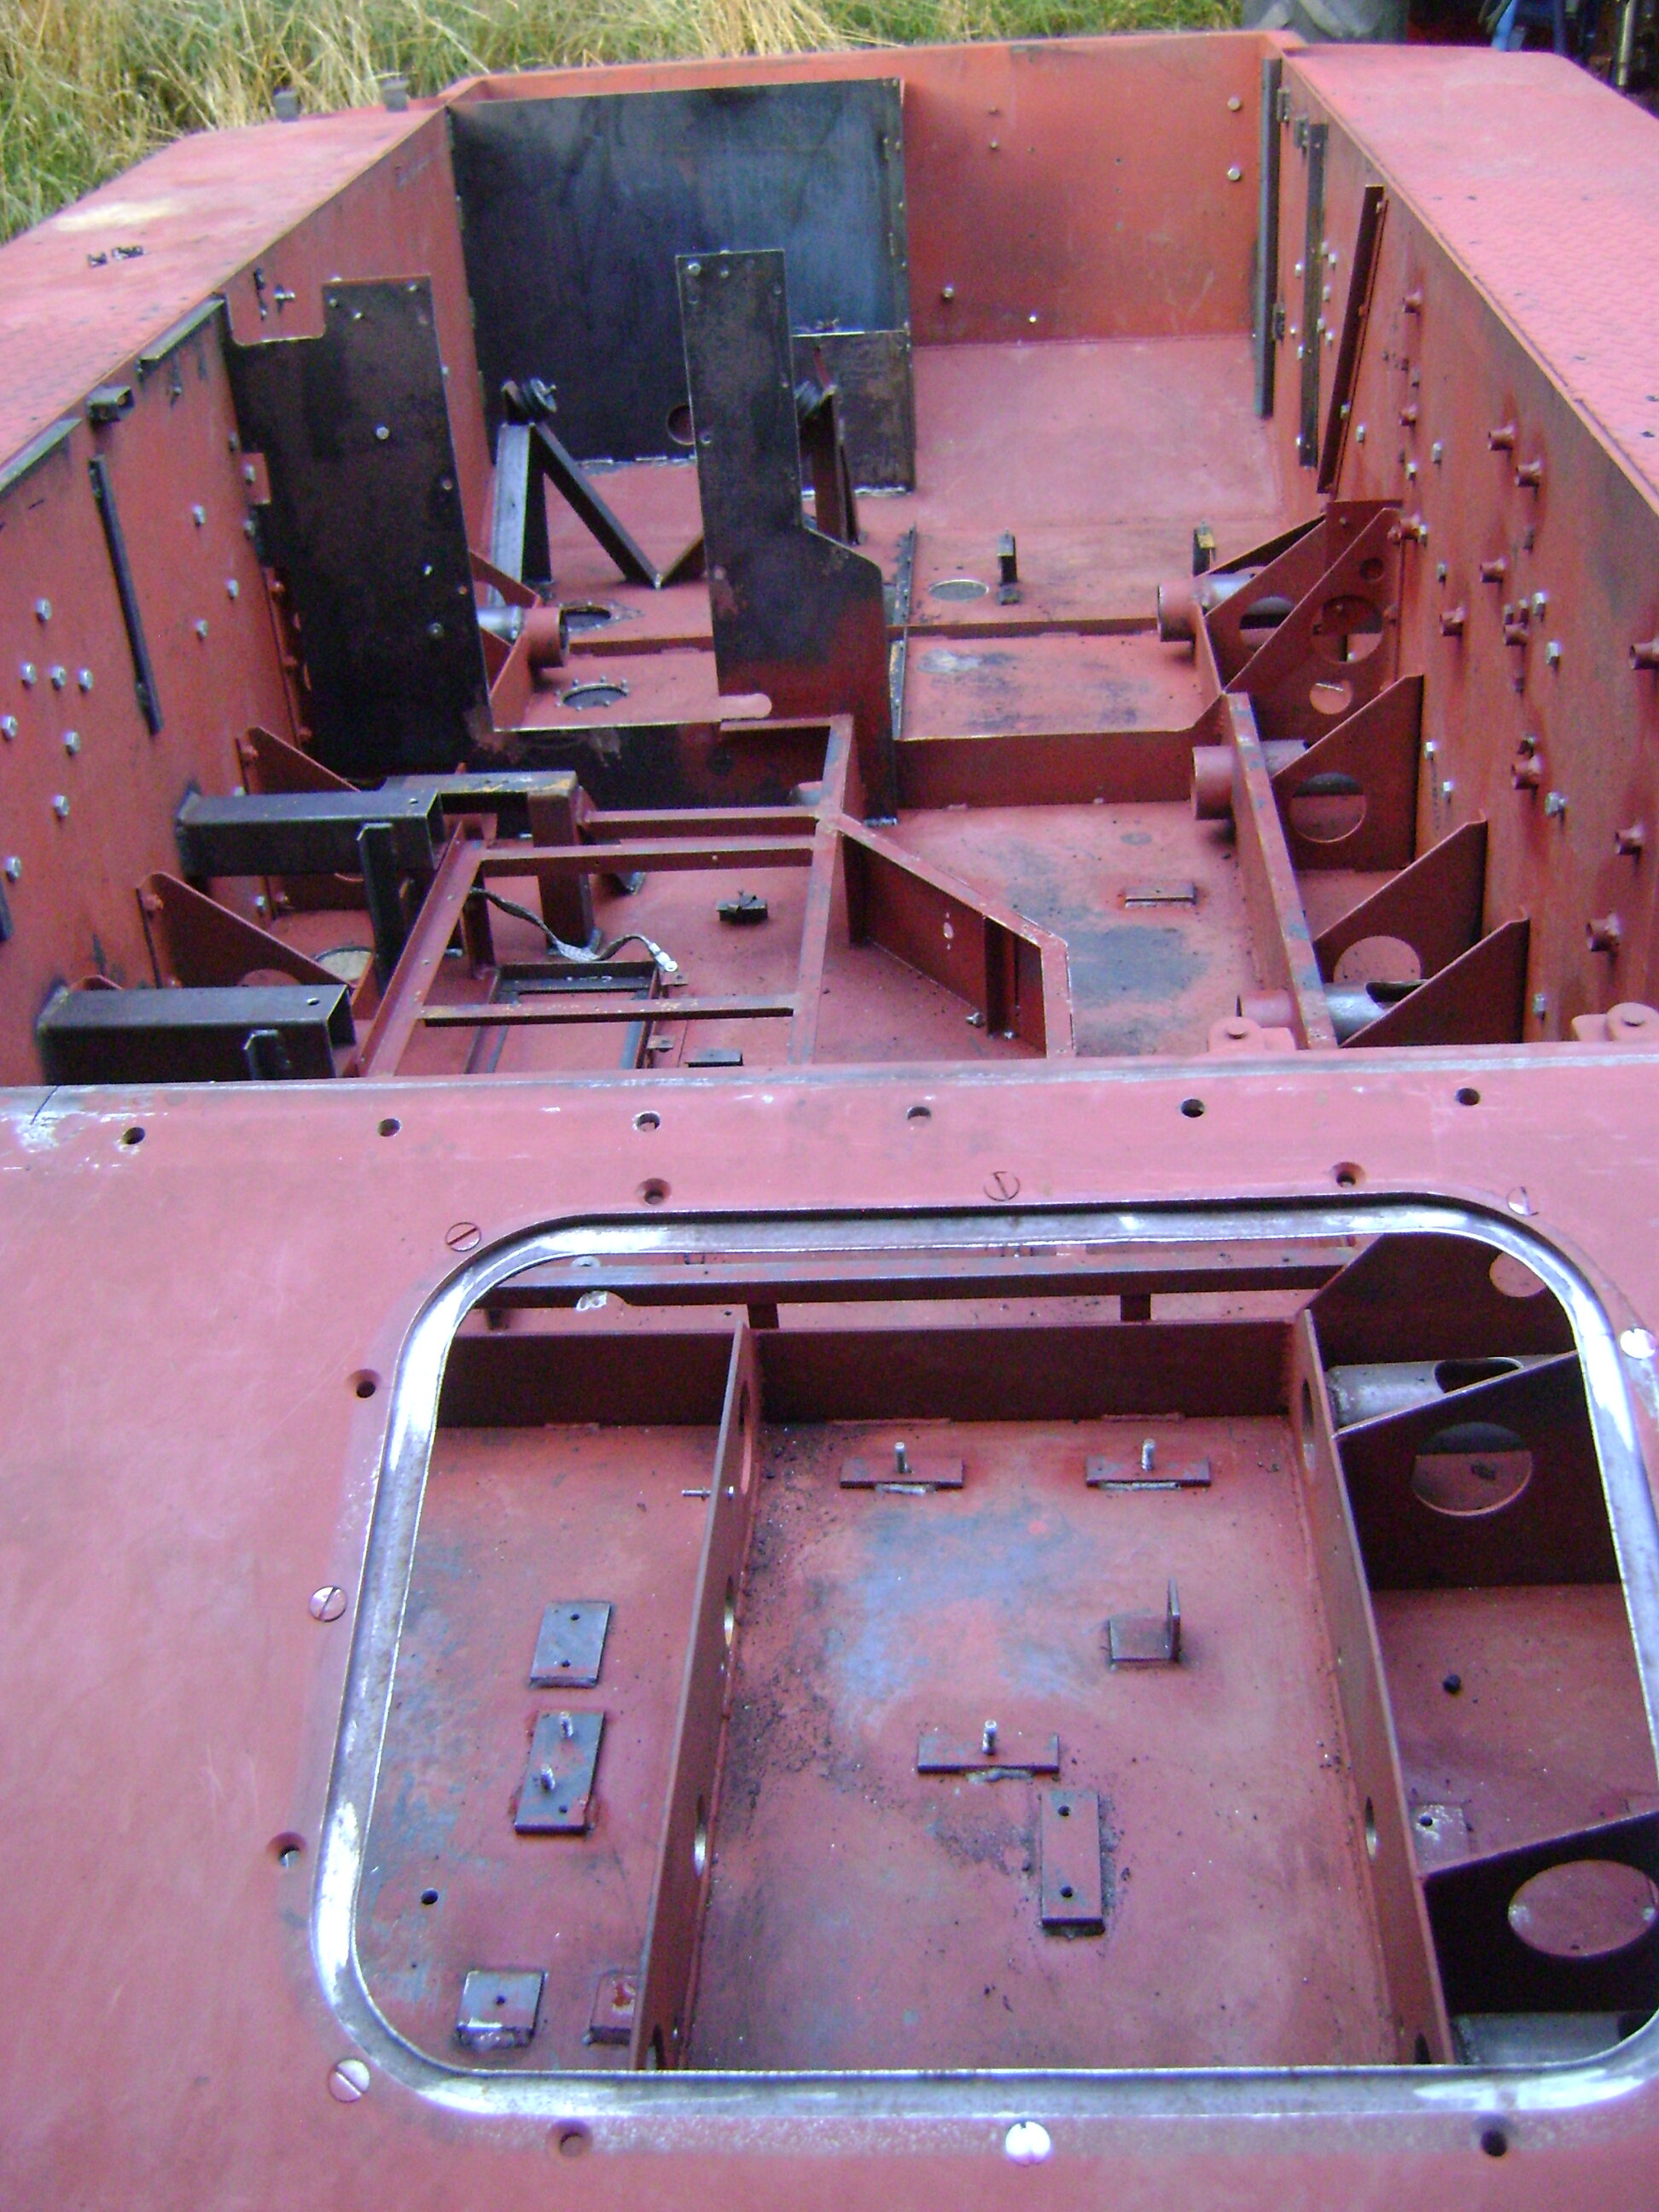
Evening All,
Well I have stripped the hull of all the fittings, which was a very unenjoyable job but it means that the project is entering it's final stages, albeit the end is still a long way off. I dragged the hull out and washed it inside and out and when it had dried off hoovered it out ready for painting.


Then this morning just when I was getting into my stride, I had to leave the tank and try to fix someones electric car window. This bloke has been asking me for months and I keep putting him off but I decided to get the job over and done with this weekend. It had been to a local garage who couldn't find the problem so they made a temporary repair.

Apparently when the car went to the garage the window went down but wouldn't go up again and since it had been returned the window wouldn't work at all. So I removed the door panel and........

The reason became clear, the motor and mechanism had been removed and replaced with a bit of wood but the garage failed to tell the owner what they had done.
Anyway what could one do but leave such an artistic repair and get back to important matters.


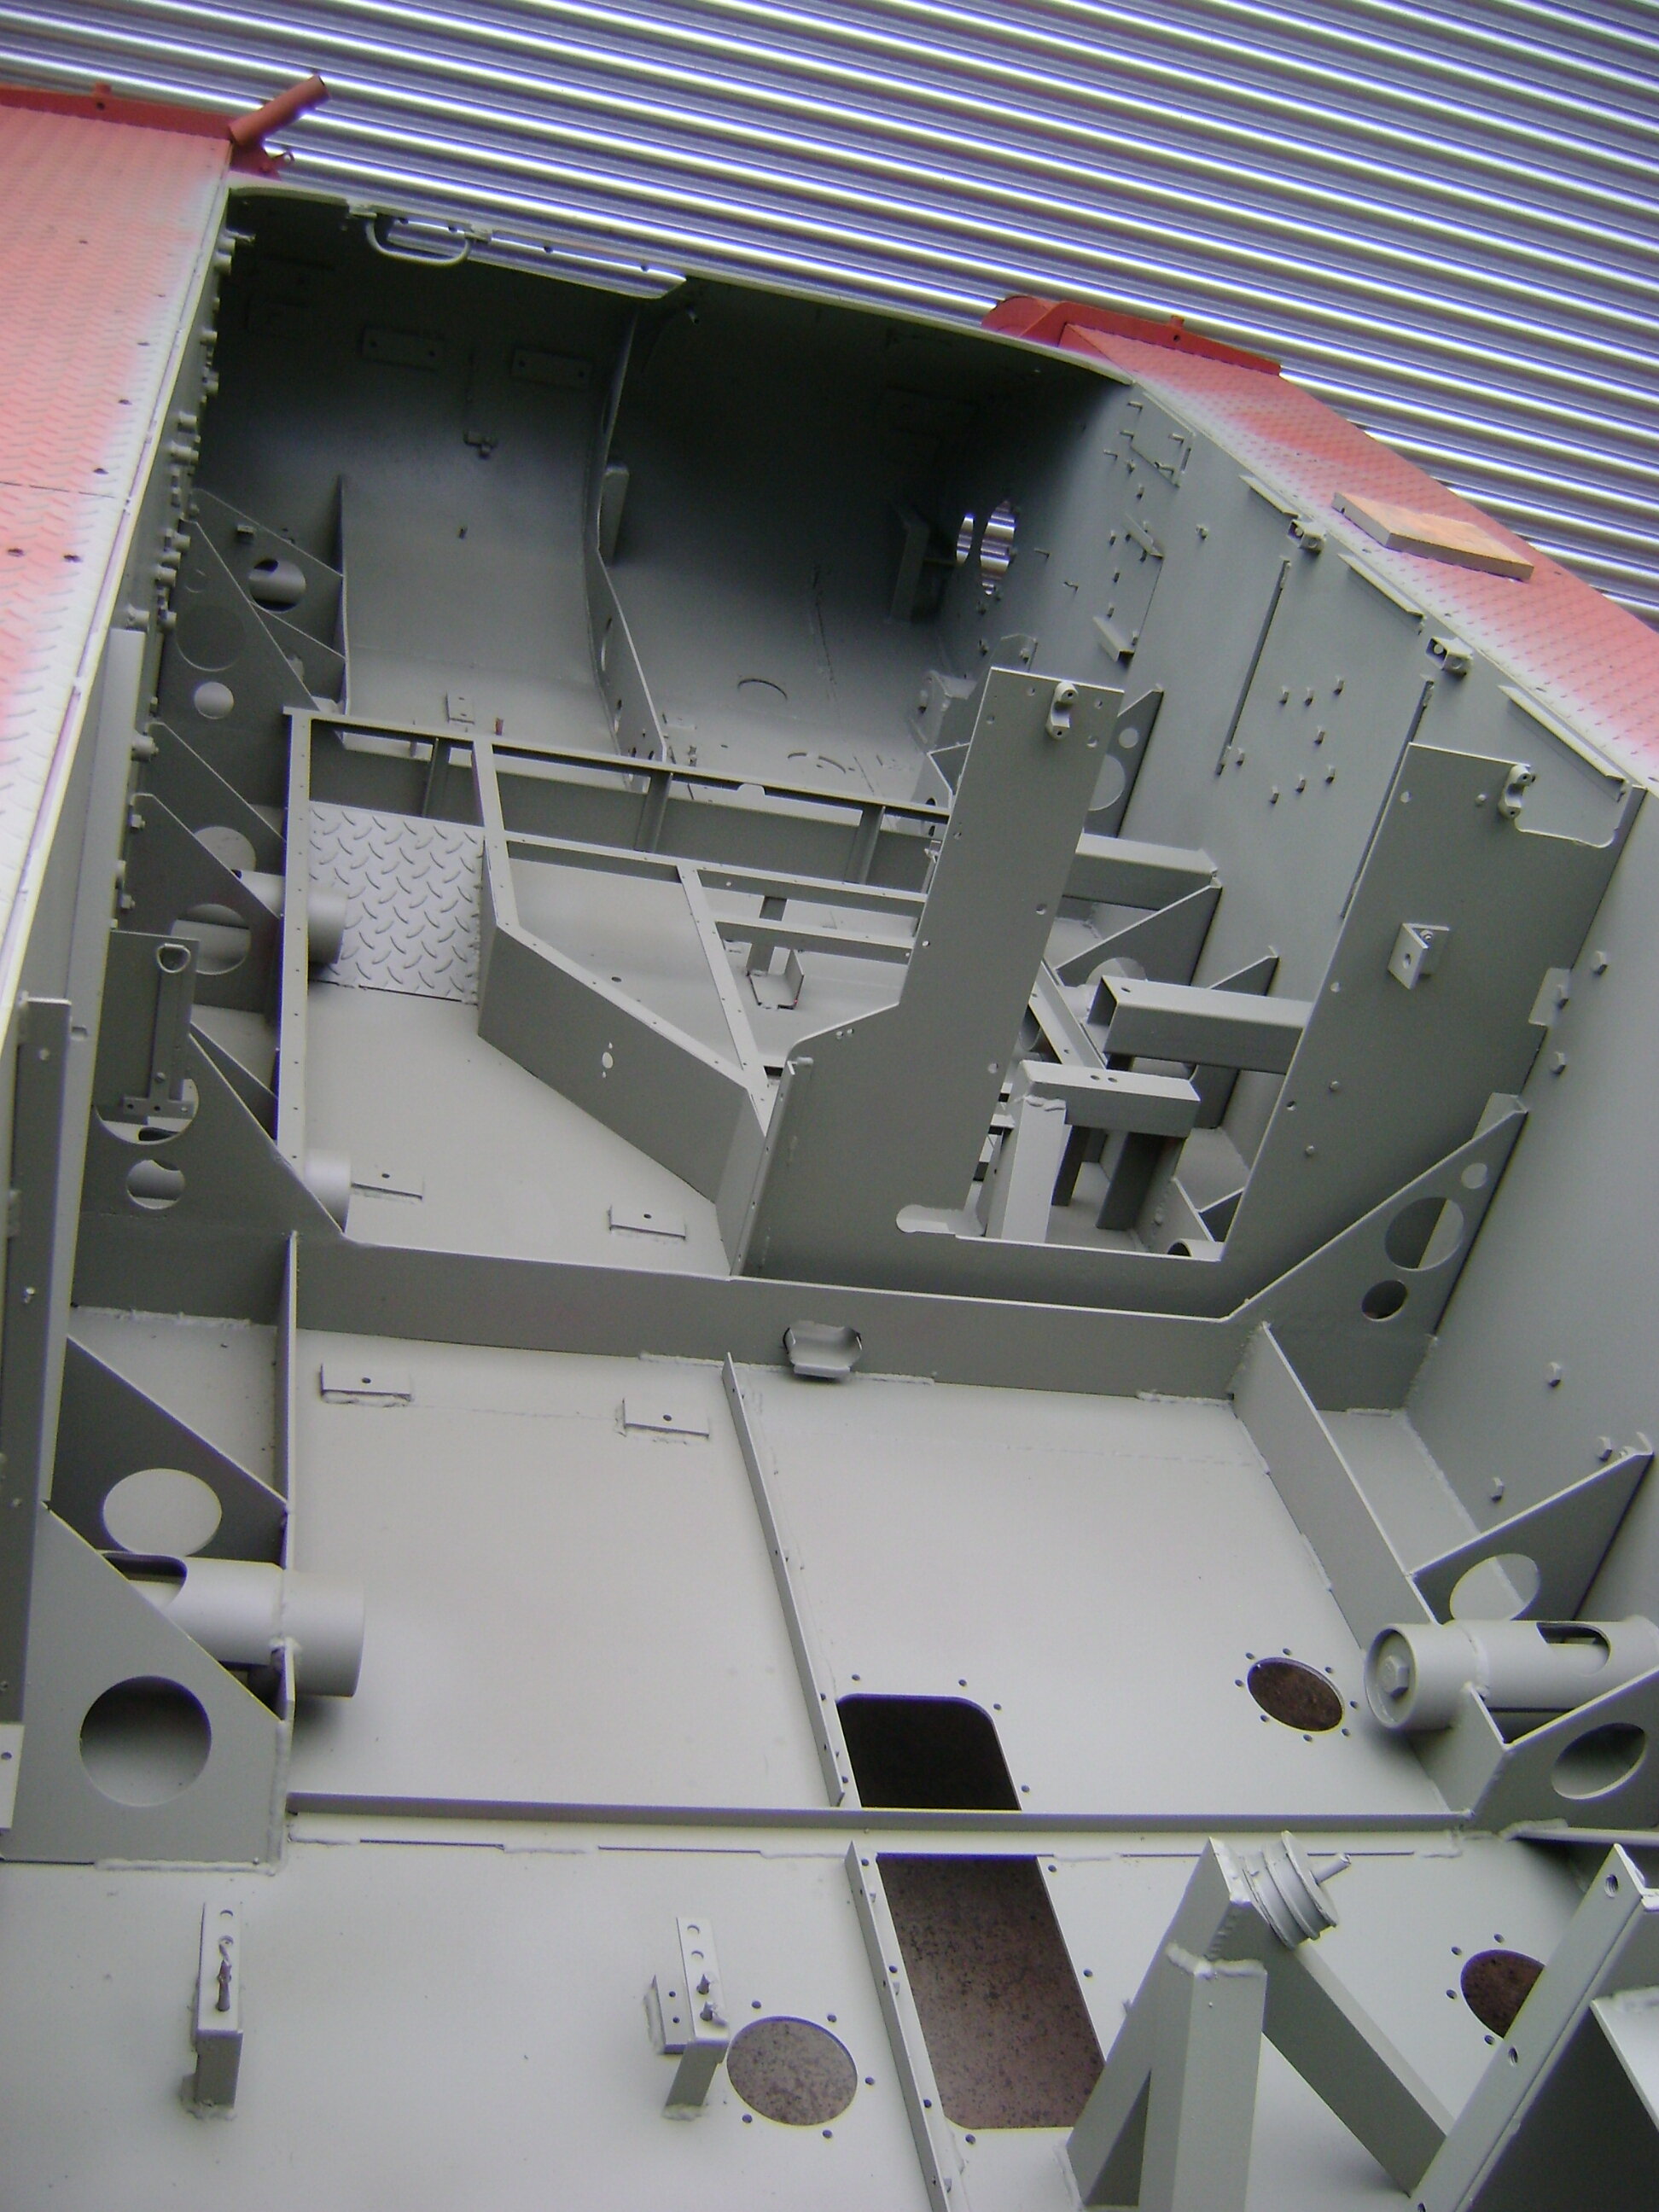
All nicely painted, in day light it's not actually gray but a green-grey RAL 7003 . I had always assumed that the internal areas in German tanks that weren't painted in RAL1001 Ivory, were just left as red oxide until I found some good pictures of the inside of the Tank Museums PZ2. The exact colour, from the pictures, is hard to establish but I found another taken in day light and the colour was definitely a green grey rather than grey. There seemed to be two choices, ( sorry my wife has corrected my poor grammar that should be options) RAL 7003 or RAL 7009 which looks grey as opposed to green-grey, so I decided on the 7003 which according to the book Real colours of WW2 was used by German industry for painting machinery components or the luftwaffe for painting aircraft interiors and I like it.
Sad I know but that's me.
Jon
-
9
-
-
Evening all,
Only me, I just thought that I would give a quick update. Life's just been too busy since my last update with very little Panzer time involved but lately things have quietened down so I have finished a few little jobs before I started to strip it all down for spraying. I had decided to make a few changes to make life easier in the future, such as moving the ecu and fuses to a more accessible location, changing all the cooper tubing to steel just a name a two but there are more which I will do as I reassemble the whole thing.
One of the two final components that needed making was the small hatch on the rear engine deck.
.jpg.d96820cff72a125584f69381077862bd.jpg)
A small job but still time consuming.


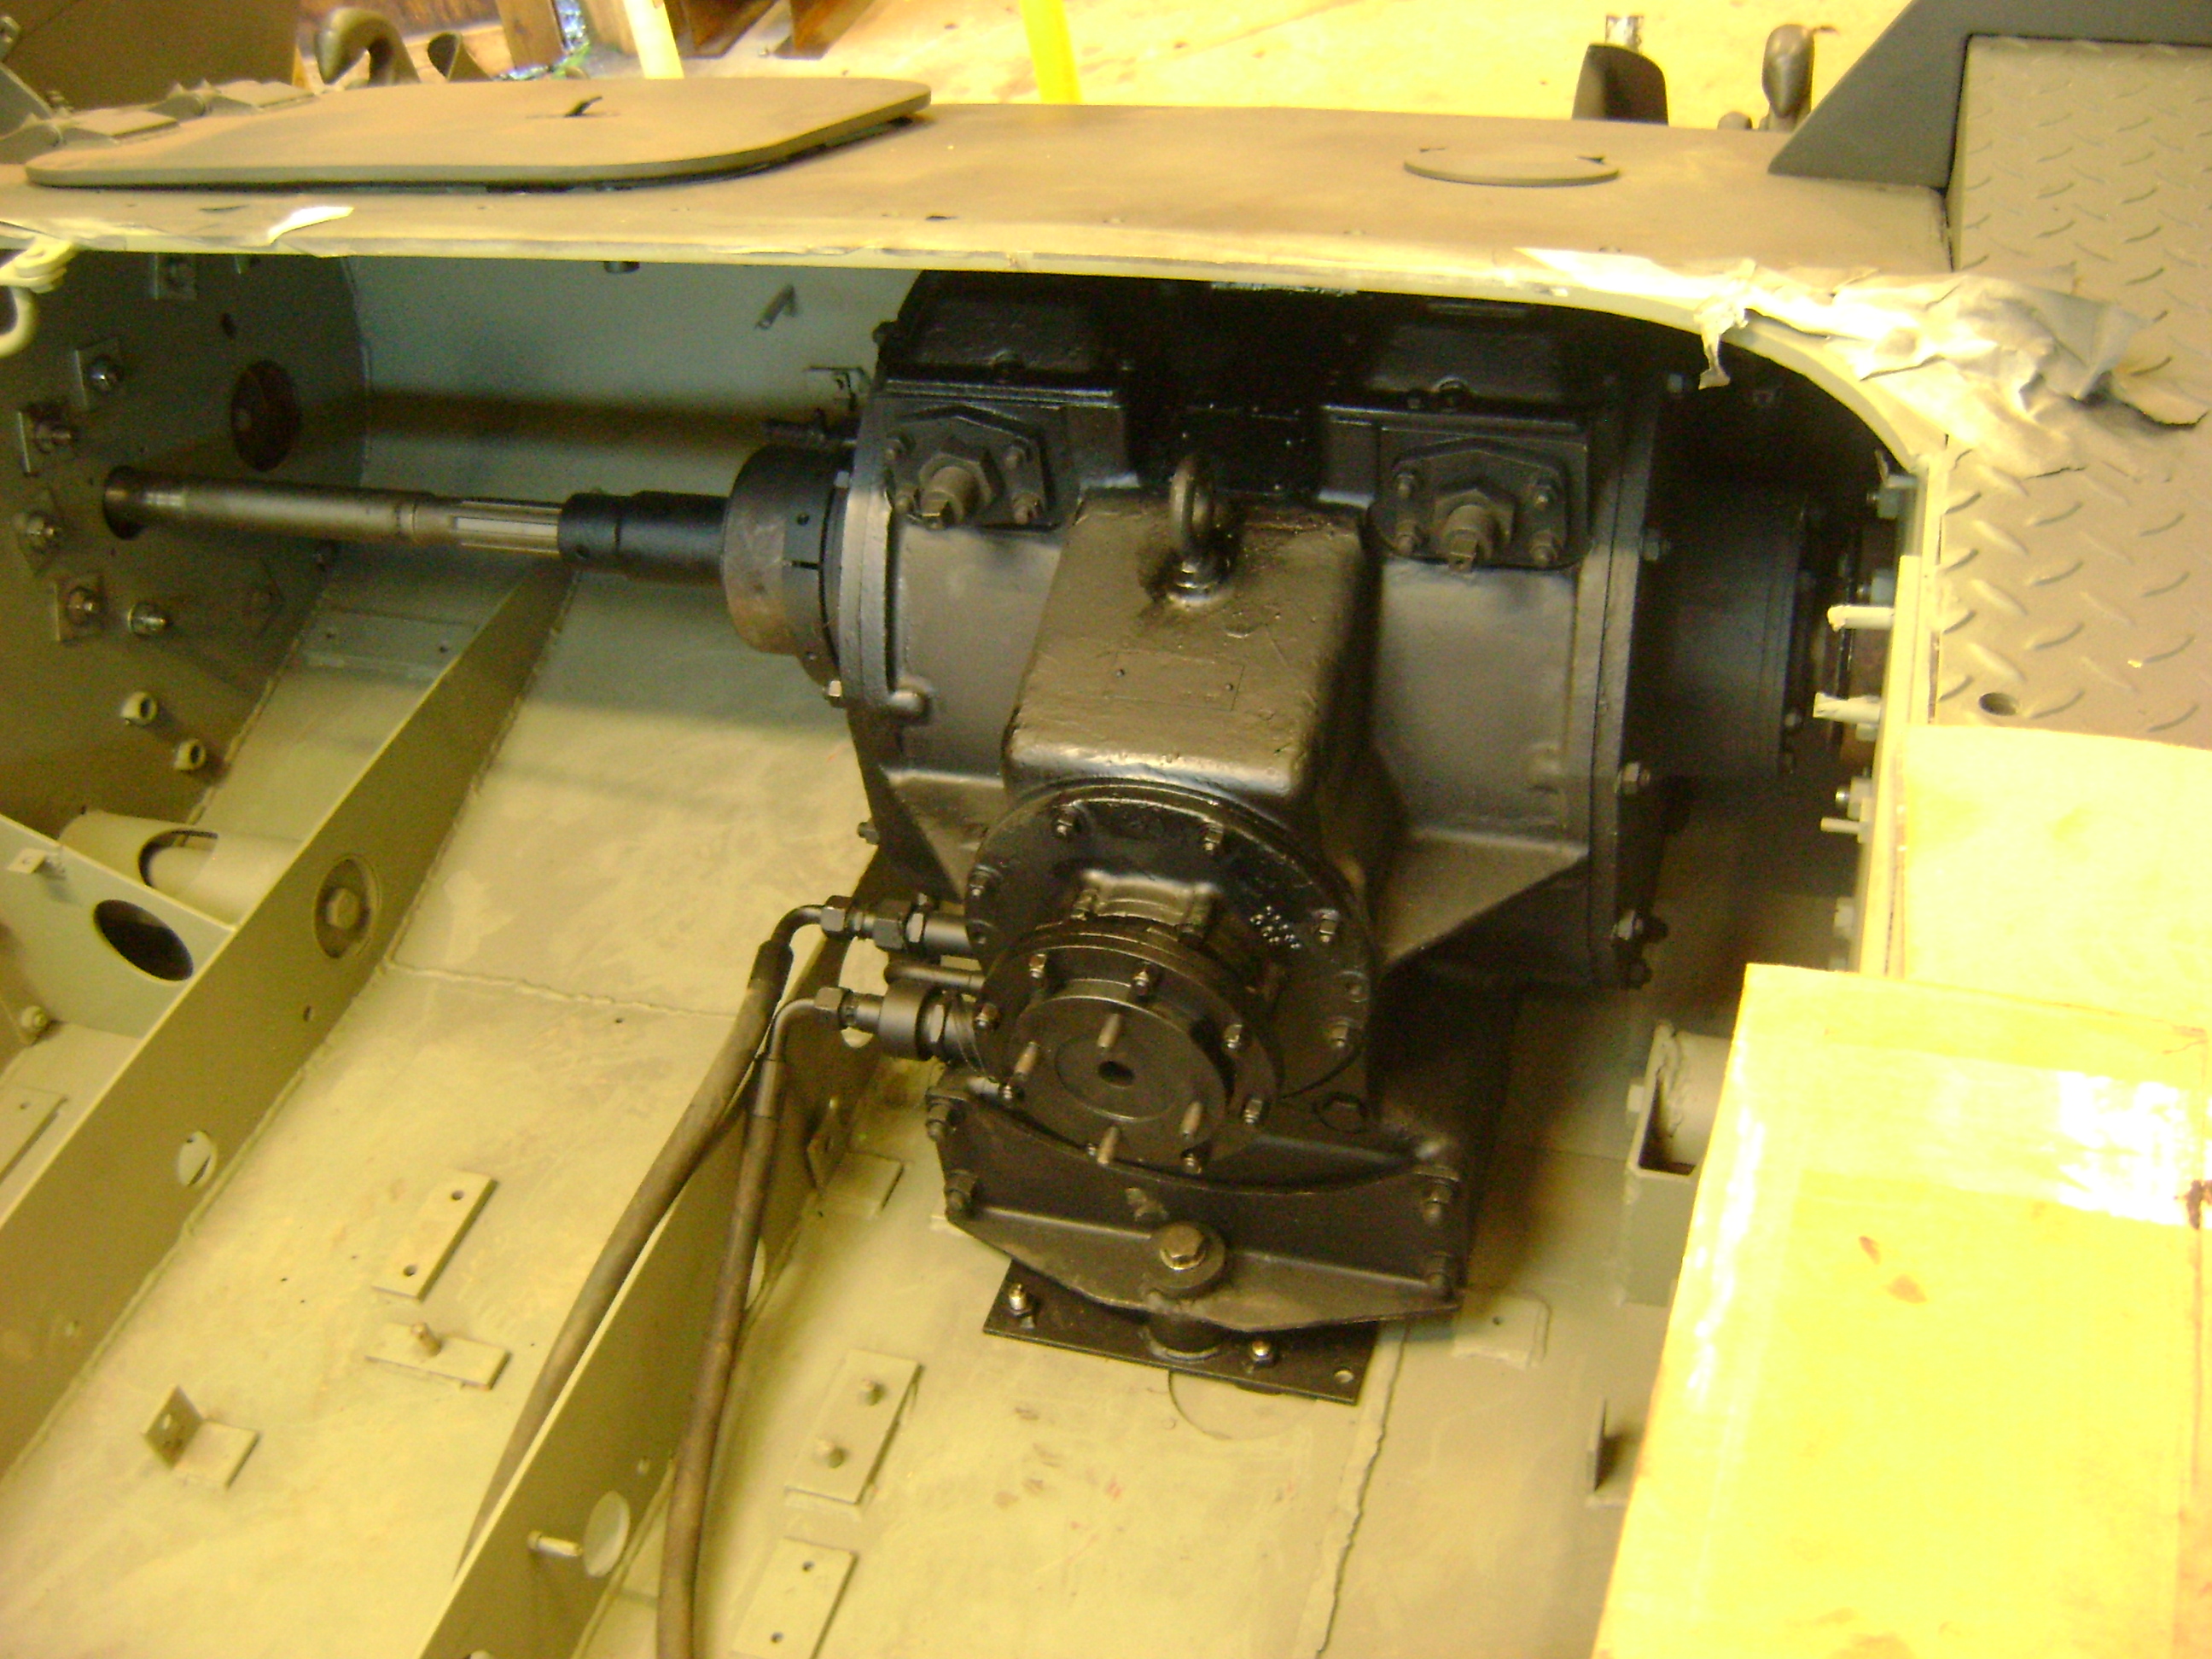
Then the final fabrication, the gearbox cover.

Of course, in the original tank there is a gearbox to fill this space but in my recreation there's just a hole,

so I wanted something that recreates the look and covers the drive shaft and covers all the bits below.


It all easily breaks down into smaller pieces so that if needed it can be removed from the interior of the tank.

I have been keeping my eyes open for all the little detail parts for the tank and found an oil can and grease gun, it took ages but the bay turned up trumps again.
That's it for now. I will update the thread as and when there is something to show but from now on there's an awful lot of spraying to do.
Jon

-
14
-
1
-
-
Afternoon Tony,
Welcome to the site, I have to say that I am very jealous of your 12 cab. I have hankered after an 11 or 12 cab for some years and have been collecting parts ready for the day when, if, I find one to restore, even if it's only the chassis and axles. One day, hopefully.
I am glad that you are enjoying the Panzer II build and it's a real boost to my enthusiasm levels to hear such nice comments but really I am just chasing my dreams and one of them was to have my own museum, even if it's only me that ever see's it. I can't afford ready done exhibits so the only way to achieve that dream was by my own hard work and as I am one of those that thinks almost anything is achievable by a bit of sweat and hard graft, that is what I am doing. Of course, having a loving, supportive and very understanding wife helps no end.
Regards,
Jon
-
9 minutes ago, welbike said:
Ok, but those 2 are the same people!
Lex
Sorry Lex but who are the same people?
Jon
-
I seem to have missed several posts and I appologise for not answering. There's some very useful information and I have obviously missed the Vanguard Foundry but I will ring them in the Morning.
Thanks to you all for information and the leads, I appreciate it all.
Regards,
Jon
-
1
-
-
1 hour ago, welbike said:
Here the link to the UK supplier of Bren tracks: Brand new track | Bren Gun Carrier Spares (vanguardrestorations.co.uk)
8000 for a full set, not bad!
Lex

Thanks Lex. I have seen these before and emailed the Gentleman enquiring where they were made and would he consider supplying some for my tank but no answer came the silent reply, so I assume that it is a closely kept secret.
Regards,
Jon
-
19 minutes ago, welbike said:
Ok, I have emailed my friend, but he's slow.
In the meantime I saw this on FB, dug up in Russia, guy says it's for Pz. 2,
I seem to recall, you already made one?
Cheers,
Lex


Morning Lex,
Thanks for contacting your friend, it will be interesting to see what they would charge.
Yes you are correct, I have already made an aerial connector but thanks for the thought.


The only item that I am struggling to find information on or even find detailed pictures of, is this leather MG pouch.
_LI.jpg.5e28c3c41569c941bce8dccd4cd0c0d6.jpg)
And it is really irritating me. In the later vehicles they used a metal box and the normal infantry MG teams used a small leather case but in early tanks the pictures always show the same case. The nearest that I can find is a post war Czech version, the dimensions appear to be correct by scaling, but the Czech one is made of canvas and has a handle. In the end it may have to do, that is until in the dark and distant future I find a real one to copy.
.png.e57b50ad7a909166013ab6af3c054333.png)

If perchance anyone out there has any more detailed information please let me know.
Regards,
Jon
-
2
-
-
7 hours ago, John F said:
£30,000, ouch!
Are you now planning to cast your own track links, Jon?
Not cast John, fabricate. If truth be known unless I find a really good deal that's the way that I will be going. I have been offered 4 good links which I have accepted, well if they are still on offer, and the rest of the tooling I have or will have in the not tooo distant future. I was feeling lazy and just thought I would cast my rod and find out what was out there, it turns out that British industry want's us all to go to China!
Jon
-
8 hours ago, Philliphastings said:
Hello John,
I struggle to find the apropriate words to describe your dedication, patience and amazing skills, but the most impressive ability you have shown during this thread us that you ALSO cook !!!
keep up the great work,
Cheers
Phill
As I tell my wife "I have to do everything".
-
Evening All,
I found time this evening to have a test fit of one of the sprockets.


Jon
-
4
-
1
-
-
3 hours ago, welbike said:
With castings, China is the way to go now, but better use a British company to order and they will have the experience to deal with the foundries there.
A mate here in Holland has just taken delivery of the first Bren Carrier tracks that were made there, I can ask him how much a set is, but the Pzkw 2 will be a little bigger and heavier.
Cheers,
Lex


Lex,
I would be very grateful if you would ask your friend for me.
Regards,
Jonathan
-
1
-


.jpg.d96820cff72a125584f69381077862bd.jpg)


_LI.jpg.5e28c3c41569c941bce8dccd4cd0c0d6.jpg)
.png.e57b50ad7a909166013ab6af3c054333.png)


Tanks-Alot has bank accounts closed.
in MV Chatter
Posted
So did he or didn't he find gold in the tank?
Jon