


dgrev
-
Posts
248 -
Joined
-
Last visited
-
Days Won
3
Content Type
Profiles
Forums
Gallery
Blogs
Events
Articles
Store
Downloads
Posts posted by dgrev
-
-
Can I have the link please?
Regards
Doug
-
Thanks. Even keener to see the actual episode now.
Regards
Doug
-
John
Thanks for that.
When I search from Oz, there are no links visible on the history site for any episodes at all. So I suspect that there is some sort of filter being triggered by my country of origin internet routing. Quite a few UK sites do that. Sometimes a message pops up saying that is what is happening, most of the time not. Usually it is worded along the lines of "This content is not viewable outside of the UK.".
If and when episode 3 becomes available, would someone please post the direct link in this thread?
Regards
Doug
-
Would anyone have a Leopard series 1 driver/operator/crew manual?
Either for sale/lend or be willing to scan it for me?
Regards
Doug
-
I think there is some sort of filter being applied because I am searching from outside of the UK. Would you be so kind as to post a direct link please to episode 2?
Thanks
Doug
-
48 minutes ago, Tony Lawrence said:
World War 2 Treasure Hunters, episode 3 on History Channel
Tony
Thanks. I just checked and not available where I live. Sigh......
Regards
Doug
-
What is the name of the programme and episode number please?
I would like to see it, but as I am in Oz, need to know the specifics?
Regards
Doug
-
10 minutes ago, Old Bill said:
It was a most soul destroying job as we couldn't see what was going on whilst trying to handle a most awkward shaped tank without scratching the paint. Eventually, we poured out the remainder and ended up with about £40- worth to dispose of! Oh well. The job is done nowand the tank is hardening off ready for when we can all get together and fit it. I will be pleased to see it installed!
Steve. The wastage is indeed annoying, but because you cannot see whether 100% coverage is happening erring, on the side of excess is the only way to try and ensure everything is indeed covered. As you will have discovered once it it time to pour out the excess it is on the way to setting and it would not be advisable to try and do another tank. Perhaps sacrificing a paint brush and getting in 10 minutes of painting something exposed to the weather and that would look ok in metallic silver would be a way of using some of the surplus. However chances are high you would come to a sudden halt and when everything had hardened have to cut the paint brush off whatever it had become a part of.
Regards
Doug
-
7 hours ago, Joris said:
Done!
Thank you.
Gold star for customer service!
Regards
Doug
-
 1
1
-
-
Joris. Can we have a default or global setting please for the "notify me of any replies" button so that we don't have to
remember to click on it every time we do a post?
Thanks
Doug
-
I think I may have at least one.
-
6 hours ago, sirhc said:
Not quite! The sidewall of the trakgrip gives you the runflat capability, not the insert. Take it from someone who had 2 punctures on normal tyres with those inserts in on the same weekend!
Chris
Agreed. The run flat insert is not their correct description, they are actually a bead spreader. They serve to keep the beads
from moving away from the rim edge and thus the tyre collapsing. Those Hutchinson inserts that somebody put a link to
have some good photos on their site, you can see the normal tyre is deflated, but still tight on the rim.
The Ferret tyres are actual run flats, whether containing air or not, there is some visual difference.
I note that the Ferret ones are inferior to the US spec run flats:
Ferret spec - 50 mile maximum allowable use if punctured. Effectively running them flat damages the tyre. If punctured or flat, you can notice it.
WW2 US spec - flat mileage not limited. If punctured or flat, you will only tell with a tyre pressure gauge.
The Staghound I once owned came with its WW2 run flats. One of them had a crack in the side wall. I well remember pushing a pocket knife blade into that crack. It bottomed out about 1" deep in the sidewall. How thick those tyres actually were I do not
know, but I was very impressed.
What were you doing when it happened, being really adventurous?
Regards
Doug
-
If anyone wants my NOS run flats I am happy to do a deal.
Can anyone tell me what normal tyres I can substitute in Australia that would fit the
British rims, most if not all available here are for US rims?
-
Joris
This new forum does not show the member's country. Much better for formulating replies to questions if you know
what country somebody is in?
Regards
Doug
-
 1
1
-
-
I have 4 unused NOS 1990s production Dunlop Track Grip RF tyres with 2nd hand inserts.
I am in Oz, but this new forum doesn't let me see where you are?
-
I did an article years ago about this very thing, look on my website for the Ferret articles
Regards
Doug
-
Joris
Can we have the green background back again rather than this plain white one?
Regards
Doug
-
1
-
-
John
Apologies to all as I am hijacking this thread somewhat, but I hope our intrepid Thornycroft restorers may find the contents relevant and help them decide a course of action for their petrol tank.
My Kettenkrad petrol tank caused me lots of grief when the rust inside started turning up as a micro fine powder in the carby. This stuff was finer than talcum powder and blew through the inline petrol filter as if the filter did not exist. The carby promptly stopped being a carby with very little warning each time this occurred. Luckily for me, both times, the vehicle was either in my shed or within a few metres of it.
The best solution would have been to cut the top off the tank off, get it all sandblasted, MIG welded back on then slosh it.
However, the vehicle is painted with nitro cellulose paint, which ceased to exist in Australia in the mid-1970s. The colour cannot be matched with modern paints so I was out of options.
I used an Aussie equivalent of PQR-15 (or whatever the US stuff is called). It comes as a 3 part system:
- Cleaner - industrial grade detergent.
- De-ruster - I suspect to be Phosphoric Acid or an equivalent.
- Slosh - A one pack (so no evil isocyanate health risk) silver coloured resin.
I don't recall which order the first 2 are used in, but you end up with what they call "flash rust"
before applying the sloshing compound. So there is some entrapment.
See photos:
NOTE: the transfer to the new cloud platform corrupted the layout of my photos, thus the first photo is the finished product and the last photo is just before I put the sealer/slosh in.
Description follows after combined photos.
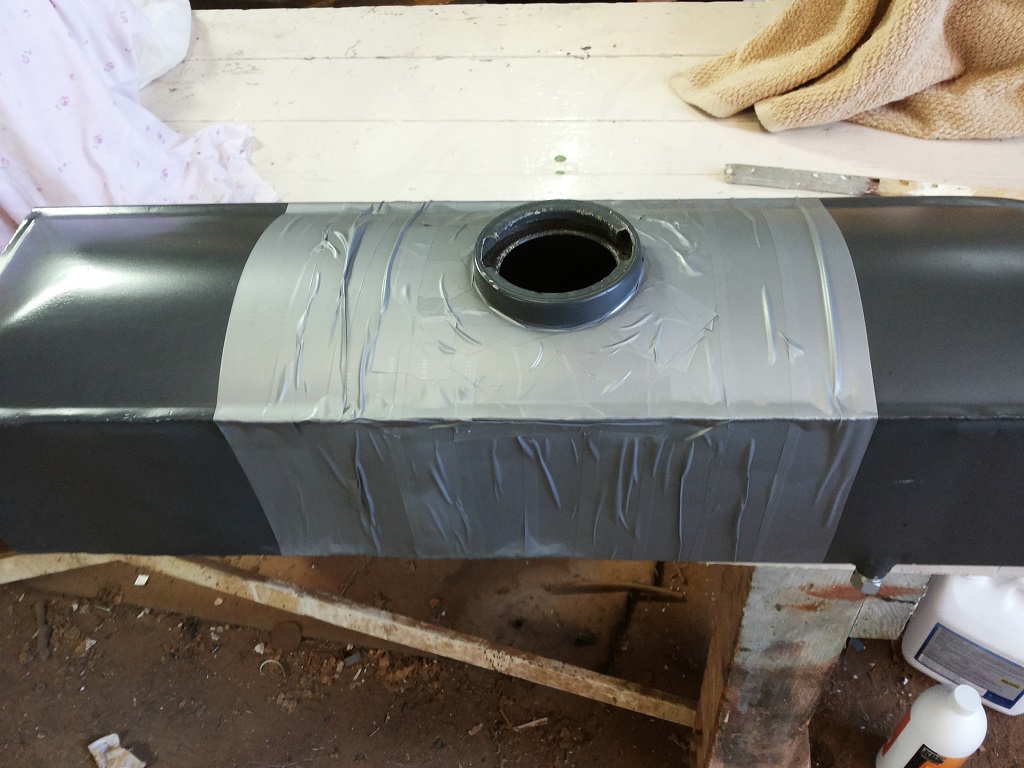
- This stuff sticks like nothing else on earth, so you need to be really careful not to get it where you would dread for it to be permanent. As I cannot get an Aussie paint to match, I protected the paint with duct tape. Wiping off spills is possible if you get to
it with seconds, but you are unlikely even then to be able to remove all indications of the spill.
- Using the petrol tank cap to seal the tank would have meant it would have become lagged with the slosh or at worse case scenario
permanently attached to the tank, so I made a combined bung and viewing window from the bottom of a 1kg honey container.
- The tank must be tumbled in all 3 dimensions to clean/treat/coat the inside, you have to keep this up for 15 to 20 minutes.
So I used a couple of buckets to make the odd shaped tank roll and my workbench as the track and also turned it end over end.
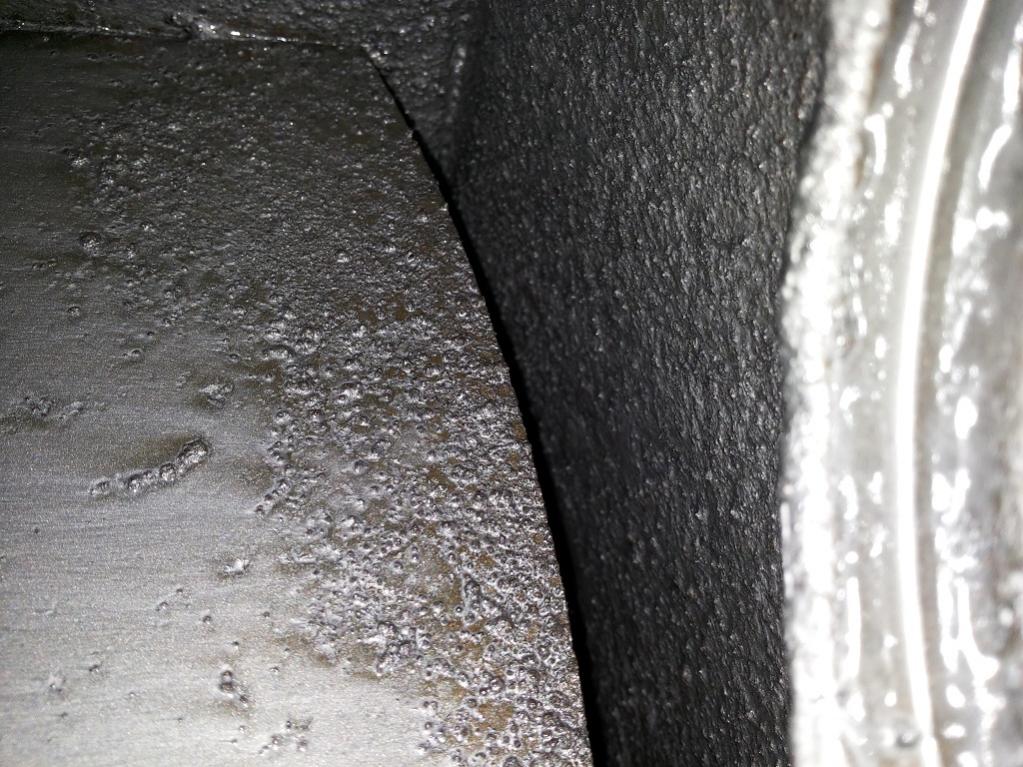
- What my Kettenkrad petrol tank looked like after the first 2 applications and before the sloshing compound. This photo is looking up towards the filler opening (taken by holding phone in 2 fingers down through filler opening). Top is to photo right, bottom is to left in photo.
- Same location after sloshing. I am not entirely happy with coverage as it looks a bit thin at top of baffle. But a huge improvement on what I had. The slosh is humidity activated, knowing what I now know, taking the dry desert climate of Broken Hill into account
I would ignore the warning in the instructions to drain the slosh by 20 minutes maximum as it was slow to cure. In the wet British climate I would be following the instructions.
Note: to Gosling clan, I too would be concerned about the effect of your soldering flux and would be making sure I had a way to
dissolve and clean it out before undertaking the sloshing system.
Regards
Doug


-
I think it's the rear half of a dummy barrel for a .50 M2 mg.
Hey Adrian,
That sounds plausible.
Why would they make it multi piece and this section so short and not make the barrel full length?
The screw together design seems like a real weakness?
Regards
Doug
-
Hi
One simple solution is to drill very small holes in the dip stick at the measure marks. The holes will retain the oil and is easier to see the level. This is a very old trick I first came across on Fords of the 40s seen it on several engings so it must have been a common trick.
Cheers Phil
Phil
I would be concerned about weakening the dip stick.
Centre punch dents will do the same job.
Regards
Doug
-
Being that the authorities monitor these forums ....
They look upon us collectors with suspicion. Someone getting
a vehicle for "other" purposes. Hmmmm.
However, by the time he does all those mods, it will go about 10km before the
bevel boxes and hubs suffer massive failures from torque overload.
HiRemember, it is historic , ex Military Armored Fighting Vehicle
and maybe the main reason was to to preserve historic vehicles by selling it to the collectors
if you convert it to other purposes for example " emergency vehicle " or "riot control" etc.
with water cannon and etc DIY bullet proof windows
I´m sure You and others aussie AFV owners Get In To Very Big Troubles with Authorities
(nowadays here in EU , they are very, very suspicious / paranoiac of...)
.....especially if you then get " a brilliant idea" to make action youtube video
pekka
-
112 views and nobody knows what it is?
Wow, not often this group gets stumped.
Regards
Doug
-
Everyone
This thing was amongst some British parts I have.
See photo.
I don't know what it is, a thing to be sure, but what sort of thing?
The shape vaguely suggests an adaptor for a very heavy antenna?
The threaded section that sticks out the fatter end spins loosely, which seems pretty self defeating.
The stud on the skinny end is fixed.

Regards
Doug
-
The Aussie Army used perhaps still do a red dye in the final drives of the APCs to give a tell tale if a housing had cracked.
I was warned the stuff is a known carcinogen and to always maintain zero exposure to it.
If you talk to one of the big oil company help lines, they probably can suggest something, hopefully human friendly.
Regards
Doug


WW1 Thornycroft restoration
in Pre WW2 vehicles
Posted
Trevor
I know that tuned pipes can be essential for certain 2 stroke engines, without them, they just won't produce power.
But I have never heard of a 4 stroke that needed "tuned" pipes in the sense you are thinking.. The advent of what is now popularly called "extractors" came about in the aero world trying to extract every last once of power from large radial engines. Basically, the outflow from the preceding firing acting as a venturi like effect.
The most noticeable use was on the engines in the Caribou transport plane and caused the distinctive crackle of those engines.
Have a look at any photo of a Merlin or Allison and you will see that the opposite was the norm, as short as possible exhaust pipes: as it turned out, in the mistaken belief that the least resistance to exhaust flow was the most efficient design.
I suspect, but will stand corrected, that the technology in use in WW1 due to the very basic designs and poor efficiencies did not extend to such exotica.
As to the actual reason for this design, I have not a clue.
Regards
Doug