


.JPG.ce5d5173b9120e587cf914646a67c75d.JPG)
Pete Ashby
-
Posts
1,681 -
Joined
-
Last visited
-
Days Won
8
Content Type
Profiles
Forums
Gallery
Blogs
Events
Articles
Store
Downloads
Posts posted by Pete Ashby
-
-
12 hours ago, B series said:
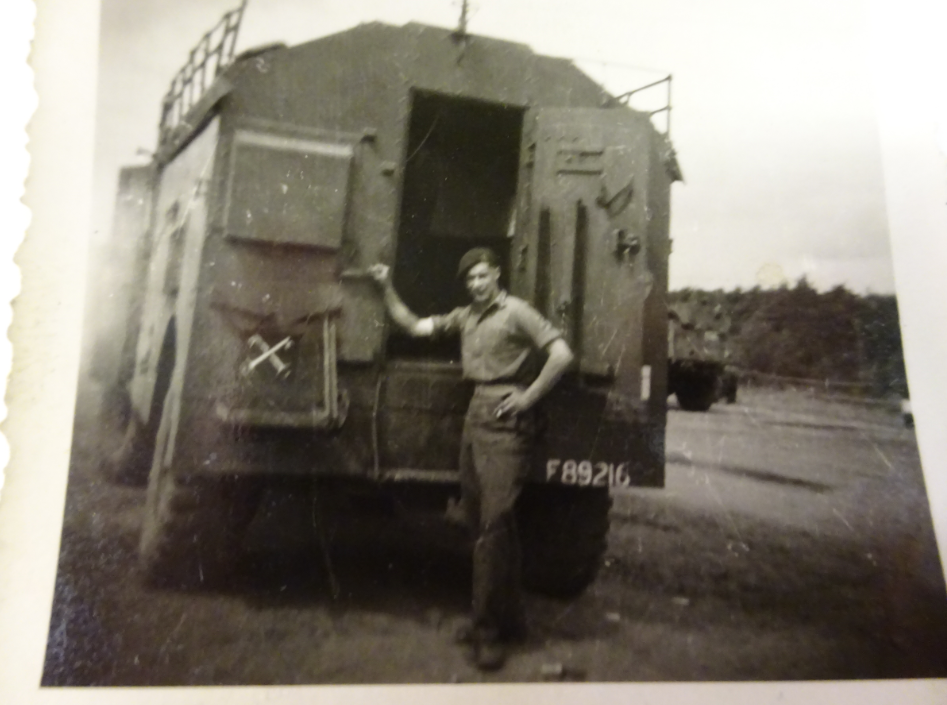
Note the crossed keys formation sign. Not sure about the F89216, it is not WW II format vehicle number, maybe it is not the vehicle number but some other code number.
Let me know if these type of photos are not required.
I think there are two possibilities for the location of of the photo the Div sign is for the 2nd Div and by the style of uniform worn by the chap in the photo I'd suggest it's tropical kit either in Burma 1944, or Malaya at the end of 1945. There is one other possibility as 5th Brigade group of this Div went on Army of occupation duties in Japan
-
There you go then a genuine Pass plate well done a very rare item indeed.
This side will have the original vehicle colour under the red paint and PASS will be either white if the base colour is G3 or black if it's light Stone.
Pete
-
 1
1
-
-
12 hours ago, B series said:
Whilst we are discussing vehicle markings one of my relatives served in the British Army in WWII, and for a period in North Africa, but maybe other locations as well.
He acquired the formation marking plate from the front of "his" truck as a war memento, and it has been in the loft for 75 odd years, with some photos. It has not been retouched or restored, it is as it was in WWII. It measures 8.5 x 9.5 inches. I did ask him about the truck it was attached to, but his memory was not that good at that time.
I have included two photos from many he either took or was given to set the scene, and added the descriptions from the rear of the photos.. I would like to know if anyone knows which unit was 2719, because I have never come across it in my investigations.
So 10 Corps, but Unit?
I could upload some WWII vehicle photos from North Africa and Middle East, but not sure where they should go..
Regards,
B Series
Interesting photos suggest you upload them into a separate thread in British Vehicles section with an appropriate title .
The Unit plate is is also very interesting not least for its genuine authenticity . I think your correct with 10 Corps this is the early design I believe white disc and white bar on red background, later it could be found as the same design but on a green background, I'd be intrested to know if there anything on the reverse side ? as it appears to be a pass plate, note the hole for a split pin top center to keep the plate from jumping out of the carrier bracket.
As to the 2719 number I can't find a reference to it the nearest is a group of numbers issued to RAOC Forward Ammo sections in the 2700 range. These were GHQ Middle East Forces numbers so it is possible that the 2719 number was also part of this number allocation although it's unusual being displayed on a plate at Corps level ( the Corps sign ie disc and bar and not on Black later to become Blue Red Blue flash of the RAOC)
Pete
-
18 minutes ago, Rootes75 said:
Out of interest, I wonder what the truck is to the left?
Dodge / Chevrolet maybe?
Kevin
It could be a Dodge D15 Kevin
-
Pleased to be of help Kevin I always think there's no point in having information if it's not shared

-
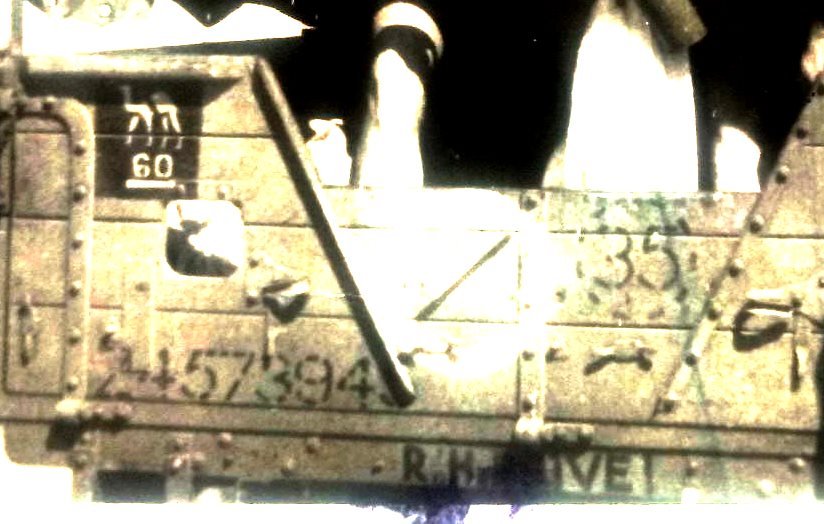
OK Kevin it looks like Wally is right about the no hand signals I've photo shopped your photo to bring out more detail and below the hand is written R H DRIVE !
The white bar under the 60 denotes GHQ troops and for MEF this could be Motor Battalion
the Camel we have already discussed
The 35 in a circle is a max speed limit sign
The truck reg number is Z457394 this is a Ford WoT2 15cwt GS on contract V4433
Pete
-
1
-
-
54 minutes ago, Rootes75 said:
I am looking through some photos of my Grandfather taken in the desert during WW2.
One photo shows them in the back of a truck and it clearly shows the markings on the tailgate.
One, which I presume may be a formation sign (?) Is a stencil of a camel over the numeral 60.
Also of interest is a large stencil of a white hand within a white circle with a line through it, I presume its a 'dont touch' sign.
Kevin
The Camel was GHQ Middle East, brown or yellow camel on a black background the 60 will relate to the specific unit that the truck belonged to, I can't say Iv'e seen any reference to the hand marking though
Pete
-
25 minutes ago, B series said:
But what does it really mean if a book is for sale on Amazon at a really high price? Does anyone buy them? Does it mean that the book is worth that much?
I want a copy of this book if anyone has one, but the Amazon price is just crazy and I don't think it means anything other than it will not sell.
I would suggest you try the independent book sellers I have done this on numerous occasions for out of print books.
Put the title into google with the ISBN number and mark for sale and you'll get a spread of realistic prices, I did this only last week for a book that on Amazon was advertised at £60, when printed it was £38, I bought a brand new unused copy from an online independent seller for £14.50 post paid.
Pete
-
1
-
-
I think Rob the lighting in the photo has made that inner panel appear worse than it actually was, the problem here was not from direct water ingress it was more a result of 77 years of atmospheric corrosion so the rust treatment to pacify and seal the surface did the job followed by a squirt of Zn rich primer from the spray gun.
I'm not familiar with Neutrarust 661 there are a number of products on the market these days that all do a similar job some are a bit more expensive than others and some need secondary treatments after application. It's a case of finding something that works for you both in terms of cost and application, all a long way from the days when we used to dab Jenolite onto BL's best offerings more in desperation than in hope

Pete
-
13 hours ago, Zero-Five-Two said:
Cracking bit of work there, especially the home made bending jig. As you say never throw anything out, it might be useful later.
Not trying to pick holes, here, but a sensible question. Did you attempt to treat the rust on the inside of this panel? And if so, how?
Yes Rob the panel was treated with the following product RUSTBUSTER Fe-123 look the company up here Rust.co.uk
I have used this product for many years for this sort of application no connection with the company but I would recommend it it can be applied by brush, roller or diluted and sprayed.
Pete
-
1 hour ago, Trooper 3/9 RAAC said:
That windscreen surround & scuttle will be a test.
regards
Pete from OZ
Your not wrong there Pete, here's the start it's not going to be a quick fix fortunately the other side is in good condition so I can use it as a pattern and take my measurements from there.
So this is what I started with

This is the mates side and what it's supposed to look like

next I cut a thin strip of card and folded and bent it to get and idea of where the folds and bends occurred then using the card strip as a guide I made a profile template out of the same gauge steel I was going to use for the repair

Next was to make up a rudimentary bending jig using bit's and pieces out of the scrap box (I very rarely throw anything away which probably explains why I can't find anything)

Using the vice, bending bars, two steel rods of a suitable diameter, a hammer and several mugs of tea with biscuits I worked up the first piece it's well oversize in width here to take account of all the bends and curves

Here everything has been trimmed to size and tack welded in

The next part will be the challenge I need to do this bit all over again but also produce the upwards curve as the pressing runs up to meet the door pillar............ I think something stronger than tea is called for while I think about how that can be done,........... there may be tears and almost certainty some bad language .
Pete
-
2
-
-
The first thing I noticed was that those cunning Dodge brothers obviously took a design decision somewhere around the late 1930's to start building truck cabs with built in obsolescence a cunning marketing ploy not adopted by British manufactures until British Leyland hit on the idea with some of their rust bucket designs of the 1960's.
Due to the shape of the pressings involved in the design sheet metal on the Dodge is mostly 18 gauge stuff. Panels are then spot welded together without any seam sealing thereby producing the perfect rust trap, any one who has restored any post 1960 cars will get the picture. Just like a 60's motor the more I looked the more I was going to have to cut.
The plan is that weld repairs will be ground down but not completely finished, when all the cab work is repaired it will all go to media blasting then welds will be dressed so the odd splodges of paint in the photos on the repair sections are just any rattle can laying around the shop to keep the flash rust at bay.
So first job replace a short section of toe plate and floor
new section welded in with captive nut on the underside

finished in rather a fetching yellow

Now lower panel this sits inside the wing when fitted you can see the difference in paint colour

The bad stuff cut out now, notice the the pressed inner skin here

New piece fitted

Now this is getting altogether a bit more scary this is where the top of the scuttle meets the side panel

This is the replacement piece being worked up with the internal butt joint and a very slight contour on the sheet starting to be formed

Tacked in place

job done but this may need some lead work after blasting cleaning

Pete
-
1
-
-
After completing the screen it was a logical step to start looking at the cab or perhaps there's some reverse logic in there somewhere. Any ways it was time to shift things around in the workshop and get ready for some serious cutting, welding and grinding so the Leyland and Dodge got cover sheets over them. The three sections that make up the cab of the Dodge were craned out ready to asses where to start. The scuttle will need the most work so that's where I started.
Photos showing the areas marked in chalk that will require attention


Pete
-
I would suggest you look at the Canadian Ford CMP gearbox as a possible option
Pete
-
1
-
-
I use War Paint G3 15% sheen on several projects and thin with a universal cellulose thinner for spraying at not more than 20% by volume straight from the can I usually work at around 10 to 15% at around 25 to 35 psi at the gun. Don't be concerned about the cure time it can take up to 3 months for single pack synthetic enamels to cure fully which ever thinner you use.
You have to be careful not to thin to much as the heavy pigments can separate but providing it's stirred well before adding to the gun it works fine, I find by using cellulose the paint coat flashes off faster than using the normal Xylene based thinners. A word of caution here is this has to be compatible with what ever undercoat system you are using if in doubt try a small area first and leave it 24hrs to see what happens.
Couple of points you may consider, when ever I get a new 5l batch of paint stir it well then split it down into new 5x 1l cans (cheap off ebay) that way you don't keep putting air back into the main stock and limit the risk of knocking the whole lot on the floor.
The other point is I have two sizes of top feed gun a stock standard one for large areas and a small 250ml one for small parts and tight corners it saves on wasted paint if you are only doing small parts
Pete
-
1
-
-
I have a question about paint and thinners, I accidentally mixed some cellulose thinners with the paint but luckily spotted it before I used it, the paint seemed to react with the thinners and after having a bad experience with a high solvent
thinners pickling paint a few years ago on another project I didn’t want to take the chance, does anyone know if its ok to use Also is there any advice for setting up a spray gun, I have an old school siphon feed Gun but it was a nightmare to set up, liquid feed adjustment made no difference, fan adjustment was either bullseye or full fan, air pressure turned down, air pressure turned up, absolute pain in the backside!!
You will find your new top feed gun a much better piece of kit to use, it maintains a stable fan over a wide range of gun angles.and will use less air to do it.
I noticed your comment that the cellulose reacted with the paint when you mixed it I'm curious as to what you saw happen and the important question here is what ratio of thinner to paint direct from the can did you use ?
Pete
-
2
-
-
10 hours ago, 79x100 said:
This Prefect badged to 60 Coy. AMPC almost certainly didn't see further service with the Wehrmacht...

Now that one is fairly comprehensively denied to the enemy I would say
-
Many thanks for posting I shall look forward to the next installment.
Every time scenes from the retreat and the beach areas appear I am always staggered at the sheer volume of equipment left behind.
Pete
-
No not bored at all. Welding fresh air is often what serious restoration is all about.
keep at it and keep posting progress
Pete
-
1
-
 1
1
-
-
Suggest having a look at 'War Paint' you'll find them on Milweb no connection with them other than a happy customer
Pete
-
1
-
-
12 hours ago, Citroman said:
A nice job you are doing. I did run into this picture on an belgian site. Is this civilised truck an Leyland too?

Not too easy to tell as the photo is difficult to enlarge however I think it is a Retriever with a very smart hard cab conversion nice picture thanks for posting
Pete
-
28 minutes ago, Niels v said:
Pete do you have any problems with adhesion between the gloss black and the G3?
No Niels providing you get the first top coat of G3 on within 48hrs of the gloss coat.
I spray all my paint finishes using cellulose thinners the idea of getting the first G3 coat on within this time frame is that the surface of the gloss coat is still slightly active (soft) so the next coat bonds with it.
A word of warning here, it's best to experiment on a piece of scrap steel first using the undercoat, gloss coat and top coat you intend to use to make sure that all three are compatible and don't adversely react (sometimes known as pickling).
Pete
-
1
-
-
On 5/17/2020 at 7:16 PM, Highland_laddie said:
Quality Job as always. Had a little laugh to myself when I re-read your opening line in the first post 🤣
Not one of the fastest restorations I've ever done for sure, as other projects have come and gone over the years this one's drifted on in fits and starts and it's very much a case of it'll be finished
 .
.
Like the paint matching I mentioned in the previous post technology, information and the supply chain have developed and evolved over the duration of this restoration. Things that were just not possible or affordable 20 to 25 years ago now are common place and can be found on a well known search engine at the press of a button so as time has gone on it's actually become easier to tackle marginal projects like this one and I'm firm believer in the getting there can be as enjoyable as reaching the destination.
Pete
-
Well Neil looks like your sorted now
thanks for coming back with the update
Pete


 .
.
A Guide to British Vehicle Markings
in British Vehicles
Posted
Fortress Head Quarters Gibraltar Garrison
Pete