


Norbo
-
Posts
146 -
Joined
-
Last visited
Content Type
Profiles
Forums
Gallery
Blogs
Events
Articles
Store
Downloads
Everything posted by Norbo
-
Dont think that will cut it im thinking something more like this


-
Im looking for 1 or a pair of tank mounted guns ive had a good google about but there doesn't seem to be a lot about what if anything do people fit
-
They are normally painted so no direct contact but the bracket the support id bolted to is steel any way so that doesn't really matter , its only touching painted steel .
-

My New Scimitar "first tank" updated 31st may
Norbo replied to Norbo's topic in Blogs of MV restorations
Any parts i remove and dont put back in again ill be keeping to pass on to a new owner when i sell it at some point , I dont want people saying O its not got this or that bits missing and them have to look for stuff and not have my one be course of it . It may not look standard when i have finished with it but it will still have all the bits to go with it . -
Can i borrow 1 front and 1 back support flap and the bar to attach the flap and the angled piece that bolts to the tank I will send them back with a full set 2 front and 2 back flap supports made in Stainless steel as thanks or if any one has some cheep used ones they want to get rid of ill buy them i need some for a patten so can make a set up in st/st .
-
I picked these up monday but the bloke didn't have the small middle one so I need the missing bin does any one have a spar one all so the side lights for a uk model they are on top of each other not side by side like these ones are the bins now get in there way DSC02115 by Norbo Lea, on FlickrDSC02114 by Norbo Lea, on Flickr
-
My New Scimitar "first tank" updated 31st may
Norbo replied to Norbo's topic in Blogs of MV restorations
Ok So I put in a couple of days over the bank holiday weekend and got a few more things looking nice The shell racks at ether side of the seats and at the back got a bloody good scrubbing down as did the straps ,its amazing how nice they came up . I was gowing to get them diped to remove the grime and make them look nice but at the end of the day it’s a tank and never gowing to be a show one at that , still very happy with how they turned out / DSC02107 by Norbo Lea, on Flickr DSC02111 by Norbo Lea, on Flickr I removed the air filter bloody heavy more then I was expecting DSC02083 by Norbo Lea, on Flickr DSC02088 by Norbo Lea, on Flickr DSC02087 by Norbo Lea, on Flickr DSC02086 by Norbo Lea, on Flickr Gave it a bloody good clean down inside and out DSC02090 by Norbo Lea, on Flickr DSC02109 by Norbo Lea, on Flickr seems to be a filter missing in the midle but the other ones looked like new once I had them out DSC02108 by Norbo Lea, on Flickr Then I fitted the rack and the filter back in and pluged everything back in to it DSC02112 by Norbo Lea, on Flickr DSC02113 by Norbo Lea, on Flickr I then cleaned it up and scrubbed it as best I could and removed all the grime and its now looks a lot different to how it did inside DSC02089 by Norbo Lea, on Flickr DSC02092 by Norbo Lea, on Flickr DSC02093 by Norbo Lea, on Flickr DSC02094 by Norbo Lea, on Flickr DSC02095 by Norbo Lea, on Flickr DSC02097 by Norbo Lea, on Flickr I removed the boxes from inside and scrubbed the cushoning round the out side and put everytghing back in place again DSC02098 by Norbo Lea, on Flickr DSC02103 by Norbo Lea, on Flickr I removed the floor panels to get underneath and cleaned the crap out of that as well didn’t fancy removing the big ring but in the end you don’t need to I was finding things out as I worked DSC02104 by Norbo Lea, on Flickr DSC02105 by Norbo Lea, on Flickr I had a day of on Sunday and me and the kids went out so on Monday I did the drivers area . this was the most ditched I think I removed some veg growing in the cushion part above the sticks . But it looks quite weet now good abough for me any way DSC02114 by Norbo Lea, on Flickr The only other thing I did was pick up some front bins and the headlight covers . im missing the middle one if any one has this and the side lights I all so need with the warning lights on the drivers side . Luckley the bloke selling them was just 20mins up the road in nottingham working on a jeap with his dad on the Monday . DSC02115 by Norbo Lea, on Flickr Some of the bits still look a bit crappy but there is no point in removing them now as powder coating will take a few weeks and Hayward tanks will need all the ducting and boxes to make shure its all right and may need to add some bits so ill wate until I get it back then ill remove everything that I can get it powdered silver and put it back in again . -
Yes i Started a thread on on it in the rebuild section. well its more of a clean up then a rebuild but i didn't know were to post so i just did it there
-
My New Scimitar "first tank" updated 31st may
Norbo replied to Norbo's topic in Blogs of MV restorations
Most i have seen in fact all i have seen just have a small holl and nothing fitted i did fined a picture of one with gun fitted but its just a small piece about 6" sticking out the small holl . Its just the ones fitted to the sabre are a lot bigger and more impressive looking as as all are just for show and not working id just like the better looking one . But I have decided not to drill and tap it ill just make something my self and use a rod that will fit they the small holl and put a big nut on it and attach it that way . so the turret remains undamaged and ill make something that looks a little like a rail gun . I did put in a lot of hours sat and ill finish it of Monday if the sun stays out . It looks a lot different in side now . just need to finish the drivers area . Ive taken some pics ill post them when ive finished after the weekend . I will say this that bloody filter box at the back was heavy as hell . -
My New Scimitar "first tank" updated 31st may
Norbo replied to Norbo's topic in Blogs of MV restorations
ill be keeping the 30mm and the piece it slots in to any everything im taking of will be boxed up the paint is just paint the trims are just bolt on The only thing thats not is i want to fit a nice chain gin so ill need to drill and tap the turret to fit on as this only have that small holl. Im not building for other people so i dont care about the value others put on it im building it for me so if its how i like it . But i understand what your saying . -
So this is what I traded my van for well my van and a couple of m cycles any way . This is how it looked before I got it home . DSC01944 by Norbo Lea, on Flickr DSC01943 by Norbo Lea, on Flickr DSC02041 by Norbo Lea, on Flickr day 1 I started to strip it down I removed all the side bins and exhorts shield and with a rubber malet fixed a few dents on the shield so it looks sweet now DSC02046 by Norbo Lea, on Flickr DSC02047 by Norbo Lea, on Flickr All These bins and heat shield will go of for powder coating the bins in crinkle coat satin black and shield in a smooth heat coat . When I get the tank back from Hatywood tanks who are going to sort out a few things inside for me ill remove the exhorts and get that hear powder coated as well and ill get some of the painted stuff in side silver powder coated as well like air ducting and so on just to make them all look nice and new . DSC02048 by Norbo Lea, on Flickr There were a few brackets like this one that held a side bin of that are rusty so ill get them powder coated as well its far better then zink plating and wont rust over time so when its done its done for ever. DSC02043 by Norbo Lea, on Flickr After removing the back bins ther was a hatch with what looks like and exhoust pipe coming out but it is infact for the rir intake when I removed the bolts and pulled it down there are 3 filters in there so I may well have to replace them at some point if needed. DSC02044 by Norbo Lea, on Flickr DSC02045 by Norbo Lea, on Flickr I removed the 30mm gun and its support If you look next to the main gun holl you will see a small holl that’s for a crappy little gun that no one ever has fitted so ill be fitting one from a Saber that have a way nice one DSC02077 by Norbo Lea, on Flickr I cant remove this rusting pice though I have removed all bolts and nothing moves but it needs coming out so I can get the center holl made bigger for the 50mm/ 60m gun ill be fitting . Ill all so be getting a custom flash breaker for the end something nicer looking then the simple trumpet fitted to the 300mm. DSC02078 by Norbo Lea, on Flickr There is not a lot of room inside not a lot at all infact once your in your pretty mush not going any were . So I striped everything out so when haywood tanks get it they don’t have to strgel to do the work . I want to make it as easy as possible for them and give them all the space I can . why stugel if they don’t have to . So I removed all the seats from inside threw the drivers hatch witch was simple once I removed the seat bace and seat pads and dropped it flat to the floor . Now the center pice with is for the shells is like a table and as i wont be firing any shells is just a large nuisance with no perpose so I removed that as well and it will not be going back in so that’s about 1/3 more moving space just in that 1 action . DSC02063 by Norbo Lea, on Flickr The problem with this is the legs are so long and with all the viewing stuff inside it just would not fit threw any hatch so I got the trusty hack saw out and cut in in half then it fitted thre a hatch no problem . DSC02064 by Norbo Lea, on Flickr So mow all the ordinance storage are out and seats there is plenty of room to work Inside DSC02075 by Norbo Lea, on Flickr DSC02076 by Norbo Lea, on Flickr DSC02072 by Norbo Lea, on Flickr So this is what I did day one of owning this tank . Ill give it a bloody good clean inside over the weekend and remove the large ring that the seats bolt to so I can get underneath and clean that down as there are bits and stuff every were as you can see. At some point I will make some better storage for the battery’s what they are in now are some crappy plastic things that are bigger then they need to be and very flimsy and brittle looking ill make them in alloy and line them with rubber . They will fit better inside and give a little more room as well . I think there is some fixing points as well so ill make a bracket on them so they can be bolted down. DSC02053 by Norbo Lea, on Flickr Theirs 2 of the buggers as well and missing from the inside is 2 more that I will need so ill have to do something for them as well . DSC02052 by Norbo Lea, on Flickr I took a load of pictures when I removed everything so hopefully when it come to putting everything back I can just look back and see what I took from were I replaced all the bolts from were they came dint make the mistake of putting them all in a tin LOL . So while its al hey wood I will be making the bigger gun and cleaning the seats and spraying them silver as the zink all pitting . They are not to bad but while they are out seems daft not to do all I can to make it as nice as possible . DSC02065 by Norbo Lea, on Flickr All stuff like this I will be removing when I get it vack from haywood tanks and powder coating and all bolts will be replaced with ST/ST and rubber like this top mount that’s looking a bit rough ill try and replace . I need to get some missing bins new cushions for the under side of the hatches and some covers for the frills on top of the engine . so ill bee making a list and looking out for this stuff . DSC02059 by Norbo Lea, on Flickr DSC02058 by Norbo Lea, on Flickr Im going to remove everything inside that does not and will not ever work so stuff like the night vision will be out as will anything else that just takes up space I don’t need decoration in side the turret id sooner have more space . For the wheels im going to do something like this not the same but some kind of alloy plate anodized black and machined back on the ends to give a blade look wheels by Norbo Lea, on Flickr Down the sides some have a stone guard and ill get some lazed up saying scimitar and 2 scimitars underneath I think it will look cool and add a little extra to it that no others have ill laser up some mud flaps holds as well as I don’t have any just 1 bent and mangled one that ill hammer flat and get copped. So ill finish of with the Paint work this is what I have in mined every one see is the same old boring green with black bits or sandy for desert camo . So other then the bins that will all be in crinkle coat the black the rest of the tank will be painted in satin black with a dark burgundy red patches with a thin green out line like in these pictures its called 3 tone disbursement paint DSC02031 by Norbo Lea, on Flickr DSC02030 by Norbo Lea, on Flickr DSC02029 by Norbo Lea, on Flickr DSC02028 by Norbo Lea, on Flickr
-
what do you use to cover your vehicle ?
Norbo replied to Norbo's question in I may be stupid, but......
Ill do a car port later im just looking for something to tide me over for a year or 2 thats all just keep the snow and rain of it while its parked up and stop the pikeys in the scrap vans seeing it on the drive -
what do you use to cover your vehicle ?
Norbo replied to Norbo's question in I may be stupid, but......
I got 1 today is was a big extra heavy duty tunnel tent its massive so well big enough to cover it its heavy so not going to be simple to get over but its big enough to cover it right to the ground on all sides by the looks of it. -
yer as i said ill just stick with it as is seems like a lot of trouble and expense for not a lot of gain. But i had to ask .
-
Think ill just keep whats in its just every one seems to thing they were better but not on hear and may be ill just stick with what i have then ill always go on advice with thins kind of thing as i have no experience with these things at all /
-
May be for the cost ill just stick with jag then i expected every one to say how great they were a lot better get one if you can . Thats good what about fuel injection on the jag then any one done that
-
well im still waiting for a price its just a lot of people say they would prefer one and they did swap them as the jag ones blew up every few weeks when in use so i was told . Not the same for road use i know but when is service they got fed up of fixing them so replaced them ,
-
So i have the chance of a new Diesel motor and gear box for my Scimitar . Is it worth the time and money to get it and have it fitted . does it add value to the vehicle and if so how much . i dont want to spend more then it adds . All so what would be a price for such a motor and what would you expect to pay for it to be fitted . there is a lot involved gear box pipe hook up and so on i appreciate its not a simple job and has many other things that will need to be changed at the same time . So your advice is welcome.
-
How many links do you need . Sounds like it may work out a lot . so ill just ask how much is a fill set for both sides
-
what do you use to cover your vehicle ?
Norbo replied to Norbo's question in I may be stupid, but......
didnt get it got out bid as didnt go back to take a second look . went for £18 LOL -
I live in Mansfield. its Nottingham Derby chesterfield area i'm in the middle of all 3 NG15
-
what do you use to cover your vehicle ?
Norbo replied to Norbo's question in I may be stupid, but......
You may be right but second hand they are less then £20 . im biding on a big one now winning it at £10 so its worth a punt -
This is the kind of end i was thinking of making for it looks really nice i think and remember the gun will be a good bit biger as well as there is a good bit of space inside of that cove were the bolts hold it i want to fill that so there is no or little space something like the scorpion may be


-
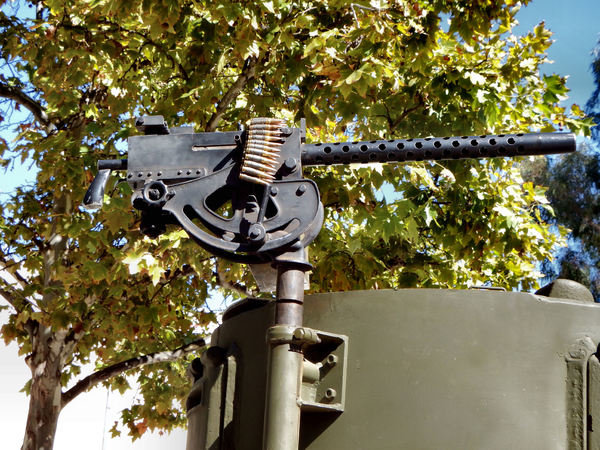
This is literally the only picture i can fined of a Scimitar with a side gun the little tiny spout sticking out . i think the sabre one looks a lot nicer but as the main gun is quite thin any way and just a steel tube any way im replacing it with one as wide as can fit in the first part that holds it and i may fit a cool looking braker on the end of it as well

-
I know its the wrong one but ive never seen a scimitar with a gun only the sabre and im not bothered if its right or not it will never be a show tank i just want it to look cool and stand out from all the others you see about and it will do hopfully . Pitty there is no one close who could pop over some weekend and help with a few jobs as the lights and air ducting need finishing of and a few other in side jobs and i dont have any idea how to do anything . I may yet have it delivered to andys and just pay him to do them and transport it to me after but the transport will be a good bit on its own i would think . Im not quite sure what to do at this point . Andy all so have a new diesel motor and gear box so im waiting to see what he wants for that as its a big job and more then just a motor and gear box swap if its not crazy ill do that and ask him to look at the few other small jobs at the same time as for him its just a weekends work but for me it could take months . could be the motor and gear box in it may pay for all the small jobs in a px .


