


Dodge'40-'45
-
Posts
179 -
Joined
-
Last visited
Content Type
Profiles
Forums
Gallery
Blogs
Events
Articles
Store
Downloads
Everything posted by Dodge'40-'45
-
restoration A Dodge called Michigan
Dodge'40-'45 replied to Dodge'40-'45's topic in Blogs of MV restorations
Thanks for the comments Well, it's against all the dust :-D Removed the tyres today, most of them came off pretty easy. They're all retreaded tyres and quite worn, so not safe anymore for using. Except for one Viking tyre which has the common norwegian clover pattern, this one seems serviceable and will be stored.


-
restoration A Dodge called Michigan
Dodge'40-'45 replied to Dodge'40-'45's topic in Blogs of MV restorations
Well, all stripped down to the chassis. Layers of mud, grease and Norwegian tar. The last kept it in good condition, but is a paint to get rid of. Once it's degreased it will get sandblasted. Fuel tank appears to be in useable condition, just one dent. A new set of tyres is on it's way, brand is Malhotra which i've heard some good comments from. Next up will be removing the old tyres and get the rims sandblasted and painted.


-
restoration A Dodge called Michigan
Dodge'40-'45 replied to Dodge'40-'45's topic in Blogs of MV restorations
Today was a good day. Body and cab has been removed without too much trouble. , next up will be the fuel tank, which seems to be ok. Lot's of mud and grease ... :-D other than that, chassis is quite good.


-
restoration A Dodge called Michigan
Dodge'40-'45 replied to Dodge'40-'45's topic in Blogs of MV restorations
More pictures of the Dodge (and replacement engine) now, we hope to have the body off by the end of the weekend.


-
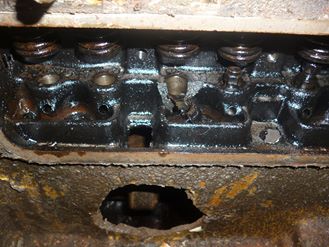
Hi All, Starting a blog for my latest project, an ex-Norwegian army Dodge WC-52. This Dodge was made in 1944. Not too much bodywork, which is unusual for a Norwegian Dodge (cold winters don't do Dodges any good unfortunately..). Luckily it was protected by a winter cab which was very nicely made. Cab is in good condition, body has some minor dents. However the engine took quite a beating. Well a beating is an understatement.. we don't know exactly what happened to the engine all we can say for sure is that there were 2 big holes on each side of the engine :-D 6th Piston only had 2 rings left and the conrod of the same piston was entirely missing. The sump contained 2 pieces of camshaft :shocked: Our guess is that the engine was over revved and that the conrod nuts snapped off. A shame because it seemed like it had been rebuild not too long ago. The good (well relatively good) news was that we have a correct T-214 Engine which had started to develop a knock and almost seized. we are currently rebuilding this engine. So far: new pistons and rings, crankshaft regrind, new bearings, new conrods. Like most norwegian Dodges it was converted to 12V, currently collecting parts to get it back to 6V. While rubbing down the layers of paint, we managed to find the original hood number USA 2219951. We also found a big invasion star with yellow gas detection paint. We were also lucky to find it's name ''Michigan'' on the side of the cargo body. To top it off we found POM-markings on the passenger side fender. POM-code (3 colored stripes and 5 digits). this was used to identify units during the invasion of france. We also found some markings on the bumpers, but these are incomplete. We found 736 on the passenger side bumper, still searching to find which unit this dodge belonged to. We're now starting to fully strip the WC-52, more pictures will follow soon. Hope you enjoy the posts. Niek


-
restoration Dodge VC3 restoration
Dodge'40-'45 replied to Dodge'40-'45's topic in Blogs of MV restorations
Hi again, Sorry for not answering, kinda forgot about this thread. Our VC3 is still in about the same state as the pictures show in previous posts so we're not taking it to Normandy yet. We've got all parts needed for finishing the restoration, but some other motorcycle related projects got in the way . We hope to continue on it soon. Just needs wiring done and a coat of paint, Ours was made late april or early may, can't put a exact date on it since the dataplate is gone. If you need any info, just send me a PM and i'll see what i can do. Regards, Niek -
restoration 1938 dkw rt 100
Dodge'40-'45 replied to Dodge'40-'45's topic in Blogs of MV restorations
Latest pic of the DKW alongside the BSA. Clutch works as it should now. Runs well, great fun to ride.
-
Starting to look like a motorbike again. :cool2: :cool2:

-
Gearbox is now installed and working. Had some problems with assembling the clutch. The clutch fork was badly worn. Because of this the clutch wasn't working propperly. We fitted the new drive shaft. turned out it was too short. We took the measurements of the old one. The old drive shaft had been welded back together, must have had a piece missing. The pinion shaft and rear drive was missing some bearings and small parts, The short drive shaft must have been the reason. Wonder how they managed to break that drive shaft. A new drive shaft has been machined, fits nicely, Now the entire drivetrain is complete i hope to start the engine soon. See how that'll work out...:rolleyes:

-
January means exams here in Belgium so i haven't had much time to work on the BMW. Luckily i have a good team (my father and grandfather) with me who are still willing to work on it. Here are some of the changes since last post: Front fork was refitted, now we can make a new brackets for fitting the mudguard. Gearbox reassembled (finally!). We assembled the gearbox and then found out it couldn't take third gear and had a very small neutral. We then had a look at the original bushings. The bushing i waited on for over a month and a half (which the seller claimed was NOS) was a really crude repro... The dimensions of the bushing were off by a couple of millimeters. Because of this the selector was unable to select 3th gear. Luckily a friend of ours is quite good at machining. He was able to turn the bushing to the correct size. we then put the gearbox back together and now it works fine. We also had to open the rear drive again, one of the previous owners had removed the original bearings and put 2 smaller bearings instead, this caused play on the pinion shaft. I wasn't aware of this untill i had a look at the parts list. I was lucky to find NOS bearings. we then put it back together with new bearings, distance bushing and a new pinion gear. A new carb and an exhaust set is on it's way, hope to have it by the end of next week.


-
Tyres arrived yesterday. Couldn't resist getting up early and putting them on the rims this morning :-D. Merry Christmas all and a good 2016.

-
Mudguards and fuel tank finished. resprayed them. Rear rim had a lot of play, because of not being assembled correctly (incorrect spacer fitted, and something which i think came out of a car gearbox...:rolleyes:) A new bushing was made and fit into it and now it's as good as new again. Due to the extremely soft temperatures (15°C here in belgium, while being December), it was ideal weather to spray paint. We've put the rims in WH-grau, will order a new set of Heidenau tyres so they can be assembled and put in stock. Also put the rear stand spring in place. Had a look at the BMW parts list and apparently there is a bearing and some spacers missing in the rear drive. Wonder why they took the bearing out. Hope to find the parts in germany. Hope to coat the fuel tank by the end of the week.


-
Couldn't Resist ...:cool2: Cardan shaft is ready,put some parts on to see how it would look.


-
Made new threaded rods for the final drive housing and reassembled it with a new gasket. A friend is making a new cardan shaft, the old one was too crudely welded to be saved.


-
More tinkering... :-D Had to adjust the gearbox a bit because we made new threaded rods for the engine. Only a test fit, put i am planning to run the engine now that the frame is still in primer.


-
Work goes on.. Engine is now fully reassembled and ready for mounting into the frame. Once it's ready that is. :rolleyes: new gaskets, new crankshaft pulley and generator belt. Just waiting on one bearing before i can put the gearbox back together. next major problem will be the drive shaft.


-
Still waiting for engine and gearbox parts to arrive, so i decided to have a look at the rear drive. With the cardan shaft broken, i was expecting quite a mess. I heard some clunky noises when turning the pinion gear. After opening up, it seems a lack of oil caused the noises. it had stood dry for quite a while. just needs some new seals and it's good to go. Also managed to reassemble the gear shifter. Just need to find the correct springs for the locking plate. They used twisted copper wire to keep the bolts in place...


-
Thanks, the engine and gearbox housing are made of aluminum. I just used some steel wool to get the dirt off and then some aluminum polish.
-
Fuel tank is finished. Ordered some products for coating and degreasing it. Put the generator back together after cleaning. Cleaned / polished the engine and gearbox. Also test fitted some parts. Looks good but still waiting on some parts before i can start reassembling.


-
Disassembled the gearbox,just waiting on some parts now to put it back together. No major issues just some worn sleeves. one repair made on the kickstarter gear but it seems well done. Painted and reassembled the horn. Started derusting the fuel tank, electrolysis rust removal and a new coat after should do the trick. Last picture is the result after 2 hours. Generator is in good condition, thought the bearings were worn but after opening, it's just a lack of grease which made them noisy.


-
Last week and yesterdays work. Finally got to removing the flywheel. Had to improvise a tool. Another surprise... seems like the shaft was quite worn and they made a speedy sleeve to go over it and fitted an undersize seal. They also made a new wedge groove, and crudely welded the old one.. Luckily i found a replacement flywheel in Germany at quite a cheap price. Crankshaft and bearings are in good condition, just need to clean out the housing. Just need a new seal and then the engine and gearbox can be fully assembled Adjusted some spokes of the rear wheel and removed the broken bearing of the front wheel. Carburator is beyond saving, it's an original carb, it has a cold-start helping channel , but they removed the plunger and pourred tin in the channel. Welded the rear mudguard. originally the mudguard and luggage rack are riveted together, we've separated them but kept the original rivets so we can weld them back on. it's the only way to get them both fully cleaned. For some reason they also removed a piece of the rear mudgaurd stay. we had to weld a new piece on it. just need to get 2 rivets now to make it look original again. Some friends came over to fix some broken bolts, quite tricky drilling in an Aluminum crankshaft case. But in the end they're all fixed. Put new plates on the clutch. Seeing all these mods on the bike and these crude repairs, i'm starting to think this bike was used for motorcross. Which might explain the off-road rear tyre when it arrived...


-
Well another episode of the story.. After 3 weeks the replacement cilinder head finally arrived. Decided to assemble both cilinder heads. Disassembled the cilinder head that was on the BMW when it arrived first. We had to improvise a tool for disassembling the valves, since we're only used to working with sidevalve engines :-D. Does anything seem odd about the valves that where in it??? Yep, non original valves... probably car valves that they've cut down and grinded a new groove in... with non original springs and home made adjustment screws. I wonder how it would have sounded with all these modifications... Well then i had a look at the replacement cilinder head. Finally i had some luck, the valves there were original. Exhaust thread,rocker arms and valves were in great condition. we just had to grind the valves, and then reassembled them. I'm no expert on valve grinding but they've told me how smaller the surface, the better the valve will seal. So seems about right, or atleast i hope. The 6th picture shows the original groove of the valves. i've read some stuff about replica carbs for these BMW, most say they are cheap copies which have problems idling. I've decided to restore the original sum carb that was with it, although in bad condition and cracked, once done it should be as good as new. Another part finished, next job will be clutch. got a new set of clutch plating while we're at it.


-
been a while since last post, lots of work happened. Test fitted the stand, a new shaft for fixing was made. The engine is ready for assembling. Sourced a new set of gaskets. Had a look at the gearbox, cleaned it out. No major issues there. Gears all seem ok, just need to clean up an old repair of the shifter. First batch of parts is now painted in primer.


-
Frame has been painted, just primer for now. Will paint it grey later, once more parts are ready. Found a serviceable cilinder head, should arrive this week. Cleaned the front fork, lots of old grease but it's in decent shape.


-
Had a look at the sump. Just had to make a small field repair to the oil filter. Cleaned the ingition, looking for a set of new points and condensator. Had a look at the carb, it's in quite bad shape, it's cracked so i'll have to source a new one. Also had a look on the rear stand, has some cracks and needs some welding done. One step forward,two steps back :rolleyes:


