


cordenj
-
Posts
687 -
Joined
-
Last visited
-
Days Won
4
Content Type
Profiles
Forums
Gallery
Blogs
Events
Articles
Store
Downloads
Posts posted by cordenj
-
-
Excellent job Mike. Perfect behind the Bedford. I know what others have said, but as there appear to be no photos to disprove it, I think you should add your Div signs to the back to set it off.
-
So the choices so far are:
- make visitors oily
- poison visitors with zinc
- lacquer the table
hmmmm...

trevor
Yes or just paint the thing!
-
Coat of engine oil on the bench top, methinks. I'll bet there was provision for storage of an oil can or the like on the trailer somewhere ?
These days diesel would probably do a better job.
Yes Gordon, am sure you are right: just oil it over.
But was wondering whether there is a more modern option, that will be more suited for displays with the public leaning on it!
-
Awesome work. We'll need some pics of the bench mounted to the trailer.
Cheers,
Terry[/quote
Here you are Terry.
The two webbing straps are original and were fitted on the trailer.
I've left the bench-top unpainted as I suspect it would have been originally, but need to think how to stop it rusting.
.jpg.44efc21e64df428ff4038c150ce7ec5d.jpg)
.jpg.63e311b168d33e26db77e4ac4fc0df53.jpg)
.jpg.9b5dee73ec839730d9d880d94abebd7c.jpg)
-
This annual event is running today to Hastings.
Sponsored by AA and all entrants are invited to donate to Combat Stress.
Part of the tradition is that all vehicles are flagged on in small batches by Maj. and Mrs. Holt (of tour and guidebook fame).
Thanks to James Baxter and Annie Appleyard for organising again this year.
Here are a few photos of this morning's start:
.jpg.fb90a8a9754a6db1f76db9585a854438.jpg)
One of two take the opportunity for the AA to provide their annual vehicle service:
.jpg.8e0ba9cffbbaa66e8a58a7a542d10dd4.jpg)
.jpg.0053705d7588f2fc5492f2f517c11785.jpg)
.jpg.5336c7ada322c7b5104eb471f95a3926.jpg)
.jpg.8949a01f169a10e0f9462335b6a0ea18.jpg)
.jpg.81a45dcfbaae83c3f527ac3b290df06a.jpg)
.jpg.42f6bc60ef645fcefe37172920e8ec75.jpg)
.jpg.87b85cc014238ccd2b6f538f59c1406e.jpg)
.jpg.1562518f7f28642b530427ed69bafbd9.jpg)
.jpg.a277dd52928f336f0c225af178acd602.jpg)
.jpg.eb7ccd3759496ff6543cf1456d5d4ad5.jpg)
.jpg.41cc699246f5aaa9052800f8dc135dda.jpg)
.jpg.144c19a96fa4260020369c2e675322db.jpg)
.jpg.be15e6ab02b111cd993e5ae9ed559882.jpg)
.jpg.2daa8fa81ae4decb55f62b4848c12857.jpg)
.jpg.e461de0b9905a5a3cd1e93abb73780b0.jpg)
-
Here is a replica of the collapsible welding bench.

Similar construction to collapsible benches on the electrical supply trailer, but as the original description from 1951 REME Vol. 2 book the "All metal welding bench with removable legs is carried on the side of the trailer" I've made this with a mild steel top rather than hardwood planks:

Very easy to make, biggest challenge has been sourcing the correct 3/8 BSF machine studs (not zinc plated modern versions!).
I was lucky to find the original "eared" 3/8 BSF Wingnuts in one of the trailer's lockers.

The two pairs of legs fit vertically in the front of the trailer, held in place by two webbing straps. The bench top sits vertically along the right hand side of the trailer and is held in place by a winged bolt.


-
Evening Andrew,
Welcome to HMVF!
Looking forward to hearing the Humber hum again.
Are you on the Sevenoaks to Hastings run tomorrow?
-
I've enjoyed reading this from the beginning. Excellent work
Thanks. It seems to have been a long time since I started this one, but definitely getting there! Currently finishing the collapsible welding bench.
-
Camouflage paint put on. Reasons and method for this all covered earlier in this thread for the Electrical Repair trailer so won't reiterate.
As the wartime instructions for this pattern included covered all horizontal surfaces of vehicle, there is a lot of matt black paint. It will be relieved by a white invasion star and pale blue "X" numbers in due course:
.jpg.e83400c75f676e9b587eb82b7c94a6e7.jpg)
.jpg.6201e0f01aaebdcaa3b0fb94b7a05f4e.jpg)
.jpg.6c9763485e64905b527ade30d3750198.jpg)
.jpg.4d93ce76d8396dcfcc92d84f087e7abb.jpg)
.jpg.8e178b04278dd1b0607a9645eec7128d.jpg)
.jpg.899fd6f433b2fdeed2d4ee4b567c8980.jpg)
-
It's looking luverly!
And will you be testing its welding ability?
trevor
Yes Trevor, definitely will.
I've read that these old MUREX welders were a pleasure to use as they produce a really good steady current output.
But probably not use it at any shows. Can just imagine the organisers will not be keen on getting claims for "arc-eye" from all and sundry!
-
After a lengthy break from work on the trailer due to family commitments arising from the flooding in Sussex, and its aftermath.....I'm now going to get on and finish the MUREX Welder for shows this year.
First tasks have been to: make and fit a fan guard; fit roof with petrol tank; fit side boxes (all with correct BSW nuts and bolts):
.jpg.9025c57ce31596fc12d11be0667c34e9.jpg)
Few photos of trailer in the sun before camouflage applied:
.jpg.9a74dfde5f9fb41cc2e48e80fbee8f0b.jpg)
.jpg.0490ce5680beac6a1c677d1091bc9dbb.jpg)
Other jobs are to: source and make up welding leads, design and build the collapsible welding bench that was part of the standard kit, fit "T-Plate", refit white convoy disc, wire up convoy light and side light.
(2).jpg.8f138cb3317b74adddf892f6f3ea73d0.jpg)
.jpg.a67f12eb4bc5fe2990dbc9f1c8ace0d6.jpg)
.jpg.7e1e86dc3769aa1926f9b7a415504260.jpg)
.jpg.9b0dbf7cb5c296dc0fb20e66cd1d3d66.jpg)
.jpg.f1c904539f12155845cd91867c64f9fe.jpg)
.jpg.3d7ef252be16f9c3686ccbed43cacf05.jpg)
.jpg.7befee7bcddf9b5b73227e3276672299.jpg)
.jpg.8364e50009c7ce20a5ccba0be17b9813.jpg)
.jpg.4eb4bce6a0065616b33108c17625984b.jpg)
.jpg.396190b761f204036c7556cc80b9e38d.jpg)
-
I know its not a GS trailer, but hopefully this photo shows what I mean about "safety chains" for each leg. The hooks on end of each light chain locate into a hole drilled through the circular foot:
.jpg.96048665c1a3d479153685b89bd274d5.jpg)
The original 1949 WO code lists do show these extra safety chains (WO 6160 Plate L).
I always use them for legs that are not positively cross pinned with large split pin and chain in transit. i.e. where leg is held in upper position only by the standard cast clamp.
So why has the "FV" stamped leg referred to earlier have a horizontal hole for a cross pin (i.e. capable of being positively locked in raised position) AND a hole drilled into foot?
One explanation could be that the leg has both means of fixing in the upper position so as to be interchangeable between different trailers. I've never before seen a 10 cwt trailer leg stamped with an FV number, which makes me wonder if it was supplied as a spare part post-war......because the original was bent in use!
-
The hole in the foot i think is no more than to stop water standing on it.
Could be, but I always use those holes on mine for a secondary safety chain and hook, to prevent the legs slipping down and striking the road in-transit.
I've had to fabricate most of the legs for my trailers, either because they were missing or those that were there were bent, so clearly they are vulnerable....
-
Hi Mike,
This page from my trailer restoration thread: http://hmvf.co.uk/forumvb/showthread.php?27455-British-WWII-REME-Lightweight-Electrical-Repair-Trailer-Restoration-Project/page5
Covers bearings for similar 10 cwt lightweight trailer. I included Timken numbers there, but you will be able to see the hub design in photos, and that may help you to decide if the same as yours.
-
Its been re-listed with a photo of the carrier without bicycle....so no one should get confused! :confused:
Come on Martyn, you know you need one for your bike

-
Endorse the previous comments.
Cliff and his team are always a pleasure to visit. Great source of parts AND advice (and tea!)
Couldn't make the clear-out last Sunday as dealing with flooding in West Sussex
 ,
, -
Hi Peter,
Great to see another of these carts being restored.
Am sure you've followed this thread on the other WWI Water Cart:
http://hmvf.co.uk/forumvb/showthread.php?24128-WW1-Water-Cart
Cheers
John
-
Very good Anthony.
And as you say, no "Mickey Mouse" cam as no evidence of a Mortar trailer with any on.
Getting all our trailers to W&P will be a challenge.....we're going to have to select what to take.
Think Trailer Trash 2014 will be the only full gathering
-
Hi Ian,
Have I sent you these photos before?

-
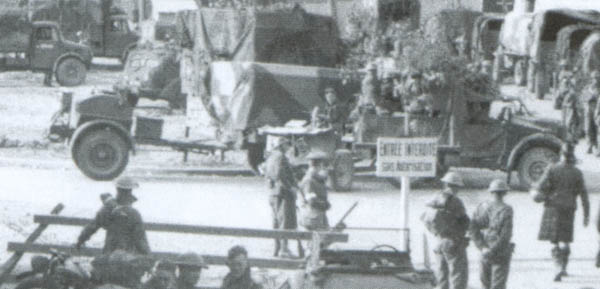
Hi Tim your right, looks like a 10cwt bowser behind a carrier.
If it is that is GREAT. I've not yet found a any photo of the 10cwt bowser in use in WWII, although we know they were!
.JPG.b99f81f940e7b3bc243db9cf113ee186.JPG)
-
Yes very good clips. Nice MW and Humber box as well.
I've looked at 6:47 Tim, and wonder if it is a bowser behind the carrier.
Could it be a 10cwt GS trailer or Mortar trailer with cover and loads of extra kit?
-
Just having a trawl through this project and spotted the photo on page 3 on the trailer stating Belton Makers of Boston.
Do not know if this has been mentioned or not but a Maurice Belton is listed as being an Agricultural Engineer in Sibsey.
May be a connection or not but may be worth a call.
No website but contact details on a directory are here - http://www.192.com/atoz/business/boston-pe22/sc/maurice-belton-machinery-ltd/52bc7a8d00c084a1fab872d8cbef7ddd33e0ed6a/comp/
Hope this helps.
Thanks Bryan, I've made Richard aware. Cheers
-
Hi John
Great job, I thought this one was going to be on the back burner for a while? I notice that strong drink always seems to lubricate the work whenever TL is involved.
Regards
Rob
Morning Robin,
Surprisingly he is holding up a tin of Easystart in the photo..... rather than the usual Talisker!
And before you ask, it was for the engine not himself.
-
After many other distractions over past couple of months, today was the day to make a determined attempt to start the Austin engine on the MUREX trailer.
I'd built and fitted an exhaust system a couple of weeks ago:
.jpg.6b3c7ad86cd1faf329216f2f051a7828.jpg)
And now with welcome assistance from a retired BAE Systems electrical engineer, the IMPS Chairman with EasyStart and a Financial Advisor (to operate the starting handle), we struggled for some time with it not quite firing correctly.
Checked the firing order and plugs leads....and corrected it to be 1:3:4:2...and it burst into life.
Very rewarding as everything had been dismantled over the past year, so there were a myriad of potential problems. It was good to see the mechanical governor working smoothly too, as that was the first one I'd ever tackled:
.jpg.84019b85927ddf9e96ea6fa9a6155826.jpg)
With the welding output box connected, the main Voltmeter showed 50v output.
.jpg.e5bb0b12069d015fe0019f9df33d272f.jpg)
I now need to find some suitable welding leads and I suspect the large Ammeter will then register an output.
Engine running smoothly, good oil pressure and electrical output, all in all a very satisfying day!
I've uploaded a couple of videos to Youtube:
Thanks to Ian, Anthony and Ross.
.jpg.fa94bd650af2408845f6b2bd5ff558e1.jpg)
.jpg.44efc21e64df428ff4038c150ce7ec5d.jpg)
.jpg.63e311b168d33e26db77e4ac4fc0df53.jpg)
.jpg.9b5dee73ec839730d9d880d94abebd7c.jpg)
.jpg.fb90a8a9754a6db1f76db9585a854438.jpg)
.jpg.8e0ba9cffbbaa66e8a58a7a542d10dd4.jpg)
.jpg.0053705d7588f2fc5492f2f517c11785.jpg)
.jpg.5336c7ada322c7b5104eb471f95a3926.jpg)
.jpg.8949a01f169a10e0f9462335b6a0ea18.jpg)
.jpg.81a45dcfbaae83c3f527ac3b290df06a.jpg)
.jpg.42f6bc60ef645fcefe37172920e8ec75.jpg)
.jpg.87b85cc014238ccd2b6f538f59c1406e.jpg)
.jpg.1562518f7f28642b530427ed69bafbd9.jpg)
.jpg.a277dd52928f336f0c225af178acd602.jpg)
.jpg.eb7ccd3759496ff6543cf1456d5d4ad5.jpg)
.jpg.41cc699246f5aaa9052800f8dc135dda.jpg)
.jpg.144c19a96fa4260020369c2e675322db.jpg)
.jpg.be15e6ab02b111cd993e5ae9ed559882.jpg)
.jpg.2daa8fa81ae4decb55f62b4848c12857.jpg)
.jpg.e461de0b9905a5a3cd1e93abb73780b0.jpg)


.jpg.e83400c75f676e9b587eb82b7c94a6e7.jpg)
.jpg.6201e0f01aaebdcaa3b0fb94b7a05f4e.jpg)
.jpg.6c9763485e64905b527ade30d3750198.jpg)
.jpg.4d93ce76d8396dcfcc92d84f087e7abb.jpg)
.jpg.8e178b04278dd1b0607a9645eec7128d.jpg)
.jpg.899fd6f433b2fdeed2d4ee4b567c8980.jpg)
.jpg.9025c57ce31596fc12d11be0667c34e9.jpg)
.jpg.9a74dfde5f9fb41cc2e48e80fbee8f0b.jpg)
.jpg.0490ce5680beac6a1c677d1091bc9dbb.jpg)
(2).jpg.8f138cb3317b74adddf892f6f3ea73d0.jpg)
.jpg.a67f12eb4bc5fe2990dbc9f1c8ace0d6.jpg)
.jpg.7e1e86dc3769aa1926f9b7a415504260.jpg)
.jpg.9b0dbf7cb5c296dc0fb20e66cd1d3d66.jpg)
.jpg.f1c904539f12155845cd91867c64f9fe.jpg)
.jpg.3d7ef252be16f9c3686ccbed43cacf05.jpg)
.jpg.7befee7bcddf9b5b73227e3276672299.jpg)
.jpg.8364e50009c7ce20a5ccba0be17b9813.jpg)
.jpg.4eb4bce6a0065616b33108c17625984b.jpg)
.jpg.396190b761f204036c7556cc80b9e38d.jpg)
.jpg.96048665c1a3d479153685b89bd274d5.jpg)


.JPG.b99f81f940e7b3bc243db9cf113ee186.JPG)
.jpg.6b3c7ad86cd1faf329216f2f051a7828.jpg)
.jpg.84019b85927ddf9e96ea6fa9a6155826.jpg)
.jpg.e5bb0b12069d015fe0019f9df33d272f.jpg)
.jpg.fa94bd650af2408845f6b2bd5ff558e1.jpg)
MOD DDay70 Accreditation Form
in Future events and meetings
Posted
At least its 2 months and not 2 weeks.
I completed the form over weekend and emailed it off.
Quickly received confirmation of receipt from the MOD, so it is for real and not some kind of joke (I did wonder as first heard about it around 1st April......).
Just have to wait now to see how I get formally "accredited".