


robin craig
-
Posts
3,693 -
Joined
-
Last visited
-
Days Won
2
Content Type
Profiles
Forums
Gallery
Blogs
Events
Articles
Store
Downloads
Posts posted by robin craig
-
-
Paul,
nice videos you shoot, what is your set up in the cab?
I am believing that nowadays the old blue and green convoy flags are not used any more?
Seems strange to see the German style convoy plate on the back of a British vehicle now.
R
-
Sir,
welcome to the forum. firstly.
I would like to say that my comments are made with no bad feelings, just a bit of reason.
Frankly I think you are not very wise if you wish to swim an FV 432 or any other supposedly amphibious vehicle without just cause.
When you look at the physical risks of being in a 10 ton coffin in water you make me shudder. I know I have been in the cab of a Stalwart when swimming but I was younger and more stupid then.
Any mechanical object with seals and gears and cavities filled with oils etc are enough work to keep running at the best of times. If you take one owned privately and supported by you doing all the work and not a REME workshops then why would you risk the chance of getting water into various cavities etc.
Work has talked about swimming our BV206, which is amphibious granted, but my voice of reason is the same. We will get many miles and years of usage out of the vehicle without subjecting it to water.
In my opinion if you immerse a vehicle into water (hopefully fresh) the first stop afterwards would be your workshops to change fluids, any that could have taken on water. Do not forget that a hot unvented cavity will, once the vehicle goes into the water, have the ability to develop a negative pressure as the oils will be cooled. If you have a slight weep on dry land that will become the point of entry once on the water.
My suggestion, is don't swim things that are not boats unless you have deep pockets.
Robin
-
Being in Canada we run into this all the time with shipments from the UK of things green.
I have used many different people for vehicles over the years.
Recently I have had dealings with British Military Vehicles run by Bob Grundy, very helpful and knowledgeable and very easy to deal with.
Regards
Robin Craig
Union Jack Collection
-
growing mushrooms my sainted @#$%%&
More likely something that goes up in smoke . . .
R
-
Arrrr Proper Job!
Cats whotsits mate.
R
-
It might be helpful to know what vehicle you are working on before we comment.
You have not mentioned why the tried and tested method of welding the connections will not work for you.
R
-
Interesting to see those pictures, lots of details for markings etc.
Thanks
R
-
Shame to hear that parts are so difficult to find that you are having to make one die to keep others alive.
R
-
NOS you prove my suspicions.
R
-
Tony,
I think silver as I have found a really good paint that sticks like glue and doesn't rub off.
After its last rebuild it was Deep Bronze Green interestingly. All that came off in the cleaning process.
The base zinc chromate is mostly there with a grey on top of that then silver.
R
-
And just what are its properties that you think will help your vehicle?
I am not familiar with this particular "fix in a can" additive.
R
-
Once those two units were done they were set aside and we wombled back over to the bench where everything is laid out in a very specific pattern, known only to Tommy, and selected the front housing and oil pump gizmo to assemble next.
A word of caution at this point about your tools. slotted screws get knackered because people will insist on using a tapered screwdriver instead of one with parrallel sides. It is a massive peeve of mine and we really should have used a new screw.
The common screwdriver as found in most tool boxes, will because of the taper, automatically ride itself out of the slot in the screw and make a complete pigs ear of the screw head.
R


-
Here is the other side. We will do all the pretty painting once the unit is complete.
R

-
Just as a note, we were using Loctite on all bolts such as in the last post. integrity of the job is very important to me.
You will not just how darn clean Tommy has all the pieces, he took hous cleaning everything, his way.
This side of the unit houses the forward reverse dog clutch on the shaft at the top.
R

-
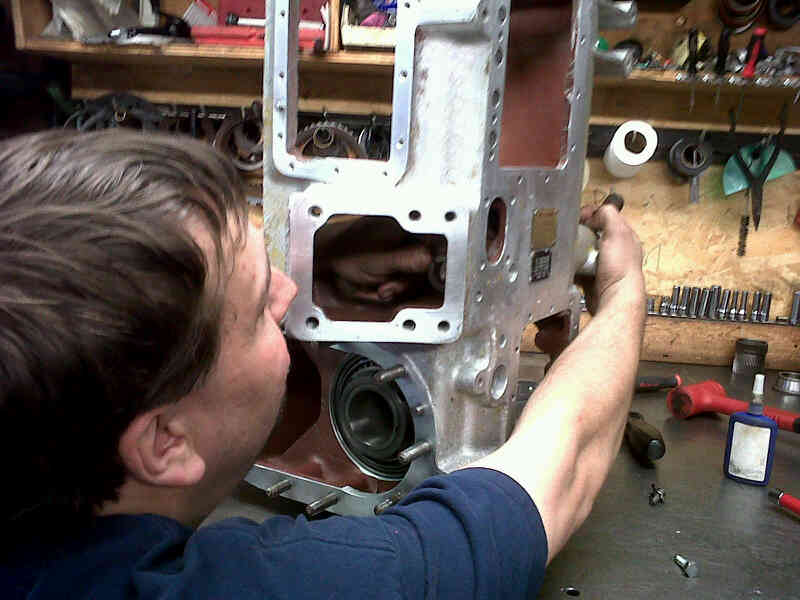
This next unit nearly brought us to a standstill.
The socket head cap screws that hold it in were very tight coming off and had been reused in a previous rebuild by 202 RCEME workshops in 1978 as per the rebuild tag.
They were used at that point and the socket part was abused and after Tommy got them apart they were junk. I was tasked with buying new ones, simple enough job, one would think. Well, when we tried to install them we found the heads were too big to get into the countersunk bores so luckily Tommy has a lathe in the shop so he spun these up and brought them down to size.
R


-
We have had to replace one bearing which was sourced locally. The internal O ring between the transfer case and the gearbox was not available from Bannisters so we sourced that locally, The seals all came from Bannisters. Richard was very quick in sending those out to us and for reasonable money.
R
-
These pictures may not quite be in the right order but anyhow, on we go.
The two side units were then built up using more green goo and kind of orange Permatex sealing goo. Somehow I got all the icky gooey jobs and Tommy got the finger pinching ones, trust me, he did pinch his finger later on and it hurt him.
Here are a couple of more shots. Note we have bought quantities of internal star washers and copper sealing washers for the rebuild. There is no point using knackered fasteners and having things leak, it only cheapens the job.
There are likely far more technical names than "whotsit and side unit" but if you have one apart you know what they are! I'm a bit brain dead this morning, but you get the drift.
R

-
The shaft for the gear change pedal caused us some grief as we made the mistake of not looking at things a bit more closely but once we install the bolts that secure the shaft and found that it would actuate we worked out that the bolt was too long and had bottomed out on the shaft after it had passed through the bushing that it also holds, adding a washer after measuring with a vernier sorted the problem.
Here is Tommy with one hand in one side and the other outstretched to the outside wiggling things in.
R
-
This past weekend saw a big push to get the gearbox assembled and out of Tommys shop and back to my work for storage.
We started with the main housing and the centre round thingy that slides in the middle. Tommy has this wonderful green goo that is some kind of gearbox assembly goo that has some very interesting properties, it sticks like clay at normal room temperature but upon warming it is soluble in any gearbox oil and does not harm in way. We used this and a fine machine oil as the two main lubes when putting things together.
Here goes the centre thingy wotsit.


-
I have nothing to add on manuals for this except to say I have wanted to get one for the collection for quite a while but it apparently isn't a priority. I think they look to be a great piece of kit and for anyone with a few vehicles well worth having.
Frankly I am jealous
R
-
Mike,
easy identification, scrap.
R
-
Mark and crew,
that looks like nothing but bull work doing the track pads on the ARRV.
what is Debs to you? the mrs / gf?
Funnily I was watching the video having read the description and was thinking that the engine was hydraulically locked before I saw the footage, then read your later posts and was amazed that I was right.
The symptom of how it just about stalled the ARRV was the clue, it was either mechanically locked or the engine was hydrauliced.
I hope you charge a decent hourly rate for your time and the use of the ARRV.
Very interesting that there really isnt much wiggle room for setting up to lift the pack, would have thought that there was much more scope to the crane.
Excellent work
R
-
so what was in those number lots you mention?
R
-
Looks like an early 432 left side drive sprocket shroud / guard.
R


Staghound Range Target recovered in Canada
in MV Chatter
Posted · Edited by robin craig
Since about 1996 or there abouts, the location of a WW2 Staghound hull has been known of by a small number of people.
Even less have seen it.
During the Second World War there were many airfields set up across Canada to train allied pilots to fly. It was all done under the British Commonwealth Air Training Program or BCATP for short.
Since the end of the war the many of the airfields have been closed and the buildings torn down and the runways ripped up.
The hangars were all the same design and used massive British Columbia fir beams, I was involved in building a cottage that used some reclaimed beams. Beautiful timbers.
The location of this vehicle was in the impact area of the Winchester airfield and infact located in a bog. From the end of winter to freeze up the area has about two to three feet of water, a peat like bottom, and willow bushes taller than your head. In winter the bog does ice over in some areas but the ice cant be counted on. The Winchester bog is located south of Ottawa, in Eastern Ontario, Canada.
I was told of the vehicle around 1998 and went looking for myself. I decided that the best way to find it was to look from above. I enlisted the help of a friend of mine who has an Aeronca Champ and flies from an airfield close by. From the pictures of the hull I had been shown the turret was off. From the air it did not take many passes to see a totally man made perfect circle in the swamp vegetation.
Using a nearby track with a dog leg close to the hull I made mental notes as to where it was.
On the ground a while later using that mental image from the air I walked out from the dog leg the 400 yards or so through the willows, fighting each step all the way. By pure dead reckoning and luck I walked right to it the first time. Trust me, navigation in the bog is very difficult as it is featureless with no points of reference.
Since that time many skilled people have attempted to walk out to it using GPS coordinates taken from satellite images. Many of those attempts failed. One could walk within feet of it but never see it.
Over the following years I visited a number of times more to make my own recovery appreciation plan. The location was "top secret" locally as a few undesirables had designs on it. Early on the Canadian War Museum declined any interest in it as too much work would have to be done and they had other projects.
Eventually the Royal Canadian Dragoons showed an interest and worked up a plan to pull it out using heavy assets within the unit. Sadly operational deployments and cut backs and budget restrictions put paid to public assets being used. A local benefactor in the shape of a contractor with big excavation equipment was nurtured and sweet talked into coming on board by the Guild of the RCD. the Guild has some kind of plan for the vehicle.
Over this past winter the recovery was scheduled and two big excavators were deployed to go dig it out and drag it back to terra firma and load it onto a trailer. Sadly I had work commitments that stopped me attending. Those involved in the recovery failed to take pictures at least as far as I have been told.
Today the hull and turret recovered from beside it sit on a trailer in a storage yard pending plans and funds being readied for the next stage of the RCD Guild's plan to do something with it. It is not up for swap or trade I am being told.
I will, over the next few days, post all the pictures I have of it when seen a few weeks after the extraction, sadly taken with a cell phone so the quality is not great.
I have a total of 19 pictures and will post just a few to start.
Regards
Robin