


Masseyboy89
-
Posts
226 -
Joined
-
Last visited
Content Type
Profiles
Forums
Gallery
Blogs
Events
Articles
Store
Downloads
Posts posted by Masseyboy89
-
-
Drivers wing after cluster removal and most of the paint taken off.

A nearly completed passenger wing being offered up for trial fitting before getting paint stripped and tacked up (I will try and take some decent pictures of the process when we do the other side!) The plan worked very well in deed, some bits still require modification, like the large hole drilled to accommodate the 3 wires for the cluster type light that will require welding up.

-
The A2 that kindly donated it's wings...

-
We managed to get a break in the weather a few days ago and got a coat of red oxide on it, when we got the car in paint we agreed that at the very least, the passenger side wing had to go despite our previous efforts to get it straight.
After a lot of head scratching this morning we cut the wing, and instead of fabricating a new one from scratch decided to start with a reasonable A2 front wing from a scrap vehicle.
-
Looking good!
-
A much needed visit from the mutt fairy...

...Who was also kind enough to bring us the remnants of 2 A1 engines to build up to replace the much later AMG built A2 take out it was previously sporting.

-
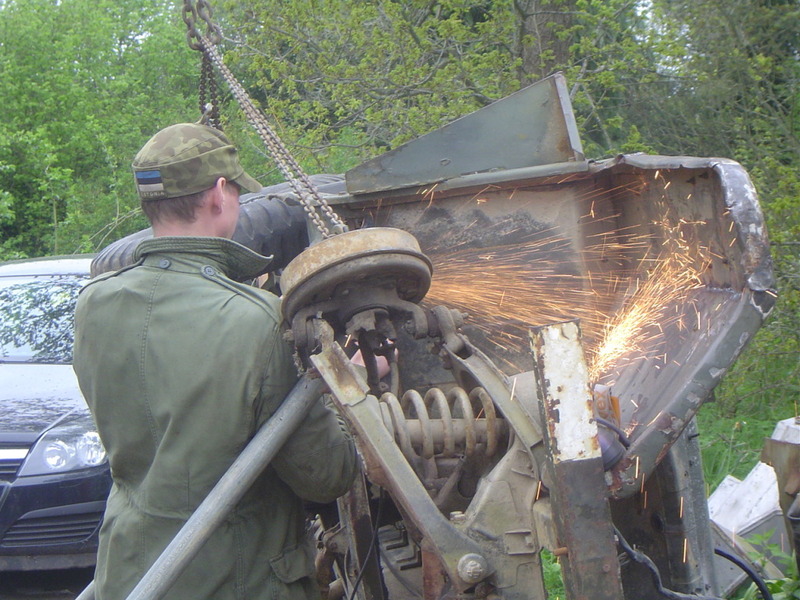
More repairs..
bumper making a handy anvil..


2 new pieces of sill, folded and welded together


Curve, cut, bent and welded.

welded in place both sides, waiting for out side welds to get tidied up

Repair complete and almost invisible, we will use a smear of filler later on, just to hide it completely

-
I found a few more pictures that I was missing

cutting the outriggers
quick coat of green to keep the rust at bay

-
A cracking restoration, champ camp really was something special this year. I can't see us seeing more than that all in one place again any time soon!
-
Thanks for the reply, it still has RAF roundals visible, it also has something like 'not suitable for road use - training aid only' on the side, would it have been for sling practice? mechanically it is very good, like it has seen little use.
-
welcome!
-
Just had a look through your resto thread, great stuff, I'll watch with interest.
Nearly forgot, welcome to the forum :thumbsup:
-
Awesome work. I nearly fell off my chair in awe of that NOS front axle :wow: It's looking really smart, I love these threads, a picture say a thousand words. keep us posted mate.
-
Welcome! will your stolly be putting in an appearance at the MVT? I hope to make it down there
-
welcome!
-
Welcome! Nice to see another landy fan on the forum! Don't worry, we'll find you a nice truck and/or landrover to buy when you get back home - just tell the wife that HMVF made you do it, having said that... this approach has never worked for me :undecided:
stay safe mate
-
The body underneath looks alot better that the A1C I had:shocked: Must find time to pop down for a few bits and bobs.
It wasn't too bad, most of the welding is now complete and the car is back down on it's wheels. You're more than welcome to visit and take a look around the collection, It will be nice to meet another mutt nut. :nut:
-
Something quite interesting, we removed the fuel tank form the other A1C yesterday, its a 1964 ford built and we found tucked away neatly under the tank a 1964 dated 10 cents! It would be nice to think that it was placed there during manufacture.
-
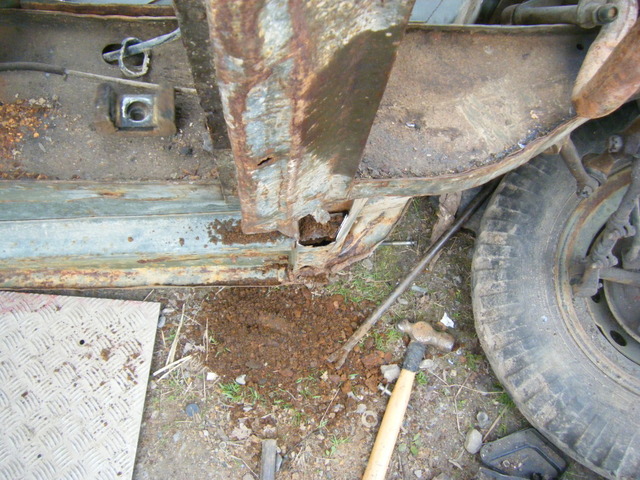
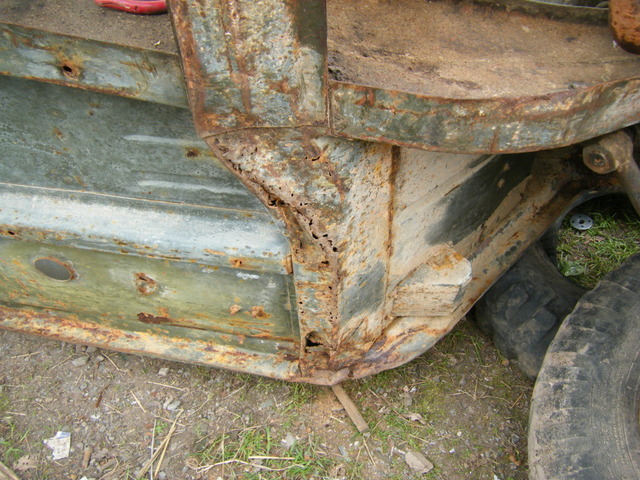
Any dubious areas removed.


Complete, all its needs now is the drain holes drilling.

Cutting out the rot.
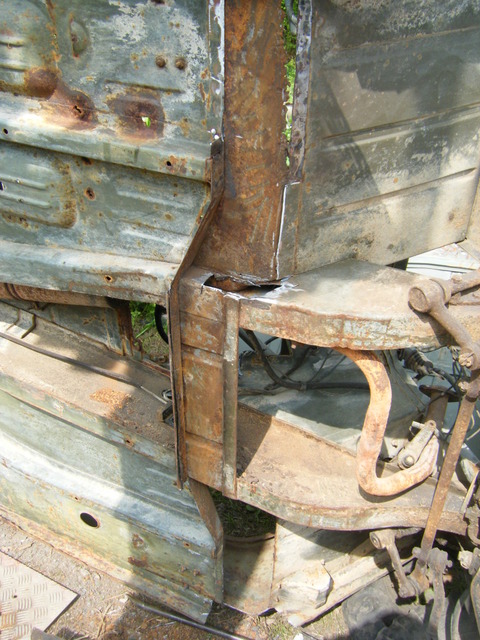
repairing the passenger outrigger.

-
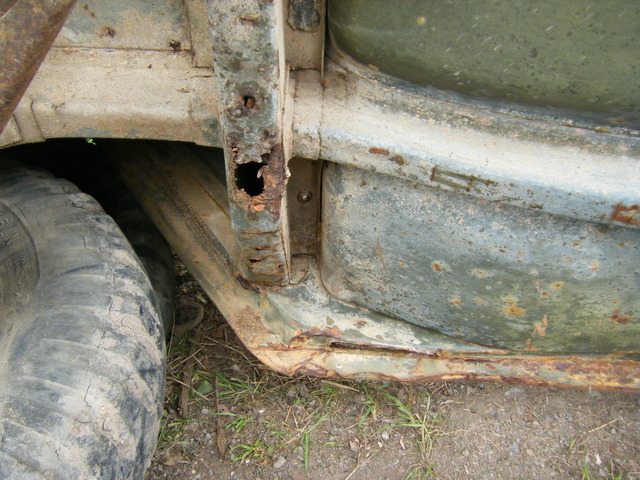
When we cut the rust away, we were left of plate of rust and mud underneath...
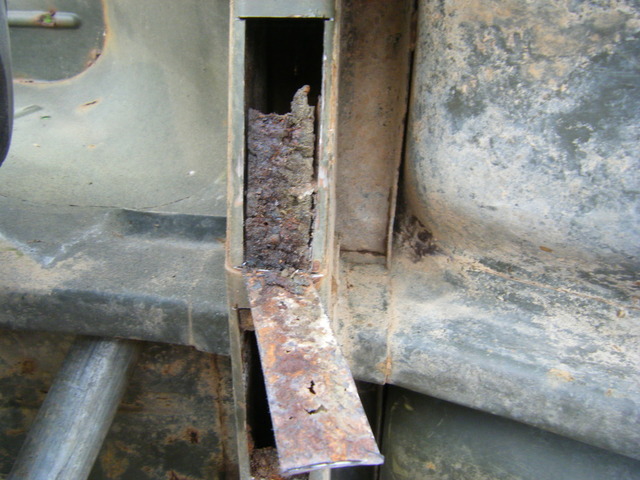
The rust in the out riggers and gearbox crossmember...

-
Over she goes...

both out riggers were rotten

and the rear chassis rail
-
Be carefull driving it without weight in the back mine was intresting as the A1C's have double springs on the back. They do ride VERY nice with the gun in the back the wife still moans that it was the best/most comfortable vehicle we have ever had for driving round Beltring.:-(
they are great, Ive driven around quite a few variants of mutts now but the A1C has the most outrageous positive camber I have ever seen! :shocked: This one has double springs, I will be putting TOW hardware into this jeep as it spent the majority of its life retro fitted with this system, in place of the RR. if you fancy getting back into A1C ownership, I will be selling my other one to fund this project later on in the year... :cool2:
-
Hi all,
Finally found time for a project I have been threatening to start for about a year now.
Here are a couple of snaps of what we started with.


.....you can tell it's a A1, because of the flat top front wings :wow:
-
Good idea to know where the marks are on your collection, can save a lot of embarresment
Luckily, I only have a MK3 sten right now, so it's easy to keep on top of.. :-D
thanks for the info mate, Simon.
-
Hi all,
I am looking at buying an RPD, my question, which I dare say is a stupid one is this -
I looked at a RPD at dallas dig out, the reason I didn't buy the gun was because it was a 'cut a way' How ever, this gun cocked and dry fired - I was told that it was a resent deactivation? I thought that the current spec deactivation ment you couldn't do a lot more then hang it on the wall, do machine guns have a different deactivation method that allows it to cock? obviously I would like one I could dry fire, but I also want to be on the right side of the law.
should I always expect a new spec RPD always dry fire?
Thanks.


1969 Ford M151 A1C mutt restoration
in Blogs of MV restorations
Posted
Thanks Snapper,
work on the A1C has halted a little, while we focused our efforts on getting my A2 on the road, it passed its mot on Friday which was quite rewarding. :-D
the wings on the A1C are now complete, and with the good weather we have experienced I was able to clean the car back and get it painted.
next job is renewing brake master cylinder, all slave cylinders and brake shoes with NOS and making copper brake lines for it.
It has been pushed outside for a few weeks to make way for another project, while we wait for the brake components to arrive.