


.png.13c2ec34f1c53365a25f5885333b02b8.png)
johann morris
-
Posts
602 -
Joined
-
Last visited
-
Days Won
33
Content Type
Profiles
Forums
Gallery
Blogs
Events
Articles
Store
Downloads
Posts posted by johann morris
-
-
-
I received my copy yesterday and although I have only had time for a quick shifty, it looks really interesting. Ordering it was easy and the delivery was very efficient.
Many thanks,
Jon
-
An interesting book but silly question, where can we buy a copy?
Jon
-
I don't do facebook, I tried it once but I really don't see the attraction, there again, I only post on here and MLU and really only use the internet for buying stuff and research. I may be alone but in reality my projects are for my own interest and enjoyment and many I have never put on the net. Are there really many people out there that are interested in what we are doing, personally I am flattered when I get a response to my posts but I wouldn't stop doing the project if I didn't. There are some incredibly talented people on here and I really enjoy reading their posts but facebook appears to be populated by those who have a lot to say but very little to offer.
As for my project, I am still making the components for the track links, all 4140 components and it's testing my patience's, so why would I inflict that pain on the forum, as soon as there's any real progress I will be posting again.
Jon
-
 4
4
-
-
Nice project I look forward to further updates. What's facebook?
Jon
-
2
-
 2
2
-
-
21 hours ago, Gordon_M said:
Good to hear. It's not like you will be driving it hundreds of miles, after all.
It does look like the sort of thing you could make as a Malleable Iron blank and then drill twice tho'
I think that I have mentioned this before but If I haven't. There is a good book, well at least I think so, published in 1944

It answers lots of questions including that regarding the use of cast iron
 12 hours ago, ltwtbarmy said:
Why won’t it work? You’ve built a tank FFS! Keep going, you are an inspiration. Now this really is stuff to emulate. Sheer determination, hard work, know how…….just keep doing what you’ve been doing all along, and if you don’t manage to give yourself a pat on the back when you’re done, send me your address, and I’ll fly over, pat you on the back, drool on your tank, and then take to your favourite pub, and buy you as many beers as you can drink.
Thanks for your support, if I didn't think that It would have a chance of success I wouldn't be doing it but I am quietly confident that it will, at least for the limited use that it will get.
7 hours ago, rewdco said:Fantastic thread! Love it!
Nice of you to say so, I am certainly enjoying the project. I would have taken some more pictures but my camera has given up the ghost.
Jon
-
5
-
-
Evening All,
Sorry that i haven't been posting but I have been busy on other things. I have looked at several other types of track links but I can't find anything suitable and I can't afford to have a set made, so I am make a set. I know, it won't work, I am wasting my time, I have heard it all but that is what I am doing.
I have made 5 part links, they are not pretty but then they are only first samples, to see how things will work.

The first and obvious lesson was that if I am to make the 216 + spares I need to automate the process some what.
So i have bought a capstan to make the spacers, and a cnc milling machine to drill the holes in the link bars. Both machines are obviously old and needed some love and care before I started but they now work. It's like going back to the eighties when I started life as an engineer and very enjoyable but to be honest these machines are for my work life. I haven't programmed a machine for 34 years but it's surprising how easy it all comes flooding back.


Getting the machines is only the start of things. The CNC came without any guards so they had to be made and then a drilling jig had to be made so that 4 sets of link bars can be drilled in one operation. The capstan was used and abused so needed stripping before I could even start to organise things.


I tried bending the link bars with a manual press but it would take me ages to do the 920 required so I have made some very basic press jigs and modified my press by adding a air over hydraulic ram and hydraulic ejection fed from a hydraulic power pack that someone had thrown out as it didn't work.

And then there's the welding, a very simple jig for the main frame but the jig for the horns is yet to be made.

From what I have achieved so far, I don't foresee a problem manufacturing the links and I know that they will fit together to form a complete track but how long they will last is another matter but as they say, he who dares........
Jon

-
13
-
-
A gentleman who lives near me has a 4 year old range rover which he is selling because of the enormous increase in his year insurance premium. When he contacted the insurance company, they told him that the increase was due to the vehicles appeal to thieves and the ease that it can be stolen. He is in his 60's and lives in the back end of nowhere, I can't remember the exact figure but it was somewhere around £4000.
Jon
-
That's ok, I thought for a minute that my prayers had been answered.
Evening All,
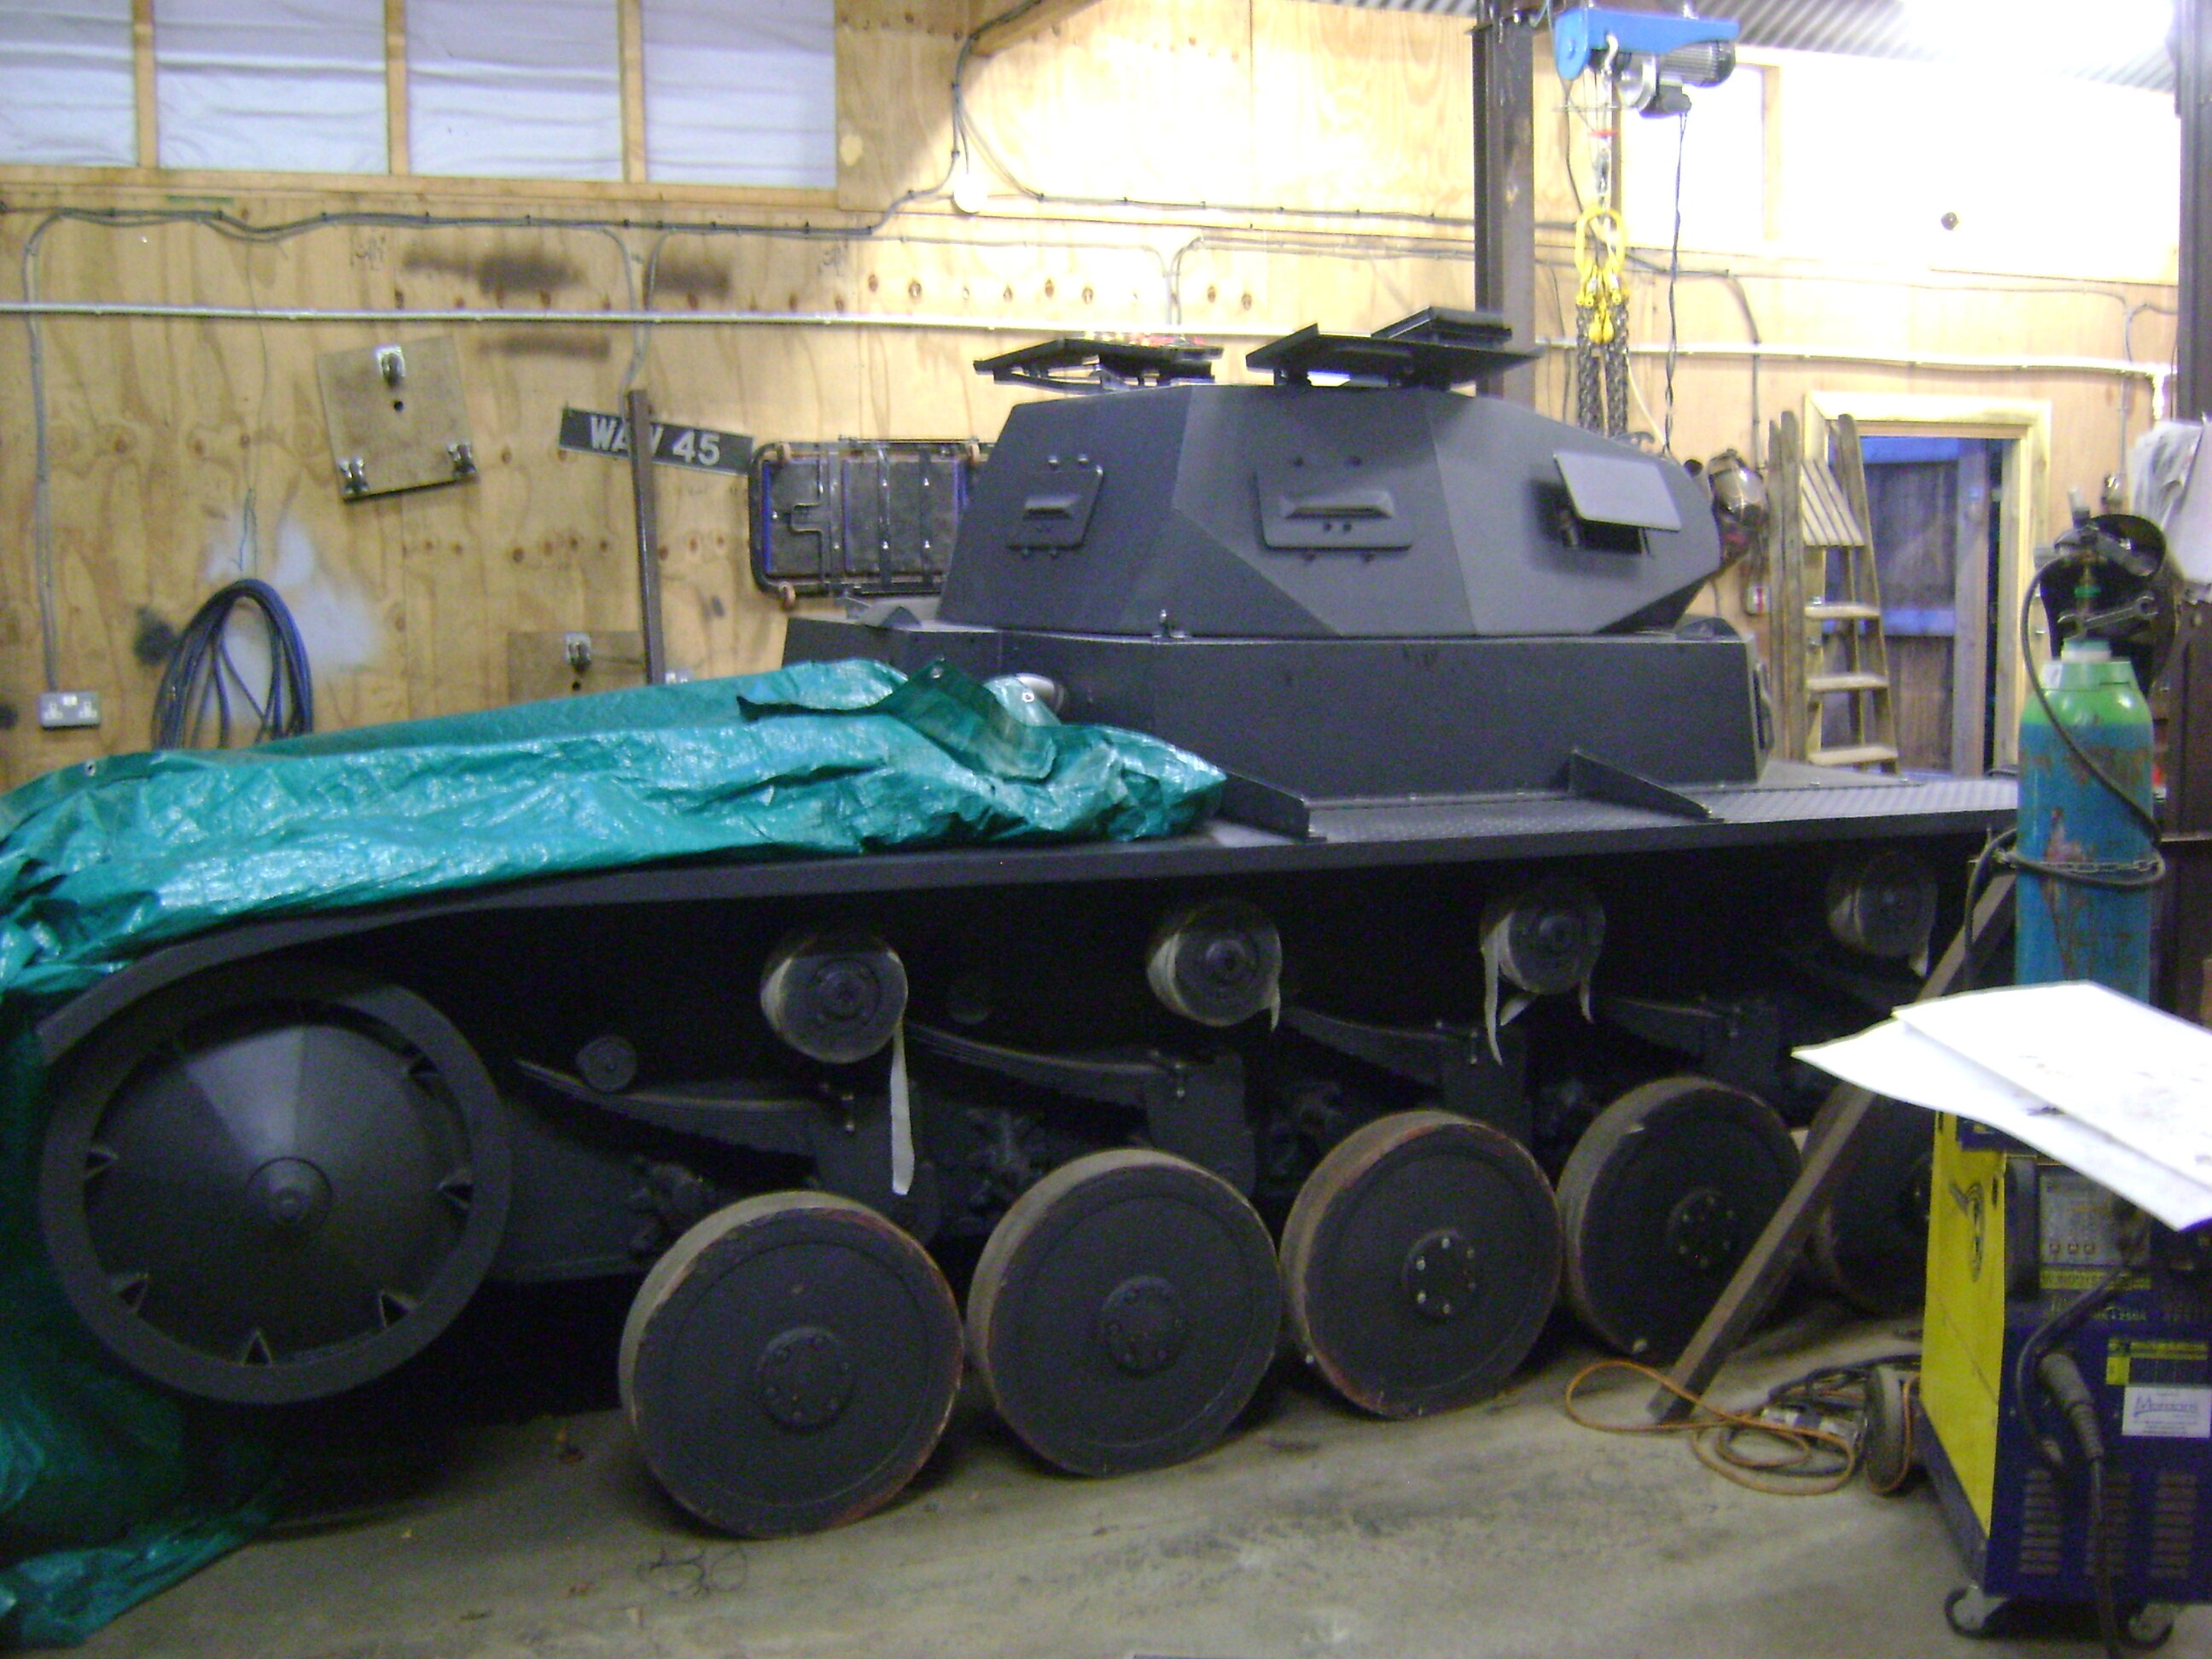
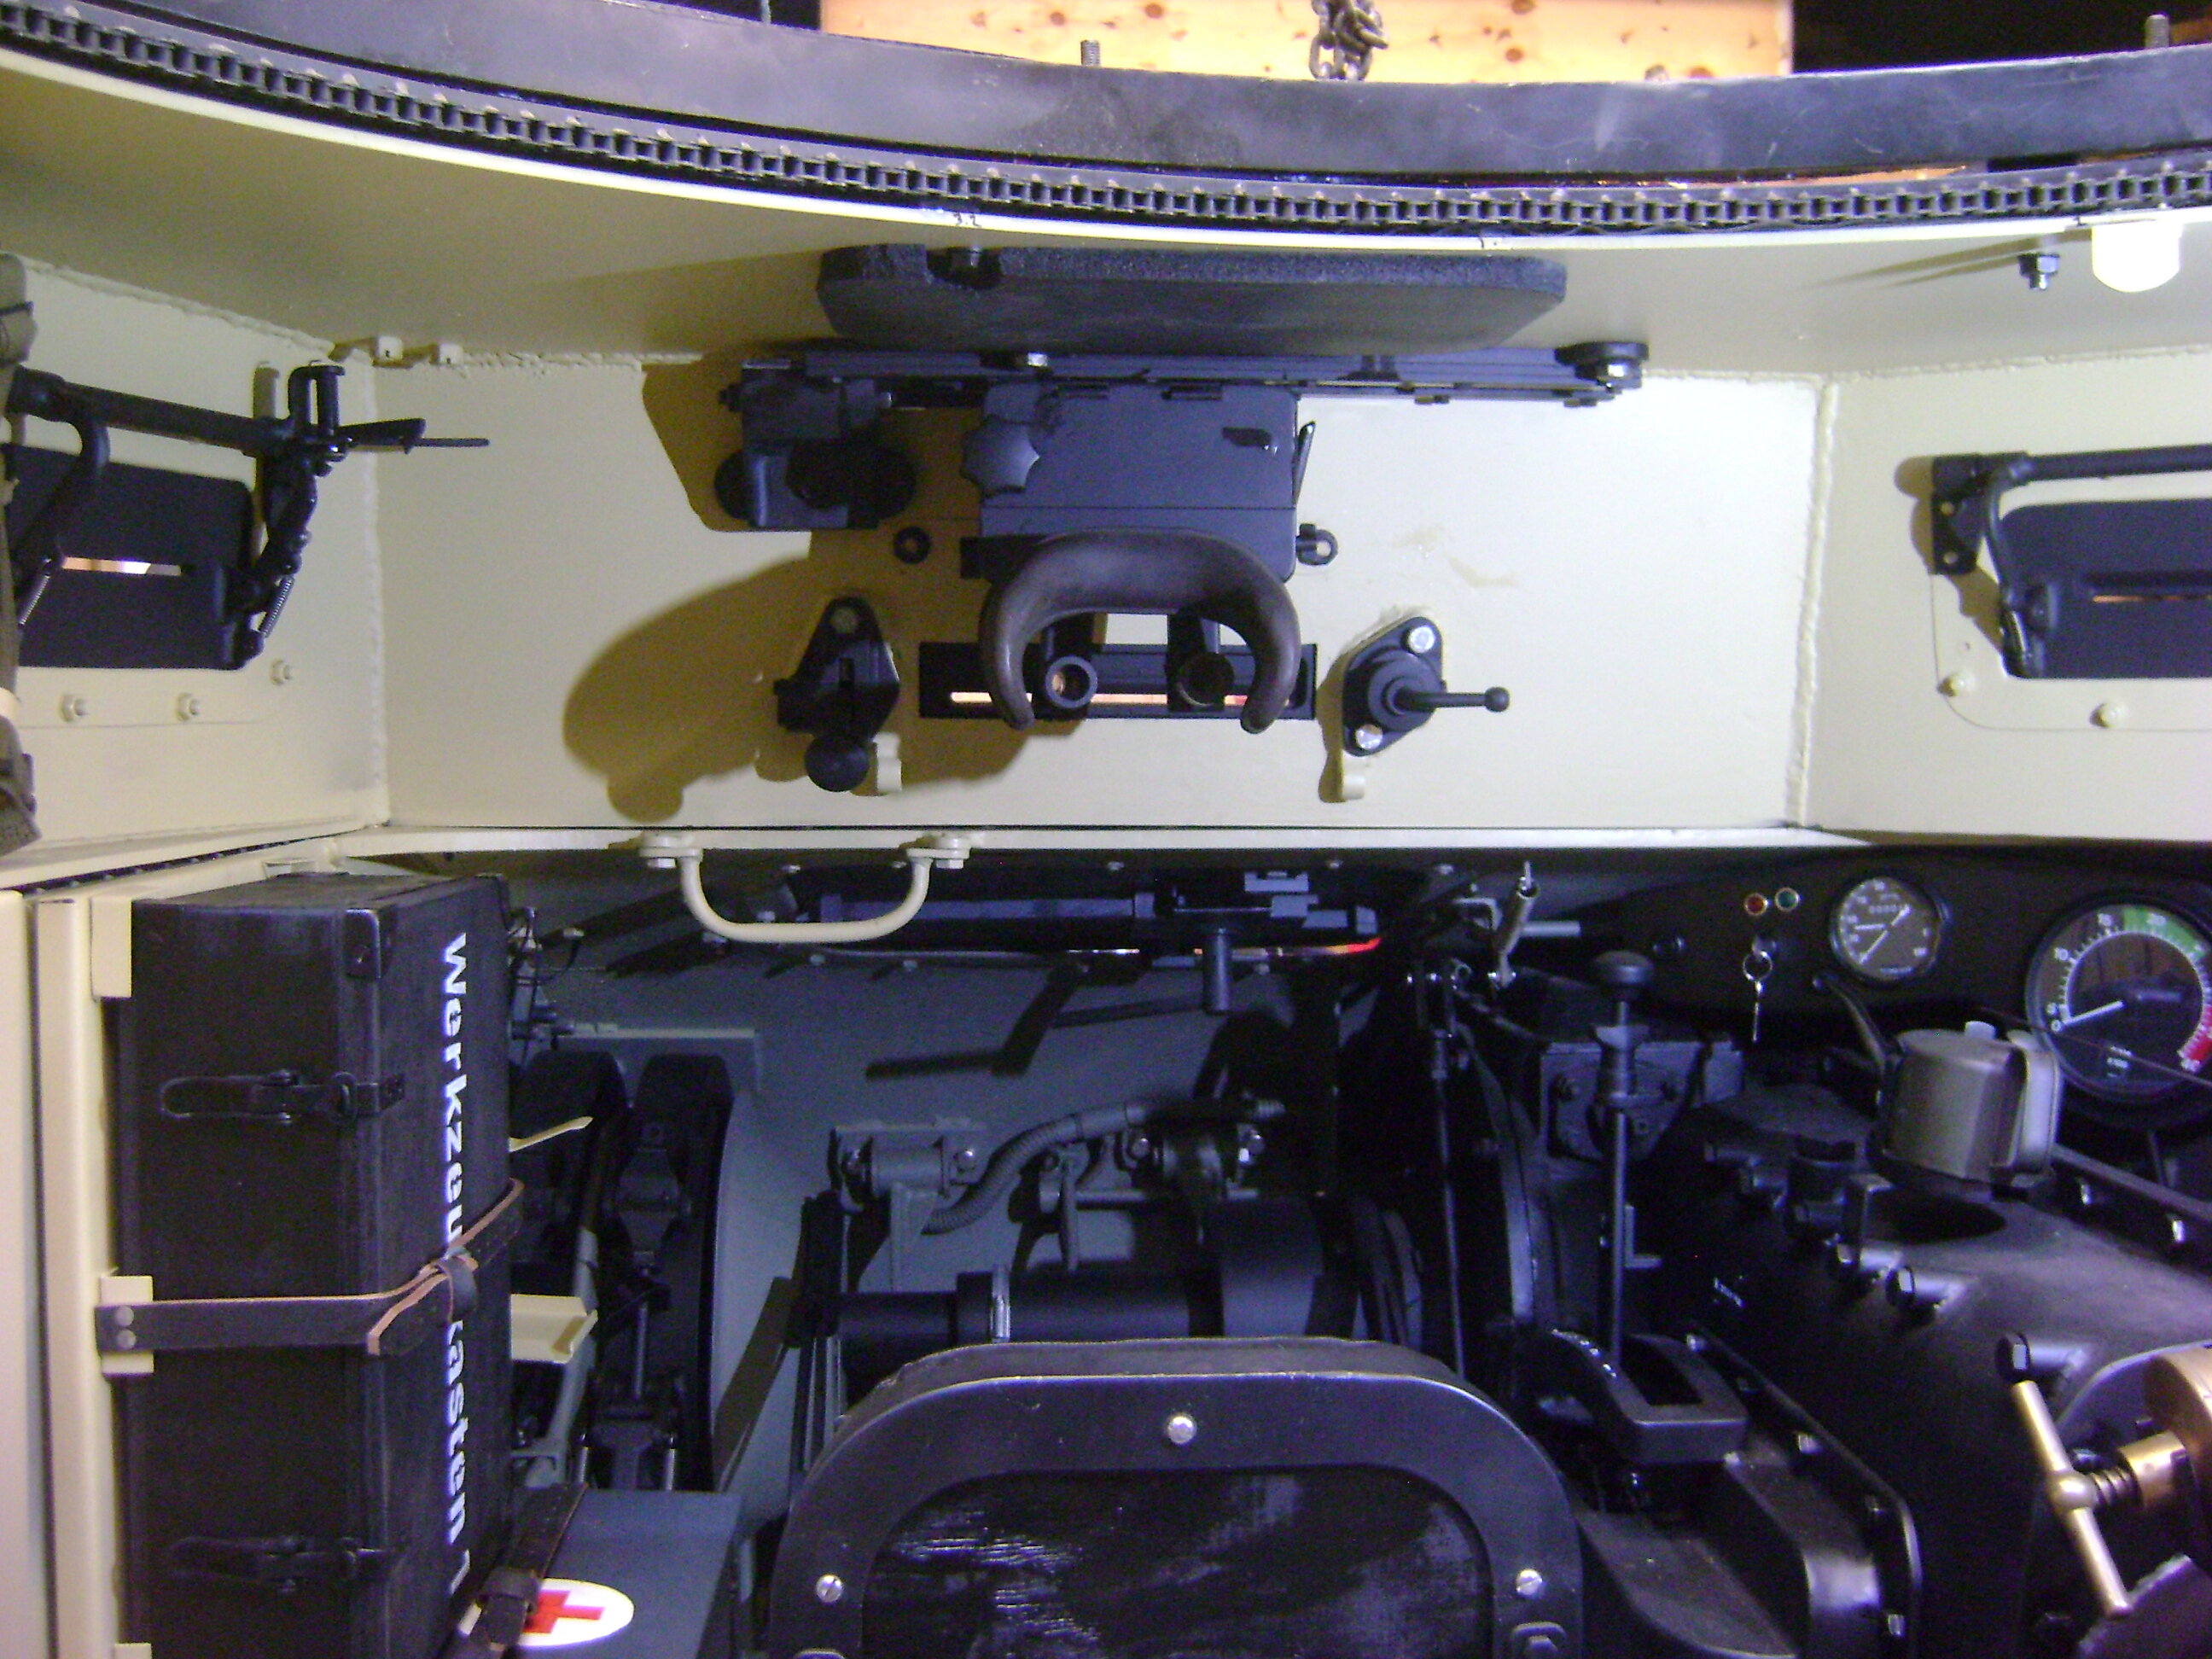
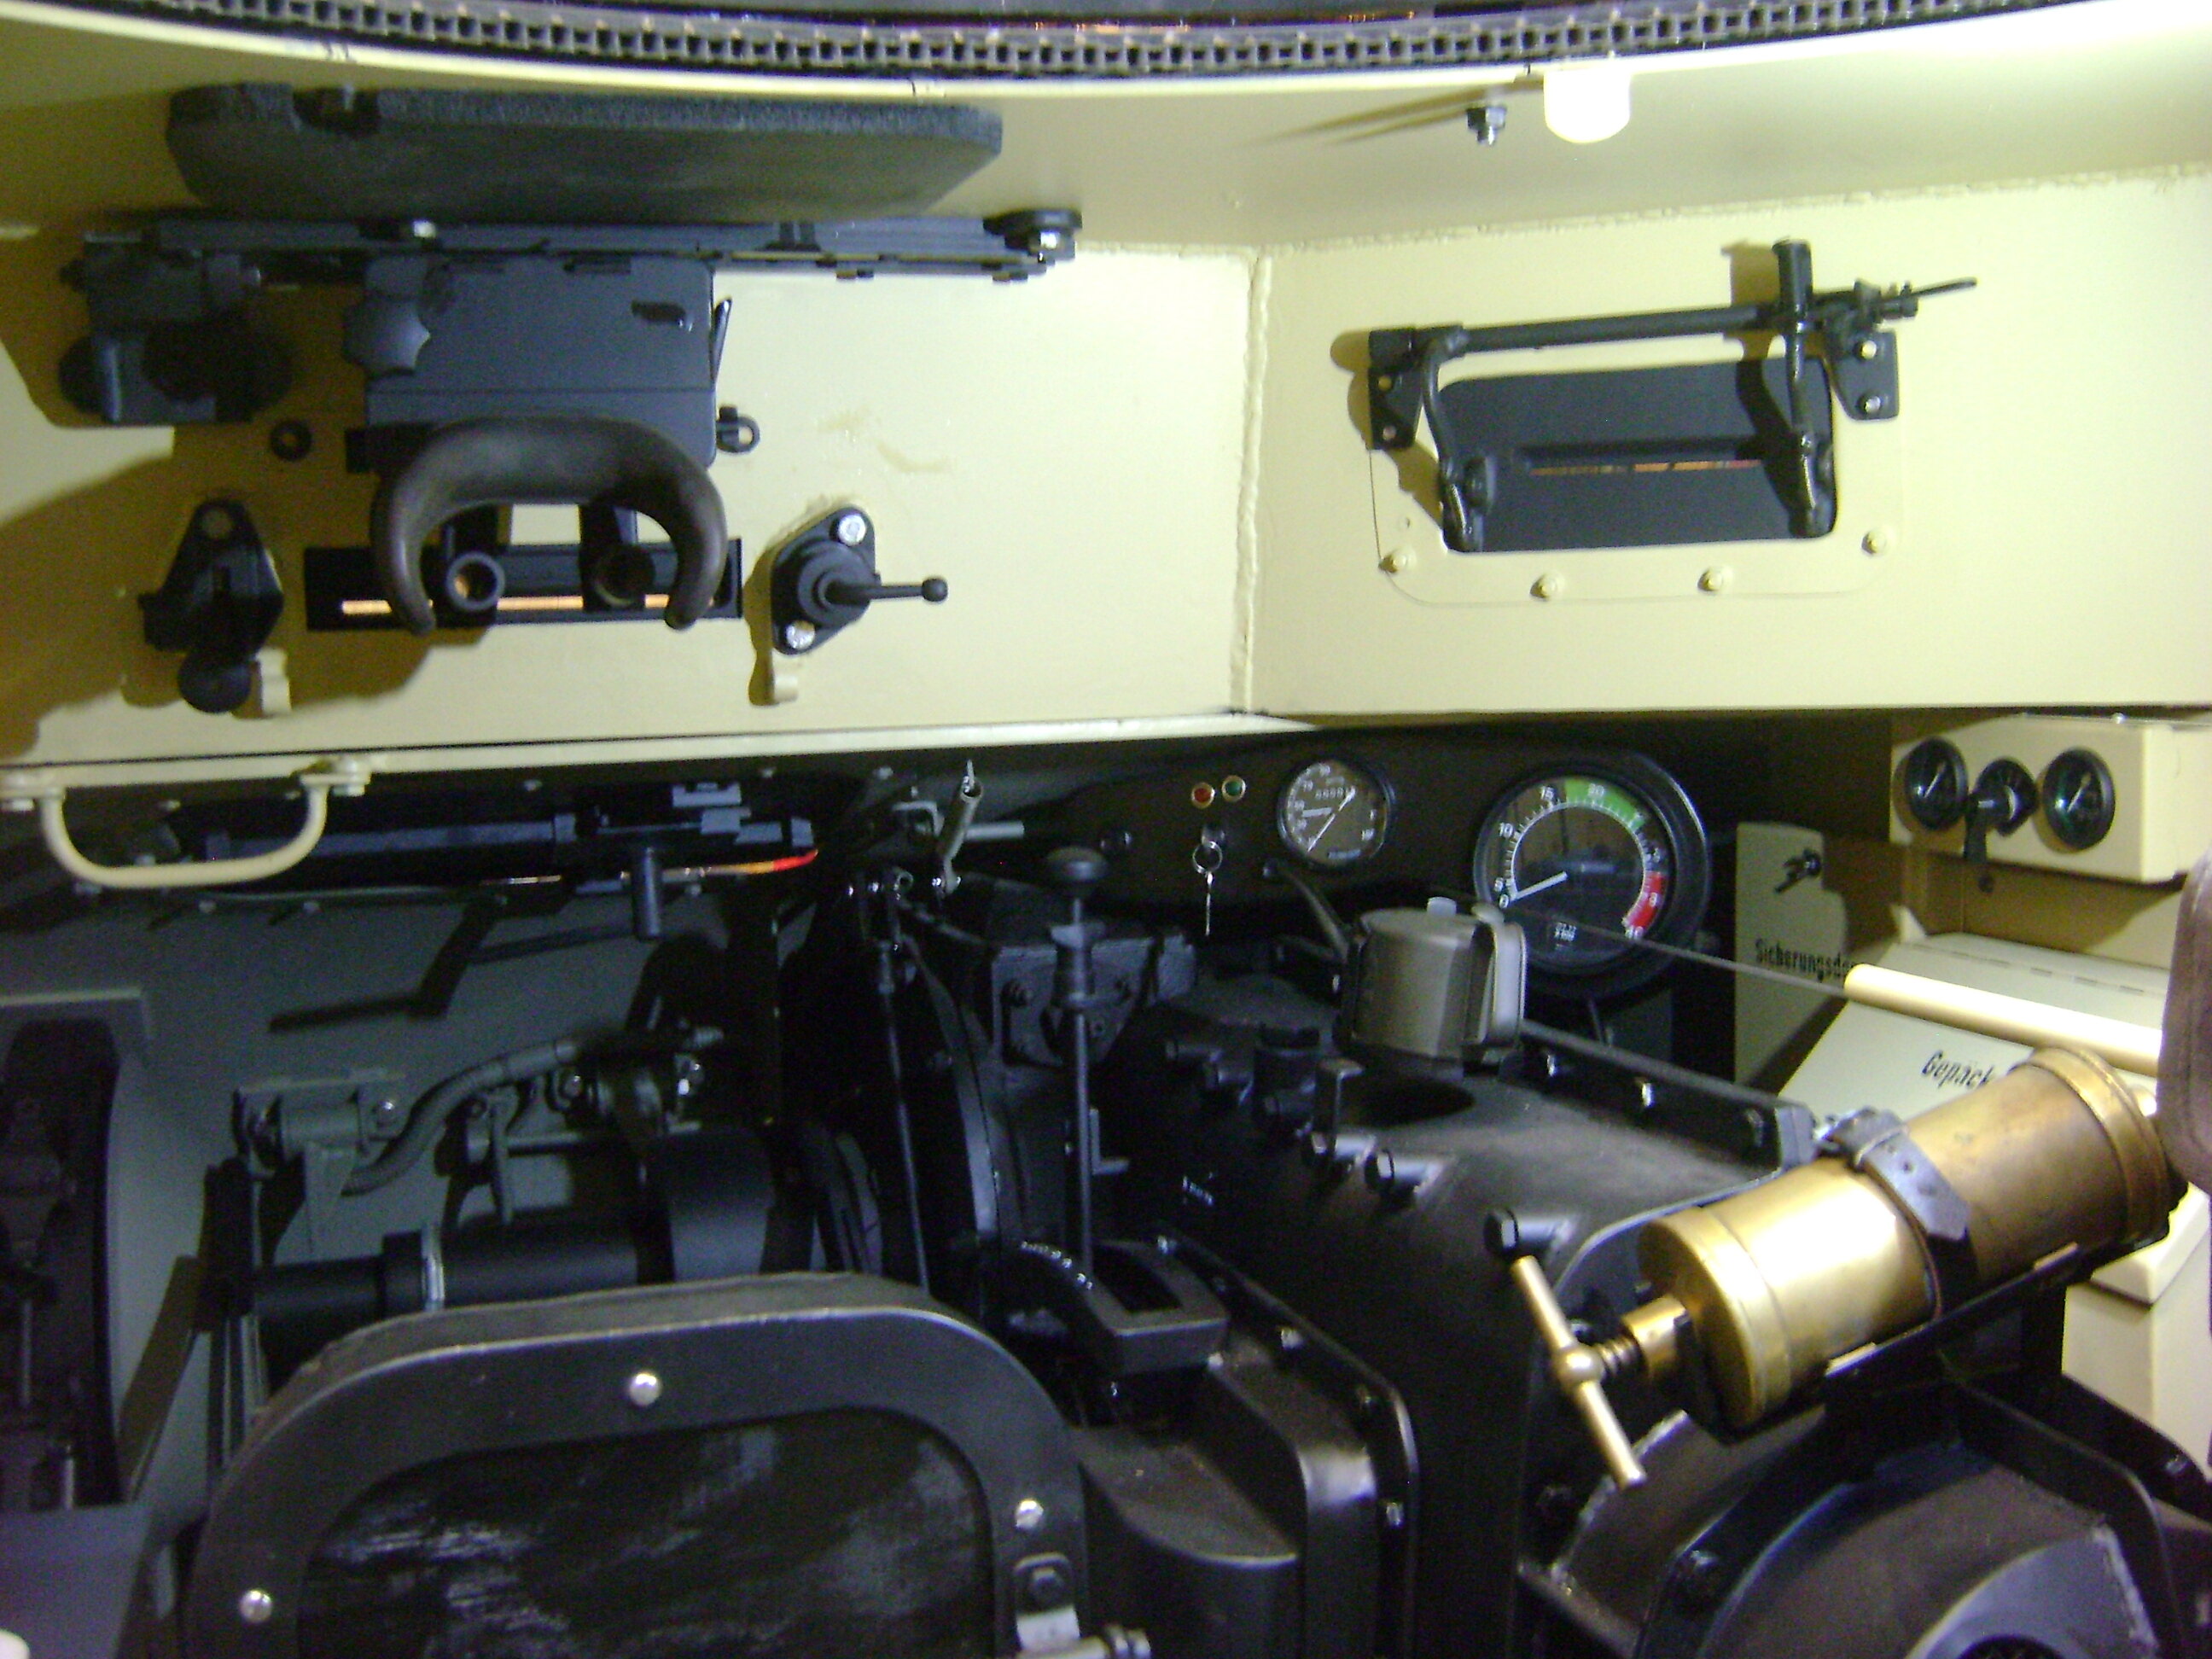
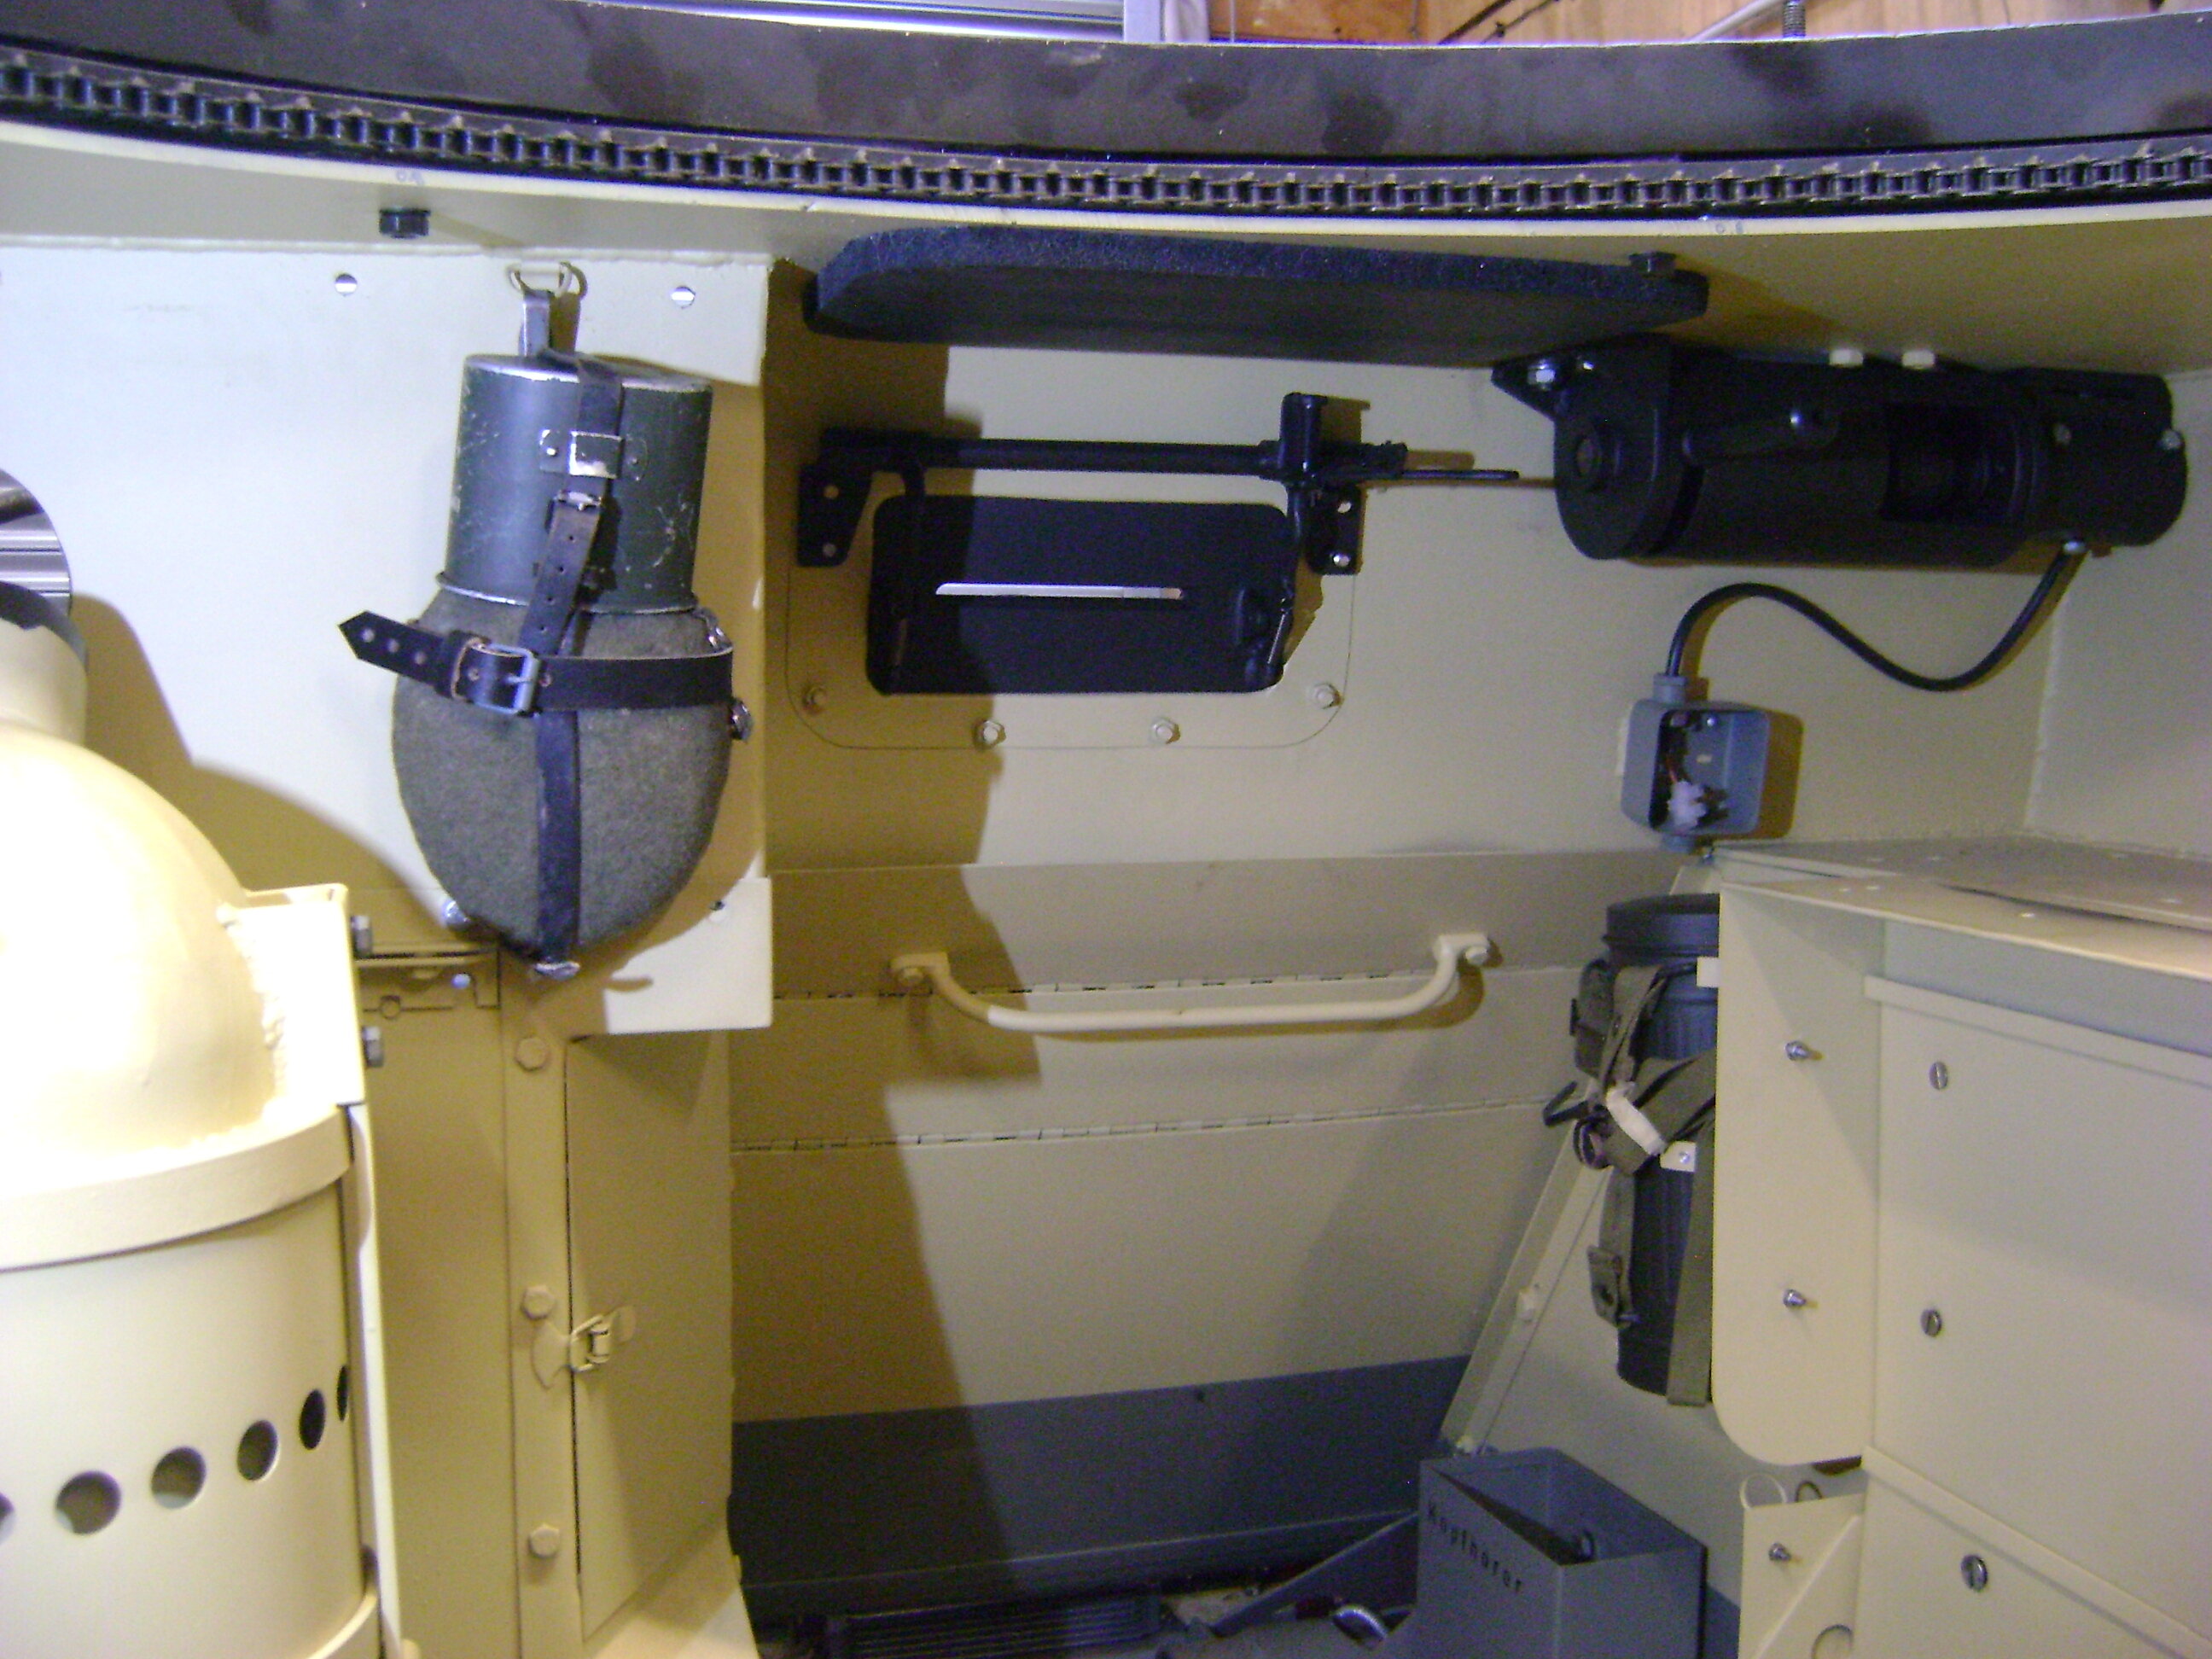
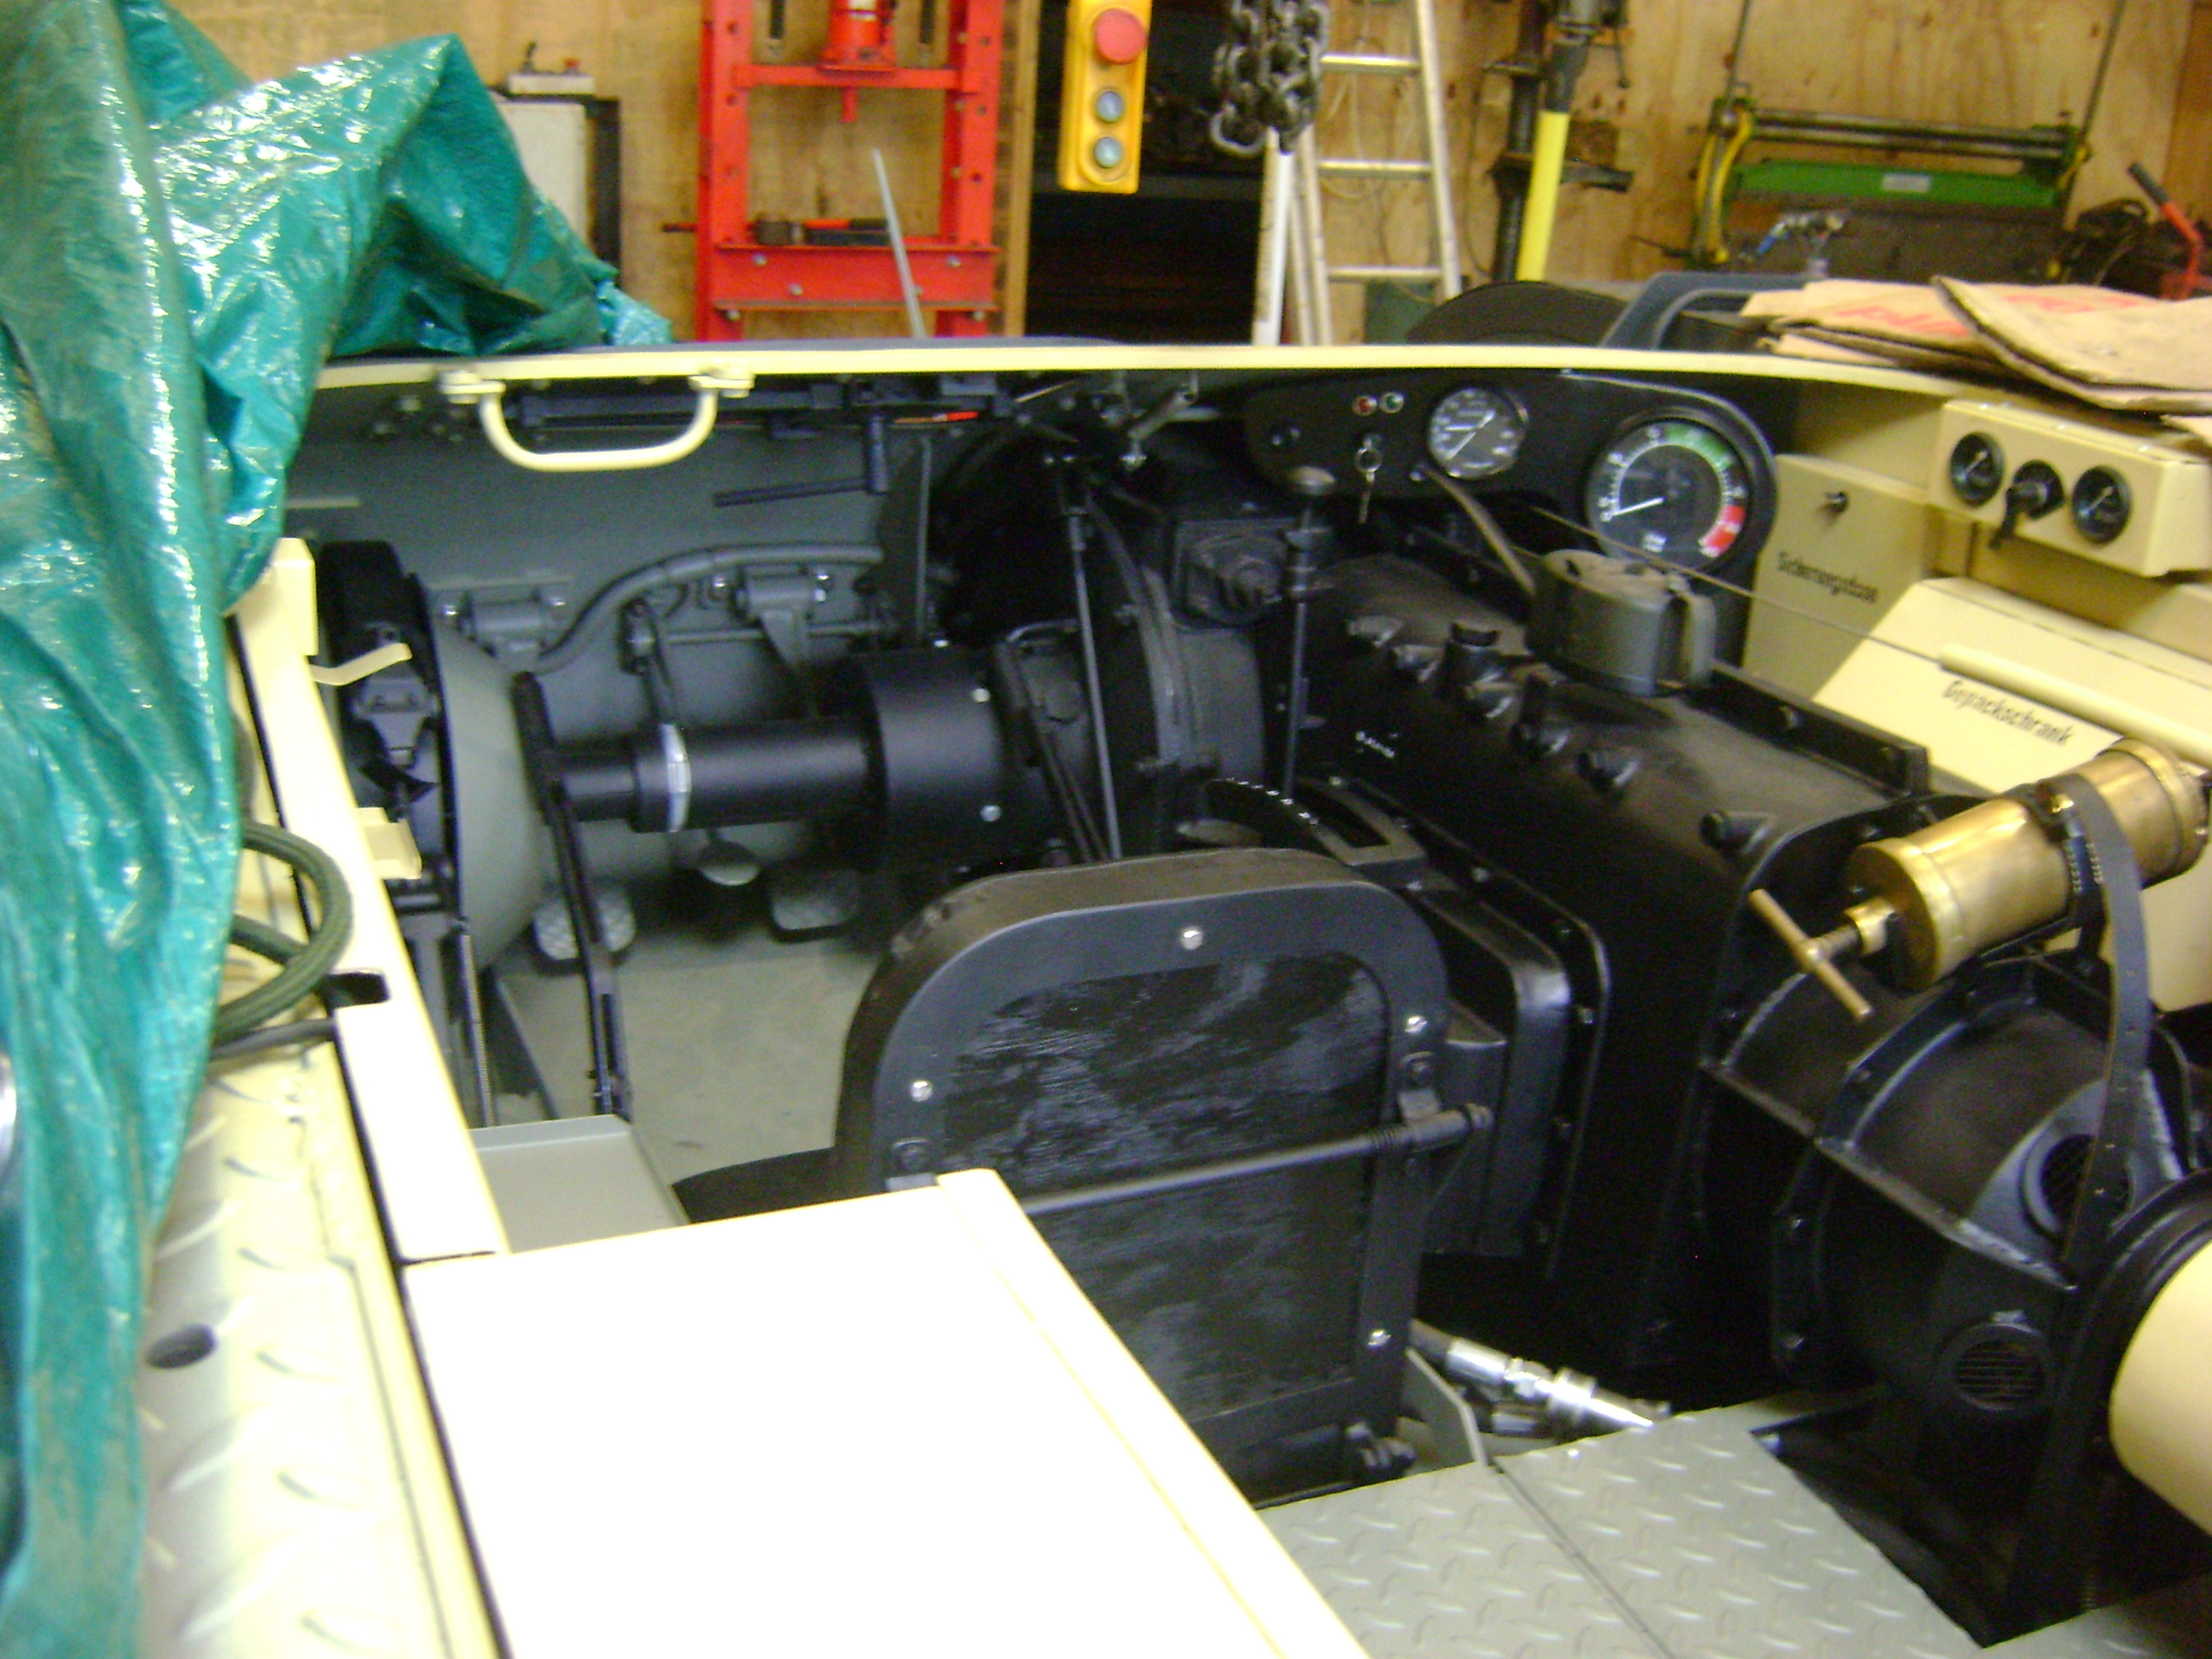
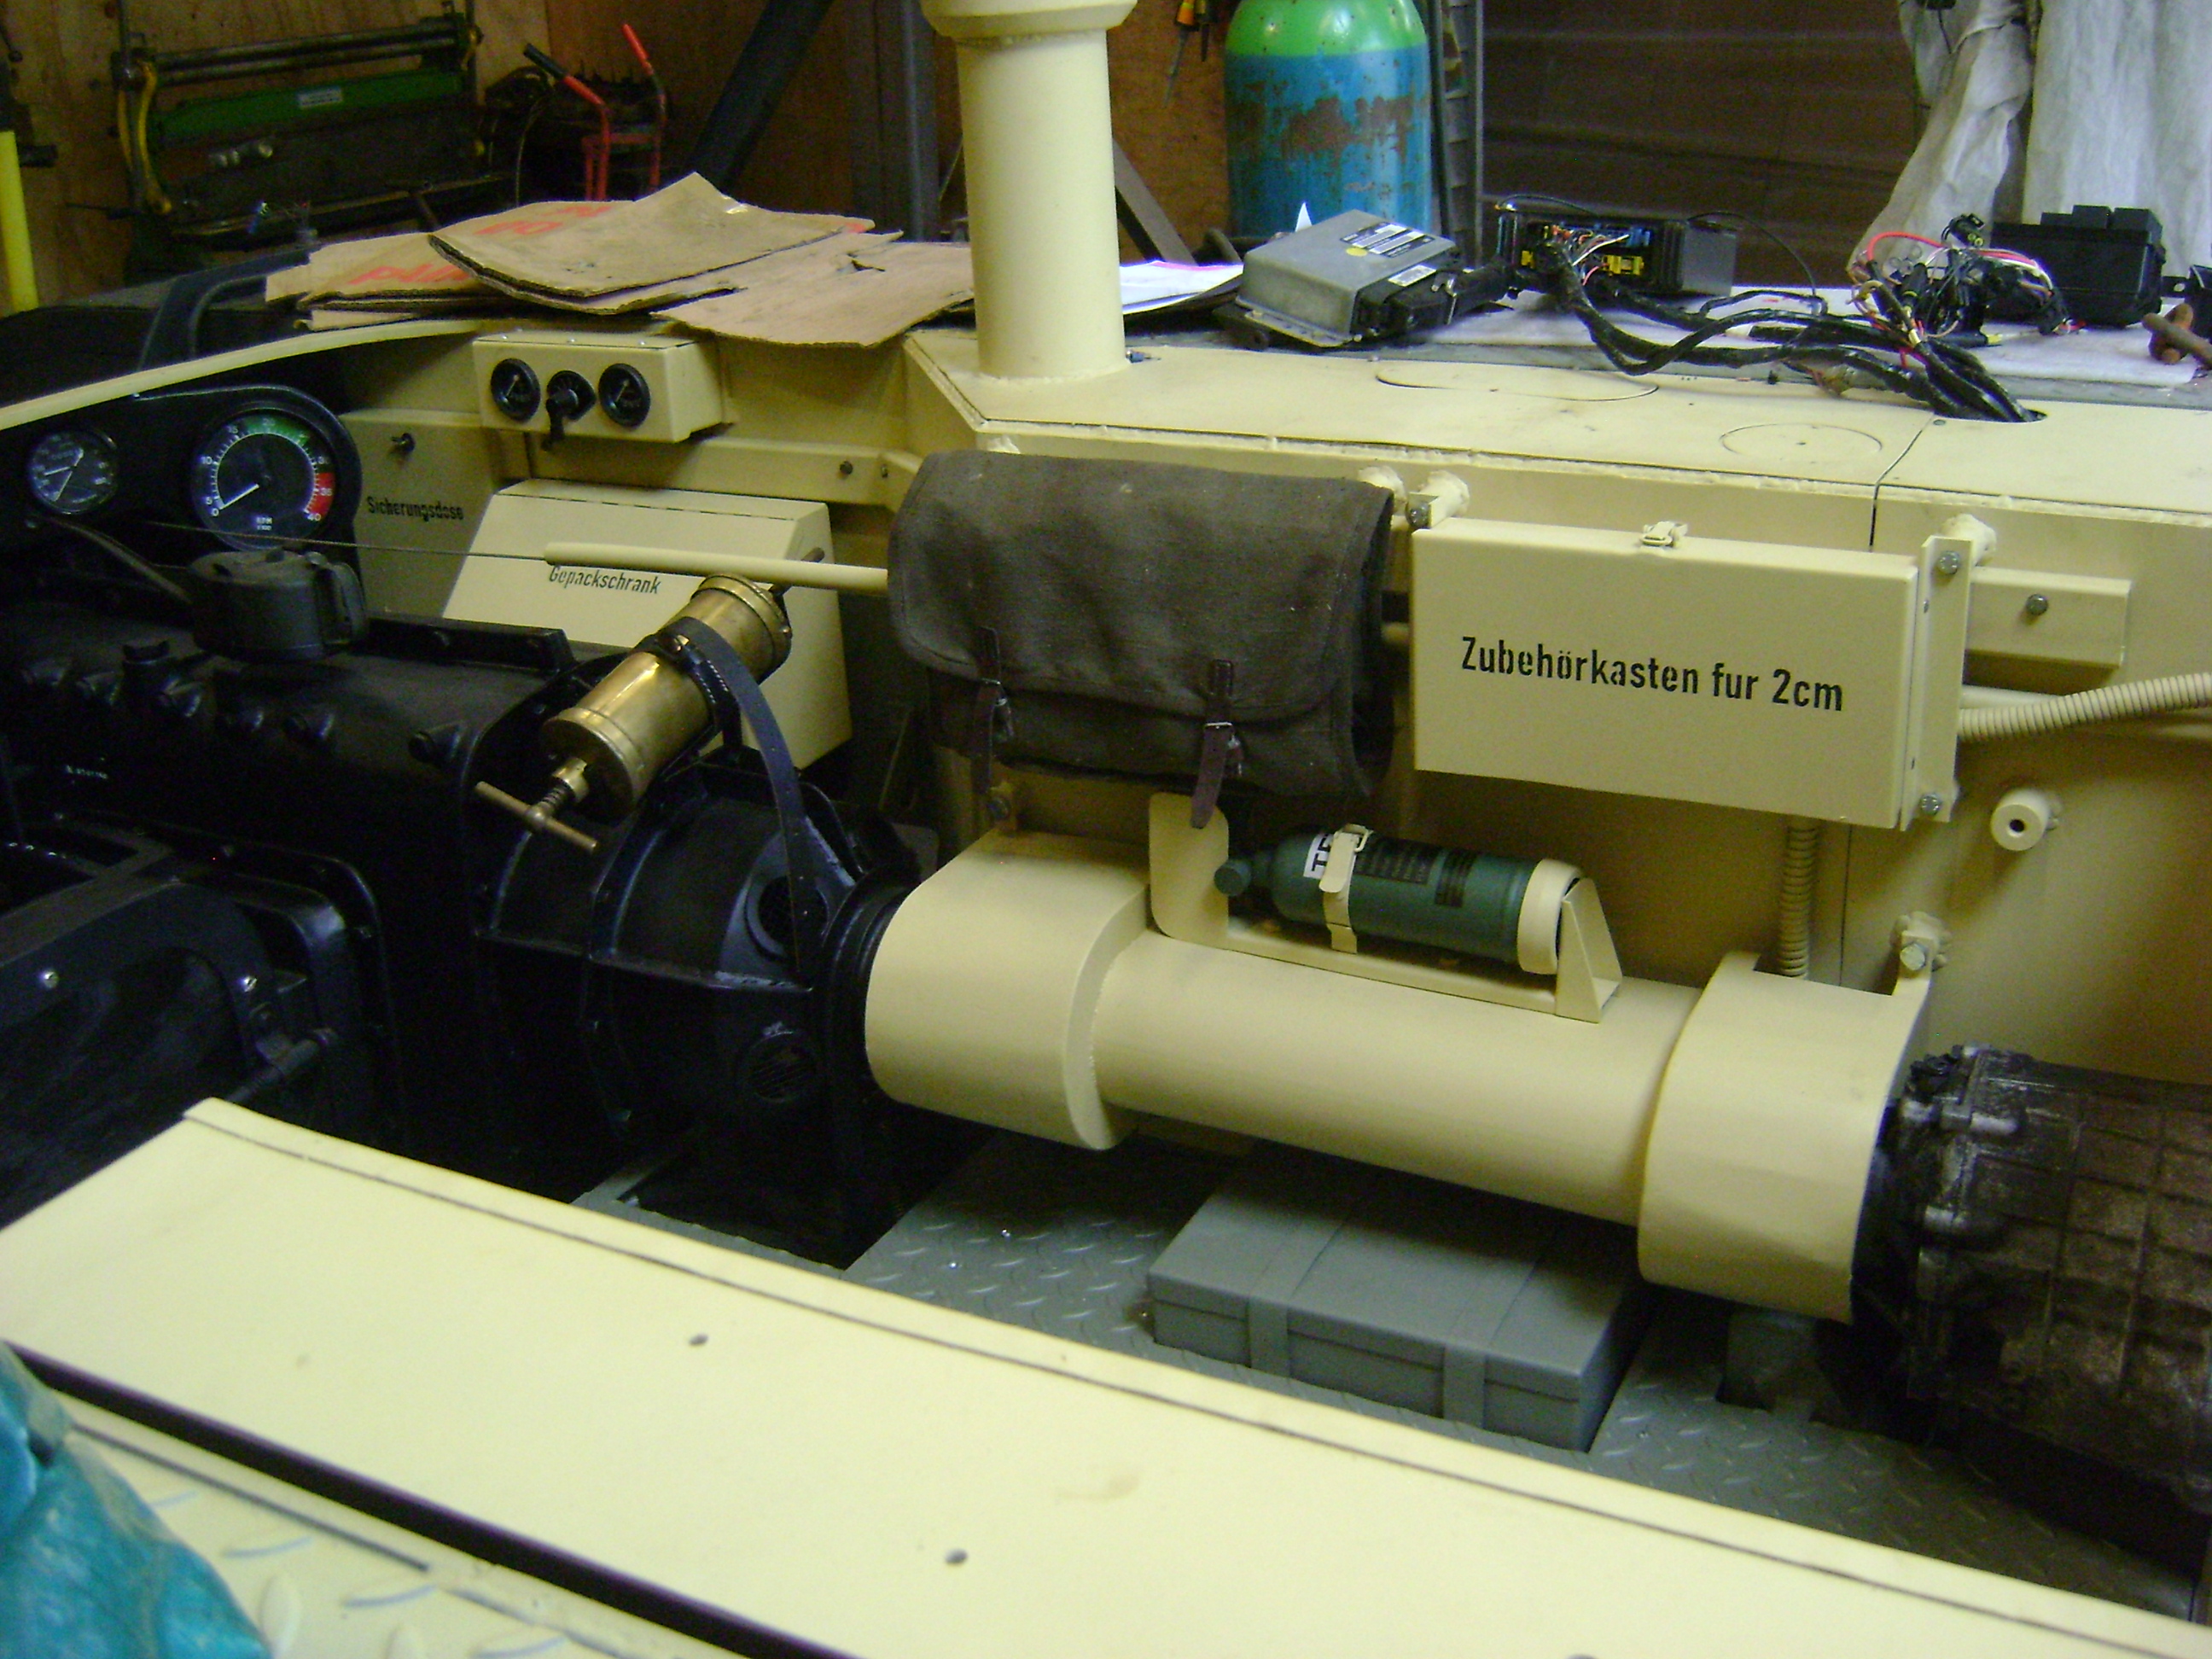
The turrets on


and I have started fitting out the inside, my goodness it's a cramped environment. I think the only thing that they forgot when they designed the tank, was that three men have to fit in, as well as all the equipment.


Sorry for the picture quality, I will try and get some better pictures when it's all fitted out. It's certainly a lot slower doing things with the turret on as I have to keep climbing in and out but it's coming together now.
Jon
-
16
-
-
Where did you see that advertised? I haven't found anything yet that would fit, maybe I am not being imaginative enough. A member of the MLU forum stated that there were loads of tracks about that would fit in the construction industry but when I sent him a Picture he went very quiet.
Jon
-
No sorry, I wish that I had seen the advert sooner but there you go.
Thanks,
Jon
-
Hi Seb,
Have you still got a steering box for sale?
Regards,
jon
-
Evening All,
I can't believe how long it is since I last posted anything, Life has been very busy, obviously not with the tank and a lot of it not very enjoyable but I have still found time to make some progress.
Niels, thanks for information and the link but social media is not a world that I enter into. However just as the project nears completion and on a totally unrelated search, I came across a German web site that has masses of different manuals including most of Panzer II ones but it appears to have disappeared from the internet.
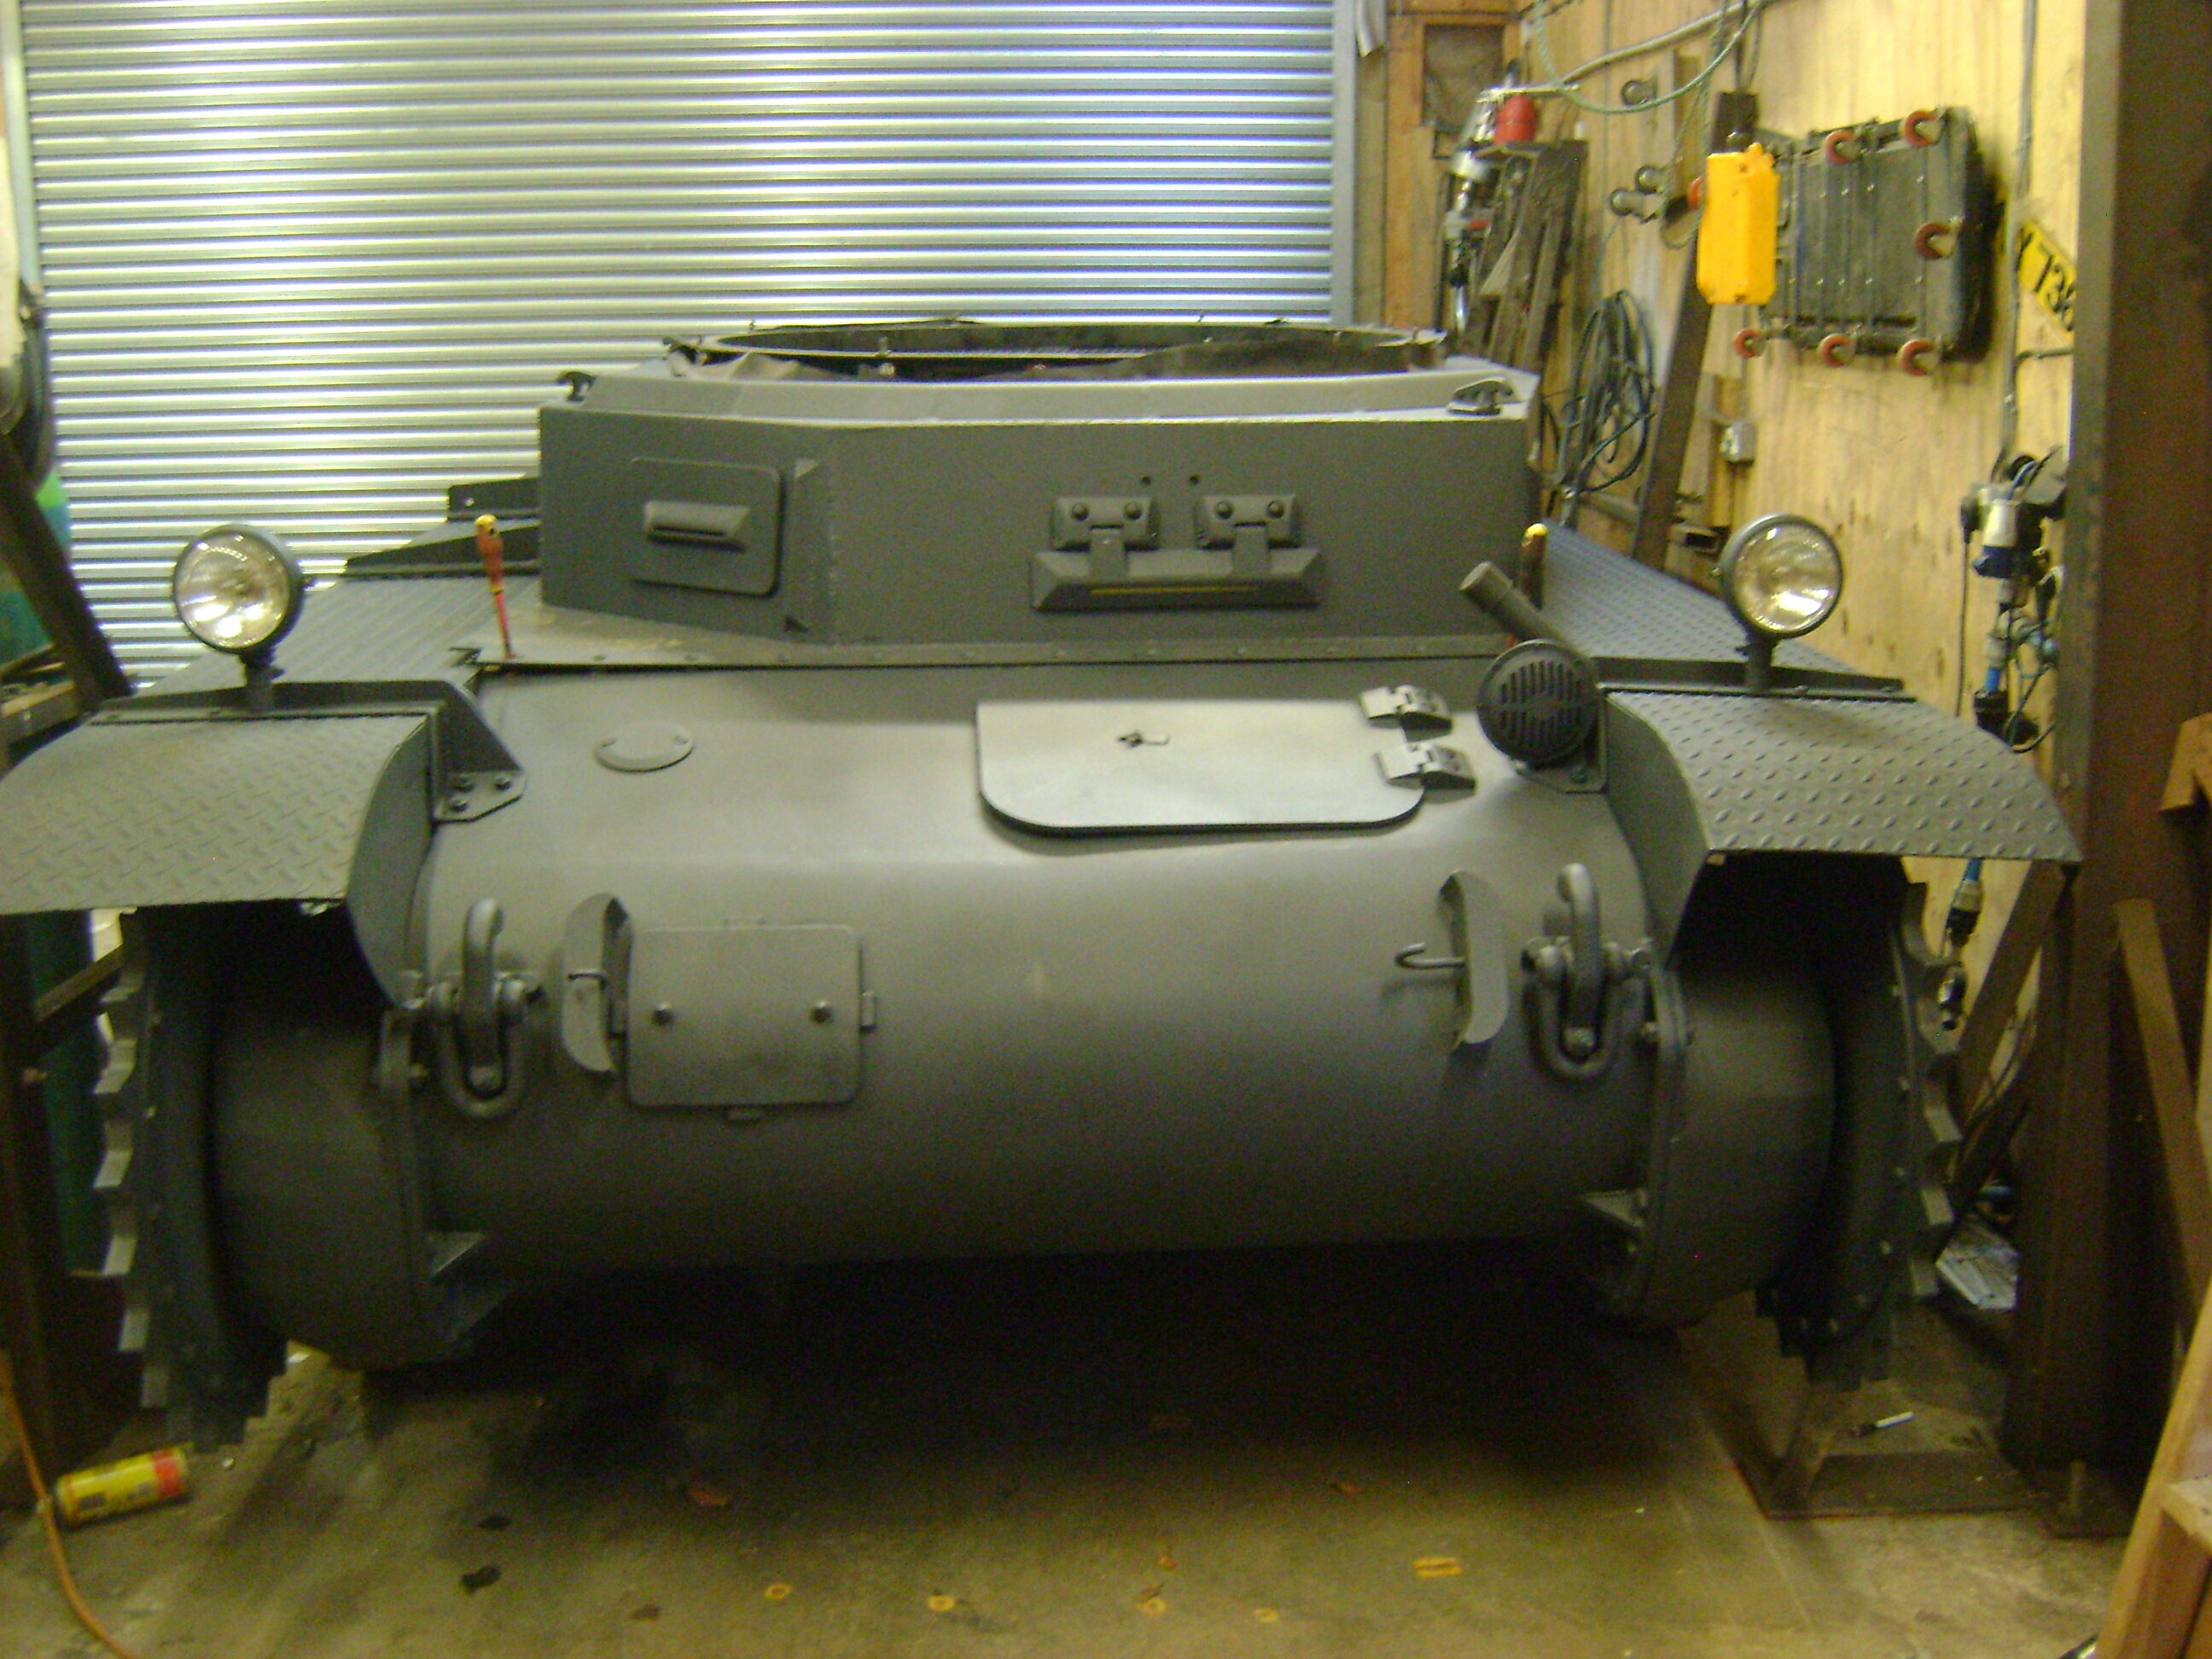
As I said there has been progress but not that much and it mainly relates to the upper hull. I still had a few pieces to make such as the vision port covers and all the associated hinges, brackets etc and as I had made various modifications, the whole lot needed repainting. The vision port covers really caused me a mental block, I had already made three sets for the turret, I knew how much work was involved and I don't know why but it stalled the project for weeks. Then by chance a cheap CNC milling machine came up for sale, much the same as I started programming in the early 1980's and as I had parts that I needed to make for my work I bought it. It made making the parts very easy and much more enjoyable.

This week I finished the upper hull and lifted it on but I can't bolt it in place as I need make a rubber gasket for the fuel filler which will entail lifting the upper hull up again to fit the gasket.


And that's it for now.
Jon
-
15
-
-
It's strange, I don't get it on any other site and the chrome pop up blocker is on. The question is, have the moderators or those in charge allowed pop up ads to boost revenue, which, seeing as they are not commenting seems highly likely.
-
Why has it just started?
I can't stand the bloody things, I don't comment that often but I do have a look every day to see what's new, if it means having to put up with these adds i shall have to stop visiting the site.
Jon
-
I haven't started my Morris C8 or CMP C8a for a good 18 months And last Friday I decided it was high time I got my arse in gear. I am very naughty and put either E5 or E10 in all my classics depending on what pump I stop at but I do add frosts conditioner to each fill. It took about 3 hours but both vehicles started and ran perfectly, the time was mainly spent getting the lift pump off of the Morris and stripping it. The problem was just the it was dry, the petrol was long gone, the rubber bowl seal was fine and after cleaning the seats and wetting them, the pump sucked perfectly and it started almost immediately. I then started them again on Monday as I had planned to go to a local show and both started and ran great. I didn't get to the show as whilst doing a spot of light gardening with a digger a water pipe got in the way.
Other than that I, run a series land rover 2a which I use for work and so far I haven't experienced any problems, a series 3 which we use only in the summer, so it sits all winter in the garage with out being started and that started fine about 3 weeks ago and then covered a 50 to 60 mile journey. Am I lucky, is the Frosts conditioner the answer or are we worrying too much about the supposed problems with E5/10 petrol?
Jon
-
I am sure that there is a picture out there somewhere, which will, in the fullness of time turn up and then watch the dealers raise the price tag.
I also have the Tan type but displayed else where at home, sorry about the picture, I like them both.

I tried lots of different ways of displaying the uniforms, as I don't like the effeminate shop mannequins that most people seem use, in the end I came up with this.

This was one of my trials using a laytex mask over a normal mannequin head, it works quite well but there are only a very limited selection available.

Then a European company started selling more life like mannequins and that is what I now use for the dioramas.


And the one with the laytex mask.

Thanks for the interest and Eaglehurst you are right, that button really needs attention.
Jon
-
2
-
-
I have heard it all and watched the conversations before and don't bother any more. Most of the stuff that we collect very probably never saw use in ww2, irrelevant of the date stamp, most of the stuff that was actually used was dumped shortly afterwards. I have seen many so called experts fall from grace after being caught out, I don't buy as an investment, I buy what I like and like what I buy. Whether or not camo pixi suits were used in WW2 is not important, all that's important, is that I like it. Welcome to my World.
Jon
-
1
-
-
10 hours ago, John F said:
Excellent work as always, Jon. If you're unsure about any of the wording on items in the vehicle please feel free to get in touch, as I think you know I'm a German technical translator with particular interest in the equipment of WW2.
Morning John,
No I didn't know that and I wish that I had earlier but I do now.
Jon
-
Evening All,
My first choice of engine was a Land Rover 300TDI but space was an issue and the question of where to put the inter cooler so i started looking around and came across the Jag 6 cylinder engine. I have no experience of Jaguar engines but I found a man that did and he steered me towards the engine that I now have.
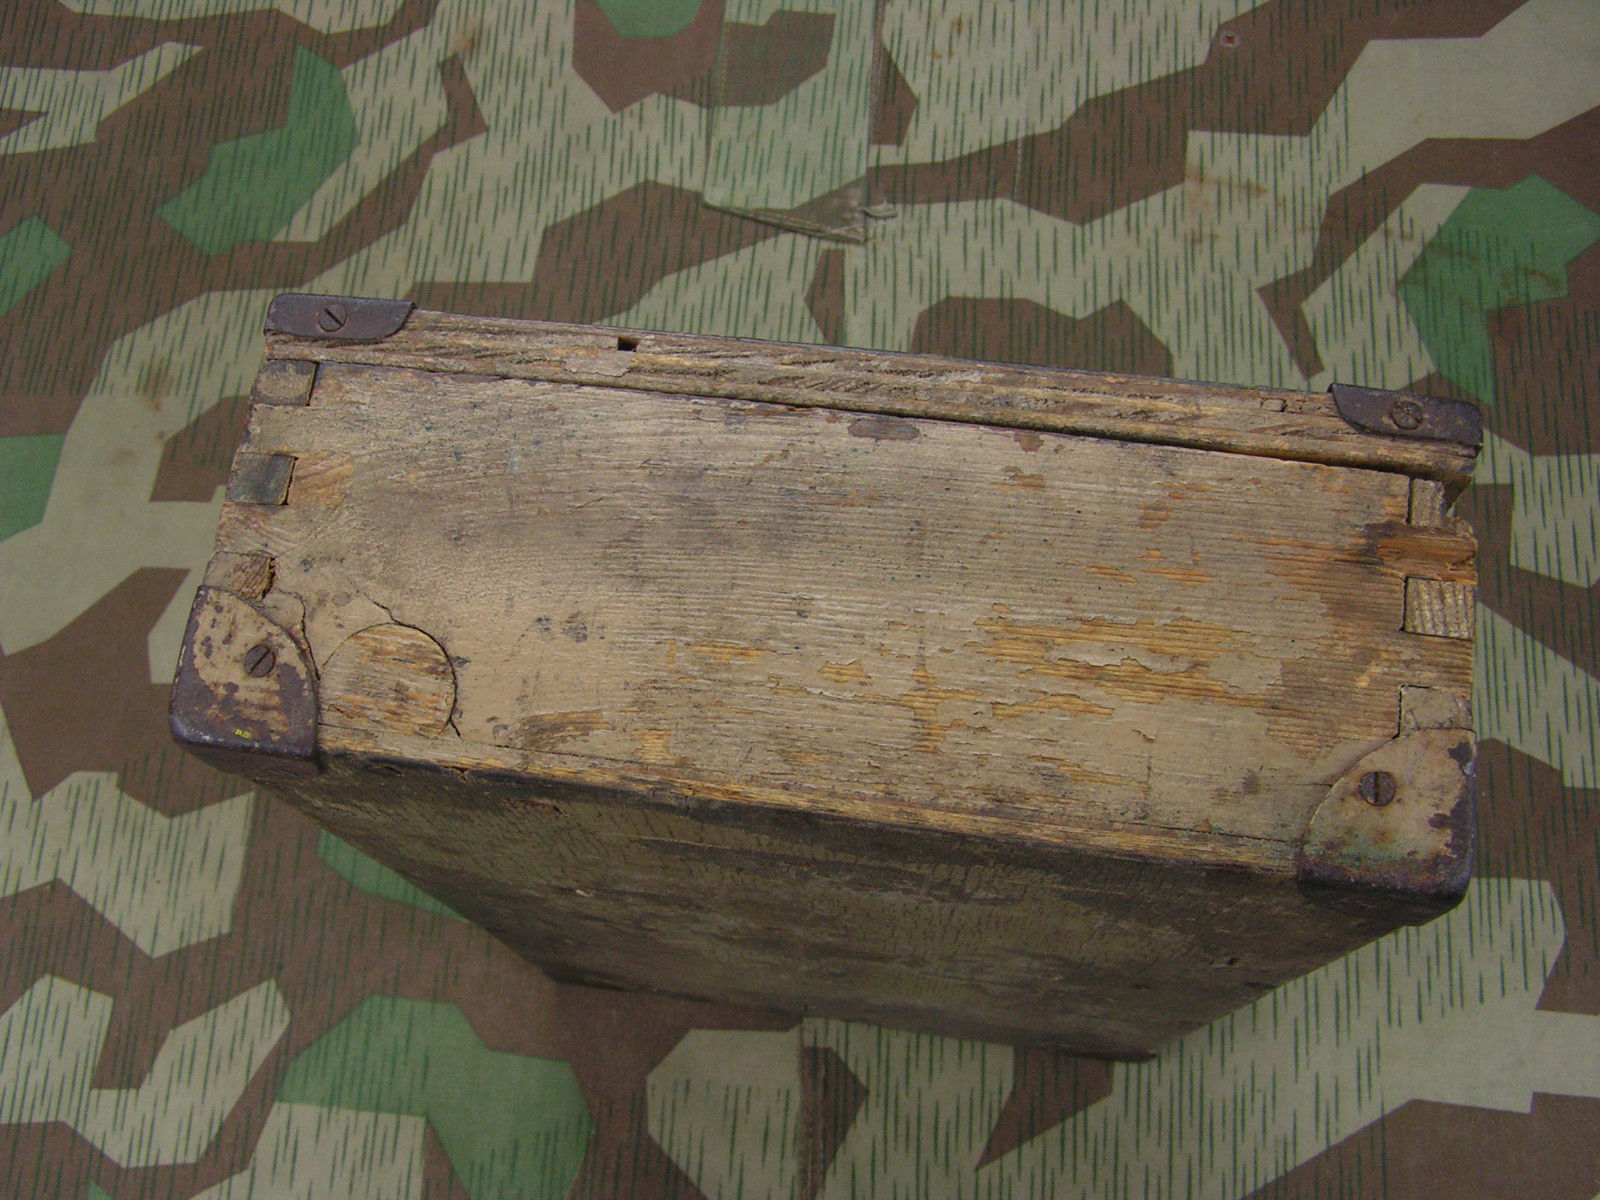
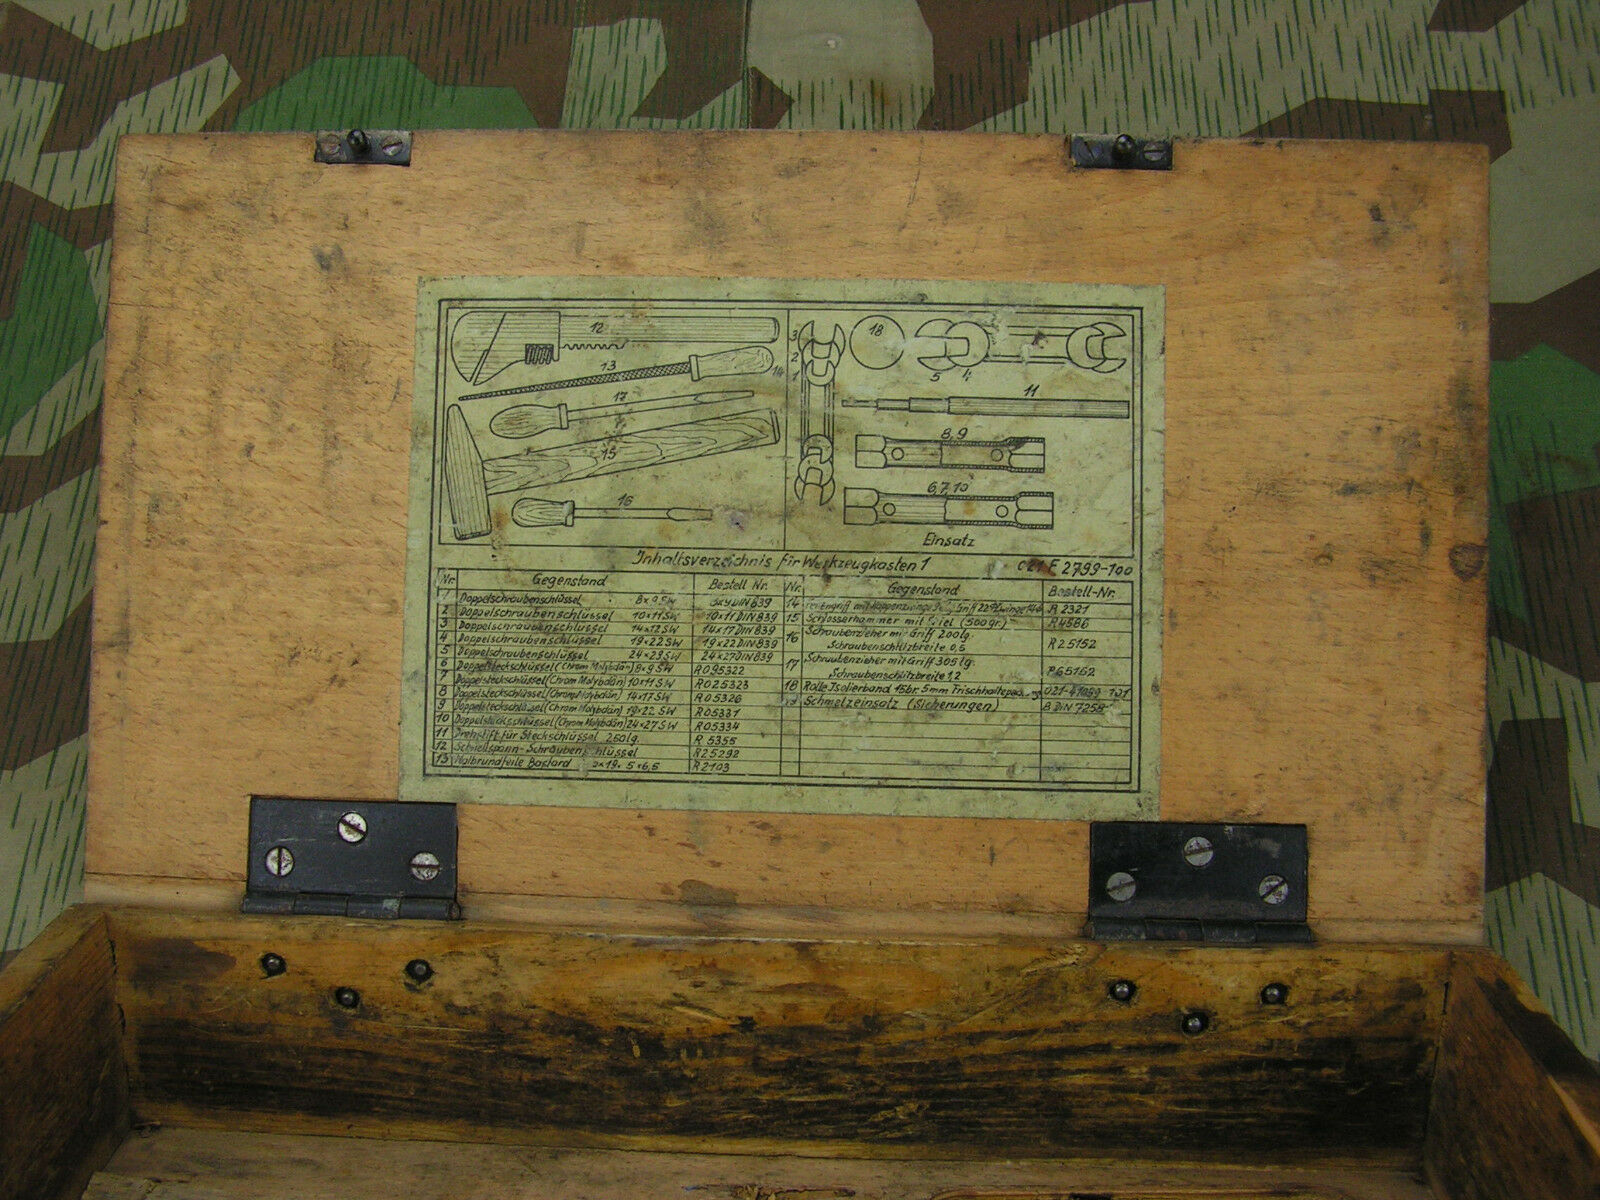
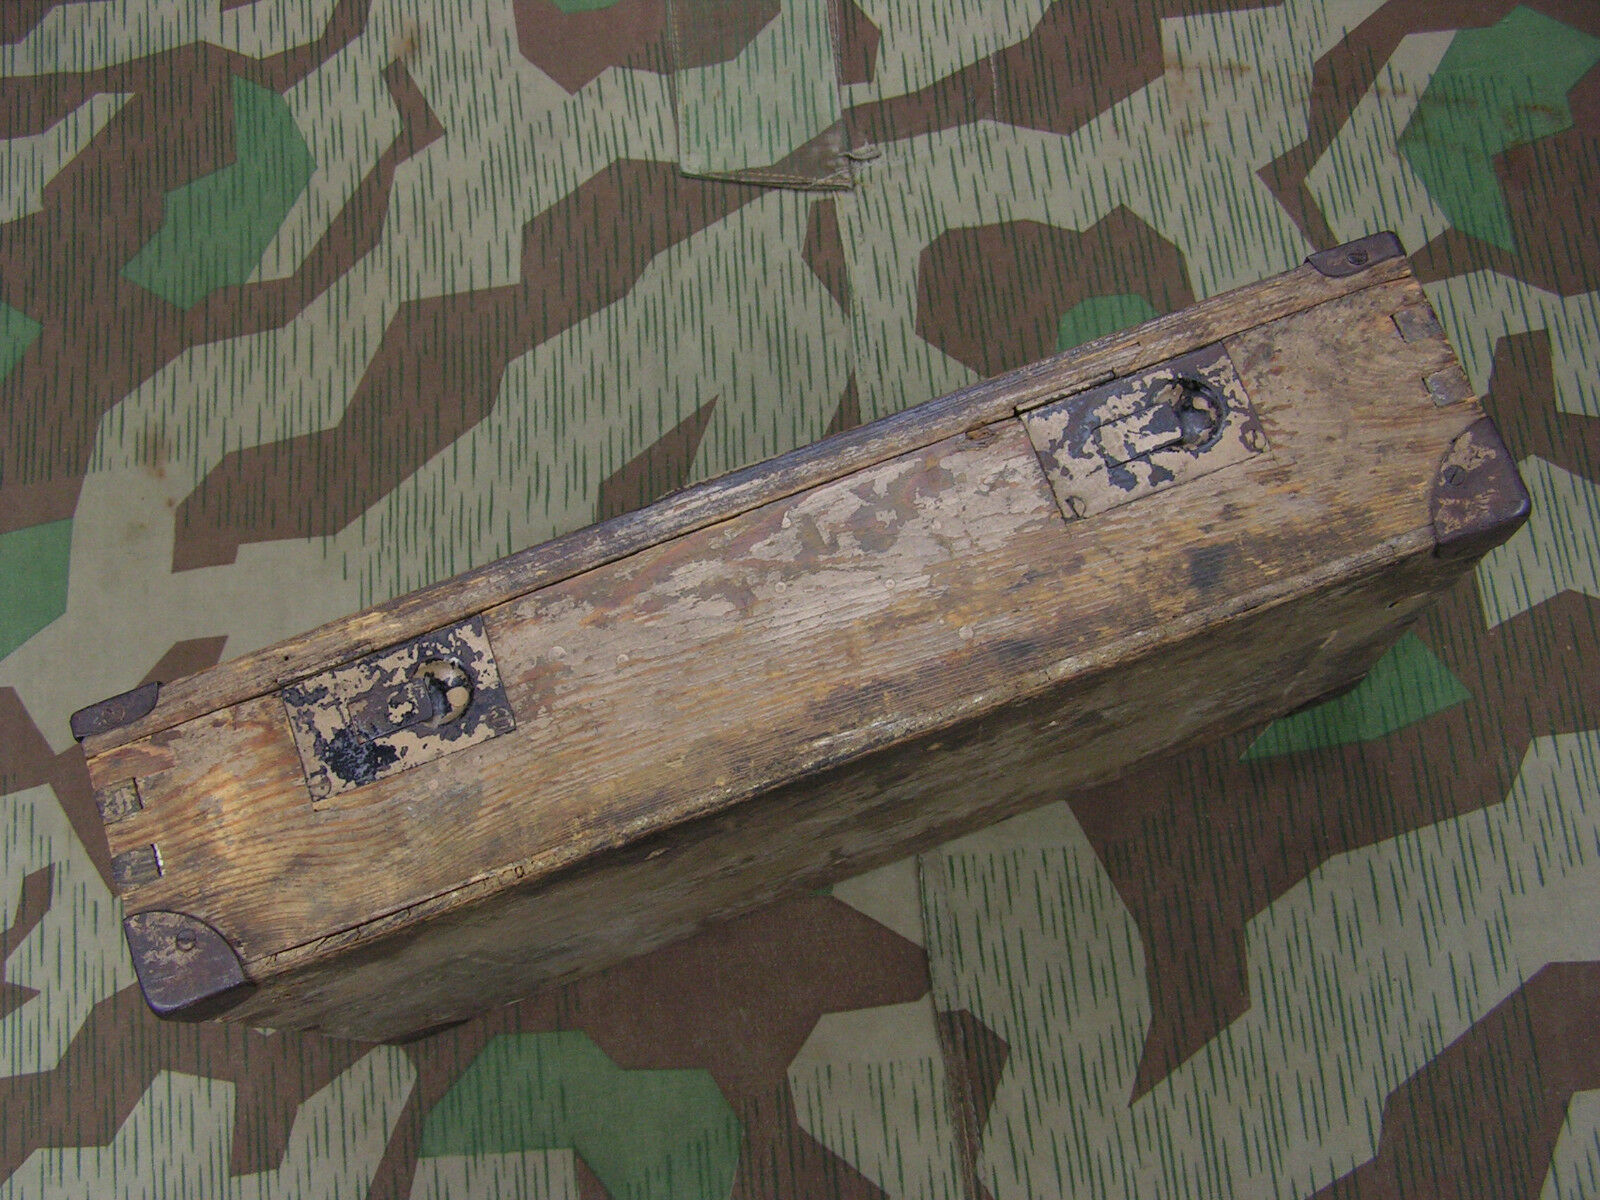
I have been doing a little wood work. I think that it was the last internal item that I was missing, a Werkzeugkasten 1.
I managed to find a couple of different ones on the web and decided to use this one as a pattern.


I have used a different design of catch, although the same pattern as I have used, were used on the other version of the box. The box above is obviously painted in sand colour and would be late war, I have assumed that mine would have been black but who knows.
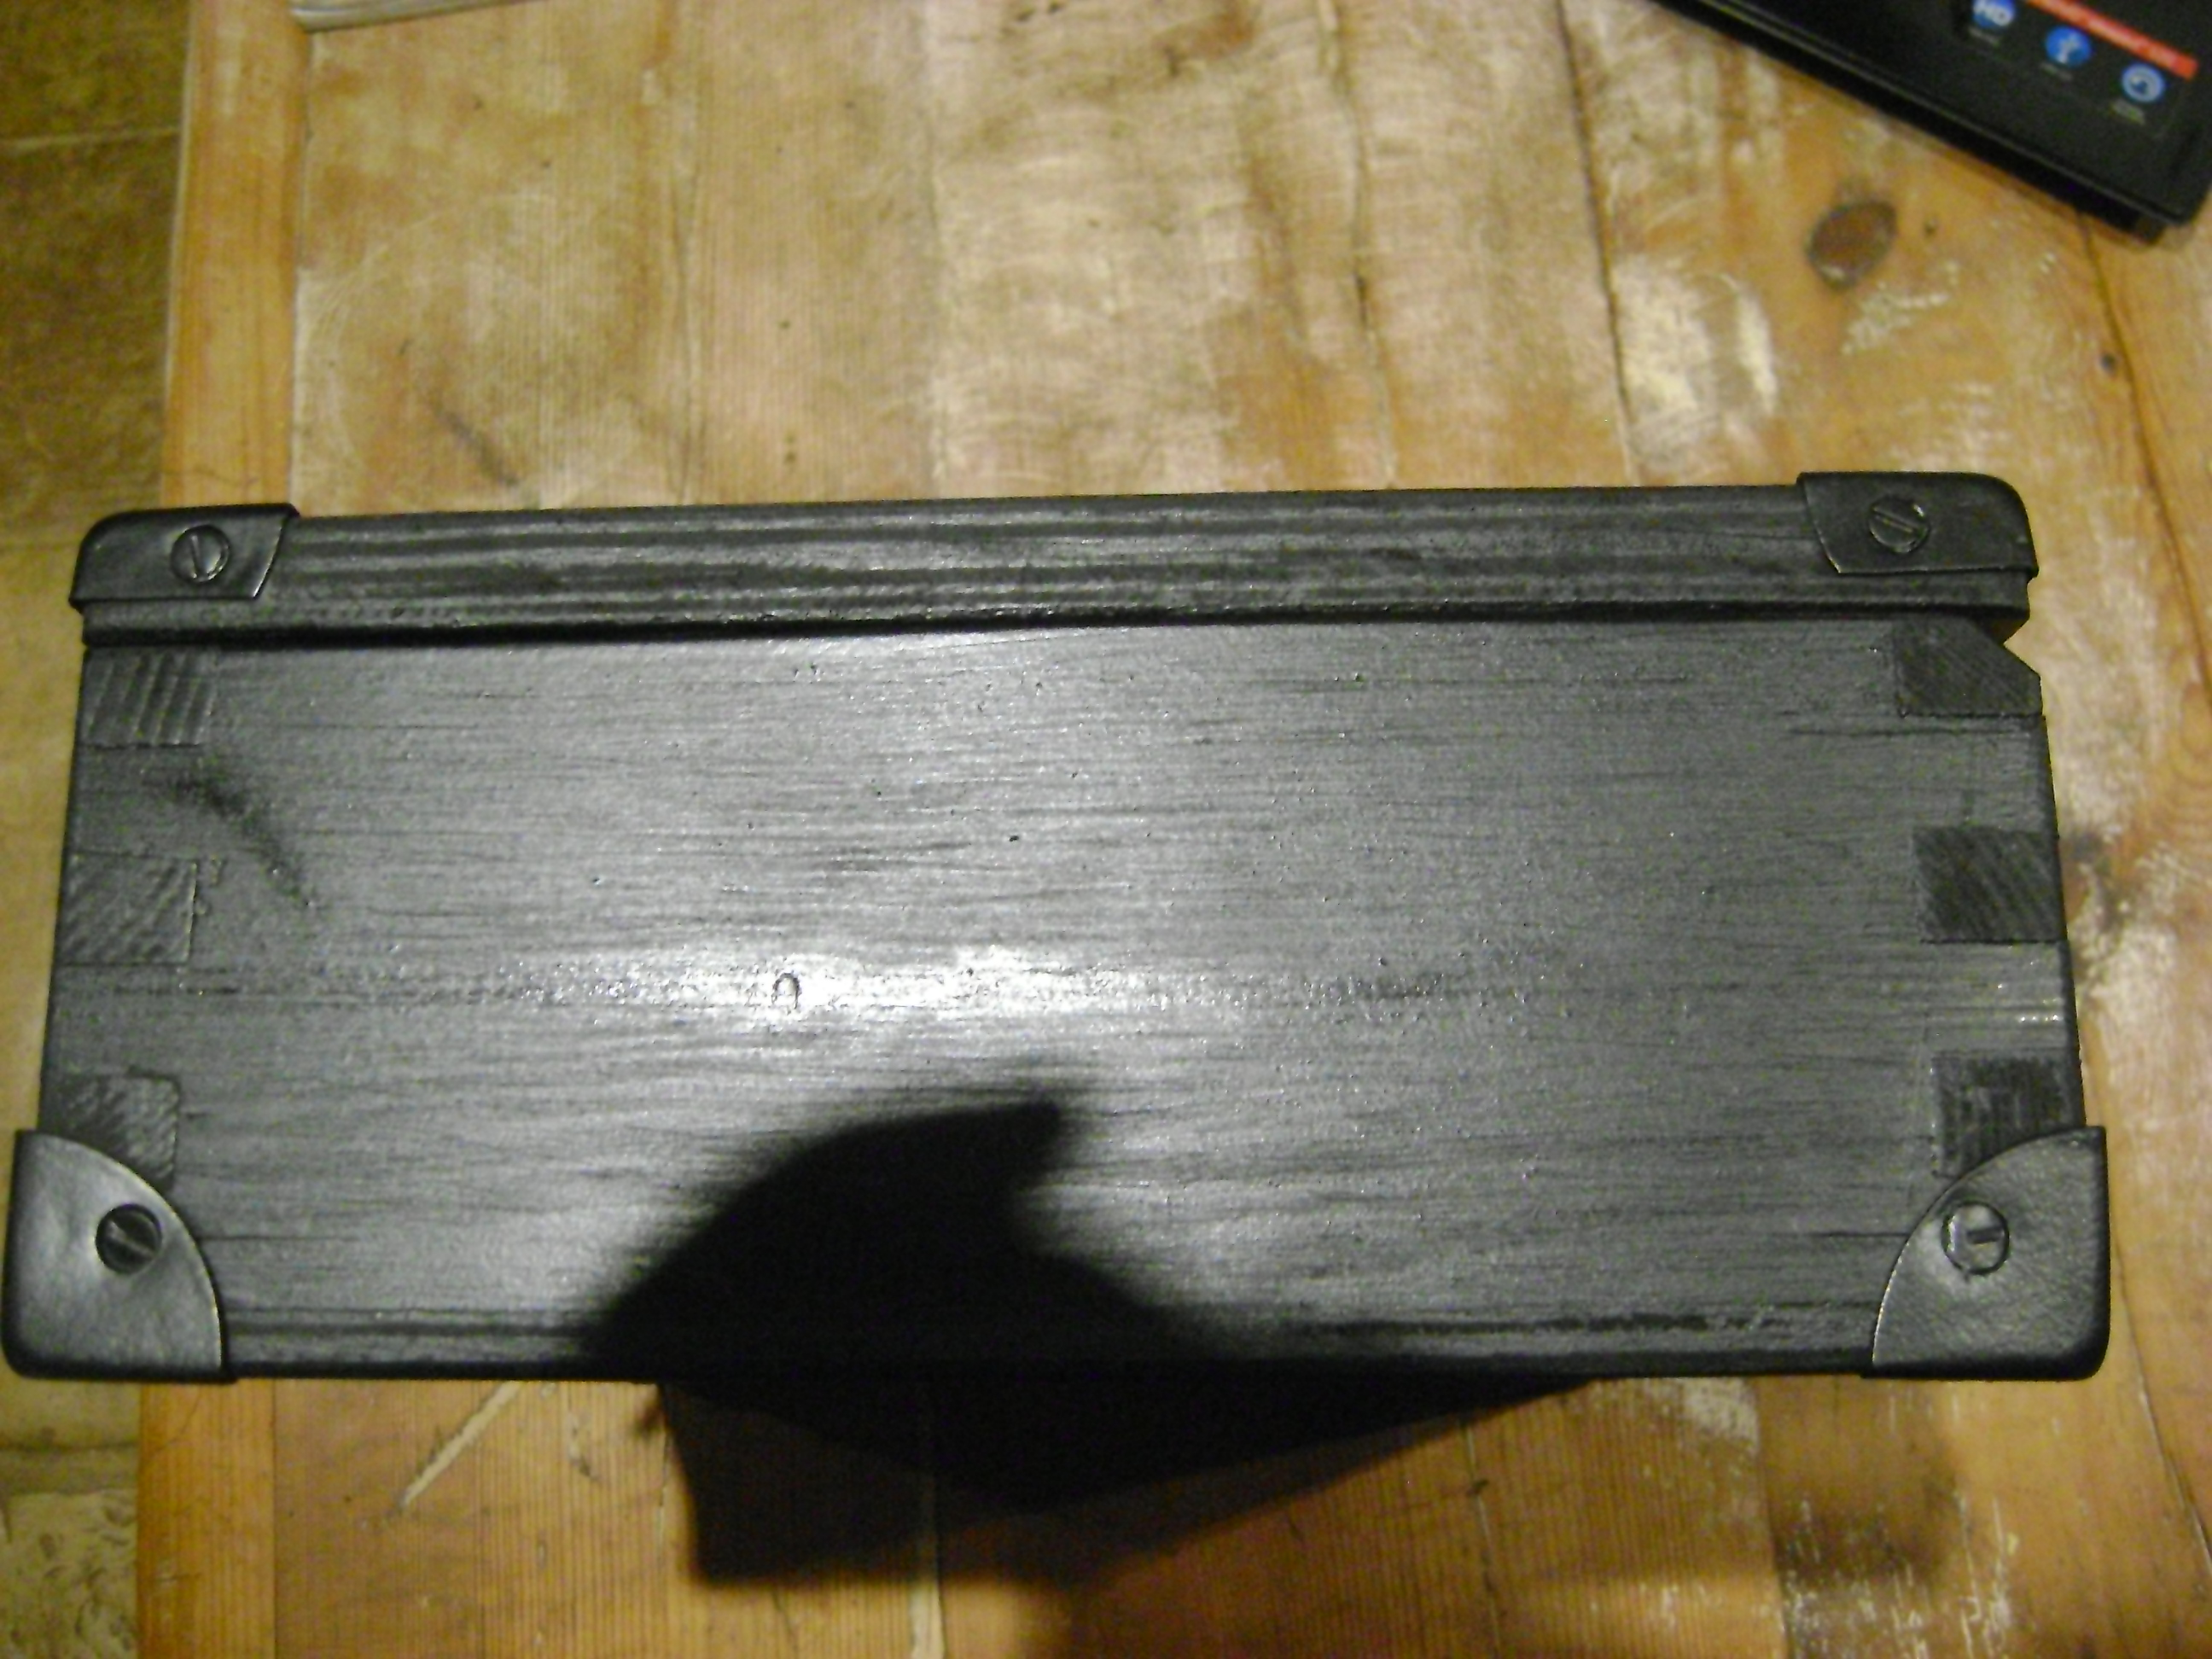
Before painting.


And the finished item.


Jon
.thumb.jpg.79ad3a0942598d04fe6860c6cc666abf.jpg)


-
8
-
-
Evening All,
Over time I have been putting some Mannequins together Just to display some of my collection and add some extra interest. I am not sure where on the forum such stuff should be put or if it's welcome but I thought someone may find it of interest
.


Jon

-
5
-
-
Just now, teletech said:
The audacity to build a replica tank from scratch is astounding and amazing to me. The sheer number of parts and hours is beyond my comprehension, it's taken me years just to fully disassemble a CVR(T) and start going the other way and yet here you are!
That said, I can't imagine putting a British engine in even a pretend German tank. Organ rejection seems likely. The Jag motors were objectively pretty bad anyway. I'd have suggested the Ford I-6 300 as a much more robust engine and Ford was a supporter of Germany at that time, so it's at least not in direct opposition.
I used what was available at the time and time will tell how well it will work. I was amazed when I tried it in, how well everything lined up, in both height and side to side, it makes one wonder was there a common design in use. I thought the CVRT' s used a JAG J60 engine unless yours is a diesel, not that I know much about CVRT's.
Jon
-
Evening All,
Thanks for the comments it all helps to keep me going.
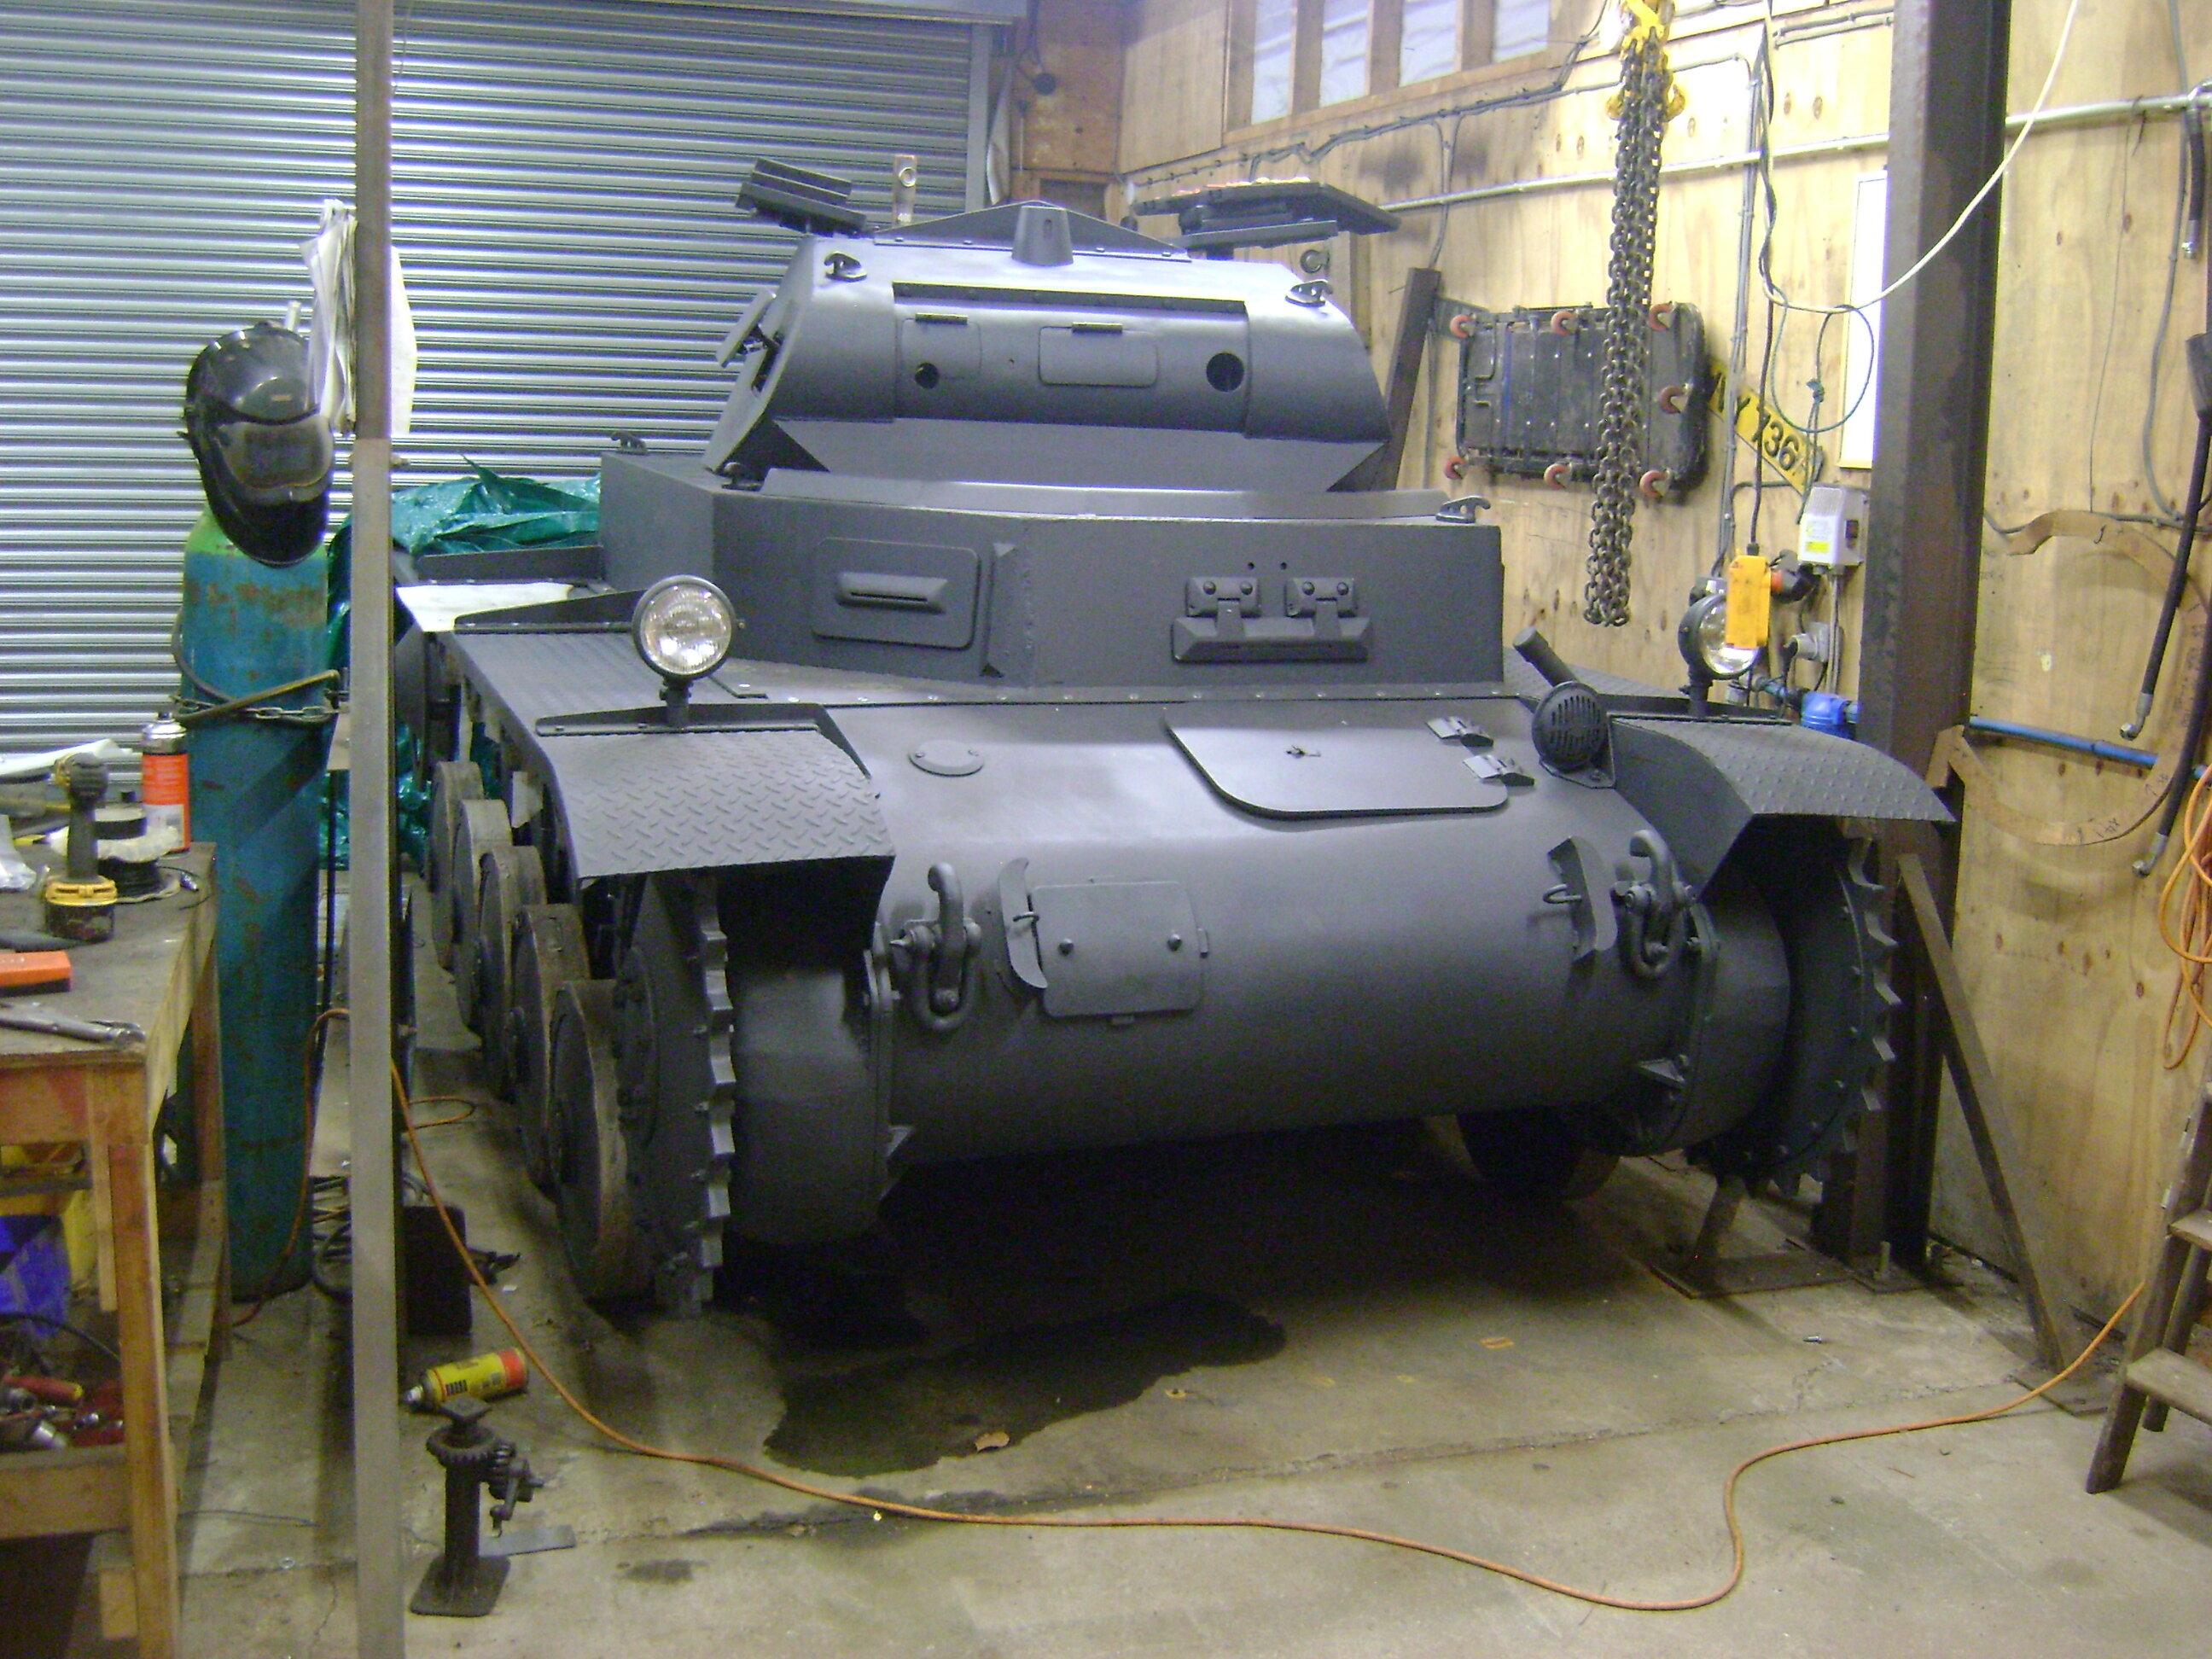
I have had a really productive weekend for once, I have done masses of spraying Panzer grey and then lots of assembling.
The engine came with a set of electrics that were supposed to be ok to use but by and by most have been replaced which left the fuse / relay panel.

It was in a state to start with being 30 years old and I used it to cobble something up to get things started but there were always connectivity problems so I decided to bin it, also I wanted a separate mains feeds from the battery to the starter and one to the rest of the electrics, meaning that all the internal electrical connections would be in one convenient place if something went wrong.
I bought a new fuse / relay module and made a new panel to affix it all to. This will be bolted by the side of the ECU's on the wall of the upper hull.

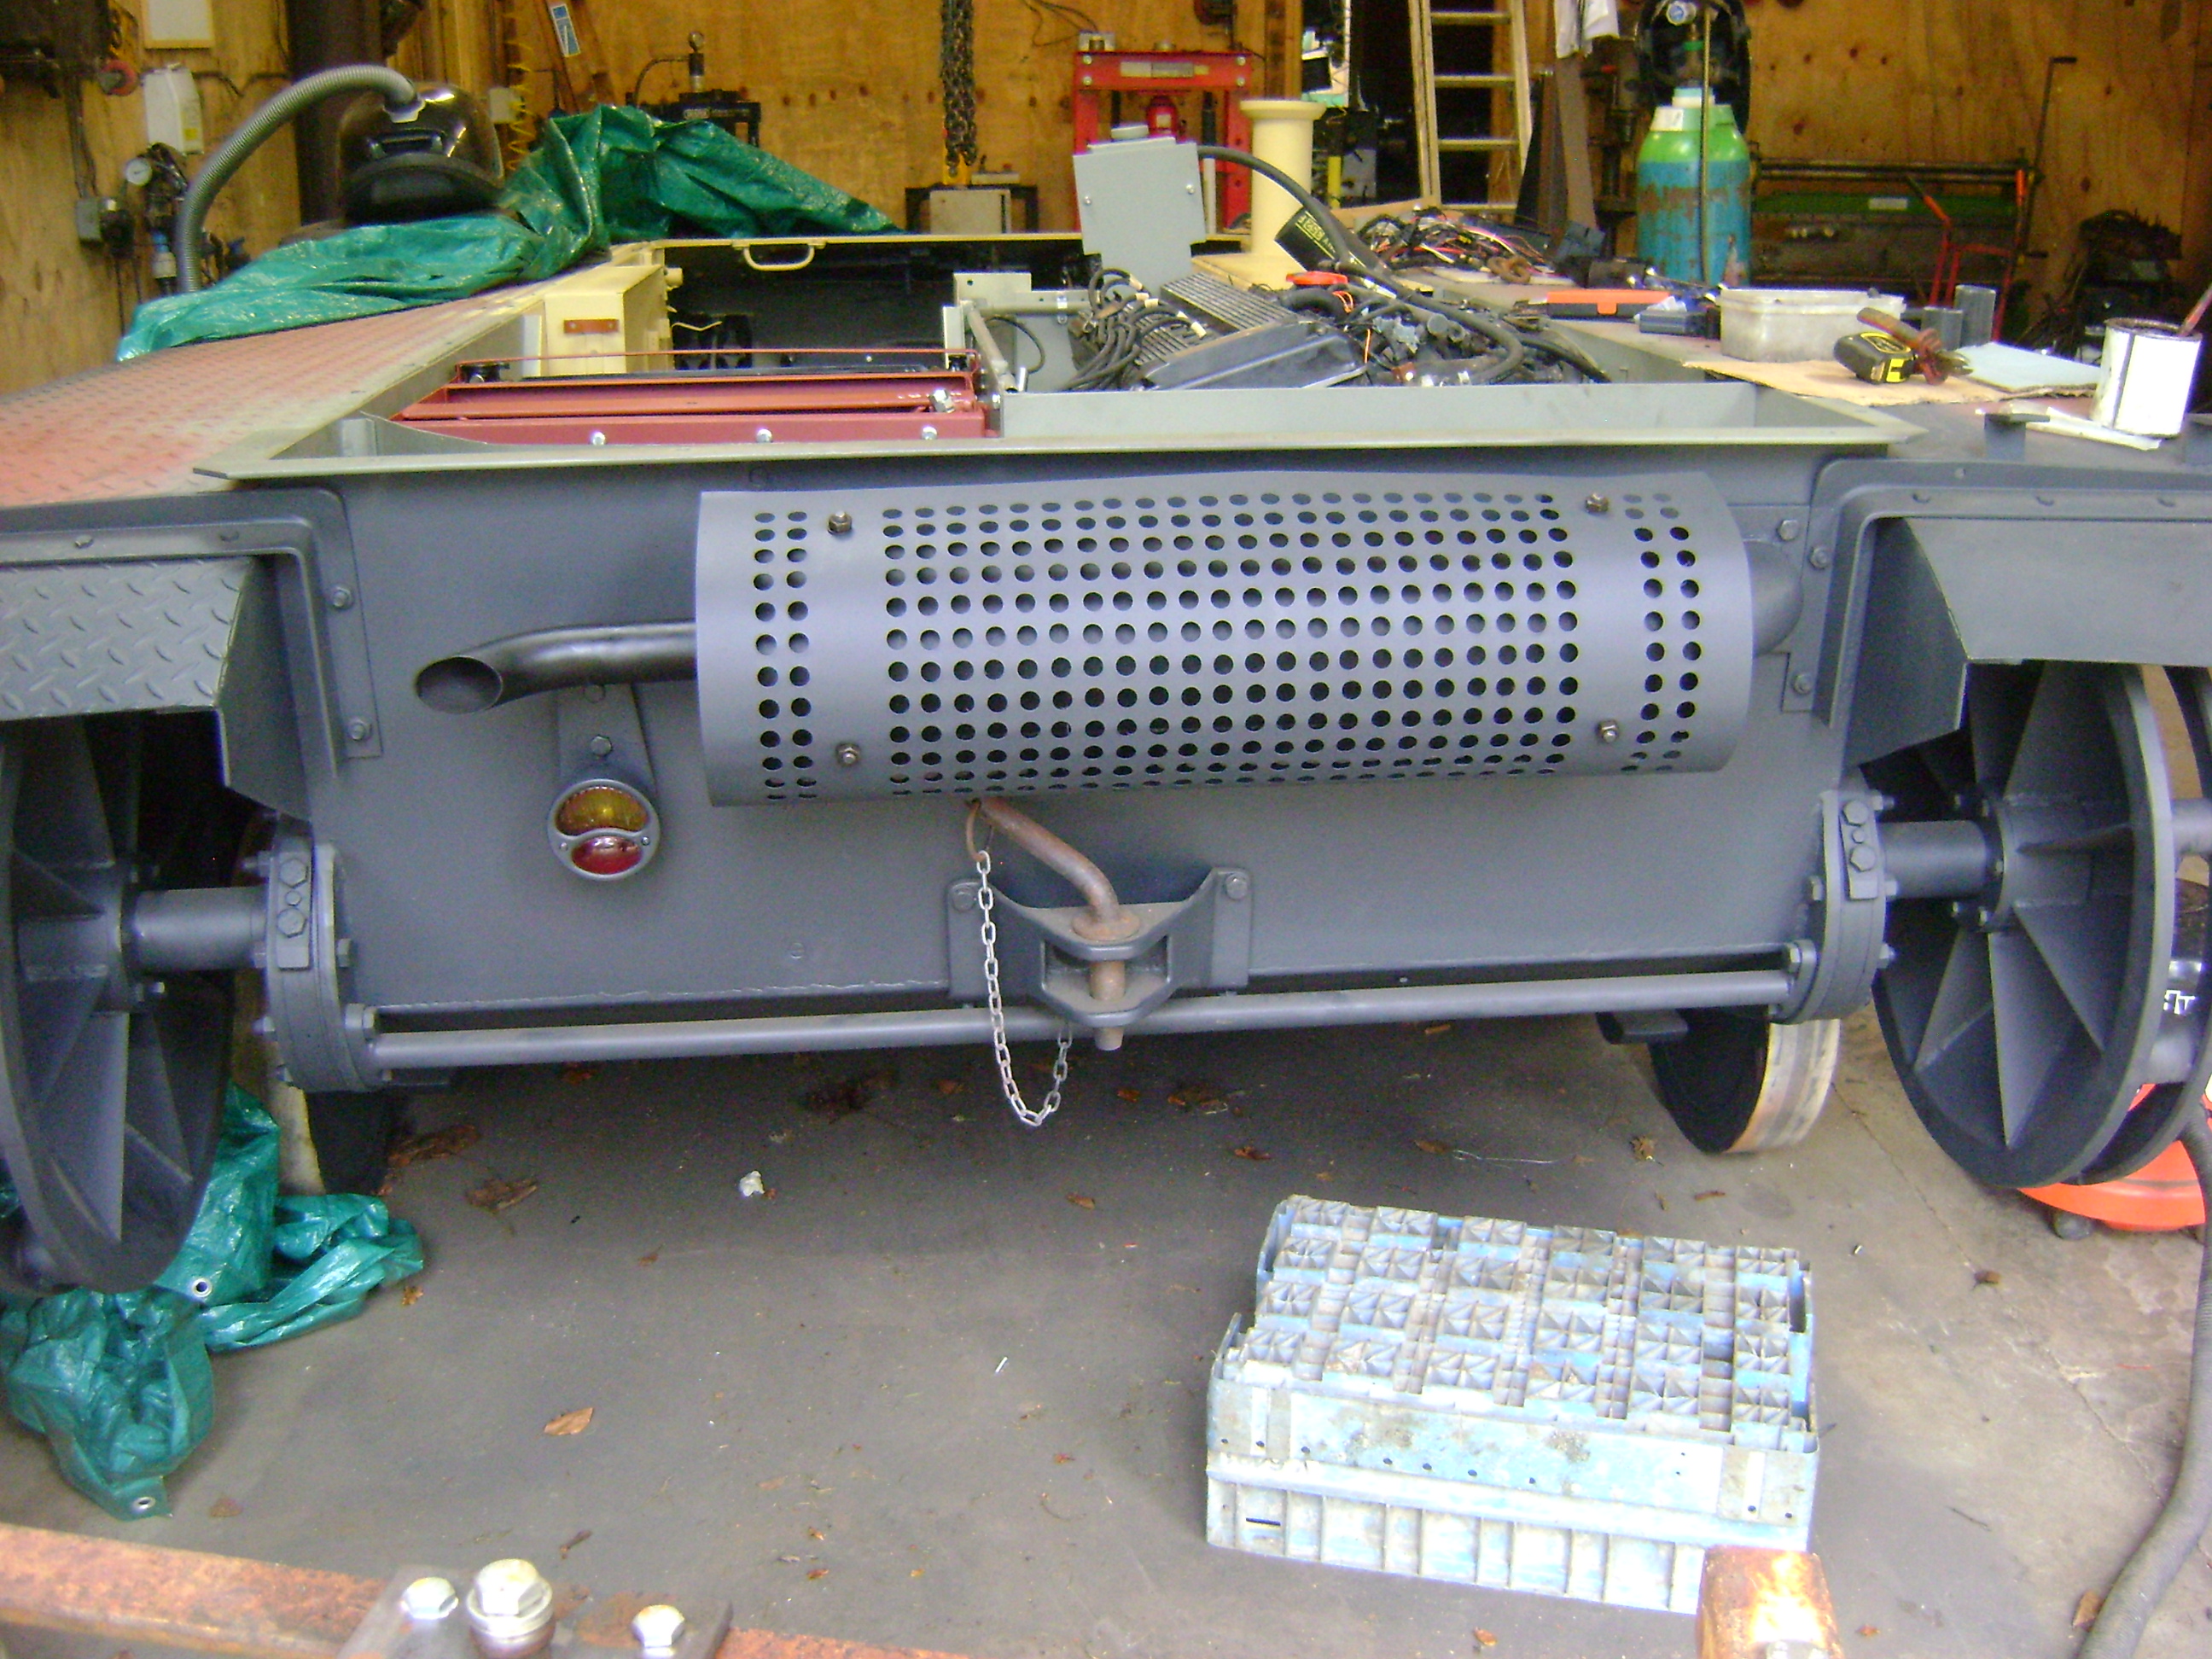
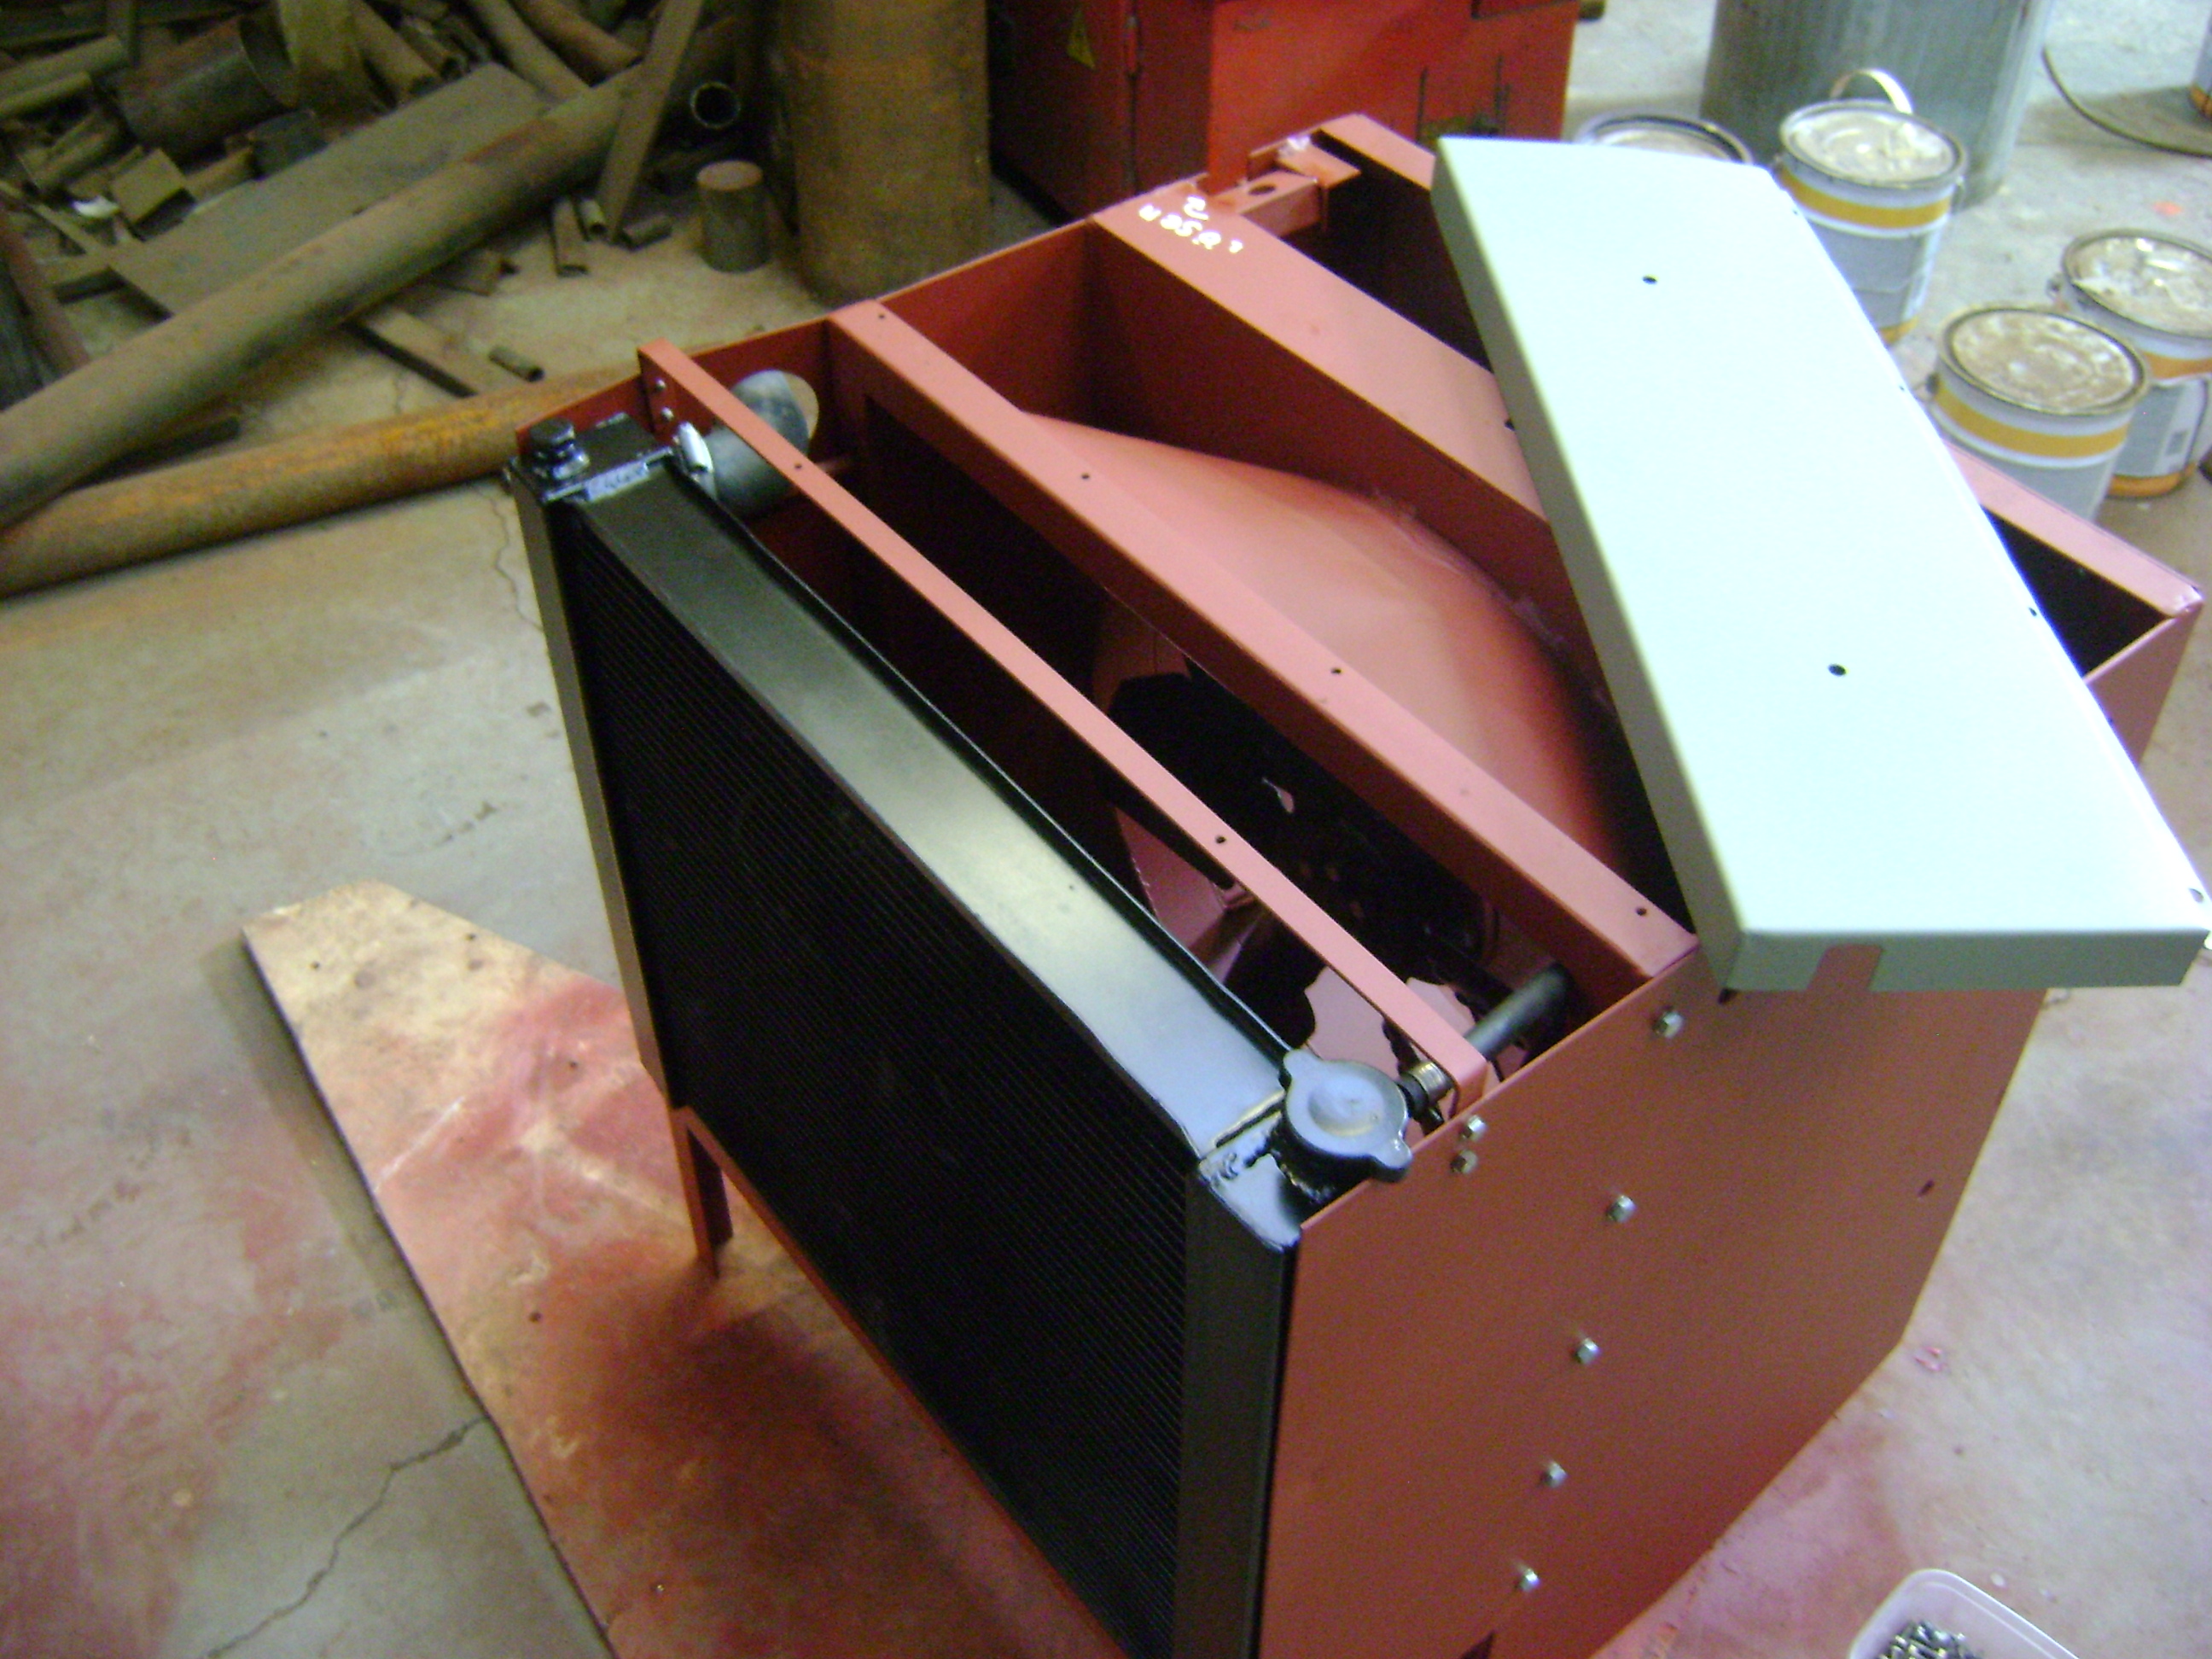
The radiator is in place and piped in.

The fly screen, or what ever it's called and the baffle have been fitted.


The exhaust and rear light have been sprayed and fitted.

The prop shafts on, the false gearbox cover is bolted in place and a lot of the internal fittings, boxes have been bolted in.


I have still got a couple of retaining straps to fit and a wooded toolbox to make but it's getting there.
Lastly, I decided that where I had fixed the charging socket was a silly idea, as every time the cover was opened the wires were pulled taught, so I made a bracket and fixed the socket to one of the floor supports.

Tank wise, that was my weekend but I still have a load more bits to assemble next week.
Jon
-
6
-
 1
1
-
-
Evening All,
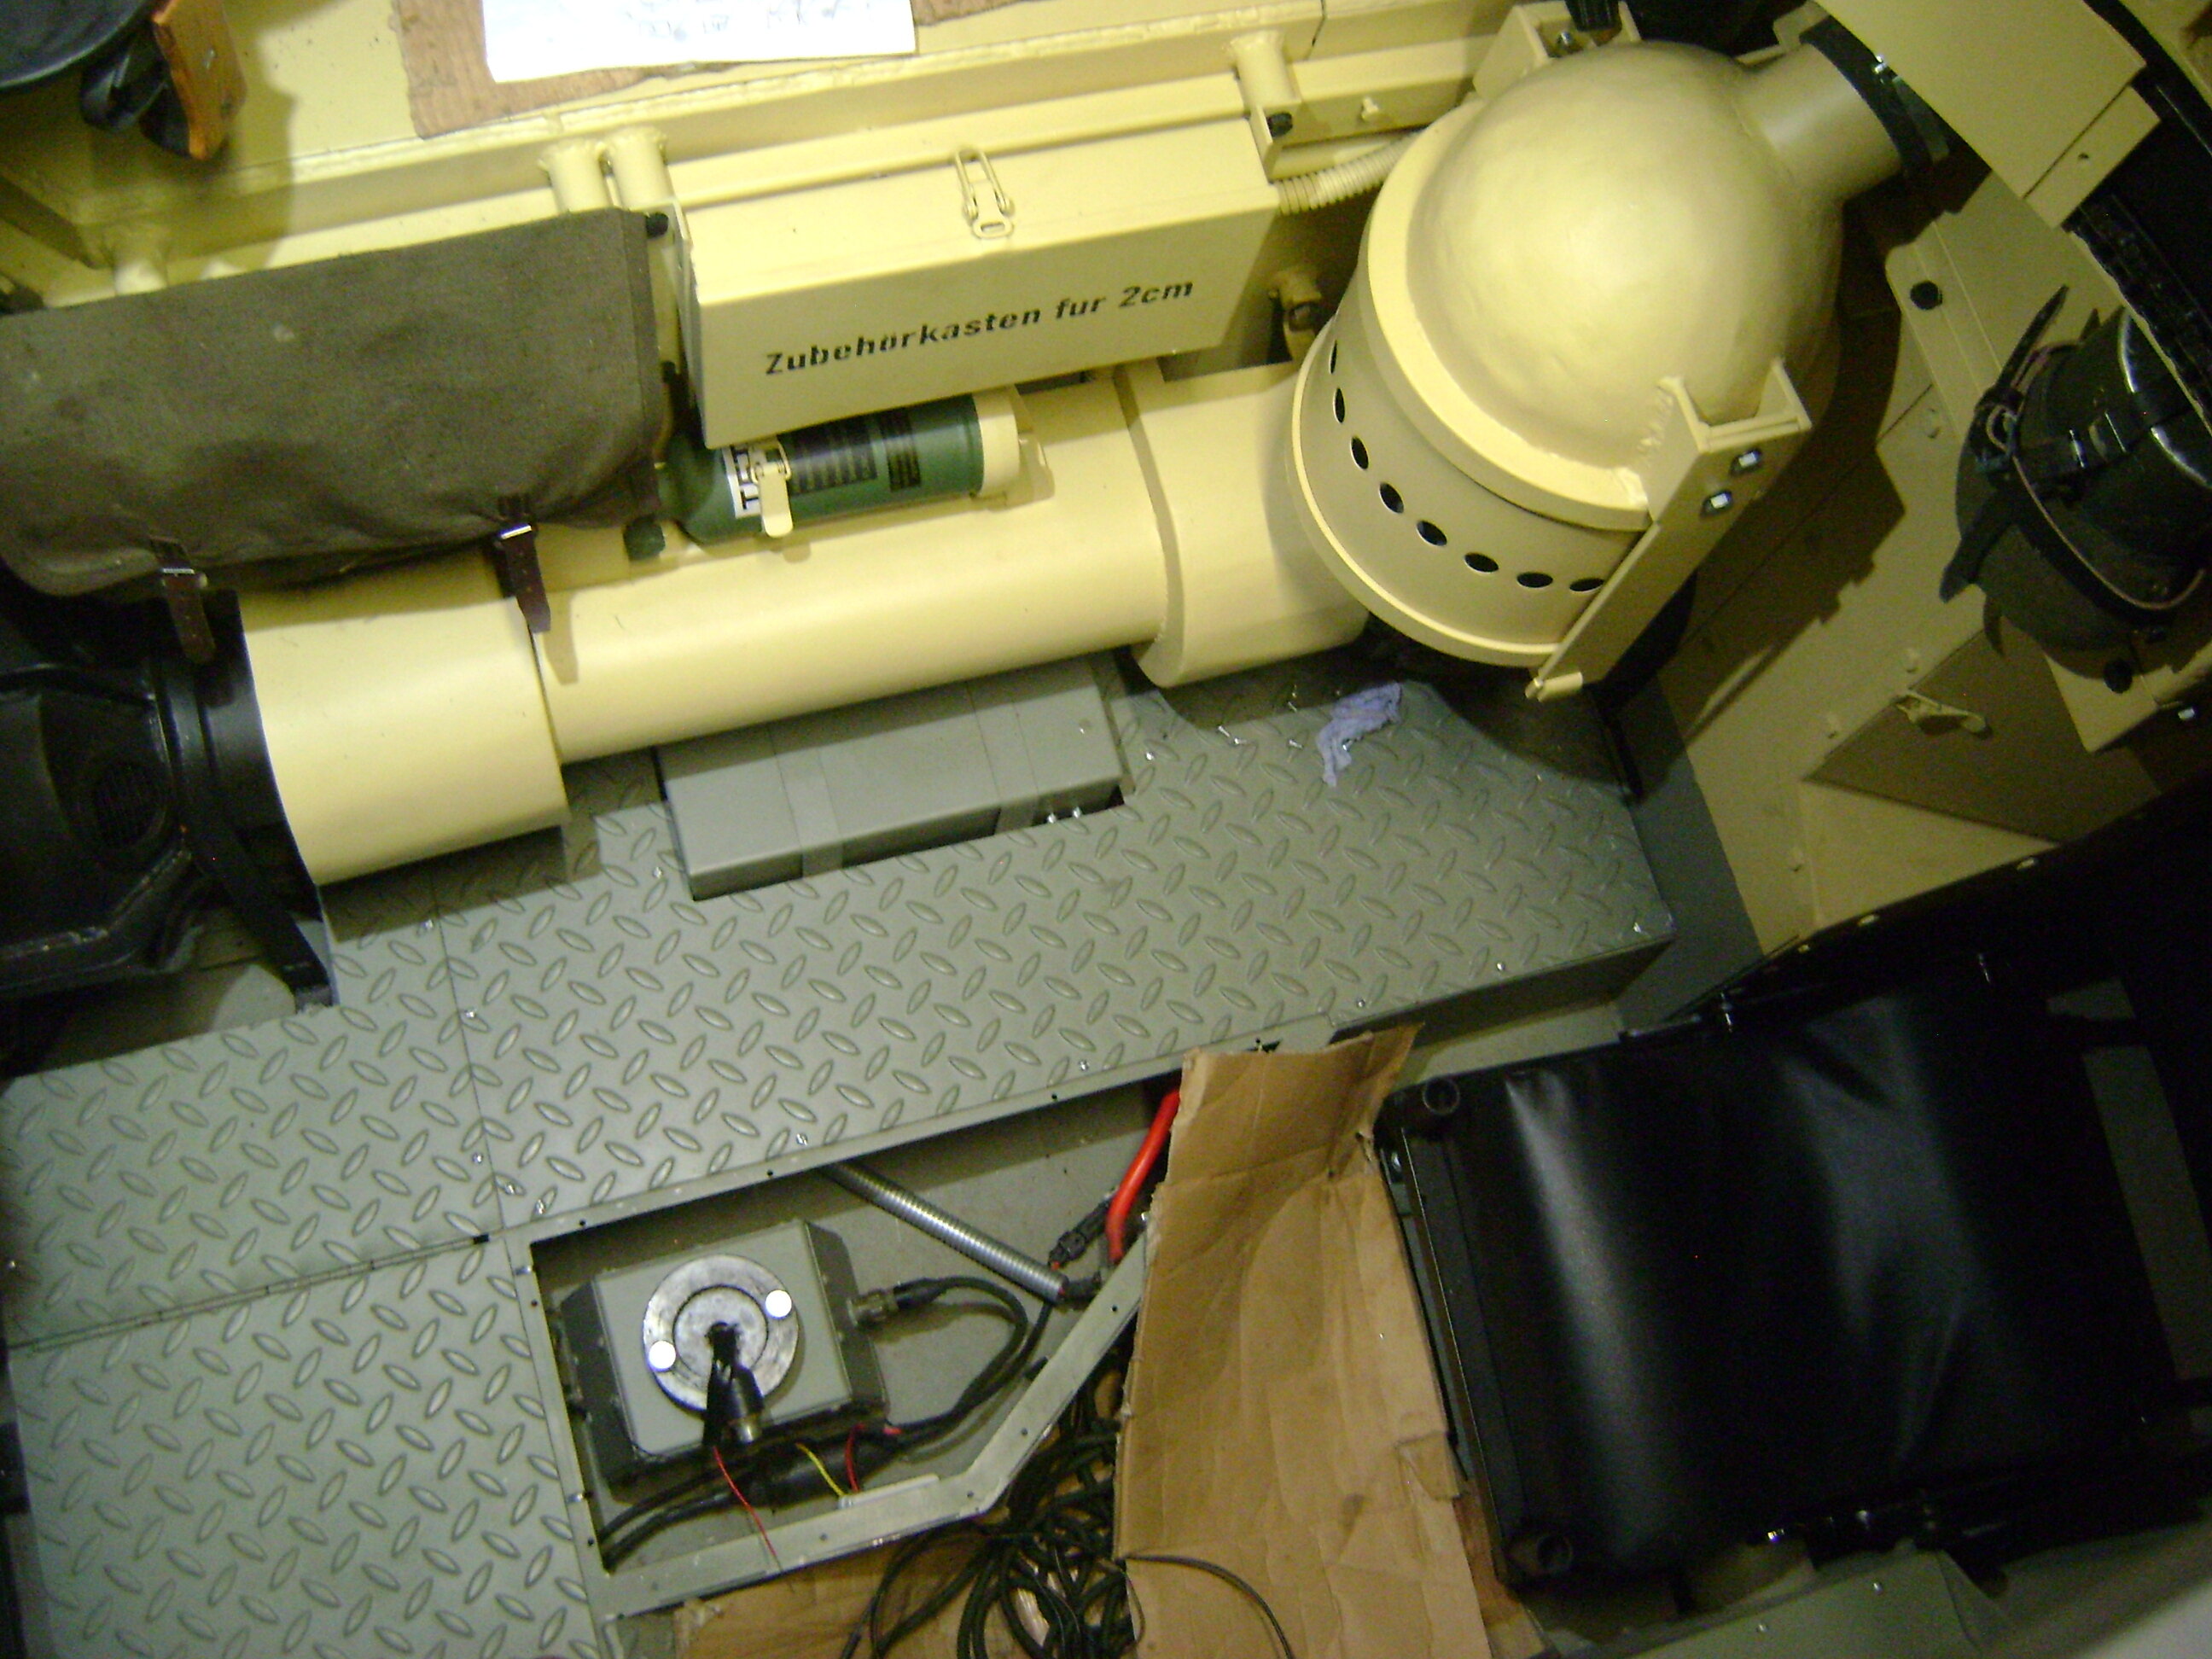
It doesn't feel like I have achieved much over the last month but I have been laid up for the last 3 weeks with a Bladder infection which entailed a nice nurse having to insert a catheter, a most unpleasant experience, the catheter I mean.
The cooling assembly is finished awaiting installation but I am not convinced that the radiator will have sufficient cooling capacity, time will tell and I have made it so that it will easily accept a deeper radiator.


I have made some instruction plates for the false gearbox casing, as I can never remember the lever positions and I keep forgetting that It needs to be in neutral to start the engine.

I fitted all the floor plates only to find that I had forgotten to modify the one just behind the drivers seat so that the false gearbox cover can be bolted in place. That had to come back up to be modified and repainted which I had planned to do today but in the end I didn't have the energy.

Keeping the batteries in my vehicles charged is always a concern to me as they are not used that much, so they all have trickle chargers on but getting to the battery on this is a right pain. I decided to incorporate an access plug under the lift up part of the floor just behind the drivers seat so that I could plug in a trickle charger or even, if needs be, jump start leads. Maybe a bit over the top but while I am doing it I may as well do it as I see properly.

That's all for now.
Jon
-
8
-
1
-


.jpg.5cd7ef832c0c24ff0dfb94f6ce0392ba.jpg)


CNC vehicle plans Humber Scout car and SDKFZ 222
in I may be stupid, but......
Posted
Did anyone see Warbird Workshop, they rebuilt a really early spitfire and it's accepted as an original, the son of one of the war time pilots even sat in it and seemed moved to think that his father had flown it . Of course his father hadn't flown in it and the only original bits appeared to be several taps, a very small panel and the restorer made a big point of telling us that the straps over the foot peddles would have originally been fire hose, so that is what they used, other than that the whole plane was new. What they have created is a very expensive replica or toy that could sell for £4 million why not just be honest, it's no different to building a replica whippet but oh, how the builders of the whippet and other such creations are frowned upon even ridiculed for there efforts. Personally I can't see what all the fuss is about, bringing something back to life that has long since disappeared or now sits motionless in a museum can only be a good thing but just be honest about what IT actually is and before anyone mentions it my Panzer II must be original as it has an original shovel attached to it.
Jon