


grey on top
-
Posts
55 -
Joined
-
Last visited
Content Type
Profiles
Forums
Gallery
Blogs
Events
Articles
Store
Downloads
Everything posted by grey on top
-
Welcome to the world of restoration. Buying parts can be very costly and they soon add up. I have to admit that the radio junction box is rather expensive. At some point I want to buy one but at the moment other things have a higher priority. A decent repro horn such as the MV Spares one that Dallas supplies is £110 Keep the posts going, they are always good to read and you get some useful feedback.
-
What make is it?
-
What are NSN and FSN numbers? What do the letters stand for? If this number is post 1974 would they still be making small weapons adapters? Were the ww2 style gun racks still being used? Sorry loads of questions but you seem to be in the know! Thanks
-
Thanks Chris. At last, someone else has one. The only difference on mine is that it has leather and not webbing as a pad so am still wondering whether it might be post war. I can also read the part number on mine. At least it sounds like they were used in WW2


-
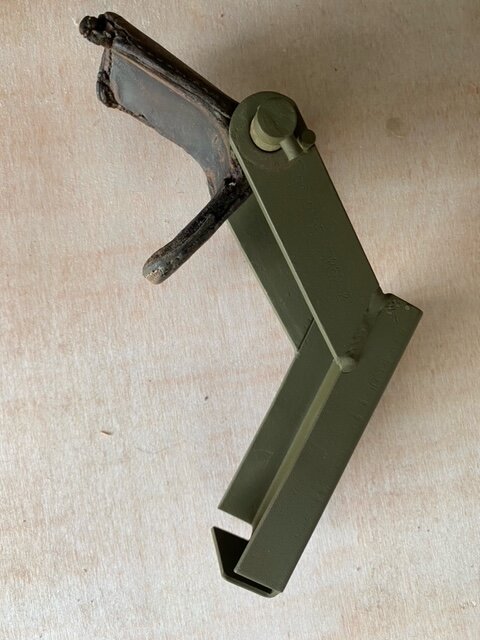
I am trying to identify an extra piece bolted on to the butt end of a gun rack I found on my jeep. I suspect it is so that the rack will hold something different to the standard M1, Thompson or Garrand rifle used during the war. Might it be French and added post war? The first picture shows this extra piece/bracket. The second shows where it bolts to the end of the gun rack - I have left a small gap as it normally sits tight up against the end of the rack. The right angled pivoted bracket has the webbing/padding covered over as it is currently masked off for paint spraying. Can anyone help? Thanks


-
Hi, If you look at the second photo it bolts up tight against the end of the rack, I left a small gap so you could clearly see the bracket. The 1st photo shows the bracket in close up. The right angle bit that pivots is actually leather covered in leather (at the moment covered in masking tape) so I think it supports the gun/weapon. The bracket seems to extend the length of weapon it can hold? I think I am correct in saying that the standard jeep gun rack holds an M1, Thompson or Garrand?
-
I'm restoring a gun rack for my jeep and there seems to be an extra bracket that bolts to the butt end of it. In the photos the webbing pads are still covered over with masking tape from the spray process. Does anyone recognise the bracket? thanks


-
Best wishes, thinking of you and your family at this sad time.
-
Hi Your tub number 219059 would suggest it was manufactured in march 1945. Is this roughly consistent with your chassis number?
-
Chris you summed it up perfectly.
-
I personally would replace the complete old wiring loom. I can see in the photo that the fabric covered wires are looking frayed and brittle and where they might make a tight turn when in the tub they could crack and potentially short out. On my Dodge under the dash the insulation had fallen away leaving complete lengths of bare copper wire. While you have the easy access with the tub off put a new MV Spares loom in ( I think about £260). Good luck with the project and I will continue to follow this thread to see how you get on.
-
Olaco were the wartime manufacturers of fuel tanks so seeing as it looks like it has some age I think you might have an original one. You can buy repro Olaco tanks but they tend to be a bit more expensive than plain un-stamped repro tanks. For me personally I would try and refurbish your tank, they can be re-lined/coated.
-
Hi guys, I personally have had a poor experience with Speedway tyres so would recommend spending the extra, you get what you pay for. Lucky you are not booting up a GMC!
-
Can you post more details about the tracking device. It sounds good. thanks
-
There are 12 bolts that hold the tub to the chassis, 4 down each side rail and 4 across the back where the tub sits on the rear fender. This assumes that you have remove the front wing and grill etc. Good luck.
-
I've re-furbished my front convoy lights but the jeepdraw link would have been handy! Please keep posting links like this as they are really useful and always interesting to read. I modified my front and rear convoy lights to be indicators so as to keep the look of the vehicle correct but be road legal and safe. I removed the masks in the lights and then fitted amber LEDs for flashers. For the headlights I replaced the sealed beam units with 5 3/4" reflectors which take standard H4 headlight bulbs and they aslo have a smaller side light bulb.
-
Hi, If it is the socket on evilbay , seller strausfs, it is missing the rear metal cover which protects the stud connectors. When I purchased some parts from the USA I had to pay 20% uk tax and a Customs and Excise handling charge before the parts were released for delivery. These were new parts but I have heard rumours that if the items are listed as used/secondhand/antique etc they only attract a small amount of tax - but don't quote me. Maybe someone else can add to this.
-
Try phoning Dallas Autoparts UK. I know they have loads more parts than they show on their website, especially less popular and odd bits. The same goes for Jeeparts. Give one of them a call, I now they are always happy to help. This will get you the price for a repro part. If you are thinking of having a trailer the socket that will be functional, being an electrical component sometimes an original part can give you problems with corrosion and poor contacts especially if you intend to keep 6 volt. A trailer socket cover which goes inside the tool locker is £18 from Joe's Motor Pool. I am not on commission from any of these companies but have just spent shed loads of money doing my restorations.....I don't dare keep count!! Keep posting photos as work progresses, am always keen to see other people's projects.
-
The harder part to find is the trailer socket cover plate which I eventually found at Joe's Motor Pool I have always found the staff at Jeeparts, Dallas and Joe's all very helpful.
-
Hi Steve, I've been following your restoration. Looking back to the photos of your windshields were there traces of yellow primer? I'm just curious about whether they used yellow as well as red primer. I also noticed that the inner windscreen handle at the bottom of the frame is screwed on, every other one I've seen is welded on. Can anyone shed any light? thanks
-
Hi, During WW2 did they ever use yellow primer instead of red? thanks
-
I got the paragraph below from the website mentioned by MatchFuzze above. https://armyvehiclemarking.com/blog/2018/03/22/alliedstar/ The “yellow” circle adopted during Operation Overlord / D-Day 1944 was mostly used by General Patton’s troops. Who were also at the 1943 Italian Sicily campaign / Operation Husky. Even Gen. Patton himself had a yellow circle band everywhere in Europe on his vehicles, like his Dodge Command Car .Maybe I misunderstood the above paragraph - does it mean Patton's personal vehicles? ...and maybe not the ones he used in Northern Europe? I stand corrected Thanks everyone for your contributions
-
So, reading the link from MatchFusee the circle was added to prevent the plain white star and the german cross being confused by allied pilots. The star and circle with gaps is called a lazy star as it was applied using a stencil. It seems that the gaps should have been filled in. Maybe because they had time to prepare for D-Day more vehicles had complete circles? Having looked at many achieve photos a lot of vehicles on D-Day did have the full circle although in pictures after D-Day I have seen the lazy star. I am only wondering about the star because I only want to paint my hood once only to be told by someone that I have got it all wrong. Just to confuse things General Patton had all the vehicles under his command have a yellow circle - with or without gaps I wonder!!!
-
Oh how true!!
-
Hi, There are two types of invasion stars applied to the front/hood of vehicles. There is the star with broken circle surround or the star with complete circle. My understanding is that the broken circle is the generic invasion star and the complete circle is the Normandy/D-Day invasion star. Am I correct? thanks


