


Freeland
-
Posts
54 -
Joined
-
Last visited
Content Type
Profiles
Forums
Gallery
Blogs
Events
Articles
Store
Downloads
Everything posted by Freeland
-
Well, for the maiden show in September we will be driving all the way, sort of an extended test drive. With current TomTom's one can actually set the max. speed to a destination and it will calculate the preferred route accordingly. For this show it means a 4 hr drive where it would normally take a car 1.5hrs.. But we will return from that show probably trailered and continue to do so until we run into an M9 Rogers trailer, preferably with a Sherman still on it. That has always been the desired configuration when starting this restoration. Last sunday we got the Diamond on its feet and running, did a few test meters in the court yard. Still there is about 30% of the electrics to do as well as many details, fittings etc. But it looks promising! :-)


-
Well, we quite boldly just brought them to the local Profile Tyrecenter (the one that also serves trucks) and one of the older mechanics was happy to accept the challenge...outside the regular opening hours
-
Thank you John! I would like to update more often but we now need all our time finishing the Diamond. Below are pictures from about 2 weeks ago when applying all decals; an accurate job that started 9 AM and lasted until 2 AM the next day: The canvas looks a bit floppy from the pics now but it still needs to be drenched with water and then dried in place to settle perfectly. All air lines are now functioning properly (getting the original US gauge sizes and fittings was a challenge) We expect the redone seats back this week as well as some rubber lines for the fuel system. New canvas doors and winch cover expected to be in at the end of this month. Decals for the engine parts are complete but will be applied at the very end. The same goes for the data plates. Currently, we are working on the electrics (looms, harnesses, voltage conversions etc.), canvas and last but not least the ring mount. The latter seems a good challenge, presumably having the necessary parts but this remains unclear until we have the truck out of the spray cabin where we actually construct the lot. Keep you posted!
.jpg.f5b2023b4092f1c020f933ae0466920d.jpg)
.jpg.0611b44a09beb2c895b4bf7b3f8fdc9a.jpg)
.jpg.550745430168c85185b7e5af57a585ff.jpg)
.jpg.2c81cd4b0cd56c413561e216611aeccc.jpg)
.jpg.7f86a4ac179be362daa2c396d72a8fac.jpg)
.jpg.b33c375c4884a92bc54af7c5044db9ab.jpg)
.jpg.29b93ae300bdee3d580798fe5c3c4519.jpg)
-
Since the last time I posted, again quite some work has been done. Here is the truck prior to the final paint job (sorry for the bad lighting): You can find a time-lapsed recording of the painting here: [video=youtube;RPho_69p-KI] The result after some 48-hr drying: The fun part begins, rebuilding the Diamond! Of course, when being perfectionist some parts will just have to be redone :-) At least we are experienced in masking off now: Currently finishing rebuilding and re-looming the fuel lines: We finally have all original clocks for the truck, ready to be painted: [ATTACH=CONFIG]117250[/ATTACH] Tonight the upholstery specialist will come over, the decal-guy has been planned for and after the fuel lines are in place the air lines will be next. We decided to keep the truck in the paint booth for finishing up and when all lines + electrics are done, the wheels will be re-attached. This way we will have easier access to the underside (and the largest bridge here is just short of 5 tonnes to lift the lot )
.jpg.a9296a08d837993ee739368c83aa913e.jpg)
.jpg.dbe03061af7dadc2fadb8307fe567038.jpg)
.jpg.390dab9721093de3304c834b3881cda9.jpg)
.jpg.bf0674ba70b93f6076841de84ad79f33.jpg)
.jpg.71ad1bf9720ead2ac44349f1fc462699.jpg)
.jpg.d1d60ab664f3dbc74df541f31201ee9b.jpg)
.jpg.72606130afba2ca01d7939281621d85e.jpg)
.jpg.85da2442c652622f279c14e4c10eee6b.jpg)
.jpg.6ee05a3167783457c8c557c012c75dc0.jpg)
.jpg.2404f618ca6ccede6b72cd12c729a043.jpg)
(Large).jpg.1defc1c39dc2ad5d25614bec42977304.jpg)
(Large).jpg.fe2d7a505355967d2965110e7d2bf304.jpg)
.jpg.869112a7cb2f45726f923fafb16a53c2.jpg)
-
We received the 11 rims with tires back which, in the process of refitting, got some paint scraped off so that again needs sanding. Got the quotation back from the radiator specialist: Eur. 4200,- to have the core fixed :nut:! Far from realistic and not an option. With the 18th of June being our definite deadline -the professional spray painter will apply the final coat- we had to come up with a solution quickly. Luck on our side; it so happened that Wildenberg in The Netherlands had multiple NOS radiators for both DT 980 and 981 still in their crates :yay: and at 1/5th of the above quotation. So we picked a 1942 dated specimen and immediately started to work on the blackish conservative it was still covered with: Spray filled and a first layer of paint later: The radiator will be installed this week followed by the front bumper. Finished the tedious job of masking all engine and drive train parts, got the leather goods back from the saddler's so the tailgate chains have been welded back on and the door closer will be fitted. We managed to get our hands on a second, wartime rifle holder and both are now in place. We also found the original mirrors (yes, the small ones) as well as the eye-catching, front roller pin collar that was missing. This DT came with a winch chain protector installed. At first we thought this was a post-war modification since many restored DT's come without them. However a deeper dive into the SNL revealed that this protector was indeed installed in the factory. One of the battery retainers is missing, a part that proved impossible to come by -unless you buy the truck surrounding it- so our local blacksmith will reproduce one for us. We still have about 25 odd jobs to wrap up though, some of them time-consumers, but we are now convinced we will meet the deadline. Further ongoing work is sanding+priming all blank nuts,bolts, rivets etc. that replaced the perished ones (an absolute necessity when dealing with modern galvanized hardware or the paint work will chip very easily). We decided to have the wheels, floor plates and ring mount spray painted separately. After the 18th we still have to do the: re-looming, fitting and installing the air lines electrics. Allied Forces will is reproducing the three cable looms for us. This week I finally found a fuel pressure gauge which we were still missing webbing and upholstery. We have the original side curtains -a must-have here in The Netherlands- but these are close to being fully perished so they need replacing. Also we do not have any of the original seats, another challenge. decals and lettering. We already decided on the division, unit etc. and we will keep lettering to the basics, so no carnival-look I will try to post some further pics on the described details above if appropriate and keep you updated!
.jpg.81d8ad1582fa1ba02c5b2064bb223c3d.jpg)
.jpg.37258d043e3f402f649daf38fee8ea5a.jpg)
.jpg.8825afeb0baee84bed6d206319359a47.jpg)
.jpg.75f800b19d6e0b825b23d86af13a1083.jpg)
-
The rims now back from the blasters, like new!: We just finished them with a first coat of paint: The second, final layer of paint will be applied after all has been assembled. This week all tires and rims will be professionally refitted
.jpg.89f16265ee35f3b218a9e2ed20cf6b92.jpg)
.jpg.9abcd04baa63a8cb4f75e1a30d695845.jpg)
.jpg.347946875bff05981a120f3ff747d92d.jpg)
.jpg.3b7b871b821e3886520ae519a497d74e.jpg)
-
wanted Mk2 Barrel Nut for a MkV Sten Gun
Freeland replied to Enfield1940's topic in HMVF Classifieds
Hi Mark, Chris is right; the barrel nut on the MKV has equal holes on each side. Here's a picture of my wartime MKV (zoom to see the barrel nut): KR Marco
-
Another brief update on this restoration. Much small activities "under the bonnet" have been done, spots that were difficult or overlooked had to be tackled like floor fittings, cut out rifle holders' bay etc. It appeared the driver's side door was patched up with different sorts of metal, breaking the primed and painted surface time after time. This was also the case with the outer window frame, leaving us with quite some welding. Also the bracket was missing from the top bar so that had to be sorted. But the end result is now 100% and fitting: The inner frame just got back from the glazier and is now fitted with the proper hardened glass panels. Cable looms have been ordered and are expected to be ready at the end of June. In addition we had a WW2 decals specialist over to measure all appropriate signs and bumper markings. We also have a saddler replicate both tailgate chain covers with the right material as these were originally made from leather instead of canvas which you see on most restored DT's. After a long search we managed to get our hands on the proper 1200 size bar grip tires. All in very good nick, they just need a bit of steam cleaning and tyre blackening (we were told this is not only for the looks but to preserve the tires as well): Result would be like this: The rims needed to be thoroughly cleaned and primed so we took those to the blasters, should be returning today: One medior setback developed in the meantime; the radiator core started leaking from several spots so we had disassemble the lot and send it off to a specialist: On the positive side this now gives us plenty of room to properly mask off the engine, preparing for the final paint job: Our solid deadline is the "Rolling Steel" event on 9-12 September this year!
.jpg.b754378a7af4d316e8d1838be9562804.jpg)
.jpg.c553070f133a0052e21afc6c49cdb69b.jpg)
.jpg.e56734c80dcd83e83893f8b9f90ec1cb.jpg)
.jpg.fec720bb04619e43224df4eec7a3dc86.jpg)
.jpg.8088cc9e9a97645c80e971aca0d7f75f.jpg)
.jpg.0f520d3e1ac8120ff2e0d50268287a06.jpg)
-
Interesting and interested Jim! I just sent you an email. KR Marco
-
One spring done, one more to go! [ATTACH=CONFIG]111307[/ATTACH]
-
Well, thanks to the hydraulic press we managed to respring all blades from the left hand spring pack. While we were at it, we overhauled both springs for the sake of it since the spaces between each blade contained lots of old grease, tar etc. Time to get our hands dirty again: After a good layer of primer: Final result:
.jpg.96c6b015fe06452014fbd1831a9cb6bb.jpg)
.jpg.0eda936d3abc79ed442e8f3bdc5dc692.jpg)
.jpg.3edd534824f391f7be9b3e244cf092c5.jpg)
.jpg.4ef4a833b3fba94c3ebd3c2e1fc7e1e9.jpg)
.jpg.8cc427f64c719d9f2b779dd5e64deed0.jpg)
-
Thanks for the tip RR. However we will first give it a go at one of our local contacts here in The Netherlands Marco
-
Yes, there is more than an inch of difference between the two. When we started with the restoration we already noticed the DT tilting to one side. We thought that it might have to do with the front left tyre being a bit more worn than the others, the front bumper and/or left beam being out of plump etc. But as we moved forward removing the engine, cab and other major parts it became clear this was not the case. We hoped that by putting back the ballast box it would -literally- be straightened out. But all this did not make any difference so the definite cause had to be the left spring assembly. We now face two possible scenarios: 1) the leaves are just completely worn out due to metal fatigue. In that case we have to look for a replacement or have the leaves reproduced. The latter would be a challenge since we have no clue what the absolute stiffness and strength should be (nothing in the manuals on this). 2) the steel is still in good condition and with the proper heat treatment, the leaves will auto-bend in their former position while retaining their strength and stiffness. It so happens that spring steel has the characteristic that it sort of "remembers" the original shape over time. A craftsman specialised in leaf springs can bring the right shape back again. The only thing we must assume is that the front side's center of gravity is right in the middle and therefore both springs have the same stiffness.... So in order to assess the condition of the assembly we are now in touch with a leave spring specialist (a craft that is getting hard to find these days)
-
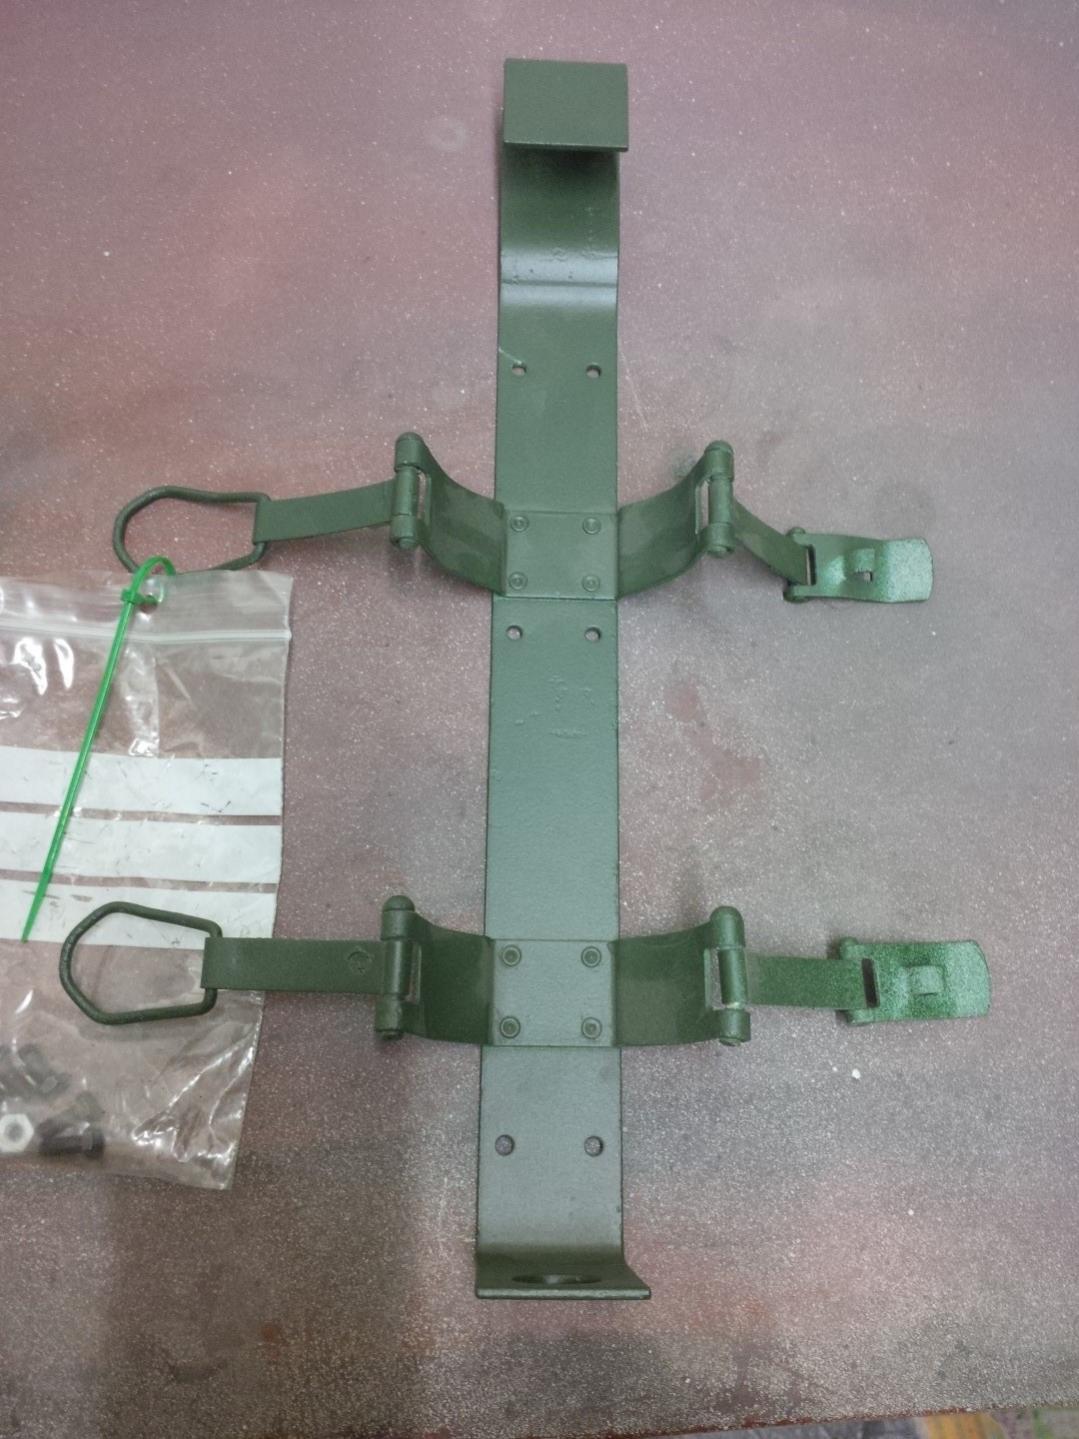
Two steps forward, one step back....We decided to remove both front springs as the DT was leaning too much to the left, something we took into account from the beginning: Note the difference...: We also decided to re-overhaul the front bumper as it had too much small cuts and dents to our liking: Other than that, we took care of the screws that attach the brake chambers' equalizers since these were worn and would not sit properly. Also touched up the rear beams with steel filler since in the past someone had obviously tested his angle grinder to remove the post-war tow hooks. And of course much time went again into finding the proper UNF/UNC nuts & bolts for various small parts on and under the truck. On the bright side, I salvaged the original bracket for the fire extinguisher ,:-) just needs a respray: Does anybody know if the bracket is fitted with canvas padding as is the case with for instance the standard rifle holders? Keep you posted, Marco


-
As said, a week ago the ballast box was put back on the truck with a little help from the Ward Lafrance: We are now working on one of the front springs that needed attention as well as on the bumper that could use some extra tlc
.jpg.bcfc914e37a03d08bd09137d40a05b80.jpg)
.jpg.890231c1f87c8cd74b267cd3cc3bb4eb.jpg)
.jpg.f0cfd98eb2e10c1037027a87e15ecfc5.jpg)
.jpg.1adf19a4a84496786128881196ac890c.jpg)
-
This restoration is still in progress so again here are some updates in pictures... Ballast box gets the first coat of paint after some pitting/mods repair. The underside was of course also taken care of: With some effort we managed to load it onto this small trailer This week we received the canvas for both Dingo and Diamond. It does need additional trimming as you can see. The doors will be added later Tomorrow (22-10-2015) the ballast box will be put back on the truck again and then the lot -minus wheels- will be prepared for the final coat of paint in the spray cabin. Next step are the electrics and air lines. Still, the search goes on for parts like ten pieces of good 1200x20 bar grips.... Keep you posted!
.jpg.eede82c6c7e3d5552e1f83eada892396.jpg)
.jpg.ff4cc5f056e929c2b38eed382644fa93.jpg)
.jpg.dce91f3f205e76e84bec44b9afe293b0.jpg)
.jpg.9e2a5a63f35333e2538aebf5b806af75.jpg)
.jpg.8b5c411ebd0d2010f313654a9729ce6b.jpg)
.jpg.436a6041e549f5e6e0fab1dbd743a429.jpg)
-
Diamond T 969 A and 968 for parts
Freeland replied to 42 chevy's topic in Transporters & Wreckers (All Nations)
John, just sent you a pm! Marco -
Thanks for your comments John and Andy, again makes things more clear to proceed for us. As for the various holes; the "channel" ones make sense to me, but how about holes in the body's floor? Both body and stowage compartments floors have holes in them. The cargo floor itself has one in each corner, each stowage compartment also has three holes. To me it makes sense to have some sort of simple water drainage solution but should there be any in the original configuration?
-
The lever seems to be bend backwards at the base and then bends forward before going straight up again. A little heat should indeed do the trick. With more effort than expected we managed to move the cargo box in the cabin this weekend: Upon inspection we noticed several modifications, some of them I am not sure are original, others are more obvious. I hope someone can comment on this: LH rear: the chalked off holes and the crossed-out "mount" I believe are not wartime. RH rear: same with these holes, not wartime(?) RH front: the cable guide, welded place holders for the bows and L-shaped corner bracket do seem to be field modifications LH front: apart from the welded L-bracket and non-original cable guide, what is with the two holes? Modification? This is where the tire lifting device sits, fixed with a canvas strap. RH front, inside: is this tube original? Welded in place and seated in a cutout in the side, it goes right through the bottom of the box, open at the underside. Frankly, I cannot find any specific purpose for it. Again a modification? I am very interested in your comments!


-
John, thanks for the tip on this, will have a look tomorrow if this indeed would be the case. Tomorrow we will also commence working on the cargo box now that the rebuilt Dingo has left the spray paint cabin. Talking about a small challenge; we can only move the box just inside the workshop with the help of the Ward LaFrance. Then it is about 30 meters or so to the cabin....:undecided:
-
Everything looks in order; the complete stick only fits one way and was removed from the housing as a whole for spray painting. When I had it removed the inside looked fine; no wear or tear of any kind so it was left untouched.
-
Hi Steve, thanks for letting me know and not a problem; someday the Steve in question will turn up Meanwhile we noticed something I am hoping someone here may have a answer to. We found out that, when putting the DT in 1st gear, the gear lever hits the cowl. As you can see from the picture, sitting in 1st gear the stick is too close to the dashboard: The cowl is 100% properly attached to the rear of the cabin so unproper seating of the cabin cannot be cause. Does anybody know if the travel of the gear stick can somehow be adjusted?
.jpg.63ddb16b6031ed3d590795348c12249a.jpg)
-
Thank Sam! It is an "easy", straighforward truck to work on compared to some other vehicles as long as you have the adequate space. So far there have not been any corners that were difficult to reach, yet...
-
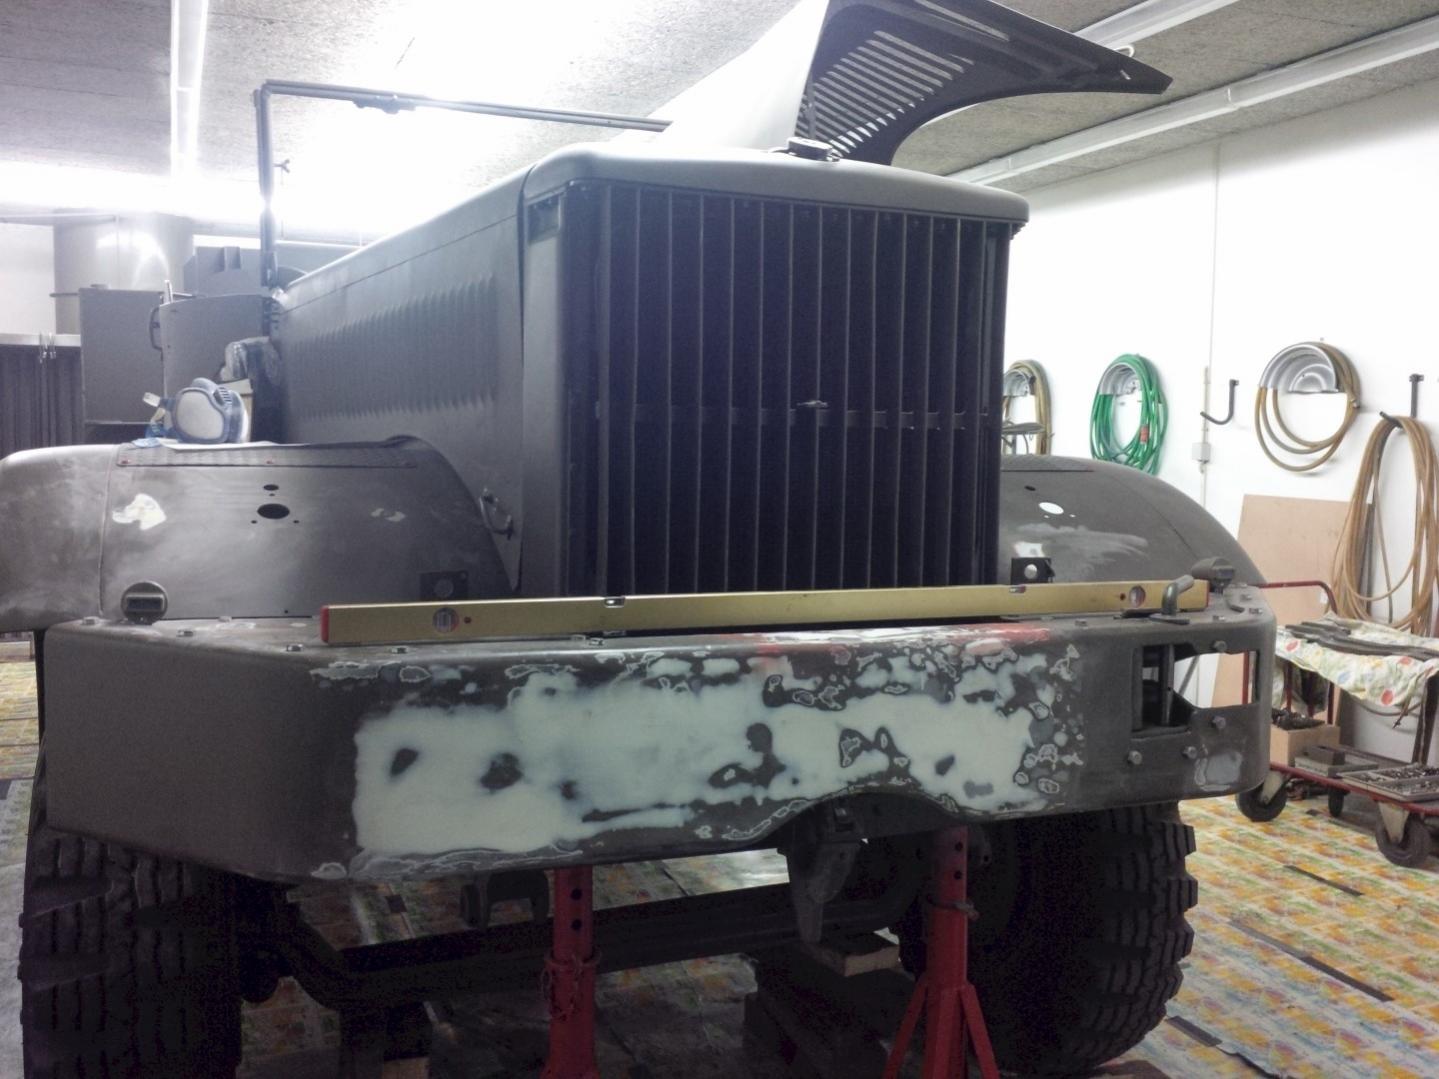
Time for an update on this project. We got the engine running now for the first time. We just intended to bleed the fuel system first but the engine turned over almost immediately Afterwards taking care of a leaking oil filter cover and copper gasket we had our second run: No leaks, good oil pressure and clean exhaust fumes! You may have noticed the bumper is in a "different" state than it was previously; we decided to give it a good Berlusconi-treatment in order to get some of the more obvious dents out. Right now, we are in need of some hard to get parts and I have a list available for anyone that might be able to help us out in providing these items (@DT-Steve: did you get my email on this?) Many thanks!
-
Thanks Adrian! Just drop me a note by then if you need any details. Note that we never took care of removing the fuel section from the block. It was already overhauled at an earlier state and it is said to be a small nightmare to have it running properly afterwards. Besides, that part of the engine was originally never painted. I will post some pictures of a NOS DXFE engine straight out of the crate for your reference. You will see that the original color is much darker than our engine but a lighter color will prove more practical in the end when checking for leaks etc. By the way, I have the impression that some part is missing in the cabine section, underneath the floorboards to be more precise. If you look at the second-last picture from my last post - the one taken from the cabin top down- and compare it to this picture: [ATTACH=CONFIG]101512[/ATTACH] The part where the arrow is pointing to is we do not have. Anyone can clarify what this part is all about? It looks too close to the bottom of the cabin to be a part of the co-driver's seat I suppose. Also, I have not come across any part that looks like the one on the picture. Many thanks!
.jpg.fe8ee0fdec17f03931325483d58b7597.jpg)


.jpg.f5b2023b4092f1c020f933ae0466920d.jpg)
.jpg.0611b44a09beb2c895b4bf7b3f8fdc9a.jpg)
.jpg.550745430168c85185b7e5af57a585ff.jpg)
.jpg.2c81cd4b0cd56c413561e216611aeccc.jpg)
.jpg.7f86a4ac179be362daa2c396d72a8fac.jpg)
.jpg.b33c375c4884a92bc54af7c5044db9ab.jpg)
.jpg.29b93ae300bdee3d580798fe5c3c4519.jpg)
.jpg.a9296a08d837993ee739368c83aa913e.jpg)
.jpg.dbe03061af7dadc2fadb8307fe567038.jpg)
.jpg.390dab9721093de3304c834b3881cda9.jpg)
.jpg.bf0674ba70b93f6076841de84ad79f33.jpg)
.jpg.71ad1bf9720ead2ac44349f1fc462699.jpg)
.jpg.d1d60ab664f3dbc74df541f31201ee9b.jpg)
.jpg.72606130afba2ca01d7939281621d85e.jpg)
.jpg.85da2442c652622f279c14e4c10eee6b.jpg)
.jpg.6ee05a3167783457c8c557c012c75dc0.jpg)
.jpg.2404f618ca6ccede6b72cd12c729a043.jpg)
(Large).jpg.1defc1c39dc2ad5d25614bec42977304.jpg)
(Large).jpg.fe2d7a505355967d2965110e7d2bf304.jpg)
.jpg.869112a7cb2f45726f923fafb16a53c2.jpg)
.jpg.81d8ad1582fa1ba02c5b2064bb223c3d.jpg)
.jpg.37258d043e3f402f649daf38fee8ea5a.jpg)
.jpg.8825afeb0baee84bed6d206319359a47.jpg)
.jpg.75f800b19d6e0b825b23d86af13a1083.jpg)
.jpg.89f16265ee35f3b218a9e2ed20cf6b92.jpg)
.jpg.9abcd04baa63a8cb4f75e1a30d695845.jpg)
.jpg.347946875bff05981a120f3ff747d92d.jpg)
.jpg.3b7b871b821e3886520ae519a497d74e.jpg)

.jpg.b754378a7af4d316e8d1838be9562804.jpg)
.jpg.c553070f133a0052e21afc6c49cdb69b.jpg)
.jpg.e56734c80dcd83e83893f8b9f90ec1cb.jpg)
.jpg.fec720bb04619e43224df4eec7a3dc86.jpg)
.jpg.8088cc9e9a97645c80e971aca0d7f75f.jpg)
.jpg.0f520d3e1ac8120ff2e0d50268287a06.jpg)
.jpg.96c6b015fe06452014fbd1831a9cb6bb.jpg)
.jpg.0eda936d3abc79ed442e8f3bdc5dc692.jpg)
.jpg.3edd534824f391f7be9b3e244cf092c5.jpg)
.jpg.4ef4a833b3fba94c3ebd3c2e1fc7e1e9.jpg)
.jpg.8cc427f64c719d9f2b779dd5e64deed0.jpg)


.jpg.bcfc914e37a03d08bd09137d40a05b80.jpg)
.jpg.890231c1f87c8cd74b267cd3cc3bb4eb.jpg)
.jpg.f0cfd98eb2e10c1037027a87e15ecfc5.jpg)
.jpg.1adf19a4a84496786128881196ac890c.jpg)
.jpg.eede82c6c7e3d5552e1f83eada892396.jpg)
.jpg.ff4cc5f056e929c2b38eed382644fa93.jpg)
.jpg.dce91f3f205e76e84bec44b9afe293b0.jpg)
.jpg.9e2a5a63f35333e2538aebf5b806af75.jpg)
.jpg.8b5c411ebd0d2010f313654a9729ce6b.jpg)
.jpg.436a6041e549f5e6e0fab1dbd743a429.jpg)


.jpg.63ddb16b6031ed3d590795348c12249a.jpg)
.jpg.fe8ee0fdec17f03931325483d58b7597.jpg)