


flandersflyer
-
Posts
264 -
Joined
-
Last visited
-
Days Won
1
Content Type
Profiles
Forums
Gallery
Blogs
Events
Articles
Store
Downloads
Posts posted by flandersflyer
-
-
Do you ever use dye and developer to test stuff...?
☹️
-
-
-
-
6 hours ago, andypugh said:
From Wikipedia " One can thus presume that rotary lathe plywood manufacturing was an established process in France in the 1860s. Plywood was introduced into the United States in 1865[7] and industrial production there started shortly after. In 1928, the first standard-sized 4 ft by 8 ft (1.22 m by 2.44 m) plywood sheets were introduced in the United States for use as a general building material.[4]"
It seems quite likely that some manufacturers might have used plywood as a convenient (or even high-tech) material for the bulkhead when others were still using glued boards.There is probably a lot of Ash being felled at the moment, if you want wide boards. I got some 20" wide oak boards (via an ebay ad) from https://www.worldofwoodsuffolk.com/ a couple of years ago. I don't think that getting wide boards is difficult if you are able to process them yourself. It's getting then in a sawn, planed state that is less easy, and possibly is best approached in as two steps: 1) Find the wood 2) Bribe the owner of a wide planer/thicknesser.
I'd get em unplaned and oversized..
Then let em settle for a bit in a dry corner before planing, thicknessing and matching...
☹🇬🇧
-
On 6/23/2023 at 11:47 PM, andypugh said:
Found on YouTube.
I think this might have been a solution to Steve's bearing removal epic. It appears to be a lot more precise than one might guess. I suppose it's like arc welding, in that it only happens where you strike the arc, and you can stop the arc at any time.
Yeah...
But Curtis has years of experience using the air arc process....
He still had to re-cut the thread...
I did a bit myself years ago...
-
I'm electrician
I like them
-
On 3/23/2023 at 1:53 PM, andypugh said:
I am trying to decide if it's a generator set, or an engine under test on a dynamometer. It looks more like the former, but the scale of the base might point to the latter.
Dynomometer test as i doubt that engine would have the capacity to swing a generator that size at the speed required to provide any useable power...
Plus the bed shows evidence of having various pads and mounts for other stuff...
-
Bit of compressed air rather than a drift would've seen that out...?
-
On 1/8/2023 at 9:37 PM, Old Bill said:
A bit more progress today. Dad has had a go at the gearbox lid and it is looking much better.


Selector fork guide casting.


Foundry mark. I wonder who they were?

You may remember that when we removed the input shaft, the first bearing cage was in the cover in bits so we had to take it out of the box.

I decided to have a go at removing the nut which holds the bearings. It is 2 3/4" AF down a hole and I don't have a spanner for it. As the nut is thin, I didn't think it would be too tight so I tried a bit of a lash-up by putting two bits of packing inside the Dennis hub-nut spanner. Amazingly, it worked!

Once slackened off, the nut just unscrewed and the centre shaft pushed out. I was expecting it to be a difficult job.

After the first clean up. The cages in both bearings have failed so they must both be replaced. Much to my surprise, they are metric with 60mm bores, 130mm OD and 26mm thick. The 26mm thickness appears to be discontinued and I can only get 31mm. However, I think I can get away with the thicker bearings by shortening the intermediate spacer collar.

Time to remove the gland from the end cover. The only way I had to apply torque to this was to use the 36" stillson wrench. I hate doing that as it marks the nut but needs must.

It let go eventually and I cleaned them all up.

This bronze cover screws into the bearing carrier to trap the bearings but unfortunately, the thread is shot.

It started out as 5 1/4" x 16tpi but there is not much left. I must decide whether to repair or replace the part now.

Dad is pressing on with cleaning stuff and having a lovely time. It really is a horrible job! More pics another day.
Steve 🙂
Cut a shoulder on it and launch it in her freezer to shrink summat on then re-cut thread...?
Or get someone to do an Adam Booth on it and spray weld build up with puddle gun & powder...?
-
-
3/4" drive is good for scale
-
 1
1
-
-
-
On 9/28/2021 at 10:20 PM, andypugh said:
A YouTube video of an upcoming clearance auction seems to have a drill similar to that from the mobile workshop:
https://youtu.be/ojGfR-A_FW4?t=748
The post drill is by the "silver manufacturing co"
I bought it together with a beam drill, an early Cunliffe & Croom lineshaft driven slotter and a lineshaft driven Plano-mill by Wm Muir
-
1
-
-
-
-
-
On 11/2/2020 at 10:36 PM, 8_10 Brass Cleaner said:
This is why


Inside corners with no radius...
Stress points
-
On 9/26/2021 at 9:41 PM, Old Bill said:
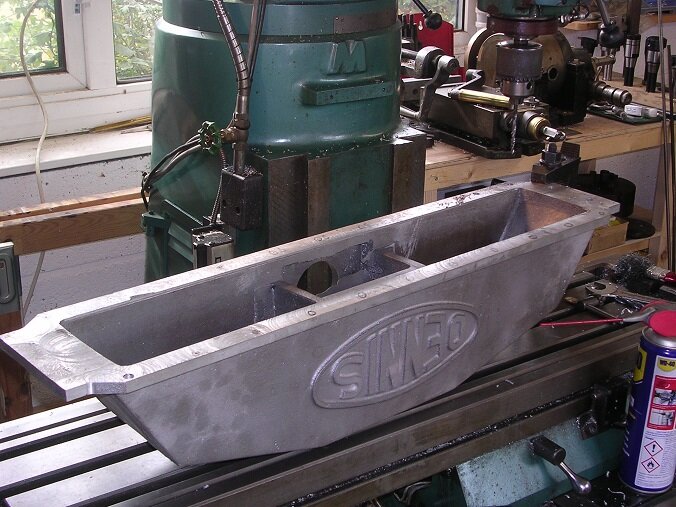
I think they are using a CO2 setting sand but I don't know what it is called. I understand that to get a better finish, an oil bonded sand would have been much better. Never mind, they have come out OK and the cleaning up process is just my time which is free. Mind you, I am pleased to report that I have finished polishing!
I have been tackling the top tank, first with a flap wheel on the angle grinder.

Then with coarse emery on a sanding block to pick up the high spots and finally, some 600 grade emery with a few drops of WD40 to act as a lubricant. The WD40 was a very good idea and give a nice fine finish without tearing up the surface.

Flap wheel on the last face;

Finally, I have picked out the letters. I will need to run the sanding block over them again to pick up the ragged edges but, essentially, the tanks are done (thank goodness!).
Now it is a case of cutting gaskets and fitting the studs before final assembly. The end is in sight!
Steve 🙂
Sodium silicate bound sand is used for cores...
They should've used Petrobond for the external faces....
But it's turned out allrite...
🇬🇧🙂
-
-
On 10/17/2020 at 1:52 PM, Great War truck said:
You are correct. If you can see them they can no doubt see you. If you were to bring a lorry that close to the front and park it they will bring down artillery fire upon you and that will really stuff your day.
Mobile pigeon lofts would move with the headquarters when they moved (which was very rarely). The pigeons adopt a location as their new home after they have been there a few weeks. The loft would be manned 24 hours a day so that any incoming messages could be seen as soon as possible. You can see a "grill" type affair on the front of the lorry behind the stuffed pigeons. The birds enter through here which rings a bell which sends the custodian upstairs to check for new messages.
For most of the war the German army held the higher ground...
This became even more apparent in the last few months of the war as the advancing allied powers were able to look back at their previous positions and realise just what a panoramic view of the battlefield German observation had been enjoying...
-
On 9/11/2021 at 8:36 PM, Old Bill said:
Had a nice day in the shed today. To carry on the job, I need some bolts so I cleaned up all of those I took out. Very tedious!

To align the holes between the tube plates and the tanks, I have turned up some transfer punches from silver steel an hardened them.
I marked the first two holes and drilled them before bolting the tank to the tube plate. I then went around marking the other holes.

Set up to drill on th emill. I marked each centre pop with a pen as I have been caught out before by drilling a casting inclusion instead!

Then the same for the top tank noting that some of the holes are for 3/8" bolts and some are tapped for studs. There is another opportunity to get it wrong here but fortunately, I was concentrating hard enough.
Both tanks are now finish machined and it remains only to polish the surface of the top tank.

Unfortunately, the casting finish is very coarse which is disappointing. This will make the job very tedious. I did ask if they could use a different sand to get a finer finish but apparently not. Oh well. Back to it.
Steve 🙂
Are they using Petrobond...?
Or greensand...?
-
On 8/26/2021 at 2:22 PM, andypugh said:
The Plano-mill might be salvaged, if anyone wanted one, as the main slides are (largely) protected by the table.
Machines always look more rusty in photos/video than in RL, too. My current lathe looked rusted beyond use in the photos, but polished up fine with a bit of wire wool. Though I would not go so far as to assume that the same is true of the lathes in the video.
FWIW the creator of the video knows more than a bit about lathe reconditioning, he is nearly finished with a complete restoration / re-scrape of a Holbrook.
Matthew Look has indeed rescraped the Holbrook lathe he owns...as well as a shaper I think...
I have been trying to contact him over the plano-mill
-
On 1/25/2021 at 11:31 AM, andypugh said:
I emailed the local planning officer (I have had previous contact with him).
--------8<------------------------
Hi Andy
For it to be listed by Historic England it would need to be of importance nationally, although contribution to the national war effort may help the building make the grade. I recall the site of a large munitions works near Thorp Arch was scheduled recently. The guides used by Historic England to determine if a building is listable is online at https://historicengland.org.uk/images-books/publications/dlsg-industrial/heag134-industrial-buildings-lsg/
Its interesting that the building appears to date from 1917, or at least part of it does.
We may, emphasis on the may, develop a local list of buildings of interest in the future so it may be suitable for that if not.
Unfortunately we’ve not got the capacity at the present time to put buildings forward for listing, but if you’ve got good knowledge of the company and their role in the war effort it would be worth giving it a go. The forms are online at
https://historicengland.org.uk/listing/apply-for-listing/
The munitions works near Thorpe Arch may be referring to Barnbows....?


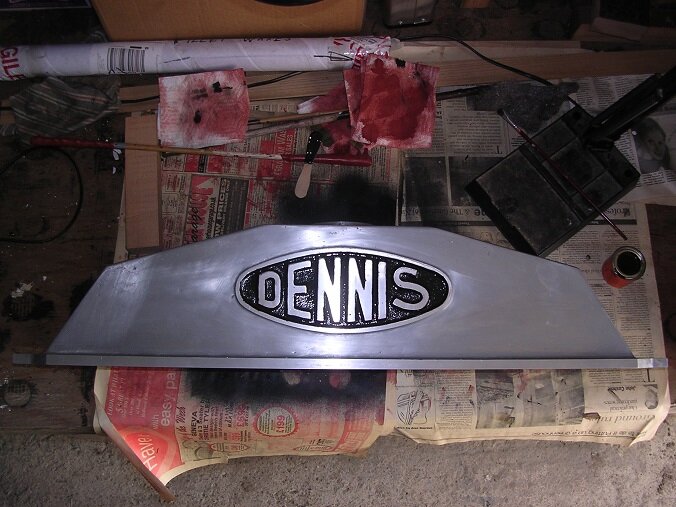
1908 Dennis Truck
in Pre WW2 vehicles
Posted
Good